基于6467T的linux平台下的SPI驱动编写
2014-11-25 15:32
656 查看
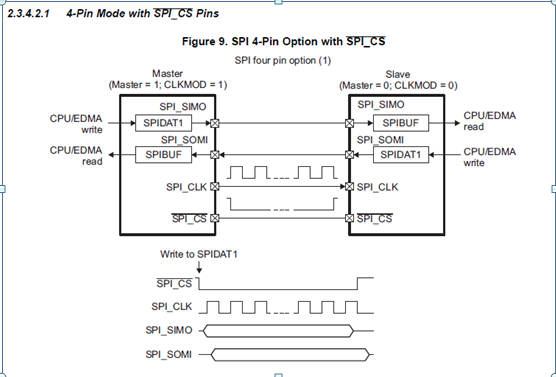
1. SPI 4线模式
根据6467T的datasheet,SPI4线模式示意图如下图所示:
2. 驱动程序编写
包括必要的头文件//#include <linux/config.h>
#include <linux/device.h>
#include <linux/spi/spi.h>
#include <linux/compiler.h>
#include <linux/init.h>
#include <linux/kernel.h>
#include <linux/module.h>
#include <linux/mm.h>
#include <linux/miscdevice.h>
#include <linux/fs.h>
#include <linux/types.h>
#include <linux/errno.h>
#include <linux/ioctl.h>
#include <linux/cdev.h>
#include <linux/string.h>
#include <linux/list.h>
//#include <linux/devfs_fs_kernel.h>
#include <linux/poll.h>
#include <asm/uaccess.h>
#include <asm/atomic.h>
#include <asm/unistd.h>
#include <asm/io.h>
根据不同的内核版本,头文件稍有差别,我使用的内核版本是2.6.32,有两个文件找不到,因此把他们注释掉。
3. 设置SPI的设备名与主设备号以及相关寄存器
注意避开那些已经使用的主设备号#define DEVICE_NAME "SPI"//设备名
#define SPI_MAJOR 240//主设备号
以下设置需要参考6467T的datasheet,不可任意设置
指定SPI寄存器的基地址
#define DAVINCI_SPI_BASE (0x01C66800)
定义SPI寄存器结构体
struct davinci_spi_reg {
volatile __u32 __bitwise SPIGCR0;
volatile __u32 __bitwise SPIGCR1;
volatile __u32 __bitwise SPIINT;
volatile __u32 __bitwise SPILVL;
volatile __u32 __bitwise SPIFLG;
volatile __u32 __bitwise SPIPC0;
volatile __u32 __bitwise SPIPC1;
volatile __u32 __bitwise SPIPC2;
volatile __u32 __bitwise SPIPC3;
volatile __u32 __bitwise SPIPC4;
volatile __u32 __bitwise SPIPC5;
volatile __u32 __bitwise SPIPC6;
volatile __u32 __bitwise SPIPC7;
volatile __u32 __bitwise SPIPC8;
volatile __u32 __bitwise SPIDAT0;
volatile __u32 __bitwise SPIDAT1;
volatile __u32 __bitwise SPIBUF;
volatile __u32 __bitwise SPIEMU;
volatile __u32 __bitwise SPIDELAY;
volatile __u32 __bitwise SPIDEF;
volatile __u32 __bitwise SPIFMT[4];
volatile __u32 __bitwise TGINTVEC[2];
volatile __u8 __bitwise RSVD0[8];
volatile __u32 __bitwise MIBSPIE;
};
4. 填充file_operations结构体
static struct file_operationsdavinci_z_spi_fops ={
.owner = THIS_MODULE,
.open = davinci_spi_open,
.write = davinci_spi_write,
.release = davinci_spi_close,
};
分别实现SPI初始化函数open、读写函数write和释放函数release,以及模块初始化函数dev_init和退出函数dev_exit。
static int davinci_spi_close(struct inode *inode,struct file *filp)
{
printk("davinci-spi closed\n");
return 0;
}
static int davinci_spi_open(struct inode *inode,struct file *filp)
{
int config;
int value;
int i;

printk("spi open begin..\n");
// 1,Reset SPI
spi_reg_davinci->SPIGCR0 = 0;
for(i=0;i<1000;i++);//进行必要的等待

// 2,Release SPI
spi_reg_davinci->SPIGCR0 = 1;

// 3,master or slave mode setup
spi_reg_davinci->SPIGCR1 = 0
| ( 0 << 24 )
| ( 0 << 16 )//loopback mode default :0 test: 1 //在最初没有从设备的调试阶段,可以设置为 1 。
| ( 1 << 1 )
| ( 1 << 0 );
// 4,Enable the SPI_SIMO, SPI_SOMI, and SPI_CLK pins and the necessary chip select pins
spi_reg_davinci->SPIPC0 = 0
| ( 1 << 11 ) // DI
| ( 1 << 10 ) // DO
| ( 1 << 9 ) // CLK
| ( 0 << 1 ) // EN1
| ( 0 << 0 ); // EN0
// 5,Configure the desired data format
spi_reg_davinci->SPIFMT[0] = 0
| ( 0 << 20 ) // SHIFTDIR MSB
| ( 0 << 17 ) // Polarity
| ( 1 << 16 ) // Phase
| ( 50 << 8 ) // Prescale
| ( 8 << 0 ); // Char Len
//6,Select the preconfigured data format
//7,using SPI in 4-pin mode with SPI_CS,configue hold time,default chip select pin value
//8,4-pin mode with spi_en
//9,5-pin mode
spidat1 = 0
| ( 1 << 28 ) // CSHOLD
| ( 0 << 24 ) // Format [0]
| ( 3 << 16 ) // CSNR [0 both, 1 CS1, 2 only CS0 enbled , 3 none]
| ( 0 << 0 ); //
spi_reg_davinci->SPIDAT1 = spidat1;
spi_reg_davinci->SPIDELAY = 0
| ( 8 << 24 ) // C2TDELAY
| ( 8 << 16 ); // T2CDELAY
spi_reg_davinci->SPIDEF = 0
| ( 1 << 1 ) // EN1 inactive high
| ( 1 << 0 ); // EN0 inactive high
//10. Enable the desired interrupts
spi_reg_davinci->SPIINT = 0
| ( 0 << 16 ) //
| ( 0 << 8 ) //
| ( 0 << 6 ) //
| ( 0 << 4 ); //
//11,select interrupt level
spi_reg_davinci->SPILVL = 0
| ( 0 << 8 ) // EN0
| ( 0 << 6 ) // EN0
| ( 0 << 4 ); // EN0

//12, Enable SPI
spi_reg_davinci->SPIGCR1 |= ( 1 << 24 );
//13. If using the EDMA to perform the transfers, setup and enable the EDMA channels for transmit or receive and then set the DMAREQEN bit in SPIINT.
//14. Data is ready to be transferred using the CPU or EDMA by writing to SPIDAT1.
printk("Open spi successfully\n");
return 0;

}
static ssize_t davinci_spi_write(struct file *filp, char __user *buf,size_t count,loff_t *f_ops)
{
// int spcon;
char i=0;
// char len=0;
//printk("in davinci_spi_write: count is %d\n",count);
//将用户空间的数据搬移到内核空间
copy_from_user(dataTx,buf,count);//sizeof(dataTx));
//dataTx[0]=0x85;//just for test
// Clear any old data
spi_reg_davinci->SPIBUF;
// SPI access cycle
// Wait for transmit ready
while ( spi_reg_davinci->SPIBUF & 0x10000000 );
//发送一字节
spi_reg_davinci->SPIDAT1 = spidat1 | (int)(dataTx[i]);
// Wait for receive data ready
while ( spi_reg_davinci->SPIBUF & 0x80000000 );
// Read 1 byte
dataRx[i] = (spi_reg_davinci->SPIBUF)&0xff;
copy_to_user(buf,dataRx,count);//sizeof(dataTx));
//printk("copy_to_user is %d\n",dataRx[0]);
return 0;
}static int __init dev_init(void)
{
int ret;
spi_reg_davinci = (struct davinci_spi_reg *)ioremap( DAVINCI_SPI_BASE ,200);
ret = register_chrdev(SPI_MAJOR,DEVICE_NAME,&davinci_z_spi_fops);//设备注册
if(ret < 0)
{
printk(DEVICE_NAME "can't get major number\n");
return ret;
}
// devfs_mk_cdev(MKDEV(SPI_MAJOR, 0), S_IFCHR | S_IRUSR | S_IWUSR | S_IRGRP,DEVICE_NAME);
printk (DEVICE_NAME"\tinitialized\n");
return 0;
}
static void __exit dev_exit(void)
{
// devfs_remove(DEVICE_NAME);
unregister_chrdev(SPI_MAJOR, DEVICE_NAME);
printk("Good-bye, SPI module was removed!\n");
}
module_init(dev_init);
module_exit(dev_exit);
MODULE_LICENSE("GPL");
MODULE_AUTHOR("surui");5. 编写Makefile
ifeq ($(KERNELRELEASE),)

DIROBJ	= ./

SRC = spi_master_mod.c

OBJ = ${SRC:%.c=$(DIROBJ)/%.o}

CSTOOL_DIR=/opt/arm-2009q1

CSTOOL_PREFIX=$(CSTOOL_DIR)/bin/arm-none-linux-gnueabi-

MVTOOL_DIR=$(CSTOOL_DIR)

MVTOOL_PREFIX=$(CSTOOL_PREFIX)

KERNELDIR = /opt/dvsdk/git_dm6467t

# The current directory is passed to sub-makes as argument

PWD := $(shell pwd)

modules:

@echo "before modules"

$(MAKE) -C $(KERNELDIR) M=$(PWD) modules

@echo "modules"

modules_install:

$(MAKE) -C $(KERNELDIR) M=$(PWD) modules_install

@echo "modules_install"

clean:

rm -rf *.o *~ core .depend .*.cmd *.ko *.mod.c .tmp_versions

@echo "clean"

.PHONY: modules modules_install clean

else

# called from kernel build system: just declare what our modules are

obj-m := spi_master_mod.o

#echo "else"

endif
6. 编译调试
l 分别编译配置好内核路径,以及交叉编译器路径,几次make即可。
l 加载模块
insmodspi_master_mod.ko
l 创建设备节点
mknod /dev/SPIc 240 1
l open设备,操作
进入运行路径,执行应用程序,./spi
7. 上电测试
在没有从设备时要进行初步的测试,可以启动spi的环路测试模式,即自发自收,这样发出的数据就是接收的数据,对应的寄存器是 spi_reg_davinci->SPIGCR1。附录
源代码下载:http://download.csdn.net/detail/surui_555/8244591

相关文章推荐
- linux sd卡驱动分析,基于mini2440,sdio mmc sd卡驱动编写
- 基于Linux-2.6.28的 EELiod平台UART驱动分析(一)
- Linux 平台上的usb驱动开发,主要有内核驱动的开发和基于libusb的无驱设计。
- 基于S3C2440的嵌入式Linux驱动——SPI子系统解读(三)
- linux下的nandflash驱动分析(1)——基于s3c6410平台
- linux sd卡驱动分析,基于mini2440,sdio mmc sd卡驱动编写
- 基于S3C2410平台移植Linux 2.6.14内核&驱动指南
- 基于Linux的v4l2视频架构驱动编写
- 基于Linux的v4l2视频架构驱动编写(三)
- 基于S3C2440的嵌入式Linux驱动——SPI子系统解读(二)
- Linux下SPI从设备驱动的编写
- 基于Linux的v4l2视频架构驱动编写(一)
- 编写基于linux的lcd驱动
- linux中LCD设备驱动(4)——基于s3c6410平台
- EZ-USB FX2 LP CY7C68013A 开发指南(4)--基于Linux的驱动编写
- 基于Linux-2.6.28的 EELiod平台UART驱动分析(一)
- 编写基于Linux的lcd驱动
- [转]基于Linux的v4l2视频架构驱动编写
- 基于S3C2410平台的Linux 2.6.14内核+平台驱动的移植指南(最终版)
- linux中LCD设备驱动(5)——基于s3c6410平台