Nginx 反向代理、负载均衡、页面缓存、URL重写及读写分离详解 (六)
2014-11-24 16:41
781 查看
原创作品,允许转载,转载时请务必以超链接形式标明文章 原始出处 、作者信息和本声明。否则将追究法律责任。http://freeloda.blog.51cto.com/2033581/1288553
八、Nginx之读写分离1.实验拓扑
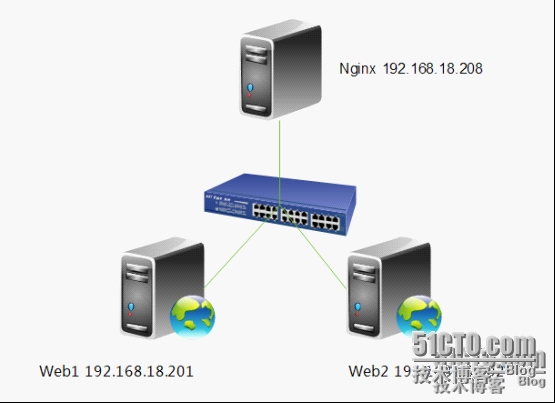
需求分析,前端一台nginx做负载均衡反向代理,后面两台httpd服务器。整个架构是提供BBS(论坛)服务,有一需求得实现读写分离,就是上传附件的功能,我们上传的附件只能上传到Web1,然后在Web1上利用rsync+inotify实现附件同步,大家都知道rsync+inotify只能是主向从同步,不能双向同步。所以Web1可进行写操作,而Web2只能进行读操作,这就带来读写分离的需求,下面我们就来说一下,读写分离怎么实现。2.WebDAV功能说明 WebDAV (Web-based Distributed Authoring and Versioning) 一种基于 HTTP 1.1协议的通信协议。它扩展了HTTP 1.1,在GET、POST、HEAD等几个HTTP标准方法以外添加了一些新的方法,使应用程序可直接对Web Server直接读写,并支持写文件锁定(Locking)及解锁(Unlock),还可以支持文件的版本控制。这样我们就能配置读写分离功能了,下面我们来具体配置一下。3.修改配置文件
4.重新加载一下配置文件
5.配置httpd的WebDAV功能

注,在<Directory "/var/www/html">下启用就行。6.重新启动一下httpd
7.测试一下
注,web1与web2访问都没问题。
注,我们上传文件到,web2上时,因为web2只人读功能,所以没有开户WebDAV功能,所以显示是405 Method Not Allowed。
注,我们在Web1开启了WebDAV功能,但我们目录是root目录是不允许apache用户上传的,所以显示的是403 Forbidden。下面我们给apache授权,允许上传。
下面我们再来测试一下,
注,大家可以看到我们成功的上传了文件,说明nginx读写分离功能配置完成。最后,我们来查看一下上传的文件。
好了,到这里nginx的反向代理、负载均衡、页面缓存、URL重写及读写分离就全部讲解完成。希望大家有所收获,^_^……
本文出自 “Share your knowledge …” 博客,请务必保留此出处http://freeloda.blog.51cto.com/2033581/1288553
八、Nginx之读写分离1.实验拓扑
需求分析,前端一台nginx做负载均衡反向代理,后面两台httpd服务器。整个架构是提供BBS(论坛)服务,有一需求得实现读写分离,就是上传附件的功能,我们上传的附件只能上传到Web1,然后在Web1上利用rsync+inotify实现附件同步,大家都知道rsync+inotify只能是主向从同步,不能双向同步。所以Web1可进行写操作,而Web2只能进行读操作,这就带来读写分离的需求,下面我们就来说一下,读写分离怎么实现。2.WebDAV功能说明 WebDAV (Web-based Distributed Authoring and Versioning) 一种基于 HTTP 1.1协议的通信协议。它扩展了HTTP 1.1,在GET、POST、HEAD等几个HTTP标准方法以外添加了一些新的方法,使应用程序可直接对Web Server直接读写,并支持写文件锁定(Locking)及解锁(Unlock),还可以支持文件的版本控制。这样我们就能配置读写分离功能了,下面我们来具体配置一下。3.修改配置文件
| 1 2 3 4 5 6 7 8 9 10 11 12 13 | [root@nginx nginx]# vim /etc/nginx/nginx.conf server { listen 80; server_name localhost; #charset koi8-r; #access_log logs/host.access.log main; location / { proxy_pass http://192.168.18.202; if ($request_method = "PUT"){ proxy_pass http://192.168.18.201; } } } |
| 1 2 3 4 | [root@nginx ~]# service nginx reload nginx: the configuration file /etc/nginx/nginx.conf syntax is ok nginx: configuration file /etc/nginx/nginx.conf test is successful 重新载入 nginx: [确定] |
| 1 | [root@web1 ~]# vim /etc/httpd/conf/httpd.conf |
注,在<Directory "/var/www/html">下启用就行。6.重新启动一下httpd
| 1 2 3 | [root@web1 ~]# service httpd restart 停止 httpd: [确定] 正在启动 httpd: [确定] |
| 1 2 3 4 | [root@nginx ~]# curl http://192.168.18.201 <h1>web1.test.com</h1> [root@nginx ~]# curl http://192.168.18.202 <h1>web2.test.com</h1> |
| 1 2 3 4 5 6 7 8 9 10 | [root@nginx ~]# curl -T /etc/issue http://192.168.18.202 <!DOCTYPE HTML PUBLIC "-//IETF//DTD HTML 2.0//EN"> <html><head> <title>405 Method Not Allowed</title> </head><body> <h1>Method Not Allowed</h1> The requested method PUT is not allowed for the URL /issue. <hr> <address>Apache/2.2.15 (CentOS) Server at 192.168.18.202 Port 80</address> </body></html> |
| 1 2 3 4 5 6 7 8 9 10 11 | [root@nginx ~]# curl -T /etc/issue http://192.168.18.201 <!DOCTYPE HTML PUBLIC "-//IETF//DTD HTML 2.0//EN"> <html><head> <title>403 Forbidden</title> </head><body> <h1>Forbidden</h1> You don't have permission to access /issue on this server. <hr> <address>Apache/2.2.15 (CentOS) Server at 192.168.18.201 Port 80</address> </body></html> |
| 1 | [root@web1 ~]# setfacl -m u:apache:rwx /var/www/html/ |
| 1 2 3 4 5 6 7 8 9 10 | [root@nginx ~]# curl -T /etc/issue http://192.168.18.201 <!DOCTYPE HTML PUBLIC "-//IETF//DTD HTML 2.0//EN"> <html><head> <title>201 Created</title> </head><body> <h1>Created</h1> Resource /issue has been created. <hr /> <address>Apache/2.2.15 (CentOS) Server at 192.168.18.201 Port 80</address> </body></html> |
| 1 2 3 4 5 6 | [root@web1 ~]# cd /var/www/html/ [root@web1 html]# ll 总用量 12 drwxr-xr-x 2 root root 4096 9月 4 13:16 forum -rw-r--r-- 1 root root 23 9月 3 23:37 index.html -rw-r--r-- 1 apache apache 47 9月 4 14:06 issue |
本文出自 “Share your knowledge …” 博客,请务必保留此出处http://freeloda.blog.51cto.com/2033581/1288553

相关文章推荐
- Nginx 反向代理、负载均衡、页面缓存、URL重写及读写分离详解(二)
- Nginx 反向代理、负载均衡、页面缓存、URL重写及读写分离详解
- Nginx 反向代理、负载均衡、页面缓存、URL重写及读写分离详解
- Nginx 反向代理、负载均衡、页面缓存、URL重写及读写分离详解
- Nginx 反向代理、负载均衡、页面缓存、URL重写及读写分离详解
- Nginx 反向代理、负载均衡、页面缓存、URL重写及读写分离详解 (三)
- Nginx 反向代理、负载均衡、页面缓存、URL重写及读写分离详解(1)
- Nginx 反向代理、负载均衡、页面缓存、URL重写及读写分离详解
- Nginx 反向代理、负载均衡、页面缓存、URL重写及读写分离详解
- [转载]Nginx 反向代理、负载均衡、页面缓存、URL重写及读写分离详解
- Nginx 反向代理、负载均衡、页面缓存、URL重写及读写分离详解
- Nginx 反向代理、负载均衡、页面缓存、URL重写及读写分离详解
- Nginx 反向代理、负载均衡、页面缓存、URL重写及读写分离详解(2)
- Nginx 反向代理、负载均衡、页面缓存、URL重写及读写分离详解
- (转)NGINX 反向代理、负载均衡、页面缓存、URL重写及读写分离详解
- Nginx 反向代理、负载均衡、页面缓存、URL重写及读写分离详解
- Nginx 反向代理、负载均衡、页面缓存、URL重写及读写分离详解 (五)
- Nginx 反向代理、负载均衡、页面缓存、URL重写及读写分离详解
- Nginx 反向代理、负载均衡、页面缓存、URL重写及读写分离详解 (转载)
- Nginx 反向代理、负载均衡、页面缓存、URL重写及读写分离详解