【安卓笔记】IntentService源码剖析
2014-09-04 23:51
288 查看
Service组件想必都不陌生,这里不费口舌了。强调一点,Service组件默认运行在UI线程,所以也是会阻塞主线程的,使用时切记不可在Service中执行耗时操作,而应该创建子线程,异步执行。
IntentService类封装了在Service中创建子线程的工作(其实创建的是HandlerThread),我们只需继承IntentService,复写其onHandleIntent方法即可,onHandleIntent方法在子线程中运行,该方法的参数Intent来自onStart或者onStartCommand,即我们将原来应该在onStart方法中写的逻辑放到onHandleIntent中即可。
一、使用示例
创建如下所示的Service:
注:实际开发时仅需复写onHandleIntent方法,这里是为了观察其生命周期
在清单文件中配置之:
<service
android:name="com.example.intentservicedemo.MyIntentService"
></service>
创建一个Activity:
观察日志:
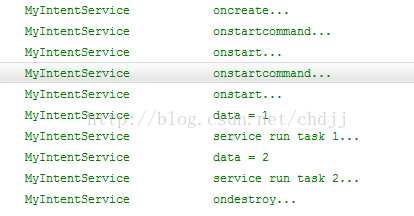
处理完事件之后,服务将被销毁。
二、源码剖析
IntentService内部封装了子线程消息循环:
其中ServiceHandler是Handler子类:
在handleMessage中调用onHandleIntent方法,当完成服务之后,调用stopSelf销毁服务。
消息循环的创建在onCreate方法中:
在onCreate方法中创建了子线程HandlerThread,然后利用HandlerThread提供的Looper创建消息循环。
在onStart方法中将Intent作为消息发送给Handler,最终交由onHandleIntent方法处理:
调用destroy方法会销毁消息循环,进而子线程终止:
-----------------------------------------
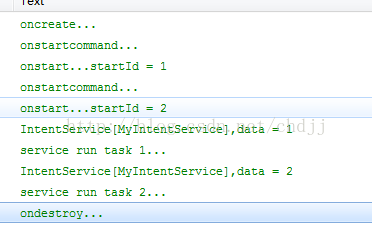
附:笔者之前有个疑问,上面例子中两次执行startService,分析源码可知,最终由其内部Handler的handleMessage处理,handleMessage执行完onHandleIntent方法后,应该会调用stopSelf销毁服务,所以日志中应该有两次destroy才是,可事实上只执行了一次destroy。这是为什么呢?我们注意到handleMessage方法的stopSelf有个参数为startId,也就是停止具有特定startId的服务,而上述两次启动startService的startId是不同的,故服务并不会停止。
打印两次的startId:
文档解释:
However, if your
service handles multiple requests to onStartCommand() concurrently, then
you shouldn't
stop the service when you're
done processing a start request, because
you might have since received a new start
request (stopping
at the end of the first request would terminate the second one). To avoid this problem, you
can use stopSelf(int) to
ensure that your request to stop the service is always based on the most recent start request. That is, when
you call stopSelf(int), you
pass the ID of the start request (the
startId delivered to onStartCommand()) to
which your stop request corresponds. Then if the
service received a new start
request before you were able to call stopSelf(int), then
the ID will not match and the service will not stop.
IntentService类封装了在Service中创建子线程的工作(其实创建的是HandlerThread),我们只需继承IntentService,复写其onHandleIntent方法即可,onHandleIntent方法在子线程中运行,该方法的参数Intent来自onStart或者onStartCommand,即我们将原来应该在onStart方法中写的逻辑放到onHandleIntent中即可。
一、使用示例
创建如下所示的Service:
注:实际开发时仅需复写onHandleIntent方法,这里是为了观察其生命周期
package com.example.intentservicedemo;
import android.app.IntentService;
import android.content.Intent;
import android.util.Log;
public class MyIntentService extends IntentService
{
private static final String TAG = "MyIntentService";
public MyIntentService()//注意提供无参构造器
{
super("MyIntentService");
}
@Override
protected void onHandleIntent(Intent intent)
{
int data = intent.getIntExtra("TEST",-1);
Log.i(TAG,"data = "+data);

switch (data)
{
case 1:
Log.i(TAG,"service run task 1...");
try
{
Thread.sleep(3000);
} catch (InterruptedException e)
{
e.printStackTrace();
}
break;
case 2:
Log.i(TAG,"service run task 2...");
break;
}
}

@Override
public void onCreate()
{
super.onCreate();
Log.i(TAG,"oncreate...");
}

@Override
public void onStart(Intent intent, int startId)
{
super.onStart(intent, startId);
Log.i(TAG,"onstart...");
}
@Override
public int onStartCommand(Intent intent, int flags, int startId)
{
Log.i(TAG,"onstartcommand...");
return super.onStartCommand(intent, flags, startId);
}

@Override
public void onDestroy()
{
super.onDestroy();
Log.i(TAG, "ondestroy...");
}
}
在清单文件中配置之:
<service
android:name="com.example.intentservicedemo.MyIntentService"
></service>
创建一个Activity:
package com.example.intentservicedemo;
import android.app.Activity;
import android.content.Intent;
import android.os.Bundle;
public class MainActivity extends Activity
{
@Override
protected void onCreate(Bundle savedInstanceState)
{
super.onCreate(savedInstanceState);
setContentView(R.layout.activity_main);

Intent intent = new Intent(this,MyIntentService.class);
intent.putExtra("TEST",1);
startService(intent);
intent.putExtra("TEST",2);
startService(intent);
}

}
观察日志:
处理完事件之后,服务将被销毁。
二、源码剖析
IntentService内部封装了子线程消息循环:
private volatile Looper mServiceLooper;//Looper
private volatile ServiceHandler mServiceHandler;//Handler
private String mName;//子线程名
private boolean mRedelivery;
其中ServiceHandler是Handler子类:
private final class ServiceHandler extends Handler {
public ServiceHandler(Looper looper) {
super(looper);
}
@Override
public void handleMessage(Message msg) {
onHandleIntent((Intent)msg.obj);
stopSelf(msg.arg1);
}
}在handleMessage中调用onHandleIntent方法,当完成服务之后,调用stopSelf销毁服务。
消息循环的创建在onCreate方法中:
public void onCreate() {
super.onCreate();
HandlerThread thread = new HandlerThread("IntentService[" + mName + "]");
thread.start();
mServiceLooper = thread.getLooper();
mServiceHandler = new ServiceHandler(mServiceLooper);
}
在onCreate方法中创建了子线程HandlerThread,然后利用HandlerThread提供的Looper创建消息循环。
在onStart方法中将Intent作为消息发送给Handler,最终交由onHandleIntent方法处理:
public void onStart(Intent intent, int startId) {
Message msg = mServiceHandler.obtainMessage();
msg.arg1 = startId;
msg.obj = intent;
mServiceHandler.sendMessage(msg);
}

@Override
public int onStartCommand(Intent intent, int flags, int startId) {
onStart(intent, startId);
return mRedelivery ? START_REDELIVER_INTENT : START_NOT_STICKY;
}
调用destroy方法会销毁消息循环,进而子线程终止:
@Override
public void onDestroy() {
mServiceLooper.quit();
}
-----------------------------------------
附:笔者之前有个疑问,上面例子中两次执行startService,分析源码可知,最终由其内部Handler的handleMessage处理,handleMessage执行完onHandleIntent方法后,应该会调用stopSelf销毁服务,所以日志中应该有两次destroy才是,可事实上只执行了一次destroy。这是为什么呢?我们注意到handleMessage方法的stopSelf有个参数为startId,也就是停止具有特定startId的服务,而上述两次启动startService的startId是不同的,故服务并不会停止。
打印两次的startId:
文档解释:
However, if your
service handles multiple requests to onStartCommand() concurrently, then
you shouldn't
stop the service when you're
done processing a start request, because
you might have since received a new start
request (stopping
at the end of the first request would terminate the second one). To avoid this problem, you
can use stopSelf(int) to
ensure that your request to stop the service is always based on the most recent start request. That is, when
you call stopSelf(int), you
pass the ID of the start request (the
startId delivered to onStartCommand()) to
which your stop request corresponds. Then if the
service received a new start
request before you were able to call stopSelf(int), then
the ID will not match and the service will not stop.

相关文章推荐
- 【安卓笔记】IntentService源码剖析
- 安卓学习笔记之IntentService
- 【安卓笔记】AsyncTask源码剖析
- 安卓学习笔记---IntentService的分析与使用
- 安卓IntentService 源码启迪
- Android IntentService源码详解
- IntentService源码分析
- uc/os-II 源码剖析笔记(1)——几个OS相关的基本概念(二)
- 迭代器的型别 《STL 源码剖析》阅读笔记
- ASP.NET MVC学习笔记-MVC运行机制之源码剖析
- Android菜鸟的成长笔记(6)——剖析源码学自定义主题Theme
- Android自学笔记:Tab控件源码剖析
- SGI STL V3.2 源码剖析笔记-3. vector(未完待续)
- 安卓学习笔记1——service开机自启动
- Android菜鸟的成长笔记(6)——剖析源码学自定义主题Theme
- 【安卓笔记】全面解析Service组件
- 源码解析IntentService的好处
- uc/os-II 源码剖析笔记(1)——几个RTOS里面的基本概念(一)
- SGI STL V3.2 源码剖析笔记-3. vector(未完待续)
- C++ Standard Stl -- SGI STL源码学习笔记(06) stl_vector 与 一些问题的细化 2 push_back函数剖析