ubuntu下git安装及使用
2014-09-01 14:31
656 查看
http://www.cnblogs.com/jackge/archive/2013/08/17/3264801.html
其实,好几个月前,就已经安装好了,可是一直搁置在那儿,所以密码等一些其它细节都忘的差不多了,所以今天就重新部署了一下,并开始积极使用。。。。。。。。。
1,git 安装:
sudo apt-get install git-core openssh-server openssh-client
$ sudo apt-get install git-core git-gui git-doc
sudo apt-get install libcurl4-gnutls-dev libexpat1-dev gettext libz-dev git-core (注意:红色部分很多网站都写错了,坑呐。。。。git-core是git的安装包,其他的是git所依赖的安装包)
如果需要在push到网上:
a、如果只是需要将github上感兴趣的代码拷贝到本地,自己进行修改使用,而不打算共享发布的话,其实不申请帐号也没有关系,只需要 git
clone 代码到本地就可以了。本文对这种方法
不做讨论,毕竟使用 github就是为了开源的目的。首先去 https://github.com/ 上注册一个帐号,具体的注册流程就不赘述了。
b、在本地建立一个文件夹,然后做一些全局变量的初始化
git config --global user.name "用户名或者用户ID"
git config --global user.email 邮箱
这两个选项会在以后的使用过程中自动添加到代码中
c、创建验证用的公钥
这个是比较复杂和困扰大多数人的地方,因为 git 是通过 ssh 的方式访问资源库的,所以需要在本地创建验证用的文件。
使用命令:ssh-keygen -C 'you email address@gmail.com'
-t rsa 会在用户目录 ~/.ssh/ 下建立相应的密钥文件
可以使用 ssh -v git@github.com 命令来测试链接是否畅通
d、上传公钥
在 github.com 的界面中 选择右上角的 Account Settings,然后选择 SSH
Public Keys ,选择新加。
Title 可以随便命名,Key 的内容拷贝自 ~/.ssh/id_rsa.pub 中的内容,完成后,可以再使用 ssh
-v git@github.com 进行测试。看到下面的信息表示验证成功。

2,创建项目:
a、创建本地新项目工作树
# mkdir new-project
# cd new-project
# git init
# touch README
# git add README (上传README 文件)
# git commit -m 'first commit'
定义远程服务器别名origin
# git remote add origin git@github.com:xxx/new-project.git (origin 在这里就是 git@github.com:xxx/new-project.git 的一个别名, 一个 url 链接)
本地和远程合并,本地默认分支为master
# git push origin master (执行这一步可能会有报错)
如果出现报错为
ERROR: Repository not found.
fatal: The remote end hung up unexpectedly
则代表你的 origin 的url 链接有误,可能是创建错误,也可能是这个 git@github.com:xxx/new-project.git
url 指定不正确。
重新创建。
如果报错为 ()
All I had to do was:
Success!
b、更新文件:
# vi README
自动commit更改文件
# git commit -a
更新至远程
# git push origin master
如果报错的话:
ssh: connect to host github.com port 22: Connection timed out
fatal: The remote end hung up unexpectedly
解决方法:http://www.cnblogs.com/kysnail/archive/2012/03/31.html
c、 创建和合并分支:
#git branch 显示当前分支是master
#git branch new-feature 创建分支
# git checkout new-feature 切换到新分支
# vi page_cache.inc.php
# git add page_cache.inc.php
Commit 到本地GIT
# git commit -a -m "added initial version of page cache"
合并到远程服务器
# git push origin new-feature
#
Counting objects: 4, done.
Compressing objects: 100% (2/2), done.
Writing objects: 100% (3/3), 336 bytes, done.
Total 3 (delta 0), reused 0 (delta 0)
To git@github.com:acanoe/hello_world.git
* [new branch] new-feature -> new-feature
root@AC:~/hello_world#
如果new-feature分支成熟了,觉得有必要合并进master
#git checkout master
#git merge new-feature
#git branch
#git push
则master中也合并了new-feature 的代码
再登录到GitHub可以看见"Switch Branches"下的分支选项
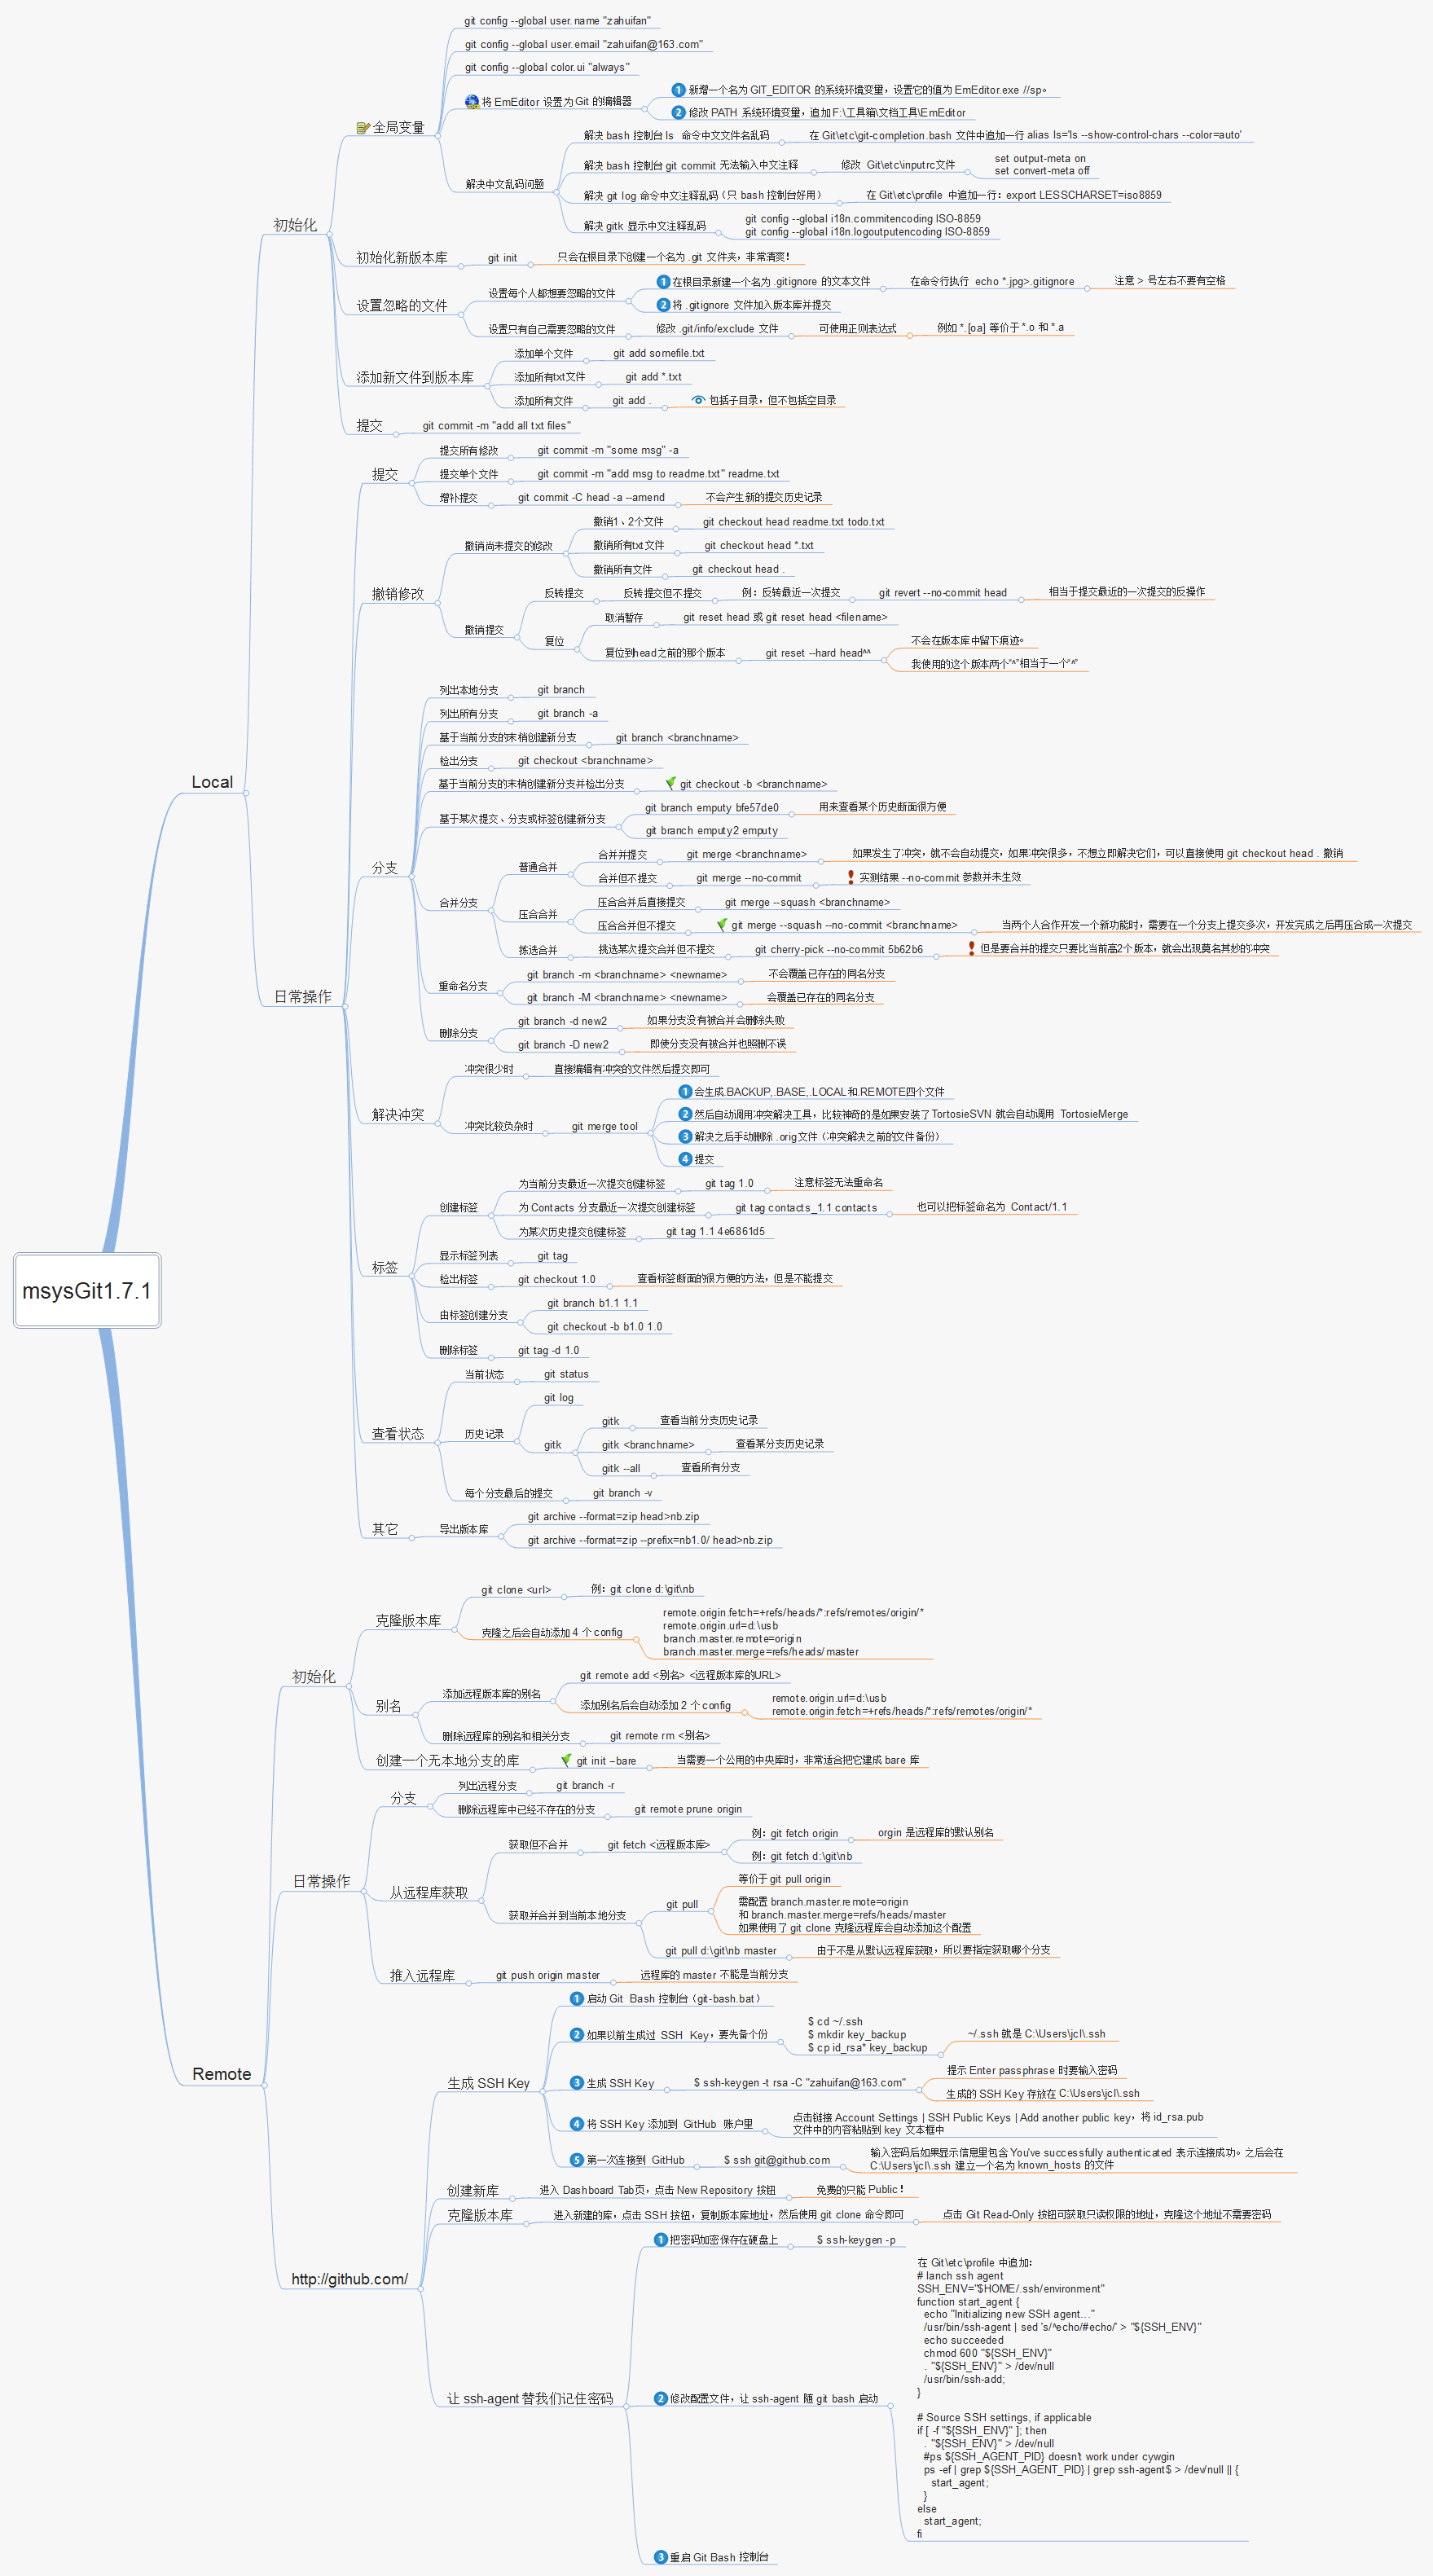
到这里,基本的操作也就完成了,在以后的操作中或许还会出现各种各样的问题,所以会继续更新,下面附一张git的命令表。。。。。。。
以下是参考链接:
/article/2021664.html
http://blog.sina.com.cn/s/blog_55465b470100s63h.html
http://www.open-open.com/lib/view/open1332904495999.html
/article/1892919.html
http://www.linuxsir.org/bbs/thread281294.html
http://www.iteye.com/topic/732199
http://www.stylejar.com/archives/ubuntu_install_git_server.html
http://www.oschina.net/question/54100_25448
http://blog.csdn.net/batoom/article/details/6594260
http://artori.us/git-github-usage/
其实,好几个月前,就已经安装好了,可是一直搁置在那儿,所以密码等一些其它细节都忘的差不多了,所以今天就重新部署了一下,并开始积极使用。。。。。。。。。
1,git 安装:
sudo apt-get install git-core openssh-server openssh-client
$ sudo apt-get install git-core git-gui git-doc
sudo apt-get install libcurl4-gnutls-dev libexpat1-dev gettext libz-dev git-core (注意:红色部分很多网站都写错了,坑呐。。。。git-core是git的安装包,其他的是git所依赖的安装包)
如果需要在push到网上:
a、如果只是需要将github上感兴趣的代码拷贝到本地,自己进行修改使用,而不打算共享发布的话,其实不申请帐号也没有关系,只需要 git
clone 代码到本地就可以了。本文对这种方法
不做讨论,毕竟使用 github就是为了开源的目的。首先去 https://github.com/ 上注册一个帐号,具体的注册流程就不赘述了。
b、在本地建立一个文件夹,然后做一些全局变量的初始化
git config --global user.name "用户名或者用户ID"
git config --global user.email 邮箱
这两个选项会在以后的使用过程中自动添加到代码中
c、创建验证用的公钥
这个是比较复杂和困扰大多数人的地方,因为 git 是通过 ssh 的方式访问资源库的,所以需要在本地创建验证用的文件。
使用命令:ssh-keygen -C 'you email address@gmail.com'
-t rsa 会在用户目录 ~/.ssh/ 下建立相应的密钥文件
可以使用 ssh -v git@github.com 命令来测试链接是否畅通
d、上传公钥
在 github.com 的界面中 选择右上角的 Account Settings,然后选择 SSH
Public Keys ,选择新加。
Title 可以随便命名,Key 的内容拷贝自 ~/.ssh/id_rsa.pub 中的内容,完成后,可以再使用 ssh
-v git@github.com 进行测试。看到下面的信息表示验证成功。
2,创建项目:
a、创建本地新项目工作树
# mkdir new-project
# cd new-project
# git init
# touch README
# git add README (上传README 文件)
# git commit -m 'first commit'
定义远程服务器别名origin
# git remote add origin git@github.com:xxx/new-project.git (origin 在这里就是 git@github.com:xxx/new-project.git 的一个别名, 一个 url 链接)
本地和远程合并,本地默认分支为master
# git push origin master (执行这一步可能会有报错)
如果出现报错为
ERROR: Repository not found.
fatal: The remote end hung up unexpectedly
则代表你的 origin 的url 链接有误,可能是创建错误,也可能是这个 git@github.com:xxx/new-project.git
url 指定不正确。
重新创建。
如果报错为 ()
error: src refspec master does not match any.
All I had to do was:
         $~ git commit -m 'initial commit'
         $~ git push origin master
Success!
b、更新文件:
# vi README
自动commit更改文件
# git commit -a
更新至远程
# git push origin master
如果报错的话:
ssh: connect to host github.com port 22: Connection timed out
fatal: The remote end hung up unexpectedly
解决方法:http://www.cnblogs.com/kysnail/archive/2012/03/31.html
c、 创建和合并分支:
#git branch 显示当前分支是master
#git branch new-feature 创建分支
# git checkout new-feature 切换到新分支
# vi page_cache.inc.php
# git add page_cache.inc.php
Commit 到本地GIT
# git commit -a -m "added initial version of page cache"
合并到远程服务器
# git push origin new-feature
#
Counting objects: 4, done.
Compressing objects: 100% (2/2), done.
Writing objects: 100% (3/3), 336 bytes, done.
Total 3 (delta 0), reused 0 (delta 0)
To git@github.com:acanoe/hello_world.git
* [new branch] new-feature -> new-feature
root@AC:~/hello_world#
如果new-feature分支成熟了,觉得有必要合并进master
#git checkout master
#git merge new-feature
#git branch
#git push
则master中也合并了new-feature 的代码
再登录到GitHub可以看见"Switch Branches"下的分支选项
到这里,基本的操作也就完成了,在以后的操作中或许还会出现各种各样的问题,所以会继续更新,下面附一张git的命令表。。。。。。。
以下是参考链接:
/article/2021664.html
http://blog.sina.com.cn/s/blog_55465b470100s63h.html
http://www.open-open.com/lib/view/open1332904495999.html
/article/1892919.html
http://www.linuxsir.org/bbs/thread281294.html
http://www.iteye.com/topic/732199
http://www.stylejar.com/archives/ubuntu_install_git_server.html
http://www.oschina.net/question/54100_25448
http://blog.csdn.net/batoom/article/details/6594260
http://artori.us/git-github-usage/

相关文章推荐
- ubuntu下git安装与使用笔记
- Ubuntu git 安装和使用
- ubuntu下git安装及使用
- ubuntu 10.04的git安装和使用
- [Ubuntu] Git可视化比较工具 P4Merge 的安装/配置及使用
- Ubuntu下的Git的安装与使用
- ubuntu 10.04的git安装和使用
- ubuntu 安装git以及如何使用(部分内容转载)
- ubuntu下git的安装和使用
- ubuntu14.10 安装git并且使用CSDN提供的git服务器管理项目代码
- ubuntu下git安装与使用笔记
- Ubuntu 12.04 下git的安装与使用
- ubuntu GIT 安装与使用
- ubuntu使用ppa源安装最新版本的git
- ubuntu下git安装与使用笔记
- Ubuntu12.1 下 安装和使用 Git
- ubuntu下git安装与使用笔记
- Ubuntu下Git安装与使用
- Ubuntu下git的安装和使用
- ubuntu下git的安装及使用