iOS_25_彩票设置的cell的数据源模型的封装
2014-08-29 23:33
316 查看
组模型的封装
SettingGroup
//
// SettingGroup.h
// 25_彩票
//
// Created by beyond on 14-8-28.
// Copyright (c) 2014年 com.beyond. All rights reserved.
// 模型,一组(Section,Group),包括 组的header,组的footer,中间的条目(cell数组)
#import <Foundation/Foundation.h>
@interface SettingGroup : NSObject
// 头部标题
@property (nonatomic, copy) NSString *header;
// 中间的条目(SettingItem对象数组)
@property (nonatomic, strong) NSArray *items;
// 尾部标题
@property (nonatomic, copy) NSString *footer;
@end
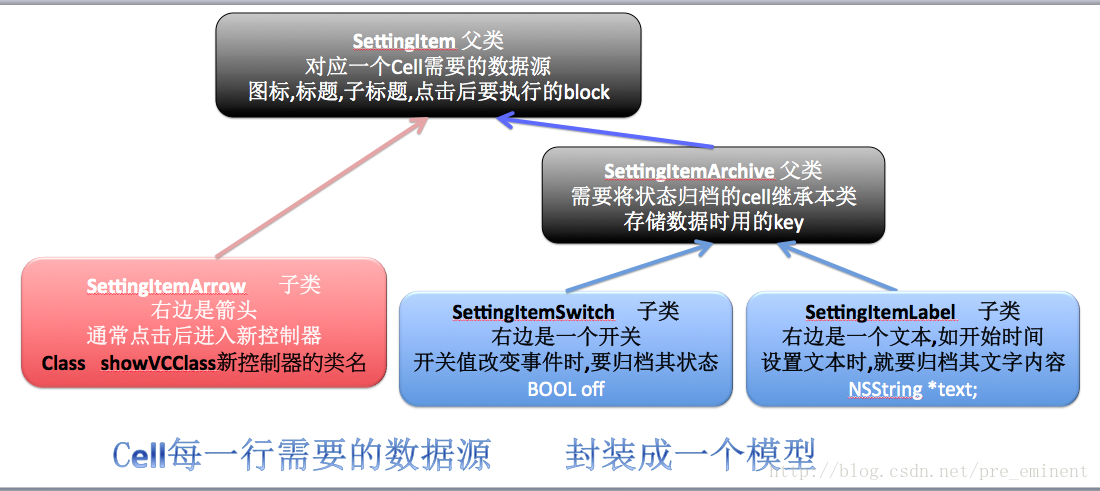
父类SettingItem
父类SettingItemArchive
//
// SettingItemArchive.h
// 25_彩票
//
// Created by beyond on 14-8-29.
// Copyright (c) 2014年 com.beyond. All rights reserved.
// 中间父类,仅一个成员,key,所有需要归档的settingItem的子类(如开关等) 都可以继承本模型
#import "SettingItem.h"
@interface SettingItemArchive : SettingItem
// 存储数据时用的key,取数据时也是用该key
@property (nonatomic, copy) NSString *key;
@end
子类SettingItemArrow
//
// SettingItemArrow.h
// 25_彩票
//
// Created by beyond on 14-8-28.
// Copyright (c) 2014年 com.beyond. All rights reserved.
// 子类 最右边是箭头的item数据模型,专业提供数据源,给右边是箭头的cell
#import "SettingItem.h"
@interface SettingItemArrow : SettingItem
// 一般带箭头的cell,被点击时候,是要跳到另一个界面(控制器)
@property (nonatomic, assign) Class showVCClass; // 即将显示的控制器的类名
@end
子类SettingItemSwitch
//
// SettingItemSwitch.h
// 25_彩票
//
// Created by beyond on 14-8-28.
// Copyright (c) 2014年 com.beyond. All rights reserved.
// 子类 最右边是【开关】的item数据模型,专业提供数据源,给右边是开关的cell
// 继承自SettingItemArchive,而SettingItemArchive又继承自SettingItem
#import "SettingItemArchive.h"
@interface SettingItemSwitch : SettingItemArchive
// 开关需要保存的是状态,在设置时,就归档
@property (nonatomic, assign) BOOL off;
@end
子类SettingItemLabel
//
// SettingItemLabel.h
// 25_彩票
//
// Created by beyond on 14-8-28.
// Copyright (c) 2014年 com.beyond. All rights reserved.
// 子类 最右边是【文字】的item数据模型,专业提供数据源,给右边是Label的cell
#import "SettingItemArchive.h"
@interface SettingItemLabel : SettingItemArchive
// cell右边显示的文字,在设置时就要归档
@property (nonatomic, copy) NSString *text;
@end
自定义cell视图View的封装 SettingCell
//
// SettingCell.h
// 25_彩票
//
// Created by beyond on 14-8-28.
// Copyright (c) 2014年 com.beyond. All rights reserved.
// view,自定义cell,接收数据源为其内部子控件提供数据
#import <UIKit/UIKit.h>
// 模型,数据源,为view cell 提供数据
@class SettingItem;
@interface SettingCell : UITableViewCell
// 模型,数据源,为view cell 提供数据
@property (nonatomic, strong) SettingItem *item;
// cell所在的组和行号
@property (nonatomic, strong) NSIndexPath *indexPath;
// 类方法创建cell实例对象,使用instancetype好处多多,更加严谨,让编译器更智能提示错误
+ (instancetype)settingCellWithTableView:(UITableView *)tableView;
@end
父类控制器的封装
BaseSettingController
//
// BaseSettingController.h
// 25_彩票
//
// Created by beyond on 14-8-28.
// Copyright (c) 2014年 com.beyond. All rights reserved.
// 父类,内部维护了一个tableView,子类提供数据源数组(GroupsArr)
#import <UIKit/UIKit.h>
#import "SettingGroup.h"
#import "SettingItem.h"
// 导入数据模型
// 右侧是箭头的数据模型
#import "SettingItemArrow.h"
// 右侧是开关的数据模型
#import "SettingItemSwitch.h"
// 右边是子文本
#import "SettingItemLabel.h"
// 所有声明的将要被存储到沙盒中的key
#import "SettingArchiveKeys.h"
@interface BaseSettingController : UIViewController<UITableViewDataSource, UITableViewDelegate>
{
// 开放给子类用,父类只负责初始化,子类负责添加一个个Group对象,一个group模型对应一个section
NSMutableArray *_allGroups; // 所有的组模型
}
@property (nonatomic, weak, readonly) UITableView *tableView;
@end
子类设置控制器
//
// SettingController.h
// 25_彩票
//
// Created by beyond on 14-8-28.
// Copyright (c) 2014年 com.beyond. All rights reserved.
// 点击【设置】按钮跳转到本控制器,本控制器继承自BaseSettingController
#import "BaseSettingController.h"
@interface SettingController : BaseSettingController
@end
//
// SettingController.m
// 25_彩票
//
// Created by beyond on 14-8-28.
// Copyright (c) 2014年 com.beyond. All rights reserved.
//
#import "SettingController.h"
#import "PushNoticeController.h"
#import "ShareController.h"
#import "AboutController.h"
#import "HelpController.h"
#import "ProductController.h"
@interface SettingController ()
@end
@implementation SettingController
- (void)viewDidLoad
{
[super viewDidLoad];
// 1.第0组:3个
[self add0SectionItems];
// 2.第1组:6个
[self add1SectionItems];
}
#pragma mark 添加第0组的模型数据
- (void)add0SectionItems
{
// 1.1.推送和提醒
SettingItemArrow *push = [SettingItemArrow itemWithIcon:@"MorePush" title:@"推送和提醒"];
push.showVCClass = [PushNoticeController class];
// copy状态下的block(堆里面的block)会对里面所使用的外界变量 产生 强引用
// __weak SettingController *setting = self;
// __unsafe_unretained
// 1.2.摇一摇机选
SettingItemSwitch *shake = [SettingItemSwitch itemWithIcon:@"handShake" title:@"摇一摇机选"];
shake.key = ILSettingShakeChoose;
// 1.3.声音效果
SettingItemSwitch *sound = [SettingItemSwitch itemWithIcon:@"sound_Effect" title:@"声音效果"];
sound.key = ILSettingSoundEffect;
SettingGroup *group = [[SettingGroup alloc] init];
group.items = @[push, shake, sound];
[_allGroups addObject:group];
}
#pragma mark 添加第1组的模型数据
- (void)add1SectionItems
{
// 2.1.检查新版本
SettingItemArrow *update = [SettingItemArrow itemWithIcon:@"MoreUpdate" title:@"检查新版本"];
update.operation = ^{
UIAlertView *alert = [[UIAlertView alloc] initWithTitle:nil message:@"目前已是最新版本了" delegate:nil cancelButtonTitle:@"确定" otherButtonTitles:nil, nil];
[alert show];
};
// 2.2.帮助
SettingItemArrow *help = [SettingItemArrow itemWithIcon:@"MoreHelp" title:@"帮助"];
help.showVCClass = [HelpController class];
// 2.3.分享
SettingItemArrow *share = [SettingItemArrow itemWithIcon:@"MoreShare" title:@"分享"];
share.showVCClass = [ShareController class];
// 2.4.查看消息
SettingItemArrow *msg = [SettingItemArrow itemWithIcon:@"MoreMessage" title:@"查看消息"];
// 2.5.产品推荐
SettingItemArrow *product = [SettingItemArrow itemWithIcon:@"MoreNetease" title:@"产品推荐"];
product.showVCClass = [ProductController class];
// 2.6.关于
SettingItemArrow *about = [SettingItemArrow itemWithIcon:@"MoreAbout" title:@"关于"];
about.showVCClass = [AboutController class];
SettingGroup *group = [[SettingGroup alloc] init];
group.items = @[update, help, share, msg, product, about];
[_allGroups addObject:group];
}
@end
SettingGroup
//
// SettingGroup.h
// 25_彩票
//
// Created by beyond on 14-8-28.
// Copyright (c) 2014年 com.beyond. All rights reserved.
// 模型,一组(Section,Group),包括 组的header,组的footer,中间的条目(cell数组)
#import <Foundation/Foundation.h>
@interface SettingGroup : NSObject
// 头部标题
@property (nonatomic, copy) NSString *header;
// 中间的条目(SettingItem对象数组)
@property (nonatomic, strong) NSArray *items;
// 尾部标题
@property (nonatomic, copy) NSString *footer;
@end
父类SettingItem
//
//  SettingItem.h
//  25_彩票
//
//  Created by beyond on 14-8-28.
//  Copyright (c) 2014年 com.beyond. All rights reserved.
//  一个SettingItem模型  对应一个Cell需要的数据源
//  父类,用来描述当前cell里面要显示的内容,描述点击cell后做什么事情

#import <Foundation/Foundation.h>

@interface SettingItem : NSObject

// 为一行(cell)提供 图标名
@property (nonatomic, copy) NSString *icon;
// 为一行(cell)提供 标题
@property (nonatomic, copy) NSString *title;
// 为一行(cell)提供 子标题
@property (nonatomic, copy) NSString *subtitle;
// 为一行(cell)提供 点击后,要执行的操作
@property (nonatomic, copy) void (^operation)() ; // 点击cell后要执行的操作

#pragma mark - 类方法,生成模型实例
// 有标题 有图片的模型
+ (id)itemWithIcon:(NSString *)icon title:(NSString *)title;
// 只有标题的模型
+ (id)itemWithTitle:(NSString *)title;
@end
//
//  SettingItem.m
//  25_彩票
//
//  Created by beyond on 14-8-28.
//  Copyright (c) 2014年 com.beyond. All rights reserved.
//  一个SettingItem模型  对应一个Cell需要的数据源
//  父类,用来描述当前cell里面要显示的内容,描述点击cell后做什么事情

#import "SettingItem.h"

@implementation SettingItem

// 有标题 有图片的模型
+ (id)itemWithIcon:(NSString *)icon title:(NSString *)title
{
SettingItem *item = [[self alloc] init];
item.icon = icon;
item.title = title;
return item;
}
// 只有标题的模型
+ (id)itemWithTitle:(NSString *)title
{
return [self itemWithIcon:nil title:title];
}

@end
父类SettingItemArchive
//
// SettingItemArchive.h
// 25_彩票
//
// Created by beyond on 14-8-29.
// Copyright (c) 2014年 com.beyond. All rights reserved.
// 中间父类,仅一个成员,key,所有需要归档的settingItem的子类(如开关等) 都可以继承本模型
#import "SettingItem.h"
@interface SettingItemArchive : SettingItem
// 存储数据时用的key,取数据时也是用该key
@property (nonatomic, copy) NSString *key;
@end
子类SettingItemArrow
//
// SettingItemArrow.h
// 25_彩票
//
// Created by beyond on 14-8-28.
// Copyright (c) 2014年 com.beyond. All rights reserved.
// 子类 最右边是箭头的item数据模型,专业提供数据源,给右边是箭头的cell
#import "SettingItem.h"
@interface SettingItemArrow : SettingItem
// 一般带箭头的cell,被点击时候,是要跳到另一个界面(控制器)
@property (nonatomic, assign) Class showVCClass; // 即将显示的控制器的类名
@end
子类SettingItemSwitch
//
// SettingItemSwitch.h
// 25_彩票
//
// Created by beyond on 14-8-28.
// Copyright (c) 2014年 com.beyond. All rights reserved.
// 子类 最右边是【开关】的item数据模型,专业提供数据源,给右边是开关的cell
// 继承自SettingItemArchive,而SettingItemArchive又继承自SettingItem
#import "SettingItemArchive.h"
@interface SettingItemSwitch : SettingItemArchive
// 开关需要保存的是状态,在设置时,就归档
@property (nonatomic, assign) BOOL off;
@end
//
//  SettingItemSwitch.m
//  25_彩票
//
//  Created by beyond on 14-8-28.
//  Copyright (c) 2014年 com.beyond. All rights reserved.
//

#import "SettingItemSwitch.h"

@implementation SettingItemSwitch

// 开关需要保存的是状态,在设置时,就归档
- (void)setOff:(BOOL)off
{
_off = off;

[SettingTool setBool:off forKey:self.key];
}

- (void)setKey:(NSString *)key
{
[super setKey:key];

_off = [SettingTool boolForKey:key];
}

@end
子类SettingItemLabel
//
// SettingItemLabel.h
// 25_彩票
//
// Created by beyond on 14-8-28.
// Copyright (c) 2014年 com.beyond. All rights reserved.
// 子类 最右边是【文字】的item数据模型,专业提供数据源,给右边是Label的cell
#import "SettingItemArchive.h"
@interface SettingItemLabel : SettingItemArchive
// cell右边显示的文字,在设置时就要归档
@property (nonatomic, copy) NSString *text;
@end
//
//  SettingItemLabel.m
//  25_彩票
//
//  Created by beyond on 14-8-28.
//  Copyright (c) 2014年 com.beyond. All rights reserved.
//  子类 最右边是【文字】的item数据模型,专业提供数据源,给右边是Label的cell

#import "SettingItemLabel.h"

@implementation SettingItemLabel

// 拦截,cell右边显示的文字,赋值时,就必须归档
- (void)setText:(NSString *)text
{

_text = text;

// 归档
[SettingTool setObject:text forKey:self.key];
}

// 为key赋值的时候,就必须解档
- (void)setKey:(NSString *)key
{
[super setKey:key];

_text = [SettingTool objectForKey:key];
}
@end
自定义cell视图View的封装 SettingCell
//
// SettingCell.h
// 25_彩票
//
// Created by beyond on 14-8-28.
// Copyright (c) 2014年 com.beyond. All rights reserved.
// view,自定义cell,接收数据源为其内部子控件提供数据
#import <UIKit/UIKit.h>
// 模型,数据源,为view cell 提供数据
@class SettingItem;
@interface SettingCell : UITableViewCell
// 模型,数据源,为view cell 提供数据
@property (nonatomic, strong) SettingItem *item;
// cell所在的组和行号
@property (nonatomic, strong) NSIndexPath *indexPath;
// 类方法创建cell实例对象,使用instancetype好处多多,更加严谨,让编译器更智能提示错误
+ (instancetype)settingCellWithTableView:(UITableView *)tableView;
@end
//
//  SettingCell.m
//  25_彩票
//
//  Created by beyond on 14-8-28.
//  Copyright (c) 2014年 com.beyond. All rights reserved.
//  view,自定义cell,接收数据源为其内部子控件提供数据

#import "SettingCell.h"
// 数据源
#import "SettingItem.h"
#import "SettingItemSwitch.h"
#import "SettingItemArrow.h"
#import "SettingItemLabel.h"

// 在ios6中,cell的contentView的x是10,因此,要想让cell全屏宽,必须使用cell左移10,宽度+20
const int MakeCellToLeftBy = 10;

@interface SettingCell()
{
// 每一个进入视野的cell 都循环利用(共用)一个arrow,switch,label
UIImageView *_arrowImgView;
UISwitch *_switch;
UILabel *_label;

UIView *_divider;
}
@end

@implementation SettingCell
#pragma mark - 生命周期
// 类方法创建cell实例对象,使用instancetype好处多多,更加严谨,让编译器更智能提示错误
// 先从参数tableView的缓存池中取,取不到,才要创建
+ (instancetype)settingCellWithTableView:(UITableView *)tableView
{
// 0.用static修饰的局部变量,只会初始化一次
static NSString *ID = @"SettingCell";

// 1.拿到一个标识先去缓存池中查找对应的Cell
SettingCell *cell = [tableView dequeueReusableCellWithIdentifier:ID];

// 2.如果缓存池中没有,才需要传入一个标识创建新的Cell
if (cell == nil) {
cell = [[SettingCell alloc] initWithStyle:UITableViewCellStyleValue1 reuseIdentifier:ID];
}

return cell;
}
// 重写父类的方法,创建cell实例
- (id)initWithStyle:(UITableViewCellStyle)style reuseIdentifier:(NSString *)reuseIdentifier
{
// 先调用父类的方法
self = [super initWithStyle:style reuseIdentifier:reuseIdentifier];
if (self) {
// 1.设置全局统一的cell背景view
[self setupCellBgView];

// 2.设置子控件属性
[self setupCellLabelBgColor];

// 3.添加cell底部的分隔线(为了统一,先移除系统自带的separateLine)
[self setupCellUnderLine];
}
return self;
}
#pragma mark - 初始化 属性设置
#pragma mark 1.设置cell背景view
- (void)setupCellBgView
{
// 1.默认 cell背景view (白色)
UIView *bgView = [[UIView alloc] init];
bgView.backgroundColor = [UIColor whiteColor];
self.backgroundView = bgView;

// 2.选中 cell背景view (灰色)
UIView *selectedBgView = [[UIView alloc] init];
selectedBgView.backgroundColor = kColor(237, 233, 218);
self.selectedBackgroundView = selectedBgView;
}
#pragma mark 2.设置cell内子控件label背景
- (void)setupCellLabelBgColor
{
// 标题 去其默认的背景
self.textLabel.backgroundColor = [UIColor clearColor];
self.textLabel.font = [UIFont systemFontOfSize:14];
// 子标题 去其默认的背景
self.detailTextLabel.backgroundColor = [UIColor clearColor];
self.detailTextLabel.font = [UIFont systemFontOfSize:12];
}
#pragma mark 3.设置分隔线
// 3.添加cell底部的分隔线(为了统一,先移除系统自带的separateLine)
- (void)setupCellUnderLine
{
UIView *divider = [[UIView alloc] init];
divider.backgroundColor = kColor(200, 200, 200);
// 不能在这里设置分隔线的x值(原因:cell没有具体的数据,里面的label就不知道最终的位置)
//    divider.frame = CGRectMake(0, 0, self.contentView.frame.size.width, 1.5);
[self.contentView addSubview:divider];
_divider = divider;
}

#pragma mark - 拦截setter方法
// 根据所在的组,所在的行号,设置分割线的显示状态
- (void)setIndexPath:(NSIndexPath *)indexPath
{
_indexPath = indexPath;

// 设置underLine的可见性,根据该cell所在的indexPath
_divider.hidden = indexPath.row == 0;
}

// 拦截数据源,为子控件们赋值
- (void)setItem:(SettingItem *)item
{
_item = item;

// 设置数据
self.imageView.image = [UIImage imageNamed:item.icon];
self.textLabel.text = item.title;
self.detailTextLabel.text = item.subtitle;

// 根据数据源模型的不同,创建不同的最右边的accessoryView
if ([item isKindOfClass:[SettingItemArrow class]]) {
// 1.设置箭头
[self setAccessoryViewArrow];
} else if ([item isKindOfClass:[SettingItemSwitch class]]) {
// 2.设置开关
[self setAccessoryViewSwitch];
} else if ([item isKindOfClass:[SettingItemLabel class]]) {
// 3.设置文本
[self setAccessoryViewLabel];
} else {
// 什么也没有,必须清空右边显示的view,因为cell循环使用
self.accessoryView = nil;
// 并且要,还原,使用默认的选中样式(即可以产生选中效果)
self.selectionStyle = UITableViewCellSelectionStyleDefault;
}
}
#pragma mark 设置右边的箭头
// 每一个进入视野的cell 都循环利用(共用)一个arrow,switch,label
- (void)setAccessoryViewArrow
{
if (_arrowImgView == nil) {
_arrowImgView = [[UIImageView alloc] initWithImage:[UIImage imageNamed:@"CellArrow"]];
}

// 右边显示箭头
self.accessoryView = _arrowImgView;
// 用默认的选中样式
self.selectionStyle = UITableViewCellSelectionStyleDefault;
}
#pragma mark 设置右边的文本标签
// 每一个进入视野的cell 都循环利用(共用)一个arrow,switch,label
- (void)setAccessoryViewLabel
{
if (_label == nil) {
_label = [[UILabel alloc] init];
_label.bounds = CGRectMake(0, 0, 100, self.frame.size.height);
_label.textAlignment = NSTextAlignmentRight;
_label.backgroundColor = [UIColor clearColor];
_label.textColor = kColor(173, 69, 14);
_label.font = [UIFont systemFontOfSize:13];
}

// 设置右边label的值
SettingItemLabel *labelItem = (SettingItemLabel *)_item;
_label.text = labelItem.text;

// 右边显示子文本
self.accessoryView = _label;
// 允许选中本行
self.selectionStyle = UITableViewCellSelectionStyleDefault;
}

#pragma mark 设置右边的开关
// 每一个进入视野的cell 都循环利用(共用)一个arrow,switch,label
- (void)setAccessoryViewSwitch
{
if (_switch == nil) {
_switch = [[UISwitch alloc] init];
[_switch addTarget:self action:@selector(switchChange) forControlEvents:UIControlEventValueChanged];
}

// 设置开关的状态
SettingItemSwitch *switchItem = (SettingItemSwitch *)_item;
_switch.on = !switchItem.off;

// 右边显示开关
self.accessoryView = _switch;
// 因为是开关,所以要禁止选中本行
self.selectionStyle = UITableViewCellSelectionStyleNone;
}

#pragma mark 开关状态改变
- (void)switchChange
{
SettingItemSwitch *switchItem = (SettingItemSwitch *)_item;
switchItem.off = !_switch.on;
}

#pragma mark - 当cell的宽高改变了就会调用
// 父类方法,需要调节cell内部子控件的frame,只有在layoutSubviews方法中,才最可靠\最有效
- (void)layoutSubviews
{
// 必须先调用父类的方法
[super layoutSubviews];

// 0.设置cell分隔线的位置 (从文字处开始)
_divider.frame = CGRectMake(self.textLabel.frame.origin.x, 0, self.contentView.frame.size.width + 100, 1.2);

if (iOS7) return;

// 以下是iOS6,设置cell占整个屏幕的宽度
[self makeCellFullWidth];
}

// 以下是iOS6,设置cell占整个屏幕的宽度
- (void)makeCellFullWidth
{
// 在ios6中,cell的contentView的x默认是10,因此,要想让cell全屏宽,必须使用cell的x左移10,宽度+20,相当于把整个cell,先左平移,再扯宽

// 1.将cell的frame拉宽
CGRect cellF = self.frame;
// cell整体先左平移10
cellF.origin.x = -MakeCellToLeftBy;
// cell整体宽度再+20,这样cell的contentView就全屏宽了
CGFloat deltaW = MakeCellToLeftBy * 2;
cellF.size.width = [UIScreen mainScreen].bounds.size.width + deltaW;
self.frame = cellF;

// 2.右边控件的frame (左移)
// accessoryView不属于contentView, 属于cell
CGRect accessF = self.accessoryView.frame;
accessF.origin.x = cellF.size.width - accessF.size.width - deltaW;
self.accessoryView.frame = accessF;
}

@end
父类控制器的封装
BaseSettingController
//
// BaseSettingController.h
// 25_彩票
//
// Created by beyond on 14-8-28.
// Copyright (c) 2014年 com.beyond. All rights reserved.
// 父类,内部维护了一个tableView,子类提供数据源数组(GroupsArr)
#import <UIKit/UIKit.h>
#import "SettingGroup.h"
#import "SettingItem.h"
// 导入数据模型
// 右侧是箭头的数据模型
#import "SettingItemArrow.h"
// 右侧是开关的数据模型
#import "SettingItemSwitch.h"
// 右边是子文本
#import "SettingItemLabel.h"
// 所有声明的将要被存储到沙盒中的key
#import "SettingArchiveKeys.h"
@interface BaseSettingController : UIViewController<UITableViewDataSource, UITableViewDelegate>
{
// 开放给子类用,父类只负责初始化,子类负责添加一个个Group对象,一个group模型对应一个section
NSMutableArray *_allGroups; // 所有的组模型
}
@property (nonatomic, weak, readonly) UITableView *tableView;
@end
//
//  BaseSettingController.m
//  25_彩票
//
//  Created by beyond on 14-8-28.
//  Copyright (c) 2014年 com.beyond. All rights reserved.
//  父类,内部维护了一个tableView,子类提供数据源数组(GroupsArr)

#import "BaseSettingController.h"
#import "SettingCell.h"

// 每一个section之间的顶部间距
const int SectionHeaderMargin = 20;
@interface BaseSettingController ()

@end

@implementation BaseSettingController
// 直接让tableView就是控制器的view
- (void)loadView
{
// 父类的组数组 初始化放在LoadView方法中,好处是,子类在viewDidLoad时,就已经拥有初始化的_allGroups,而不再需要先调用父类的viewDidLoad,然后才可向数组添加成员
_allGroups = [NSMutableArray array];

// 创建并维护自己的tableView,子类仅需提供数据源 groupsArr 即可
[self createTableView];

}

// 创建并维护自己的tableView,子类仅需提供数据源 groupsArr 即可
- (void)createTableView
{
UITableView *tableView = [[UITableView alloc] initWithFrame:[UIScreen mainScreen].applicationFrame style:UITableViewStyleGrouped];
// 设置数据源和代理 为当前父控制器
tableView.delegate = self;
tableView.dataSource = self;

// 设置全局统一的表格背景
// 如果是分组,则要先清空背景view,才可设置表格背景颜色(colorWithPattern平铺)
tableView.backgroundView = nil;
tableView.backgroundColor = kGlobalBg;

// group状态下,sectionFooterHeight和sectionHeaderHeight是有值的
tableView.sectionFooterHeight = 0;
tableView.sectionHeaderHeight = SectionHeaderMargin;

// 在tableView初始化的时候设置contentInset
// 在tableView展示完数据的时候给contentInset.top增加(20+44)的值
// 重要~~  ?????
if (iOS7) {
tableView.contentInset = UIEdgeInsetsMake(SectionHeaderMargin - 35, 0, 0, 0);
}

// 先隐藏表格默认的分隔线,cell内部在根据所在的indexPath绘制underLine
tableView.separatorStyle = UITableViewCellSeparatorStyleNone;

self.view = tableView;

_tableView = tableView;
}
#pragma mark - 数据源
// 多少组
- (NSInteger)numberOfSectionsInTableView:(UITableView *)tableView
{
// 返回组 数组的长度
return _allGroups.count;
}
// 各个组有多少行
- (NSInteger)tableView:(UITableView *)tableView numberOfRowsInSection:(NSInteger)section
{
// 取出组模型
SettingGroup *group = _allGroups[section];
// 返回组模型中成员---settingItems数组的长度
return group.items.count;
}

// 每当有一个cell进入视野范围内就会调用,返回当前这行显示的cell
- (UITableViewCell *)tableView:(UITableView *)tableView cellForRowAtIndexPath:(NSIndexPath *)indexPath
{
// 1.创建一个SettingCell  自定义的view
SettingCell *cell = [SettingCell settingCellWithTableView:tableView];

// 2.取出组模型
SettingGroup *group = _allGroups[indexPath.section];
// 3.取出组中的被点的cell模型,并赋值给自定义的view,供其内部子控件使用
cell.item = group.items[indexPath.row];
// 根据所在的组,所在的行号,设置分割线的显示状态
cell.indexPath = indexPath;

return cell;
}

#pragma mark - 代理
// 点击了cell后的操作
- (void)tableView:(UITableView *)tableView didSelectRowAtIndexPath:(NSIndexPath *)indexPath
{
// 1.去除选中时的背景
[tableView deselectRowAtIndexPath:indexPath animated:YES];
// 2.取出这行对应的模型
SettingGroup *group = _allGroups[indexPath.section];
// 取出对应的cell数据源模型
SettingItem *item = group.items[indexPath.row];

// 3.取出这行对应模型中有block代码
if (item.operation) {
// 执行block
item.operation();
return;
}

// 4.检测有没有要跳转的控制器
if ([item isKindOfClass:[SettingItemArrow class]]) {
// 将cell对应的数据源模型  转成具体的子类
SettingItemArrow *arrowItem = (SettingItemArrow *)item;
// 创建并跳转到指定的控制器
if (arrowItem.showVCClass) {
UIViewController *vc = [[arrowItem.showVCClass alloc] init];
[self.navigationController pushViewController:vc animated:YES];
}
}
}

#pragma mark 返回每一组的header标题
- (NSString *)tableView:(UITableView *)tableView titleForHeaderInSection:(NSInteger)section
{
// 取得组模型
SettingGroup *group = _allGroups[section];
// 返回组的头部标题
return group.header;
}
#pragma mark 返回每一组的footer标题
- (NSString *)tableView:(UITableView *)tableView titleForFooterInSection:(NSInteger)section
{
// 取得组模型
SettingGroup *group = _allGroups[section];
// 返回组的尾部标题
return group.footer;
}

@end
子类设置控制器
//
// SettingController.h
// 25_彩票
//
// Created by beyond on 14-8-28.
// Copyright (c) 2014年 com.beyond. All rights reserved.
// 点击【设置】按钮跳转到本控制器,本控制器继承自BaseSettingController
#import "BaseSettingController.h"
@interface SettingController : BaseSettingController
@end
//
// SettingController.m
// 25_彩票
//
// Created by beyond on 14-8-28.
// Copyright (c) 2014年 com.beyond. All rights reserved.
//
#import "SettingController.h"
#import "PushNoticeController.h"
#import "ShareController.h"
#import "AboutController.h"
#import "HelpController.h"
#import "ProductController.h"
@interface SettingController ()
@end
@implementation SettingController
- (void)viewDidLoad
{
[super viewDidLoad];
// 1.第0组:3个
[self add0SectionItems];
// 2.第1组:6个
[self add1SectionItems];
}
#pragma mark 添加第0组的模型数据
- (void)add0SectionItems
{
// 1.1.推送和提醒
SettingItemArrow *push = [SettingItemArrow itemWithIcon:@"MorePush" title:@"推送和提醒"];
push.showVCClass = [PushNoticeController class];
// copy状态下的block(堆里面的block)会对里面所使用的外界变量 产生 强引用
// __weak SettingController *setting = self;
// __unsafe_unretained
// 1.2.摇一摇机选
SettingItemSwitch *shake = [SettingItemSwitch itemWithIcon:@"handShake" title:@"摇一摇机选"];
shake.key = ILSettingShakeChoose;
// 1.3.声音效果
SettingItemSwitch *sound = [SettingItemSwitch itemWithIcon:@"sound_Effect" title:@"声音效果"];
sound.key = ILSettingSoundEffect;
SettingGroup *group = [[SettingGroup alloc] init];
group.items = @[push, shake, sound];
[_allGroups addObject:group];
}
#pragma mark 添加第1组的模型数据
- (void)add1SectionItems
{
// 2.1.检查新版本
SettingItemArrow *update = [SettingItemArrow itemWithIcon:@"MoreUpdate" title:@"检查新版本"];
update.operation = ^{
UIAlertView *alert = [[UIAlertView alloc] initWithTitle:nil message:@"目前已是最新版本了" delegate:nil cancelButtonTitle:@"确定" otherButtonTitles:nil, nil];
[alert show];
};
// 2.2.帮助
SettingItemArrow *help = [SettingItemArrow itemWithIcon:@"MoreHelp" title:@"帮助"];
help.showVCClass = [HelpController class];
// 2.3.分享
SettingItemArrow *share = [SettingItemArrow itemWithIcon:@"MoreShare" title:@"分享"];
share.showVCClass = [ShareController class];
// 2.4.查看消息
SettingItemArrow *msg = [SettingItemArrow itemWithIcon:@"MoreMessage" title:@"查看消息"];
// 2.5.产品推荐
SettingItemArrow *product = [SettingItemArrow itemWithIcon:@"MoreNetease" title:@"产品推荐"];
product.showVCClass = [ProductController class];
// 2.6.关于
SettingItemArrow *about = [SettingItemArrow itemWithIcon:@"MoreAbout" title:@"关于"];
about.showVCClass = [AboutController class];
SettingGroup *group = [[SettingGroup alloc] init];
group.items = @[update, help, share, msg, product, about];
[_allGroups addObject:group];
}
@end

相关文章推荐
- iOS_25_彩票设置的cell的数据源模型的封装
- iOS学习笔记-098.彩票13——设置2_UITableViewCell创建
- 诸如设置界面自定义Cell模型item封装(所有界面通用)(自定义Cell1⃣️)
- iOS学习笔记-097.彩票12——设置1_数据模型创建
- iOS:针对固定数据源,更好的封装cell
- iOS:一个Cell中设置另外一个Cell中的button
- ios开发——解决UICollectionView的cell间距与设置不符问题
- iOS 关于tableView cell的分割线的一些设置
- iOS 在TableView的Cell之间设置空白间隔空间
- ios25-封装一个类---
- iOS 根据文字内容设置cell 的高度
- 关于iOS UITableView 数据源数组加载完成之后,滑动时出现cell为空的问题解决笔记
- IOS开发(25)之删除UITableView的Cell
- 【iOS开发】深入MVC---UITableView的数据源方法封装
- ios-day06-01(UITableView的使用:分组、设置数据源、UITableViewDataSource协议等)
- 【iOS开发-60】案例学习:多组数据的tableView设置、添加右側组索引、多层数据模型设置以及valueForKeyPath
- 20141211笔记(UIImageView 设置内容的Mode的方法\UICollectionViewCell Custom的方法\ios modal segue code)
- iOS_14_tableViewController_xib创建和封装自定义cell
- iOS学习笔记1—UITableViewCell设置
- iOS_25_彩票_控制器的view的适配