Resizing the disk space on Ubuntu Server VMs running on VMware ESXi 5
2014-06-24 13:43
651 查看
We generally do both dedicated and VPS hosting for our websites, apps and some premium projects we run for others.
When we choose to have VPS servers (aka virtual machines or VMs for short) instead of dedicated servers, we usually opt for VMware's free ESXi 5 and install Ubuntu Server as the OS for the VPSs we
create on top of ESXi 5. It may not be as friendly as some VPS providers like Amazon, Rackspace etc. but you got more control and it's on YOUR hardware (pretty important actually!)...
Now, when you build a VPS on VMware, you start with say 40GBs of hard disk space. You install the OS, setup the server, move the sites on this new server and you're on. But what happens when there's no more room
on the server for your site or sites and you need to add more disk space?
The process is quite simple:
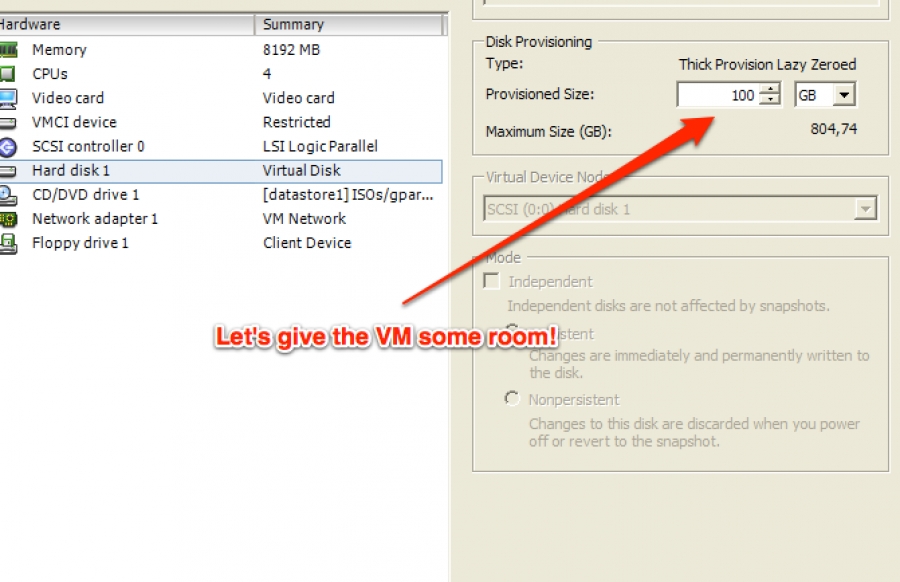
a) Connect to the VMware ESXi 5 server using the vShpere Client. Edit the VM's properties to increase the hard disk size (VM has to be off) - I won't get into details on that, if you have the experience on managing
ESXi you know what to do... I'm assuming the process is the same for ESXi 4. Now restart the VM.
b) Login via SSH to the VM and follow this process.
- First list all partitions:
$ ls -al /dev/sda*
- Create new partition using fdisk:
$ fdisk /dev/sda
Then:
type p - to list all your partitions
type n - to create a new partition
type l - for "logical"
then give it a number (e.g. if you got 2 partitions listed as /dev/sda1 & /dev/sda2, for the new partition simply type "3" to create /dev/sda3)
type t - to change the partition type to "Linux LVM"
provide the partition number you previously created
type 8e - for the "Linux LVM" type
type p - to list the new partition table
type w - to write changes and exit
- Reboot server:
$ reboot
- Assuming you created partition /dev/sda3, let's now create the physical volume in that partition:
$ pvcreate /dev/sda3
- Now let's extend the server's Volume Group to that physical volume.
$ vgdisplay
This will give you the info on your current Volume Group. Note down the entry next to "VG Name". That's your Volume Group name.
$ vgextend EnterVolumeGroupNameHere /dev/sda3
=== IMPORTANT NOTE [start] ===
If you get a message saying /dev/sda3 could not be added to your Volume Group, you need to remove the physical volume and recreate it. Metadata might have gotten corrupt and thus the volume cannot be added to your Volume Group. So just do:
$ pvremove /dev/sda3
And then again:
$ pvcreate /dev/sda3
=== IMPORTANT NOTE [end] ===
- Since we're (essentially) extending the main logical volume, let's get the name of that:
$ lvdisplay
and note down the entry next to "LV Name". This is your logical volume's name (e.g. /dev/srv/root), which you'll now extend to the newly added partition/physical volume.
- Extend the logical volume by X GBs:
$ lvextend -L +XG yourLogicalVolumeName
Make sure you replace X above with the actual number of GBs you've added in your VM's settings. So if you increased your VM by 20GBs, the command becomes:
$ lvextend -L +20G yourLogicalVolumeName
- Finally, let's resize the file system to the new allocated space:
$ resize2fs yourLogicalVolumeName
(this may take some time depending on number of GBs added to the file system.
- Check the new file system sizes:
$ df -hT
You should now see an increased disk space for your primary logical volume.
- Reboot and you're set :)

相关文章推荐
- Resizing the disk space on Ubuntu Server VMs running on VMware ESXi 5
- Best Practices of Resizing Windows Virtual Machine Disks on VMWARE ESX Server 3
- 解决Cannot open the disk 'F:/vmware/Ubuntu.vmdk' or one of the snapshot disks it depends on.
- Unable to start debugging on the web server. The IIS worker process for the launched URL is not currently running
- Installation of the Robocup 3D simspark simulation server on Ubuntu
- 虚拟机异常关闭,重新打开vmware:Cannot open the disk 'XXX' or one of the snapshot disks it depends on. reason: fa
- VMWare的The network bridge on device VMnet0 is not running故障解决
- VMWare的The network bridge on device VMnet0 is not running故障解决
- vmware:Cannot open the disk 'XXX' or one of the snapshot disks it depends on. reason: failed to lock
- 关于VMware提示there is not enough space on the file system for the selected operation
- enlarge the space of linux based on vmware
- Installing Xen On An Ubuntu 8.04 (Hardy Heron) Server From The Ubuntu Repositories
- VMWARE] the network bridge on device vmnet0 is not running解决方法[转]
- There is not enough space on the disk.
- the methods running X server on CoLinux
- VMware启动Ubuntu时出现错误Cannot open the disk 'xxxxxxx.vmdk' or one of the snapshot disks it depends on. .
- VMWare的The network bridge on device VMnet0 is not running故障解决
- VMWare的The network bridge on device VMnet0 is not running故障解决
- VMWare的The network bridge on device VMnet0 is not running故障解决
- Windows Mobile开发启动模拟器时,得到错误 0x80070070: There is not enough space on the disk