用C#做的一个简单的图片浏览器
2014-06-11 19:23
411 查看
(1)参考现有图片浏览软件的功能,实现一个自己的图片浏览器;
(2)该文档浏览器,至少完成以下功能;
文件操作: 目录打开,指定文件打开;
图片显示方式: normal,stretch;
图片旋转操作;
图片浏览功能:幻灯片演示;
(3)界面美观,操作方便
设计思路
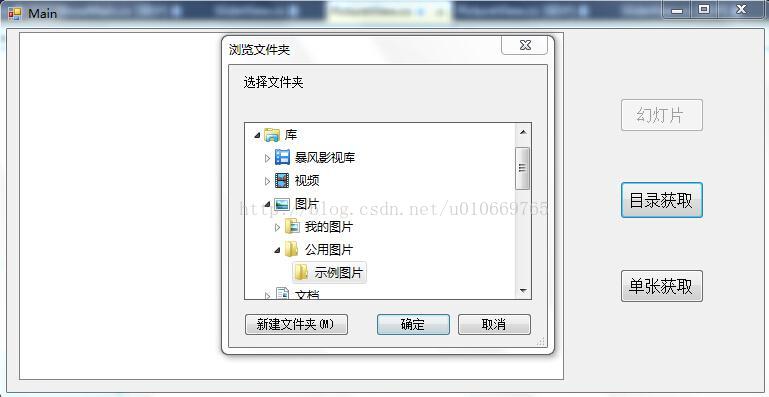
(1)首先,无论是进行哪一步的操作,获取本地图片的path都是至关重要的,所以第一步是实现“目录打开,指定文件打开”,这里用到的控件是folderBrowserDialog,利用他可以轻松的获取本地的相应地址,然后用imageList保存,下面是实现代码:
目录获取:
if (folderBrowserDialog1.ShowDialog() == DialogResult.OK)
{
filePath = folderBrowserDialog1.SelectedPath;//获取目录path
}
if (!string.IsNullOrEmpty(filePath)) //判空
{
DirectoryInfo dir = new DirectoryInfo(filePath);
foreach (FileInfo dChild in dir.GetFiles("*.jpg"))//获取jpg图片,并压入imageList
{
Image img = Image.FromFile(dChild.FullName, true);
list.Add(dChild.FullName);
imageList1.Images.Add(img);
imageList2.Images.Add(img);
}
//
//中间夹杂着重复性的对不同图片格式的相同处理,因为不关键,所以不想占字数了。
//
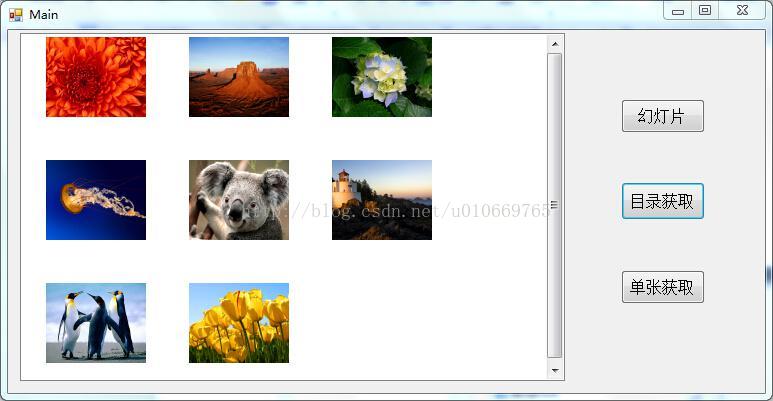
for (int i = 0; i < imageList1.Images.Count; i++)//用listView显示缩略图
{
ListViewItem lvi = new ListViewItem();
lvi.Name = list[i];
lvi.ImageIndex = i;
listView1.Items.Add(lvi);
}
单个文件获取:
OpenFileDialog openFileDialog1 = new OpenFileDialog();
openFileDialog1.Filter = "图?片?文?件t(*.bmp,jpg,gif,jpeg)|*.bmp;*.jpg;gif;jpeg";
openFileDialog1.Multiselect = true;
if (openFileDialog1.ShowDialog() == DialogResult.OK)
{
List<string> keylist = new List<string>();
string filename = openFileDialog1.FileName;
path2 = filename;
PictureView a = new PictureView(path2);//将文件导入单独文件处理模块
a.Show();
}
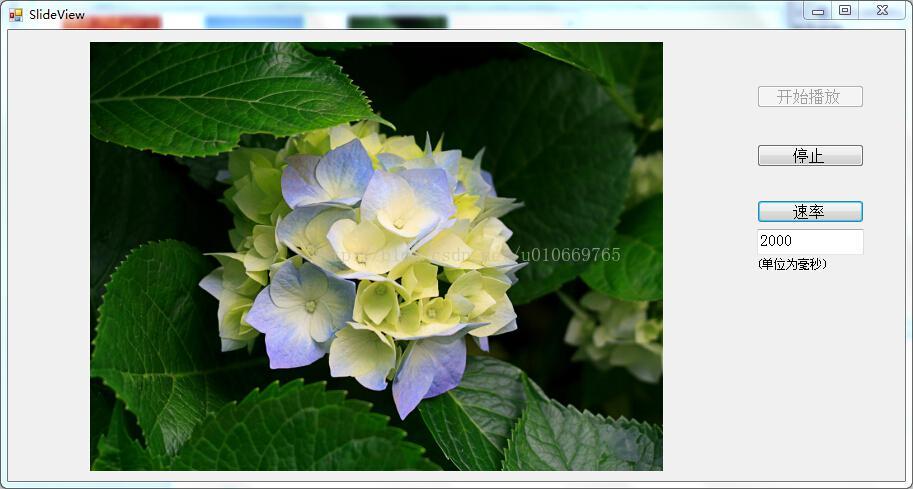
(2)获取了图片文件后,我首先完成的是幻灯片的放映,所利用的原理很简单,就是利用timer 控件,循环的切换image,以达到自动幻灯片的效果:
if (i < allpath.Count())
{
Image img;
img = Image.FromFile(allpath[i], true);
int width = img.Width;
int height = img.Height;
if (width > pictureBox1.Width || height > pictureBox1.Height)
{
pictureBox1.SizeMode = PictureBoxSizeMode.Zoom;
}
else
{
pictureBox1.SizeMode = PictureBoxSizeMode.CenterImage;
}
pictureBox1.Image = img;
GC.Collect();
i++;
if (i == allpath.Count())
{
i = 0;
}
}
在这里小小地补充了一个设置播放时速的功能:
int tmp;
if (textBox1.Text.Length != 0)
{
tmp = Convert.ToInt32(textBox1.Text);
if (tmp > 0)
{
timer1.Interval = tmp;
}
}
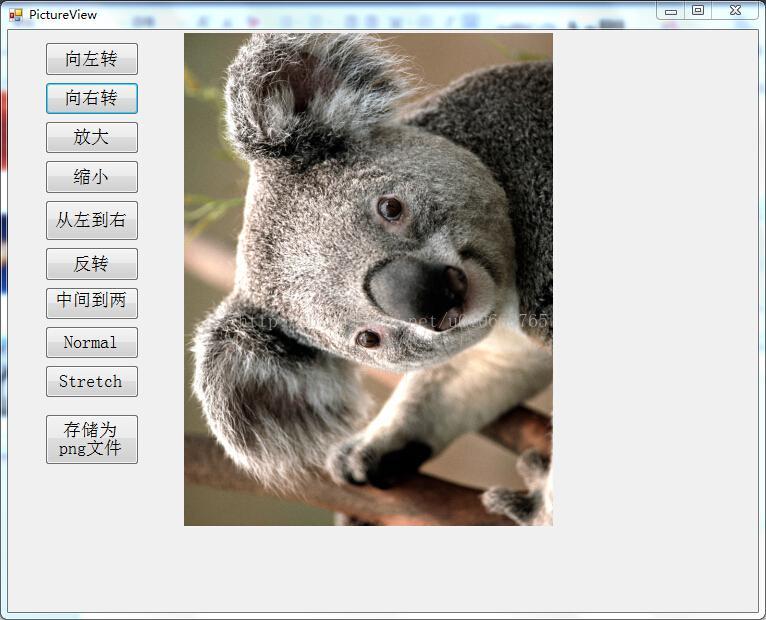
(3)接下来是针对单独一张图片的处理,包括扩大,缩小,旋转操作
首先是放大缩小
width1 = Convert.ToInt32( width1/1.2);
height1 = Convert.ToInt32( height1/1.2);
pictureBox1.SizeMode = PictureBoxSizeMode.Zoom;
pictureBox1.Size = new Size(width1,height1);
width1 =Convert.ToInt32( width1 * 1.2);
height1 = Convert.ToInt32( height1 * 1.2);
pictureBox1.SizeMode = PictureBoxSizeMode.Zoom;
pictureBox1.Size = new Size(width1, height1);
然后是旋转,这里是用RotateFlipType的自带方法完成的
pheight = pictureBox1.Width;
pwidth = pictureBox1.Height;
pictureBox1.Size = new Size(pwidth, pheight);
pictureBox1.Image.RotateFlip(RotateFlipType.Rotate270FlipNone);
pictureBox1.Refresh();
int p = pictureBox1.Width;
pwidth = pictureBox1.Height;
pheight = p;
pictureBox1.Size = new Size(pwidth,pheight);
pictureBox1.Image.RotateFlip(RotateFlipType.Rotate90FlipNone);
pictureBox1.Refresh();
然后是调节显示的模式,这里直接设置就好了
Normal:
pictureBox1.SizeMode = PictureBoxSizeMode.AutoSize;
Stretch
pictureBox1.Size = new Size(713, 405);
pictureBox1.SizeMode = PictureBoxSizeMode.Zoom;
再然后就是一些小的附加功能,比如说将图片强制生成为123.png,当然是自选路径的。
folderBrowserDialog1.Description = "选?择?文?件t夹D";
if (folderBrowserDialog1.ShowDialog() == DialogResult.OK)
{
filePath = folderBrowserDialog1.SelectedPath;
}
bmp = (Bitmap)Bitmap.FromFile(path);
pictureBox1.Image = bmp;
filePath = filePath + "/123.png";
bmp.Save(filePath, System.Drawing.Imaging.ImageFormat.Png);
反转演示:
gra = this.pictureBox1.CreateGraphics();
gra.Clear(this.BackColor);
for (int x = -width / 2; x <= width / 2; x++)
{
Rectangle DestRect = new Rectangle(0, height / 2 - x, width, 2 * x);
Rectangle SrcRect = new Rectangle(0, 0, this.pictureBox1.Image.Width, this.pictureBox1.Image.Height);
gra.DrawImage(this.pictureBox1.Image, DestRect, SrcRect, GraphicsUnit.Pixel);
}
gra.Dispose();
程序运行效果图
1. 目录获取:
2.获取后缩略图显示
3.幻灯片播放:
4.单张处理:
下面附上demo的下载地址http://download.csdn.net/detail/u010669765/7484375
(2)该文档浏览器,至少完成以下功能;
文件操作: 目录打开,指定文件打开;
图片显示方式: normal,stretch;
图片旋转操作;
图片浏览功能:幻灯片演示;
(3)界面美观,操作方便
设计思路
(1)首先,无论是进行哪一步的操作,获取本地图片的path都是至关重要的,所以第一步是实现“目录打开,指定文件打开”,这里用到的控件是folderBrowserDialog,利用他可以轻松的获取本地的相应地址,然后用imageList保存,下面是实现代码:
目录获取:
if (folderBrowserDialog1.ShowDialog() == DialogResult.OK)
{
filePath = folderBrowserDialog1.SelectedPath;//获取目录path
}
if (!string.IsNullOrEmpty(filePath)) //判空
{
DirectoryInfo dir = new DirectoryInfo(filePath);
foreach (FileInfo dChild in dir.GetFiles("*.jpg"))//获取jpg图片,并压入imageList
{
Image img = Image.FromFile(dChild.FullName, true);
list.Add(dChild.FullName);
imageList1.Images.Add(img);
imageList2.Images.Add(img);
}
//
//中间夹杂着重复性的对不同图片格式的相同处理,因为不关键,所以不想占字数了。
//
for (int i = 0; i < imageList1.Images.Count; i++)//用listView显示缩略图
{
ListViewItem lvi = new ListViewItem();
lvi.Name = list[i];
lvi.ImageIndex = i;
listView1.Items.Add(lvi);
}
单个文件获取:
OpenFileDialog openFileDialog1 = new OpenFileDialog();
openFileDialog1.Filter = "图?片?文?件t(*.bmp,jpg,gif,jpeg)|*.bmp;*.jpg;gif;jpeg";
openFileDialog1.Multiselect = true;
if (openFileDialog1.ShowDialog() == DialogResult.OK)
{
List<string> keylist = new List<string>();
string filename = openFileDialog1.FileName;
path2 = filename;
PictureView a = new PictureView(path2);//将文件导入单独文件处理模块
a.Show();
}
(2)获取了图片文件后,我首先完成的是幻灯片的放映,所利用的原理很简单,就是利用timer 控件,循环的切换image,以达到自动幻灯片的效果:
if (i < allpath.Count())
{
Image img;
img = Image.FromFile(allpath[i], true);
int width = img.Width;
int height = img.Height;
if (width > pictureBox1.Width || height > pictureBox1.Height)
{
pictureBox1.SizeMode = PictureBoxSizeMode.Zoom;
}
else
{
pictureBox1.SizeMode = PictureBoxSizeMode.CenterImage;
}
pictureBox1.Image = img;
GC.Collect();
i++;
if (i == allpath.Count())
{
i = 0;
}
}
在这里小小地补充了一个设置播放时速的功能:
int tmp;
if (textBox1.Text.Length != 0)
{
tmp = Convert.ToInt32(textBox1.Text);
if (tmp > 0)
{
timer1.Interval = tmp;
}
}
(3)接下来是针对单独一张图片的处理,包括扩大,缩小,旋转操作
首先是放大缩小
width1 = Convert.ToInt32( width1/1.2);
height1 = Convert.ToInt32( height1/1.2);
pictureBox1.SizeMode = PictureBoxSizeMode.Zoom;
pictureBox1.Size = new Size(width1,height1);
width1 =Convert.ToInt32( width1 * 1.2);
height1 = Convert.ToInt32( height1 * 1.2);
pictureBox1.SizeMode = PictureBoxSizeMode.Zoom;
pictureBox1.Size = new Size(width1, height1);
然后是旋转,这里是用RotateFlipType的自带方法完成的
pheight = pictureBox1.Width;
pwidth = pictureBox1.Height;
pictureBox1.Size = new Size(pwidth, pheight);
pictureBox1.Image.RotateFlip(RotateFlipType.Rotate270FlipNone);
pictureBox1.Refresh();
int p = pictureBox1.Width;
pwidth = pictureBox1.Height;
pheight = p;
pictureBox1.Size = new Size(pwidth,pheight);
pictureBox1.Image.RotateFlip(RotateFlipType.Rotate90FlipNone);
pictureBox1.Refresh();
然后是调节显示的模式,这里直接设置就好了
Normal:
pictureBox1.SizeMode = PictureBoxSizeMode.AutoSize;
Stretch
pictureBox1.Size = new Size(713, 405);
pictureBox1.SizeMode = PictureBoxSizeMode.Zoom;
再然后就是一些小的附加功能,比如说将图片强制生成为123.png,当然是自选路径的。
folderBrowserDialog1.Description = "选?择?文?件t夹D";
if (folderBrowserDialog1.ShowDialog() == DialogResult.OK)
{
filePath = folderBrowserDialog1.SelectedPath;
}
bmp = (Bitmap)Bitmap.FromFile(path);
pictureBox1.Image = bmp;
filePath = filePath + "/123.png";
bmp.Save(filePath, System.Drawing.Imaging.ImageFormat.Png);
反转演示:
gra = this.pictureBox1.CreateGraphics();
gra.Clear(this.BackColor);
for (int x = -width / 2; x <= width / 2; x++)
{
Rectangle DestRect = new Rectangle(0, height / 2 - x, width, 2 * x);
Rectangle SrcRect = new Rectangle(0, 0, this.pictureBox1.Image.Width, this.pictureBox1.Image.Height);
gra.DrawImage(this.pictureBox1.Image, DestRect, SrcRect, GraphicsUnit.Pixel);
}
gra.Dispose();
程序运行效果图
1. 目录获取:
2.获取后缩略图显示
3.幻灯片播放:
4.单张处理:
下面附上demo的下载地址http://download.csdn.net/detail/u010669765/7484375

相关文章推荐
- C# 图片的转换,一个简单的实例,没有特别的修饰,涉及线程
- sql server 关于表中只增标识问题 C# 实现自动化打开和关闭可执行文件(或 关闭停止与系统交互的可执行文件) ajaxfileupload插件上传图片功能,用MVC和aspx做后台各写了一个案例 将小写阿拉伯数字转换成大写的汉字, C# WinForm 中英文实现, 国际化实现的简单方法 ASP.NET Core 2 学习笔记(六)ASP.NET Core 2 学习笔记(三)
- 使用wxpython实现的一个简单图片浏览器实例
- C# 一个图片上传的简单方法
- 工具类:自写一个简单的图片浏览器(LCGPicBrowser)
- 在 .NET 中开发基于 Chrome 内核的浏览器-创建一个简单浏览器 分类: C# 2014-10-27 16:27 593人阅读 评论(0) 收藏
- 在 .NET 中开发基于 Chrome 内核的浏览器-创建一个简单浏览器 分类: C# 2014-10-27 16:27 594人阅读 评论(0) 收藏
- 一个简单的图片浏览器
- 简介 WatiN是一个开源的用于Web测试自动化的类库,从watir中获得的灵感,使用C#开发。WatiN通过与浏览器的交互来实现自动化,使用起来具有轻便,简单的特点。目前最新版本为2.0,加入了对
- 使用wxpython实现的一个简单图片浏览器实例
- java建立一个简单的图片浏览器
- 一个简单的 C# 图片缩放模块 —— Less.Image
- C#编写简单的图片浏览器
- C#简单的图片浏览器
- iOS开发中实现一个简单的图片浏览器的实例讲解
- C# 一个图片上传的简单方法
- 制作一个简单的图片浏览器 对应图片的张数,与描述,还有图片的缩放
- C# 系统应用之ListView实现简单图片浏览器
- 一个简单的图片浏览器(java版)
- 使用C# Builder建一个简单的ASP.NET应用程序