Android学习之——自己搭建Http框架(1)
2014-05-21 01:32
465 查看
一、前言
最近学习http框架。
目前写的这个框架暂时只适用于学习之用,实际用于项目之中还需要不断的优化。
要从服务器或者网络获取数据,显示到UI上面,网络请求的操作不能放在UI线程中进行,android为我们封装了AsyncTask类来进行异步的请求操作,所以这个Http框架基于AsyncTask。
二、框架主要类
定义Request类,定义url,服务器返回数据,post的请求params,下载进度等参数。
定义HttpUtil类来封装http请求代码。在里面定义execute()方法,该方法判断是get还是post,然后再去call get(),post() 方法。post() 请求需要的参数在Request中设置.
在AsyncTask中,doingBackground()方法中 execute http,将返回的数据写到内存中变成String返回,如果数据较大,可以先存到文件中,把path返回,在不同的callback中处理。
三、框架搭建
1. 首先,我们建立 HttpClientUtil.java 类,用于处理HTTP的get和post,里面定义execute()方法,该方法判断是get还是post,然后再去call get(),post() 方法,post()
请求需要的参数在Request中设置.:
3. ICallback接口,该接口的onFilure和onSuccess方法在UI线程当中实现,如果在RequestTask中doInBackground中HttpResponse返回成功则在onPostExecute中调用onSuccess,否则调用onFilure,并传递已经解析了的返回参数:
4. RequestTask 继承自 AsyncTask ,在doInBackground 进行HTTP请求,同时对HTTP请求返回的数据结果进行解析,通过调用callback中的handle方法,解析HTTP请求返回的参数,返回后的结果(如果抛出异常,将异常也返回),在onPostExecute中进行处理,调用不同的方法,返回到UI线程,代码如下:
返回到doInBackground 中(doInBackground 中的return request.callback.handle(response)步骤)。如果没有设置路径,则直接调用bindData(EntityUtils.toString(entity)),
放入到具体的Callback中进行处理,然后返回到doInBackground中进行下一步处理。
7. 当中用到的TextUtil.java 类
其中mTestResultLabel 是TextView
可以看到实现效果,这里我们在SD卡的根目录下将返回结果存入到了 "mrfu_http.txt" 文件中,同时显示到了 UI 上面:如图所示:
这里的这只是一个最初步的框架,可以看到很多的操作都没有处理,如 Json解析,下载进度更新,随时取消请求,对返回的对象进行预处理操作,以及异常处理都没有具体的去实现,而且里面的一些代码结构也不够完善,如直接对Object进行操作。
后面的文章中会将该框架逐步晚上,包括上面提到的。
特别感谢stay老师在这当中的帮助。让我在框架学习这块实打实的迈出了第一步!
欢迎转载,转载注明出处,谢谢
Mr.傅
最近学习http框架。
目前写的这个框架暂时只适用于学习之用,实际用于项目之中还需要不断的优化。
要从服务器或者网络获取数据,显示到UI上面,网络请求的操作不能放在UI线程中进行,android为我们封装了AsyncTask类来进行异步的请求操作,所以这个Http框架基于AsyncTask。
二、框架主要类
定义Request类,定义url,服务器返回数据,post的请求params,下载进度等参数。
定义HttpUtil类来封装http请求代码。在里面定义execute()方法,该方法判断是get还是post,然后再去call get(),post() 方法。post() 请求需要的参数在Request中设置.
在AsyncTask中,doingBackground()方法中 execute http,将返回的数据写到内存中变成String返回,如果数据较大,可以先存到文件中,把path返回,在不同的callback中处理。
三、框架搭建
1. 首先,我们建立 HttpClientUtil.java 类,用于处理HTTP的get和post,里面定义execute()方法,该方法判断是get还是post,然后再去call get(),post() 方法,post()
请求需要的参数在Request中设置.:
/**
* @author Mr.傅
*/
public class HttpClientUtil {
/**
* 执行HTTP方法,Request 设置请求类型
* @param request
* @return
* @throws Exception
*/
public static HttpResponse excute(Request request) throws Exception{
switch (request.requestMethod) {
case GET:
return get(request);
case POST:
return post(request);
default:
//这里没有定义 DELETE 和 PUT 操作
throw new IllegalStateException("you doesn't define this requestmethod");
}
}

private static HttpResponse get(Request request) throws Exception {
HttpClient client = new DefaultHttpClient();
HttpGet get = new HttpGet(request.url);
addHeader(get, request.headers);
//返回的结果放到上一层进行处理
HttpResponse response = client.execute(get);
return response;
}

private static HttpResponse post(Request request) throws Exception {
HttpClient client = new DefaultHttpClient();
HttpPost post = new HttpPost(request.url);
addHeader(post, request.headers);
//post的请求参数在 Request 中定义,如果为空,则没有定义
if (request.entity == null) {
throw new IllegalStateException("you forget to set post content to the httpost");
}else {
post.setEntity(request.entity);
}
HttpResponse response = client.execute(post);
return response;
}

/**
* 请求头
* @param request
* @param headers
*/
public static void addHeader(HttpUriRequest request, Map<String, String> headers){
if (headers != null && headers.size() > 0 ) {
for(Entry<String, String> entry : headers.entrySet()){
request.addHeader(entry.getKey(), entry.getValue());
}
}
}
}
2. 上述代码中的 Request.java 类,定义url,服务器返回数据,post的请求params,下载进度等参数定义如下:/**
* @author Mr.傅
*/
public class Request {
public enum RequestMethod{
GET,POST,DELETE,PUT
}
RequestMethod requestMethod;
public String url;
/**
* Http请求参数的类型,包括表单,string, byte等
*/
public HttpEntity entity;
public Map<String, String> headers;
public static final String ENCODING = "UTF-8";
/**
* 设置回调接口,该接口中的onSuccess和onFilure方法需要在体现在UI线程当中
*/
public ICallback callback;
private RequestTask task;
public Request(String url, RequestMethod method) {
this.url = url;
this.requestMethod = method;
}
public void setEntity(ArrayList<NameValuePair> forms){
try {
entity = new UrlEncodedFormEntity(forms, ENCODING);
} catch (UnsupportedEncodingException e) {
e.printStackTrace();
}
}
public void setEntity(String postContent){
try {
entity = new StringEntity(postContent, ENCODING);
} catch (UnsupportedEncodingException e) {
e.printStackTrace();
}
}
public void setEntity(byte[] bytes){
entity = new ByteArrayEntity(bytes);
}
/**
* 设置回调方法,在ui线程中定义需要请求 返回的 方法
* @param callback
*/
public void setCallback(ICallback callback) {
this.callback = callback;
}
/**
* UI线程中,执行该方法,开启一个AsyncTask,注意AsyncTask每次使用必须重新new
*/
public void execute() {
task = new RequestTask(this);
task.execute();
}
} 3. ICallback接口,该接口的onFilure和onSuccess方法在UI线程当中实现,如果在RequestTask中doInBackground中HttpResponse返回成功则在onPostExecute中调用onSuccess,否则调用onFilure,并传递已经解析了的返回参数:
public interface ICallback {
void onFilure(Exception result);
void onSuccess(Object result);
/**
* 将从服务器得到的HttpResponse进行解析,解析完成以后,返回给UI线程
*/
Object handle(HttpResponse response);
}
4. RequestTask 继承自 AsyncTask ,在doInBackground 进行HTTP请求,同时对HTTP请求返回的数据结果进行解析,通过调用callback中的handle方法,解析HTTP请求返回的参数,返回后的结果(如果抛出异常,将异常也返回),在onPostExecute中进行处理,调用不同的方法,返回到UI线程,代码如下:
/**
* @author Mr.傅
* @version create time:2014年5月17日 下午2:19:39
*/
public class RequestTask extends AsyncTask<Object, Integer, Object> {
private Request request;

public RequestTask(Request request) {
super();
this.request = request;
}
@Override
protected Object doInBackground(Object... params) {
try {
HttpResponse response = HttpClientUtil.excute(request);
//response 解析代码放到对应的类中,对应handle中的bindData方法
return request.callback.handle(response);
} catch (Exception e) {
return e;
}
}

@Override
protected void onPostExecute(Object result) {
super.onPostExecute(result);
if (result instanceof Exception) {//失败
request.callback.onFilure((Exception)result);
}else {//成功
request.callback.onSuccess(result);
}
}
}
5. AbstractCallback.java 该类 中实现接口 ICallback 的 handle 方法,该方法主要作用是,对HTTP返回的HttpResponse 进行解析,如果返回状态码是200,则进行下一步处理;如果UI调用了setPath()方法,设置了保存的路径的话,就将HTTP返回的数据先写入到文件中,然后文件中读取出来,放入到对应的解析实现类中,如:StringCallback,JsonCallback等,返回到doInBackground 中(doInBackground 中的return request.callback.handle(response)步骤)。如果没有设置路径,则直接调用bindData(EntityUtils.toString(entity)),
放入到具体的Callback中进行处理,然后返回到doInBackground中进行下一步处理。
/**
* @author Mr.傅
*/
public abstract class AbstractCallback implements ICallback{
/**
* 文件存放的路径
*/
public String path;
private static final int IO_BUFFER_SIZE = 4*1024;

@Override
public Object handle(HttpResponse response){
// file, json, xml, image, string
int statusCode = -1;
InputStream in = null;
try {
HttpEntity entity = response.getEntity();
statusCode = response.getStatusLine().getStatusCode();
switch (statusCode) {
case HttpStatus.SC_OK:
if (TextUtil.isValidate(path)) {
//将服务器返回的数据写入到文件当中
FileOutputStream fos = new FileOutputStream(path);
if (entity.getContentEncoding() != null) {
String encoding = entity.getContentEncoding().getValue();
if (encoding != null && "gzip".equalsIgnoreCase(encoding)) {
in = new GZIPInputStream(entity.getContent());
} if (encoding != null && "deflate".equalsIgnoreCase(encoding)) {
in = new InflaterInputStream(entity.getContent());
}
} else {
in = entity.getContent();
}
byte[] b = new byte[IO_BUFFER_SIZE];
int read;
while ((read = in.read(b)) != -1) {
// TODO update progress
fos.write(b, 0, read);
}
fos.flush();
fos.close();
in.close();
//写入文件之后,再从文件当中将数据读取出来,直接返回对象
return bindData(path);
} else {
// 需要返回的是对象,而不是数据流,所以需要去解析服务器返回的数据
// 对应StringCallback 中的return content;
//2. 调用binData
return bindData(EntityUtils.toString(entity));
}
default:
break;
}
return null;
} catch (ParseException e) {
//这些异常处理都没有进行操作,后面的文章会再做处理
} catch (IOException e) {
}
return null;
}

/**
* 数据放入到不同的Callback中处理
*/
protected Object bindData(String content){
//StringCallback等方法中实现了该方法
return null;
}

/**
* 如果要存入到文件,则设置文件路径
*/
public AbstractCallback setPath(String path){
this.path = path;
return this;
}
}
6. StringCallback.java 目前的代码,只实现了该callback,JsonCallback,PathCallback,会在后面的文章当中具体实现:public abstract class StringCallback extends AbstractCallback {
@Override
protected Object bindData(String content) {
//如果路径存在,则重新讲数据从文件中读取出来
if (TextUtil.isValidate(path)) {
return IOUtiliteies.readFromFile(path);
}
return content;
}
} 7. 当中用到的TextUtil.java 类
public class TextUtil {
public static boolean isValidate(String content){
return content != null && !"".equals(content.trim());
}
public static boolean isValidate(ArrayList<NameValuePair> content){
return content != null && content.size() > 0;
}
}
8. UI线程中具体调用方法如下:private void requestString() {
//设置保存路径
String path = Environment.getExternalStorageDirectory().getAbsolutePath() + File.separator + "mrfu_http.txt";
Request request = new Request("http://www.baidu.com", RequestMethod.GET);
request.setCallback(new StringCallback() {
@Override
public void onSuccess(Object result) {
mTestResultLabel.setText((String)result);
}
@Override
public void onFilure(Exception result) {
result.printStackTrace();
}
}.setPath(path));
request.execute();
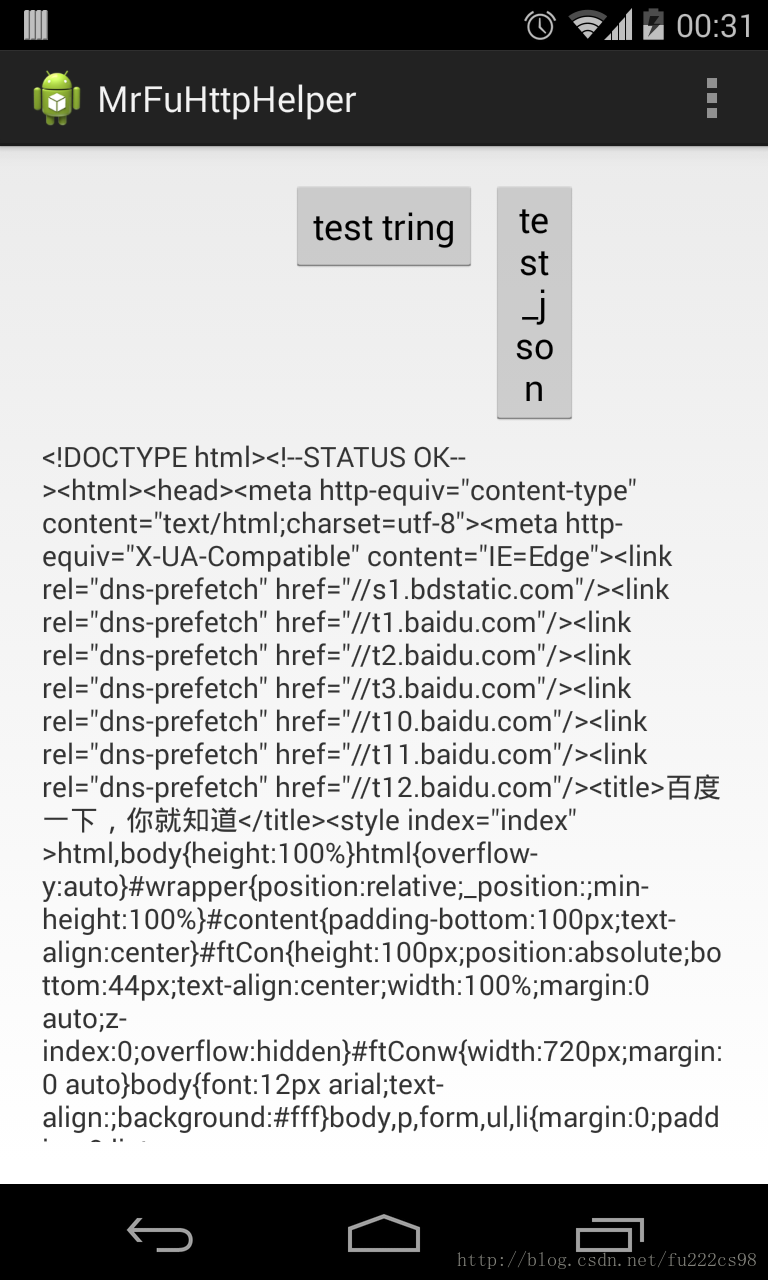
}其中mTestResultLabel 是TextView
可以看到实现效果,这里我们在SD卡的根目录下将返回结果存入到了 "mrfu_http.txt" 文件中,同时显示到了 UI 上面:如图所示:
这里的这只是一个最初步的框架,可以看到很多的操作都没有处理,如 Json解析,下载进度更新,随时取消请求,对返回的对象进行预处理操作,以及异常处理都没有具体的去实现,而且里面的一些代码结构也不够完善,如直接对Object进行操作。
后面的文章中会将该框架逐步晚上,包括上面提到的。
特别感谢stay老师在这当中的帮助。让我在框架学习这块实打实的迈出了第一步!
欢迎转载,转载注明出处,谢谢
Mr.傅

相关文章推荐
- Android学习之——自己搭建Http框架(2)——框架扩展
- Android学习之——自己搭建Http框架(2)——框架扩展
- Android学习之——自己搭建Http框架(2)——框架扩展
- Android学习之——自己搭建Http框架(2)——框架扩展
- Android学习之——自己搭建Http框架(2)——框架扩展
- android网络请求框架的学习之路——浅谈对Volley,OkHttp,Retrofit的了解与对比
- android 网络框架学习(okhttp,retrofit,rxjava)
- 新浪微博Android客户端学习记录二:系统主框架搭建
- Android中Http网络请求库框架Volley和Asnyc-http的使用---第三方库学习笔记(一)
- android ui定义自己的dialog(项目框架搭建时就写好,之后事半功倍)
- Android框架学习笔记01Okhttp框架
- 自己搭建Android项目框架必备的框架与第三方应用
- 移动端跨平台开发框架 Cordova 学习笔记(一) 环境搭建及创建第一个 Cordova Android APP
- Android开源框架android-async-http的学习
- android 学习随笔十一(网络:HttpClient框架)
- Android : 自己写个HTTP框架
- android网络框架volley学习之HttpStack接口
- Android 网络操作学习HttpURLConnection与HttpClient及网络框架选择
- android 学习随笔十一(网络:HttpClient框架)