Linux项目实战之基于IP的虚拟主机
2014-04-19 22:45
585 查看
Linux项目实战之基于IP的虚拟主机
说明:
服务器上有多块网卡,每块网卡对应一个IP地址,每个地址绑定一个域名。
补充:
多网卡实现方法:(1)多个物理网卡(2)多个虚拟网卡,例如eth0:0 eth0:1 ……
实验环境:
服务器安装了Apache httpd服务(有测试网页,站点位置/var/www/html/index.html)一台主机、一个物理网卡eth0(在此基础上再创建eth0:0 eth0:1两个虚拟网卡)win 7客户端
实验目标:
通过客户端访问同一主机上的不同域名不同IP
www.tarena.com192.168.10.10
www.baidu.com192.168.10.11www.google.com192.168.10.12
步骤:
(1)创建虚拟网卡
[root@localhost ~]# cd /etc/sysconfig/network-scripts/
[root@localhost network-scripts]# cp ifg-eth0 ifg-eth0:0
[root@localhost network-scripts]# cp ifg-eth0 ifg-eth0:1
[root@localhost network-scripts]# vim ifg-eth0:0
[root@localhost network-scripts]# vim ifg-eth0:1
[root@localhost network-scripts]# service network restart
网卡内容:
eth0:
DEVICE=eth0
BOOTPROTO=static
IPADDR=192.168.1.254
NETMASK=255.255.255.0
HWADDR=00:0C:29:E5:7C:DF
ONBOOT=yes
eth0:0
DEVICE=eth0:0
BOOTPROTO=static
IPADDR=192.168.1.253
NETMASK=255.255.255.0
HWADDR=00:0C:29:E5:7C:DF
ONBOOT=yes
eth0:1
DEVICE=eth0:1
BOOTPROTO=static
IPADDR=192.168.1.252
NETMASK=255.255.255.0
HWADDR=00:0C:29:E5:7C:DF
ONBOOT=yes
(2)修改主配置文件
[root@localhost ~]#vim /etc/httpd/conf.d/virt.conf //在配置目录文件中创建并编辑virt.conf虚拟主机配置文件
virt.conf虚拟主机配置文件内容(可以参考主配置文件/etc/httpd/conf/httpd中的模板)
<VirtualHost 192.168.10.10:80>
DocumentRoot /var/www/ht ServerName www.tarena.com ErrorLog logs/tarena.com-error_log
CustomLog logs/tarena.com-access_log common
</VirtualHost>
<VirtualHost 192.168.10.11:80>
DocumentRoot /data/web/baidu
ServerName www.baidu.com
ErrorLog logs/baidu.com-error_log
CustomLog logs/baidu.com-access_log common
</VirtualHost>
<VirtualHost 192.168.10.12:80>
DocumentRoot /data/web/google
ServerName www.google.com
ErrorLog logs/google.com-error_log
CustomLog logs/google.com-access_log common
</VirtualHost>
(3)启动服务
[root@localhost ~]# service httpd restart
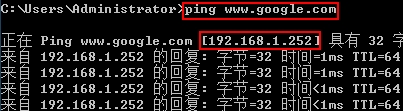
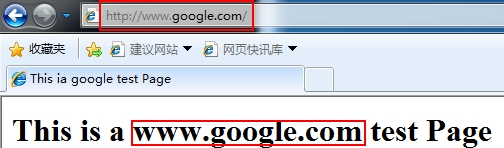
(4)客户端测试(注意更改hosts文件)
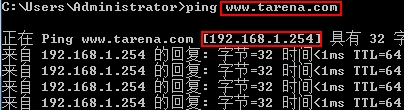
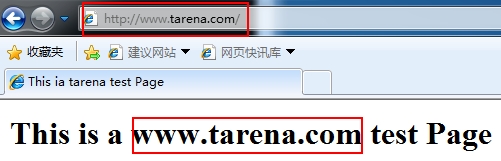
在地址栏输入:http://www.tarena.com
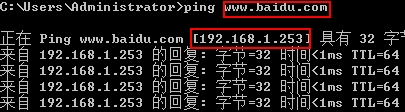
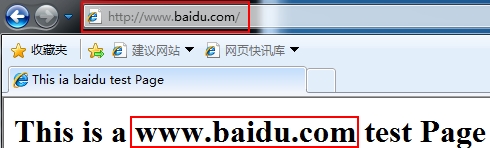
在地址栏输入:http://www.baidu.com
在地址栏输入:http://www.google.com
附:
各站点日志文件:
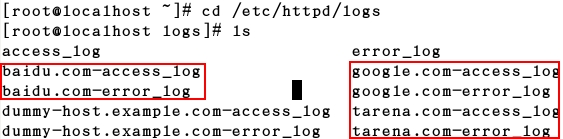
虚拟主机配置文件内容模板:
#vim /etc/httpd/conf/httpd.conf

说明:
服务器上有多块网卡,每块网卡对应一个IP地址,每个地址绑定一个域名。
补充:
多网卡实现方法:(1)多个物理网卡(2)多个虚拟网卡,例如eth0:0 eth0:1 ……
实验环境:
服务器安装了Apache httpd服务(有测试网页,站点位置/var/www/html/index.html)一台主机、一个物理网卡eth0(在此基础上再创建eth0:0 eth0:1两个虚拟网卡)win 7客户端
实验目标:
通过客户端访问同一主机上的不同域名不同IP
www.tarena.com192.168.10.10
www.baidu.com192.168.10.11www.google.com192.168.10.12
步骤:
(1)创建虚拟网卡
[root@localhost ~]# cd /etc/sysconfig/network-scripts/
[root@localhost network-scripts]# cp ifg-eth0 ifg-eth0:0
[root@localhost network-scripts]# cp ifg-eth0 ifg-eth0:1
[root@localhost network-scripts]# vim ifg-eth0:0
[root@localhost network-scripts]# vim ifg-eth0:1
[root@localhost network-scripts]# service network restart
网卡内容:
eth0:
DEVICE=eth0
BOOTPROTO=static
IPADDR=192.168.1.254
NETMASK=255.255.255.0
HWADDR=00:0C:29:E5:7C:DF
ONBOOT=yes
eth0:0
DEVICE=eth0:0
BOOTPROTO=static
IPADDR=192.168.1.253
NETMASK=255.255.255.0
HWADDR=00:0C:29:E5:7C:DF
ONBOOT=yes
eth0:1
DEVICE=eth0:1
BOOTPROTO=static
IPADDR=192.168.1.252
NETMASK=255.255.255.0
HWADDR=00:0C:29:E5:7C:DF
ONBOOT=yes
(2)修改主配置文件
[root@localhost ~]#vim /etc/httpd/conf.d/virt.conf //在配置目录文件中创建并编辑virt.conf虚拟主机配置文件
virt.conf虚拟主机配置文件内容(可以参考主配置文件/etc/httpd/conf/httpd中的模板)
<VirtualHost 192.168.10.10:80>
DocumentRoot /var/www/ht ServerName www.tarena.com ErrorLog logs/tarena.com-error_log
CustomLog logs/tarena.com-access_log common
</VirtualHost>
<VirtualHost 192.168.10.11:80>
DocumentRoot /data/web/baidu
ServerName www.baidu.com
ErrorLog logs/baidu.com-error_log
CustomLog logs/baidu.com-access_log common
</VirtualHost>
<VirtualHost 192.168.10.12:80>
DocumentRoot /data/web/google
ServerName www.google.com
ErrorLog logs/google.com-error_log
CustomLog logs/google.com-access_log common
</VirtualHost>
(3)启动服务
[root@localhost ~]# service httpd restart
(4)客户端测试(注意更改hosts文件)
在地址栏输入:http://www.tarena.com
在地址栏输入:http://www.baidu.com
在地址栏输入:http://www.google.com
附:
各站点日志文件:
虚拟主机配置文件内容模板:
#vim /etc/httpd/conf/httpd.conf

相关文章推荐
- 小心服务器内存居高不下的元凶--WebAPI服务
- 10 篇对初学者和专家都有用的 Linux 命令教程
- Linux 与 Windows 对UNICODE 的处理方式
- Ubuntu12.04下QQ完美走起啊!走起啊!有木有啊!
- 解決Linux下Android开发真机调试设备不被识别问题
- 运维入门
- 运维提升
- Linux 自检和 SystemTap
- Ubuntu Linux使用体验
- c语言实现hashmap(转载)
- Linux 信号signal处理机制
- linux下mysql添加用户
- Scientific Linux 5.5 图形安装教程
- 基于 Linux 集群环境上 GPFS 的问题诊断
- 谁是桌面王者?Win PK Linux三大镇山之宝
- vivi下重新调整分区
- Linux VS Unix:Linux欲一统天下 Unix不死
- linux下设定环境变量