iOS7新特性之TextKit(二)FontResizeDemo扩展
2014-04-19 16:16
316 查看
在写完了FontResize_Demo之后,在这个Demo的基础上我又进行了一些扩展。在这个过程中我又感受到了Xcode 5带来的一些新特性,感觉非常有用。在写这个扩展Demo时也遇到了一些大大小小的问题,下面从头说起。
原来的Demo中仅可以对UTextView中的文字大小做出调整,在IntroduceToTextkit的Categories中包含了对UILabel和UITextField的文字大小做出调整的类别,所以我首先为文本阅读界面加了一个标题标签,并可以对标签中的文字大小做出调整。调整的原理和UITextView相似,不再赘述。
下面从功能上的扩展从头说起。
(一)添加搜索栏
本来想添加一个UITextField类型的组件来对其中的文字大小做出调整,后来直接在程序中加了一个搜索栏UISearchBar,这是我第一次使用搜索栏。总结一下:
1.首先要在类中声明遵守UISearchBarDelegate:
[cpp] view
plaincopy
@interface FontResizeViewController () <UISearchBarDelegate, UITextViewDelegate> // confirm to UISearchBarDelegate and UITextViewDelegate
2.在视图中添加UISearchBar组件:
[cpp] view
plaincopy
// 添加搜索栏
self.searchBar = [[UISearchBar alloc] initWithFrame:CGRectMake(0.0, self.view.frame.size.height - 40.0, self.view.frame.size.width, 40.0)];
self.searchBar.placeholder = @"Please input the book name"; // 设置placeholder可以显示提醒用户的文字
self.searchBar.showsCancelButton = YES; // 显示cancel按钮
self.searchBar.delegate = self; // 设置searchBar的UISearchBarDelegate为self
[self.view addSubview:self.searchBar];
其中placeholder用于显示浅灰色的文字,一般用于提示用户,这段文字不需要用户手动去删除。
showsCancelButton可以在搜索栏中显示cancel按钮,可以以相似的方法在搜索栏中显示其他按钮。
注意最后一定设置好委托,否则无法响应下面实现的委托方法。
3.实现委托中定制的方法:
[cpp] view
plaincopy
// UISearchBarDelegate
// 在搜索栏输入文字完成后点击search后的动作
-(void)searchBarSearchButtonClicked:(UISearchBar *)searchBar
{
shouldRespondToTap = NO; // 搜索栏消失,所以可以不用响应点击事件再次使搜索栏消失
// 搜索栏及键盘消失
[searchBar resignFirstResponder];
self.searchBar.hidden = YES;
// 设置标题内容
self.bookTitle = [[NSMutableAttributedString alloc] initWithString:searchBar.text];
self.titleLabel.attributedText = self.bookTitle;
// 设置文本视图内容
NSURL *url = nil;
url = [[NSBundle mainBundle] URLForResource:searchBar.text withExtension:nil];
NSMutableAttributedString *attributedTextHolder = [[NSMutableAttributedString alloc] initWithFileURL:url options:@{} documentAttributes:nil error:nil];
[attributedTextHolder addAttribute:NSFontAttributeName value:[UIFont preferredFontForTextStyle:UIFontTextStyleBody] range:NSMakeRange(0, attributedTextHolder.length)];
/*
NSString *newFlatText = [[[NSAttributedString alloc] initWithFileURL:url options:@{} documentAttributes:nil error:nil] string];
NSAttributedString *attributedString = [[NSAttributedString alloc] initWithString:newFlatText attributes:@{NSFontAttributeName: [UIFont preferredFontForTextStyle:UIFontTextStyleBody]}];
*/
self.content = [attributedTextHolder copy];
self.textView.attributedText = self.content;
self.textView.editable = NO;
self.textView.dataDetectorTypes = UIDataDetectorTypeAll; // 为文本中如网址,号码等内容添加下划线链接状态,可以响应用户的点击动作
}
// 点击搜索栏的cancel按钮后的动作
-(void)searchBarCancelButtonClicked:(UISearchBar *)searchBar
{
shouldRespondToTap = NO; // 搜索栏消失,所以可以不用响应点击事件再次使搜索栏消失
// 搜索栏及键盘消失
[searchBar resignFirstResponder];
self.searchBar.hidden = YES;
}
在这里不得不赞一下Xcode 5一个非常棒的功能改进,就是在IB中增加了属性设置的代码方法提示信息,如下所示:
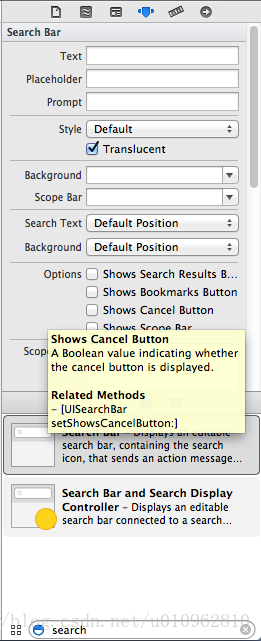
在Shows Canel Button的提示信息中包含了该属性的作用以及相关的方法。
(二)添加手势识别来显示和隐藏搜索栏
搜索栏的作用时在搜索栏中输入书名后,如book.txt(因为同一个电子书可能有多种格式如book.txt,book.rtf,所以要输入包括后缀的完整书名),点击Search将在文本视图中加载对应电子书的内容。为了不妨碍读者阅读,必须使搜索栏隐藏或者键盘隐藏起来,但是又要在用户需求时使搜索栏重新出现(如输入新的书名来打开新的电子书),为了高效利用页面,我绝不打算用按钮, 最后我使用了手势来实现。
[cpp] view
plaincopy
@property (nonatomic, strong) UILongPressGestureRecognizer *longPress; // 长按手势识别器
@property (nonatomic, strong) UITapGestureRecognizer *tap; // 轻击手势识别器
定义了长按和轻击两个手势识别器。
[cpp] view
plaincopy
// 添加底部标签
CGRect rect = self.view.frame;
self.bottomLabel = [[UILabel alloc] initWithFrame:CGRectMake(0.0, rect.size.height - 100.0, rect.size.width, 100.0)];
self.bottomLabel.userInteractionEnabled = YES; // 为了识别用户的手势,必须使userInteractionEnabled为YES
self.bottomLabel.text = @""; // 该标签不能用于显示文字
[self.view addSubview:self.bottomLabel];
// 在标签中添加长按手势识别器,当用户在底部标签区域长按时显示搜索栏
self.longPress = [[UILongPressGestureRecognizer alloc] initWithTarget:self action:@selector(showSearchBar:)];
[self.bottomLabel addGestureRecognizer:self.longPress];
首先设置了一个处于底部内容空白的标签bottomLabel,然后在bottomLabel中添加长按手势识别器。特别注意的是,由于标签本身是不能相应用户的触按事件的,所以必须要设置userInteractionEnabled属性为YES。
当用户轻击整个视图时,搜索栏隐藏,轻击手势定义如下:
[cpp] view
plaincopy
// 在视图中添加轻击手势识别器,当用户轻击视图时隐藏搜索栏并取消之前文字的选中状态
self.tap = [[UITapGestureRecognizer alloc] initWithTarget:self action:@selector(hideSearchBar:)];
[self.view addGestureRecognizer:self.tap];
响应的方法为:
[cpp] view
plaincopy
-(void)hideSearchBar:(UITapGestureRecognizer *)tap
{
[self.textView resignFirstResponder]; // 如果用户之前选中了一段文字,用该方法可以使文字取消选中状态
// 若视图响应轻击事件
if (shouldRespondToTap) {
[self.searchBar resignFirstResponder]; // 搜索栏的resignFirstResponder方法可以使得键盘消失
self.searchBar.hidden = YES; // 隐藏搜索栏
}
}
如果用户看的是一些学术性文章,可能需要复制文字,因此我认为绝不能使文本的selectable属性为NO,但在实际运行程序时我发现当用户选择完一段文字,在点击视图或者点击copy等选项后,并不能取消对文字的选中状态,所以我使用了以下方法:
[cpp] view
plaincopy
[self.textView resignFirstResponder]; // 如果用户之前选中了一段文字,用该方法可以使文字取消选中状态
当搜索栏消失时,用户输入时出现的键盘可能没有消失,所以要使用方法
[cpp] view
plaincopy
[self.searchBar resignFirstResponder]; // 搜索栏的resignFirstResponder方法可以使得键盘消失
来实现键盘的消失。
说到底都是使用resignFirstResponder方法。
相信在iOS6以前很多初学者都对键盘消失的方法烦恼而已,如今iOS7出了两个官方的方法来实现这个功能。
先看看我在程序中添加的方法:
[cpp] view
plaincopy
self.textView.keyboardDismissMode = UIScrollViewKeyboardDismissModeOnDrag; // 设置键盘的消失方式为拖拉页面,iOS7新增特性
// self.textView.keyboardDismissMode = UIScrollViewKeyboardDismissModeInteractive; // 设置键盘的消失方式为拖拉并点击页面,iOS7新增特性
这是ios7 sdk包中的定义:
[cpp] view
plaincopy
typedef NS_ENUM(NSInteger, UIScrollViewKeyboardDismissMode) {
UIScrollViewKeyboardDismissModeNone,
UIScrollViewKeyboardDismissModeOnDrag, // dismisses the keyboard when a drag begins
UIScrollViewKeyboardDismissModeInteractive, // the keyboard follows the dragging touch off screen, and may be pulled upward again to cancel the dismiss
} NS_ENUM_AVAILABLE_IOS(7_0);
不得不承认这个结构体的确可以简化程序的编写,但这种方式也是有局限性的。例如当视图无法滚动时就无法响应UIScrollViewKeyboardDismissModeOnDrag,更加不要说UIScrollViewKeyboardDismissModeInterative了。希望官方以后还可以有更多改进。
当用户长按bottomLabel(该标签是没有文字的,所以看不见,但是只要在屏幕视图底部区域长按就可以了)时可以显示搜索栏,长按手势响应的方法为:
[cpp] view
plaincopy
-(void)showSearchBar:(UILongPressGestureRecognizer *)longPress
{
shouldRespondToTap = YES; // 搜索栏出现,视图必须响应轻击事件
self.searchBar.frame = CGRectMake(0.0, self.view.frame.size.height - 40.0, self.view.frame.size.width, 40.0); // 设置搜索栏的位置在视图底部
self.searchBar.hidden = NO; // 显示搜索栏
}
搜索栏在重新出现时,位置是在底部的,若用户点击搜索栏进行编辑,那么键盘将从下方出现,这样搜索栏就会被盖住,如果一开始直接将搜索栏放在视图中间又显得不够美观。为了动态调整搜索栏的位置,可以使用下面的方法:
首先在程序中注册一个键盘将要出现的事件监视者:
[cpp] view
plaincopy
[[NSNotificationCenter defaultCenter] addObserver:self selector:@selector(keyboardWillShow:) name:UIKeyboardWillShowNotification object:nil]; // 当键盘将要出现时发送消息给self
然后实现键盘出现时的动作:
[cpp] view
plaincopy
-(void)keyboardWillShow:(NSNotification *)noti
{
// 获得键盘的尺寸大小
NSDictionary *info = [noti userInfo];
CGSize keyboardsize = [[info objectForKey:UIKeyboardFrameEndUserInfoKey] CGRectValue].size;
// 重新设置搜索栏的位置在键盘上面
CGFloat newY = self.view.frame.size.height - keyboardsize.height - 40.0;
self.searchBar.frame = CGRectMake(0.0, newY, self.view.frame.size.width, 40.0);
}
这样就可以保持搜索栏可见并且输入文字了。
(三)在文本中显示网址,号码,地址,日历事件的链接状态
IntroduceToTextKitDemo中的Interaction就是打开文本中的http://www.apple.com。于是我打算参考这个部分在程序中打开对应的一些链接。
本来以为文本中的网址会自动变成下划线的形式,也就是提示用户这是一个链接。结果多次调整程序都做不到,这样一来无法打开对应的链接,更谈不上在新的视图中加载网页数据。
这个问题卡了我半天,通过反复比较最后终于在IB中找出了问题所在(再次赞一下Xcode 5的IB):
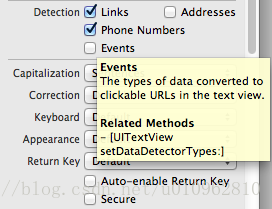
原来必须在Detection中设置对应的选项由系统进行探测。小弟太菜了,以前没用过这个功能。
在代码中可以这样设置:
[cpp] view
plaincopy
self.textView.dataDetectorTypes = UIDataDetectorTypeAll; // 为文本中如网址,号码等内容添加下划线链接状态,可以响应用户的点击动作
// self.textView.dataDetectorTypes = UIDataDetectorTypeLink; // 为文本中的网址添加下划线链接状态
这是ios sdk包中的定义:
[cpp] view
plaincopy
typedef NS_OPTIONS(NSUInteger, UIDataDetectorTypes) {
UIDataDetectorTypePhoneNumber = 1 << 0, // Phone number detection
UIDataDetectorTypeLink = 1 << 1, // URL detection
#if __IPHONE_4_0 <= __IPHONE_OS_VERSION_MAX_ALLOWED
UIDataDetectorTypeAddress = 1 << 2, // Street address detection
UIDataDetectorTypeCalendarEvent = 1 << 3, // Event detection
#endif
UIDataDetectorTypeNone = 0, // No detection at all
UIDataDetectorTypeAll = NSUIntegerMax // All types
};
(四)响应网页链接
在完成(三)以后,就可以在程序中加载这些链接了。
为了响应在程序中响应这些链接,可以通过iOS7新出的UITextViewDelegate方法:
[cpp] view
plaincopy
- (BOOL)textView:(UITextView *)textView shouldInteractWithURL:(NSURL *)URL inRange:(NSRange)characterRange NS_AVAILABLE_IOS(7_0);
在程序中实现如下:
首先要设置委托对象,这是必须的:
[cpp] view
plaincopy
self.textView.delegate = self; // 设置textView的UITextViewDelegate委托为self,如果没有设置委托那么textView将无法响应-(BOOL)textView:(UITextView *)textView shouldInteractWithURL:(NSURL *)URL inRange:
然后是实现委托中的方法:
[cpp] view
plaincopy
// UITextViewDelegate
// 当用户在textView中点击特定的链接内容时,程序是否需要作出响应
-(BOOL)textView:(UITextView *)textView shouldInteractWithURL:(NSURL *)URL inRange:(NSRange)characterRange
{
NSString *urlstr = [URL absoluteString];
// 响应以下前缀或域名的网址链接
if ([[URL host] isEqual:@"www.apple.com"] || [urlstr hasPrefix:@"http://"] || [urlstr hasPrefix:@"https://"] || [urlstr hasPrefix:@"www."]) {
AppDelegate *appDelegate = [[UIApplication sharedApplication] delegate]; // appDelegate用于调用全局变量urlvc
[self presentViewController:appDelegate.urlvc animated:YES completion:^ {
[appDelegate.urlvc.urlView.webView loadRequest:[NSURLRequest requestWithURL:URL]]; // urlView中的webView开始加载链接的网页内容
}];
return NO;
}
return YES; // 若返回YES,则打开系统中的浏览器转到链接内容
}
(五)添加网页浏览视图
先来看看类的接口部分:
[cpp] view
plaincopy
@interface URLInteractionViewController : UIViewController <UIWebViewDelegate, UIToolbarDelegate> // confirm to UIWebViewDelegate and UIToolBarDelegate
@property (nonatomic, strong) URLInteractionView *urlView; // 本试图控制器控制的视图,其内容与WebView.xib的内容相关联
@end
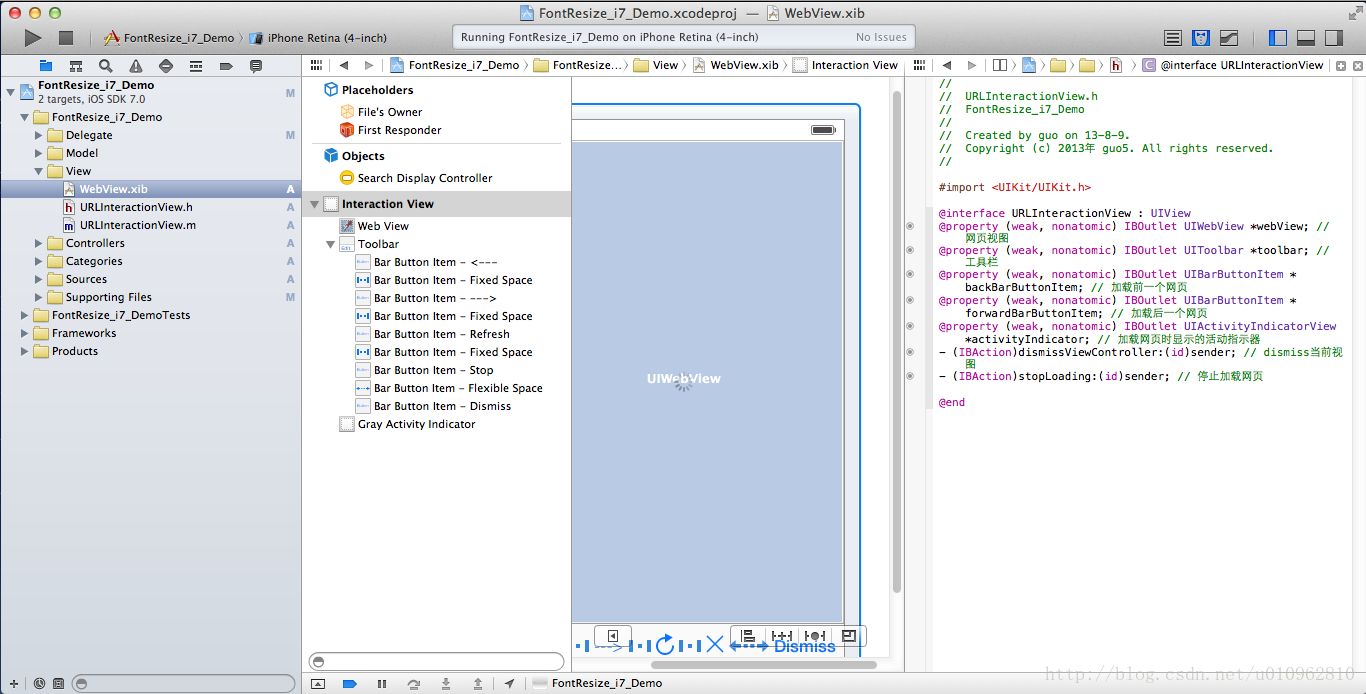
在看了IntroduceToTextKit的Interaction中的网页浏览视图后觉得做得挺有趣的,打算对照着做一个。由于网页浏览视图中有UIWebView,UIToolBar,而且UIToolBar上有多个UIBarButtonItem组件,整个GUI的布局略显麻烦,但是我没有使用故事板,本来打算纯代码实现,但是觉得界面布置略显麻烦,而且我之前没用过xib(我是iOS6才开始学习iOS开发的),所以打算实践一下xib。
初次使用,的确卡了一下。
首先我新建了一个xib文件,并且新建了一个对应的UIView子类进行布局和代码关联,如下:
随后我直接在URLInteractionViewController的viewDidLoad方法中使用[self.view addSubview:urlView];添加视图,结果无法显示我之前布局好的内容,查了一下资料,原来首要进行视图和视图控制器关联,可以在xib的File's Owner里设置和视图关联的类:

然后要在控制器类的代码中通过以下方法实现:
[cpp] view
plaincopy
- (void)viewDidLoad
{
[super viewDidLoad];
NSArray *nibarray = [[NSBundle mainBundle] loadNibNamed:@"WebView" owner:self options:nil]; // 加载WebView.xib文件
self.urlView = nibarray[0]; // 设置urlView为WebView.xib文件中的底层视图
// 设置委托为self
self.urlView.toolbar.delegate = self;
self.urlView.webView.delegate = self;
// 在视图中心加载urlView
CGRect rect = [[UIScreen mainScreen] bounds];
self.urlView.center = CGPointMake(rect.size.width / 2, rect.size.height / 2);
[self.view addSubview:self.urlView];
}
也就是说先要加载xib文件并获取xib文件中的底层视图,然后将其加载到主视图中。注意要设置好委托。
在完成页面布局以后,就到功能方面了,先看该视图的接口部分:
[cpp] view
plaincopy
@interface URLInteractionView : UIView
@property (weak, nonatomic) IBOutlet UIWebView *webView; // 网页视图
@property (weak, nonatomic) IBOutlet UIToolbar *toolbar; // 工具栏
@property (weak, nonatomic) IBOutlet UIBarButtonItem *backBarButtonItem; // 加载前一个网页
@property (weak, nonatomic) IBOutlet UIBarButtonItem *forwardBarButtonItem; // 加载后一个网页
@property (weak, nonatomic) IBOutlet UIActivityIndicatorView *activityIndicator; // 加载网页时显示的活动指示器
- (IBAction)dismissViewController:(id)sender; // dismiss当前视图
- (IBAction)stopLoading:(id)sender; // 停止加载网页
@end
工具栏有5个按钮,分别对应后退,前进,刷新,停止和解散当前页面功能。
后退和前进和刷新按钮的方法实现可以在xib中通过连接直接实现:
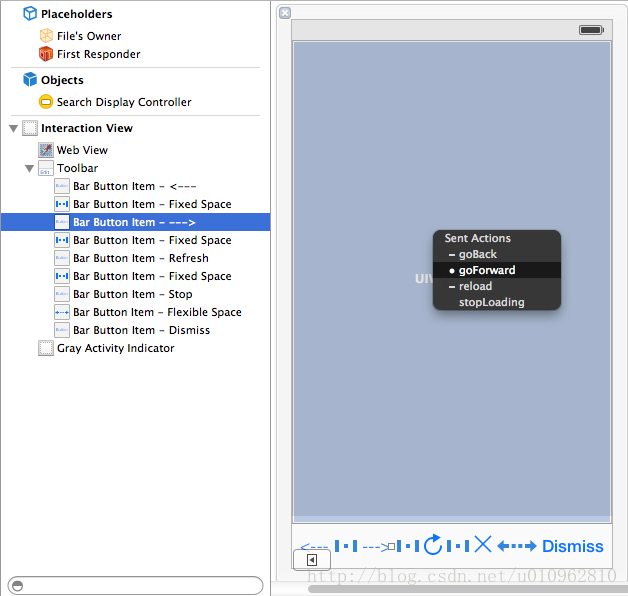
剩余的两个按钮则通过代码方法实现:
[cpp] view
plaincopy
- (IBAction)dismissViewController:(id)sender {
AppDelegate *appDelegate = [[UIApplication sharedApplication] delegate];
[appDelegate.urlvc dismissViewControllerAnimated:YES completion:^{}];
}
- (IBAction)stopLoading:(id)sender {
[self.webView stopLoading];
}
至此整个Demo大功告成。可能单纯贴代码和写文字有点乱,可以在我的资源中下载对应的Demo对照着看一下。
这个Demo涉及到TextKit和iOS7的新特性的东西还是比较少的,主要还是UITextViewDelegate的新方法的使用:
[cpp] view
plaincopy
- (BOOL)textView:(UITextView *)textView shouldInteractWithURL:(NSURL *)URL inRange:(NSRange)characterRange NS_AVAILABLE_IOS(7_0);
以及Xcode 5的一些使用感想和心得,主要还是尝试一下很多以前自己没有使用过的知识点,如使用UISearchBar组件和实现UISearchBarDelegate,初次使用xib,获得keyboard的size,在程序中添加事件监听器,UIBarButtonItem对应方法的实现等。
原来的Demo中仅可以对UTextView中的文字大小做出调整,在IntroduceToTextkit的Categories中包含了对UILabel和UITextField的文字大小做出调整的类别,所以我首先为文本阅读界面加了一个标题标签,并可以对标签中的文字大小做出调整。调整的原理和UITextView相似,不再赘述。
下面从功能上的扩展从头说起。
(一)添加搜索栏
本来想添加一个UITextField类型的组件来对其中的文字大小做出调整,后来直接在程序中加了一个搜索栏UISearchBar,这是我第一次使用搜索栏。总结一下:
1.首先要在类中声明遵守UISearchBarDelegate:
[cpp] view
plaincopy
@interface FontResizeViewController () <UISearchBarDelegate, UITextViewDelegate> // confirm to UISearchBarDelegate and UITextViewDelegate
2.在视图中添加UISearchBar组件:
[cpp] view
plaincopy
// 添加搜索栏
self.searchBar = [[UISearchBar alloc] initWithFrame:CGRectMake(0.0, self.view.frame.size.height - 40.0, self.view.frame.size.width, 40.0)];
self.searchBar.placeholder = @"Please input the book name"; // 设置placeholder可以显示提醒用户的文字
self.searchBar.showsCancelButton = YES; // 显示cancel按钮
self.searchBar.delegate = self; // 设置searchBar的UISearchBarDelegate为self
[self.view addSubview:self.searchBar];
其中placeholder用于显示浅灰色的文字,一般用于提示用户,这段文字不需要用户手动去删除。
showsCancelButton可以在搜索栏中显示cancel按钮,可以以相似的方法在搜索栏中显示其他按钮。
注意最后一定设置好委托,否则无法响应下面实现的委托方法。
3.实现委托中定制的方法:
[cpp] view
plaincopy
// UISearchBarDelegate
// 在搜索栏输入文字完成后点击search后的动作
-(void)searchBarSearchButtonClicked:(UISearchBar *)searchBar
{
shouldRespondToTap = NO; // 搜索栏消失,所以可以不用响应点击事件再次使搜索栏消失
// 搜索栏及键盘消失
[searchBar resignFirstResponder];
self.searchBar.hidden = YES;
// 设置标题内容
self.bookTitle = [[NSMutableAttributedString alloc] initWithString:searchBar.text];
self.titleLabel.attributedText = self.bookTitle;
// 设置文本视图内容
NSURL *url = nil;
url = [[NSBundle mainBundle] URLForResource:searchBar.text withExtension:nil];
NSMutableAttributedString *attributedTextHolder = [[NSMutableAttributedString alloc] initWithFileURL:url options:@{} documentAttributes:nil error:nil];
[attributedTextHolder addAttribute:NSFontAttributeName value:[UIFont preferredFontForTextStyle:UIFontTextStyleBody] range:NSMakeRange(0, attributedTextHolder.length)];
/*
NSString *newFlatText = [[[NSAttributedString alloc] initWithFileURL:url options:@{} documentAttributes:nil error:nil] string];
NSAttributedString *attributedString = [[NSAttributedString alloc] initWithString:newFlatText attributes:@{NSFontAttributeName: [UIFont preferredFontForTextStyle:UIFontTextStyleBody]}];
*/
self.content = [attributedTextHolder copy];
self.textView.attributedText = self.content;
self.textView.editable = NO;
self.textView.dataDetectorTypes = UIDataDetectorTypeAll; // 为文本中如网址,号码等内容添加下划线链接状态,可以响应用户的点击动作
}
// 点击搜索栏的cancel按钮后的动作
-(void)searchBarCancelButtonClicked:(UISearchBar *)searchBar
{
shouldRespondToTap = NO; // 搜索栏消失,所以可以不用响应点击事件再次使搜索栏消失
// 搜索栏及键盘消失
[searchBar resignFirstResponder];
self.searchBar.hidden = YES;
}
在这里不得不赞一下Xcode 5一个非常棒的功能改进,就是在IB中增加了属性设置的代码方法提示信息,如下所示:
在Shows Canel Button的提示信息中包含了该属性的作用以及相关的方法。
(二)添加手势识别来显示和隐藏搜索栏
搜索栏的作用时在搜索栏中输入书名后,如book.txt(因为同一个电子书可能有多种格式如book.txt,book.rtf,所以要输入包括后缀的完整书名),点击Search将在文本视图中加载对应电子书的内容。为了不妨碍读者阅读,必须使搜索栏隐藏或者键盘隐藏起来,但是又要在用户需求时使搜索栏重新出现(如输入新的书名来打开新的电子书),为了高效利用页面,我绝不打算用按钮, 最后我使用了手势来实现。
[cpp] view
plaincopy
@property (nonatomic, strong) UILongPressGestureRecognizer *longPress; // 长按手势识别器
@property (nonatomic, strong) UITapGestureRecognizer *tap; // 轻击手势识别器
定义了长按和轻击两个手势识别器。
[cpp] view
plaincopy
// 添加底部标签
CGRect rect = self.view.frame;
self.bottomLabel = [[UILabel alloc] initWithFrame:CGRectMake(0.0, rect.size.height - 100.0, rect.size.width, 100.0)];
self.bottomLabel.userInteractionEnabled = YES; // 为了识别用户的手势,必须使userInteractionEnabled为YES
self.bottomLabel.text = @""; // 该标签不能用于显示文字
[self.view addSubview:self.bottomLabel];
// 在标签中添加长按手势识别器,当用户在底部标签区域长按时显示搜索栏
self.longPress = [[UILongPressGestureRecognizer alloc] initWithTarget:self action:@selector(showSearchBar:)];
[self.bottomLabel addGestureRecognizer:self.longPress];
首先设置了一个处于底部内容空白的标签bottomLabel,然后在bottomLabel中添加长按手势识别器。特别注意的是,由于标签本身是不能相应用户的触按事件的,所以必须要设置userInteractionEnabled属性为YES。
当用户轻击整个视图时,搜索栏隐藏,轻击手势定义如下:
[cpp] view
plaincopy
// 在视图中添加轻击手势识别器,当用户轻击视图时隐藏搜索栏并取消之前文字的选中状态
self.tap = [[UITapGestureRecognizer alloc] initWithTarget:self action:@selector(hideSearchBar:)];
[self.view addGestureRecognizer:self.tap];
响应的方法为:
[cpp] view
plaincopy
-(void)hideSearchBar:(UITapGestureRecognizer *)tap
{
[self.textView resignFirstResponder]; // 如果用户之前选中了一段文字,用该方法可以使文字取消选中状态
// 若视图响应轻击事件
if (shouldRespondToTap) {
[self.searchBar resignFirstResponder]; // 搜索栏的resignFirstResponder方法可以使得键盘消失
self.searchBar.hidden = YES; // 隐藏搜索栏
}
}
如果用户看的是一些学术性文章,可能需要复制文字,因此我认为绝不能使文本的selectable属性为NO,但在实际运行程序时我发现当用户选择完一段文字,在点击视图或者点击copy等选项后,并不能取消对文字的选中状态,所以我使用了以下方法:
[cpp] view
plaincopy
[self.textView resignFirstResponder]; // 如果用户之前选中了一段文字,用该方法可以使文字取消选中状态
当搜索栏消失时,用户输入时出现的键盘可能没有消失,所以要使用方法
[cpp] view
plaincopy
[self.searchBar resignFirstResponder]; // 搜索栏的resignFirstResponder方法可以使得键盘消失
来实现键盘的消失。
说到底都是使用resignFirstResponder方法。
相信在iOS6以前很多初学者都对键盘消失的方法烦恼而已,如今iOS7出了两个官方的方法来实现这个功能。
先看看我在程序中添加的方法:
[cpp] view
plaincopy
self.textView.keyboardDismissMode = UIScrollViewKeyboardDismissModeOnDrag; // 设置键盘的消失方式为拖拉页面,iOS7新增特性
// self.textView.keyboardDismissMode = UIScrollViewKeyboardDismissModeInteractive; // 设置键盘的消失方式为拖拉并点击页面,iOS7新增特性
这是ios7 sdk包中的定义:
[cpp] view
plaincopy
typedef NS_ENUM(NSInteger, UIScrollViewKeyboardDismissMode) {
UIScrollViewKeyboardDismissModeNone,
UIScrollViewKeyboardDismissModeOnDrag, // dismisses the keyboard when a drag begins
UIScrollViewKeyboardDismissModeInteractive, // the keyboard follows the dragging touch off screen, and may be pulled upward again to cancel the dismiss
} NS_ENUM_AVAILABLE_IOS(7_0);
不得不承认这个结构体的确可以简化程序的编写,但这种方式也是有局限性的。例如当视图无法滚动时就无法响应UIScrollViewKeyboardDismissModeOnDrag,更加不要说UIScrollViewKeyboardDismissModeInterative了。希望官方以后还可以有更多改进。
当用户长按bottomLabel(该标签是没有文字的,所以看不见,但是只要在屏幕视图底部区域长按就可以了)时可以显示搜索栏,长按手势响应的方法为:
[cpp] view
plaincopy
-(void)showSearchBar:(UILongPressGestureRecognizer *)longPress
{
shouldRespondToTap = YES; // 搜索栏出现,视图必须响应轻击事件
self.searchBar.frame = CGRectMake(0.0, self.view.frame.size.height - 40.0, self.view.frame.size.width, 40.0); // 设置搜索栏的位置在视图底部
self.searchBar.hidden = NO; // 显示搜索栏
}
搜索栏在重新出现时,位置是在底部的,若用户点击搜索栏进行编辑,那么键盘将从下方出现,这样搜索栏就会被盖住,如果一开始直接将搜索栏放在视图中间又显得不够美观。为了动态调整搜索栏的位置,可以使用下面的方法:
首先在程序中注册一个键盘将要出现的事件监视者:
[cpp] view
plaincopy
[[NSNotificationCenter defaultCenter] addObserver:self selector:@selector(keyboardWillShow:) name:UIKeyboardWillShowNotification object:nil]; // 当键盘将要出现时发送消息给self
然后实现键盘出现时的动作:
[cpp] view
plaincopy
-(void)keyboardWillShow:(NSNotification *)noti
{
// 获得键盘的尺寸大小
NSDictionary *info = [noti userInfo];
CGSize keyboardsize = [[info objectForKey:UIKeyboardFrameEndUserInfoKey] CGRectValue].size;
// 重新设置搜索栏的位置在键盘上面
CGFloat newY = self.view.frame.size.height - keyboardsize.height - 40.0;
self.searchBar.frame = CGRectMake(0.0, newY, self.view.frame.size.width, 40.0);
}
这样就可以保持搜索栏可见并且输入文字了。
(三)在文本中显示网址,号码,地址,日历事件的链接状态
IntroduceToTextKitDemo中的Interaction就是打开文本中的http://www.apple.com。于是我打算参考这个部分在程序中打开对应的一些链接。
本来以为文本中的网址会自动变成下划线的形式,也就是提示用户这是一个链接。结果多次调整程序都做不到,这样一来无法打开对应的链接,更谈不上在新的视图中加载网页数据。
这个问题卡了我半天,通过反复比较最后终于在IB中找出了问题所在(再次赞一下Xcode 5的IB):
原来必须在Detection中设置对应的选项由系统进行探测。小弟太菜了,以前没用过这个功能。
在代码中可以这样设置:
[cpp] view
plaincopy
self.textView.dataDetectorTypes = UIDataDetectorTypeAll; // 为文本中如网址,号码等内容添加下划线链接状态,可以响应用户的点击动作
// self.textView.dataDetectorTypes = UIDataDetectorTypeLink; // 为文本中的网址添加下划线链接状态
这是ios sdk包中的定义:
[cpp] view
plaincopy
typedef NS_OPTIONS(NSUInteger, UIDataDetectorTypes) {
UIDataDetectorTypePhoneNumber = 1 << 0, // Phone number detection
UIDataDetectorTypeLink = 1 << 1, // URL detection
#if __IPHONE_4_0 <= __IPHONE_OS_VERSION_MAX_ALLOWED
UIDataDetectorTypeAddress = 1 << 2, // Street address detection
UIDataDetectorTypeCalendarEvent = 1 << 3, // Event detection
#endif
UIDataDetectorTypeNone = 0, // No detection at all
UIDataDetectorTypeAll = NSUIntegerMax // All types
};
(四)响应网页链接
在完成(三)以后,就可以在程序中加载这些链接了。
为了响应在程序中响应这些链接,可以通过iOS7新出的UITextViewDelegate方法:
[cpp] view
plaincopy
- (BOOL)textView:(UITextView *)textView shouldInteractWithURL:(NSURL *)URL inRange:(NSRange)characterRange NS_AVAILABLE_IOS(7_0);
在程序中实现如下:
首先要设置委托对象,这是必须的:
[cpp] view
plaincopy
self.textView.delegate = self; // 设置textView的UITextViewDelegate委托为self,如果没有设置委托那么textView将无法响应-(BOOL)textView:(UITextView *)textView shouldInteractWithURL:(NSURL *)URL inRange:
然后是实现委托中的方法:
[cpp] view
plaincopy
// UITextViewDelegate
// 当用户在textView中点击特定的链接内容时,程序是否需要作出响应
-(BOOL)textView:(UITextView *)textView shouldInteractWithURL:(NSURL *)URL inRange:(NSRange)characterRange
{
NSString *urlstr = [URL absoluteString];
// 响应以下前缀或域名的网址链接
if ([[URL host] isEqual:@"www.apple.com"] || [urlstr hasPrefix:@"http://"] || [urlstr hasPrefix:@"https://"] || [urlstr hasPrefix:@"www."]) {
AppDelegate *appDelegate = [[UIApplication sharedApplication] delegate]; // appDelegate用于调用全局变量urlvc
[self presentViewController:appDelegate.urlvc animated:YES completion:^ {
[appDelegate.urlvc.urlView.webView loadRequest:[NSURLRequest requestWithURL:URL]]; // urlView中的webView开始加载链接的网页内容
}];
return NO;
}
return YES; // 若返回YES,则打开系统中的浏览器转到链接内容
}
(五)添加网页浏览视图
先来看看类的接口部分:
[cpp] view
plaincopy
@interface URLInteractionViewController : UIViewController <UIWebViewDelegate, UIToolbarDelegate> // confirm to UIWebViewDelegate and UIToolBarDelegate
@property (nonatomic, strong) URLInteractionView *urlView; // 本试图控制器控制的视图,其内容与WebView.xib的内容相关联
@end
在看了IntroduceToTextKit的Interaction中的网页浏览视图后觉得做得挺有趣的,打算对照着做一个。由于网页浏览视图中有UIWebView,UIToolBar,而且UIToolBar上有多个UIBarButtonItem组件,整个GUI的布局略显麻烦,但是我没有使用故事板,本来打算纯代码实现,但是觉得界面布置略显麻烦,而且我之前没用过xib(我是iOS6才开始学习iOS开发的),所以打算实践一下xib。
初次使用,的确卡了一下。
首先我新建了一个xib文件,并且新建了一个对应的UIView子类进行布局和代码关联,如下:
随后我直接在URLInteractionViewController的viewDidLoad方法中使用[self.view addSubview:urlView];添加视图,结果无法显示我之前布局好的内容,查了一下资料,原来首要进行视图和视图控制器关联,可以在xib的File's Owner里设置和视图关联的类:
然后要在控制器类的代码中通过以下方法实现:
[cpp] view
plaincopy
- (void)viewDidLoad
{
[super viewDidLoad];
NSArray *nibarray = [[NSBundle mainBundle] loadNibNamed:@"WebView" owner:self options:nil]; // 加载WebView.xib文件
self.urlView = nibarray[0]; // 设置urlView为WebView.xib文件中的底层视图
// 设置委托为self
self.urlView.toolbar.delegate = self;
self.urlView.webView.delegate = self;
// 在视图中心加载urlView
CGRect rect = [[UIScreen mainScreen] bounds];
self.urlView.center = CGPointMake(rect.size.width / 2, rect.size.height / 2);
[self.view addSubview:self.urlView];
}
也就是说先要加载xib文件并获取xib文件中的底层视图,然后将其加载到主视图中。注意要设置好委托。
在完成页面布局以后,就到功能方面了,先看该视图的接口部分:
[cpp] view
plaincopy
@interface URLInteractionView : UIView
@property (weak, nonatomic) IBOutlet UIWebView *webView; // 网页视图
@property (weak, nonatomic) IBOutlet UIToolbar *toolbar; // 工具栏
@property (weak, nonatomic) IBOutlet UIBarButtonItem *backBarButtonItem; // 加载前一个网页
@property (weak, nonatomic) IBOutlet UIBarButtonItem *forwardBarButtonItem; // 加载后一个网页
@property (weak, nonatomic) IBOutlet UIActivityIndicatorView *activityIndicator; // 加载网页时显示的活动指示器
- (IBAction)dismissViewController:(id)sender; // dismiss当前视图
- (IBAction)stopLoading:(id)sender; // 停止加载网页
@end
工具栏有5个按钮,分别对应后退,前进,刷新,停止和解散当前页面功能。
后退和前进和刷新按钮的方法实现可以在xib中通过连接直接实现:
剩余的两个按钮则通过代码方法实现:
[cpp] view
plaincopy
- (IBAction)dismissViewController:(id)sender {
AppDelegate *appDelegate = [[UIApplication sharedApplication] delegate];
[appDelegate.urlvc dismissViewControllerAnimated:YES completion:^{}];
}
- (IBAction)stopLoading:(id)sender {
[self.webView stopLoading];
}
至此整个Demo大功告成。可能单纯贴代码和写文字有点乱,可以在我的资源中下载对应的Demo对照着看一下。
这个Demo涉及到TextKit和iOS7的新特性的东西还是比较少的,主要还是UITextViewDelegate的新方法的使用:
[cpp] view
plaincopy
- (BOOL)textView:(UITextView *)textView shouldInteractWithURL:(NSURL *)URL inRange:(NSRange)characterRange NS_AVAILABLE_IOS(7_0);
以及Xcode 5的一些使用感想和心得,主要还是尝试一下很多以前自己没有使用过的知识点,如使用UISearchBar组件和实现UISearchBarDelegate,初次使用xib,获得keyboard的size,在程序中添加事件监听器,UIBarButtonItem对应方法的实现等。

相关文章推荐
- iOS7新特性之TextKit(四)通过boundingRectWithSize:options:attributes:context:计算文本尺寸
- iOS7新特性之TextKit(一)可以调整字体大小的FontResizeDemo
- iOS7新特性之TextKit(三)NSTextStorage,NSLayoutManager,NSTextContainer和UITextView
- iOS7新特性之TextKit(四)通过boundingRectWithSize:options:attributes:context:计算文本尺寸
- TextKit学习(二)FontResizeDemo扩展
- 【Demo 0007】Java基础-类扩展特性
- IOS7-TextKit
- TextKit学习(二)FontResizeDemo扩展
- 第十四章 高级特性-海纳百川:BIRT报表扩展点
- iOS7新特性总结
- C# 3.0新特性之扩展方法
- 安卓常用控件--textView 的特性和演变
- iOS7 UIKit动力学-碰撞特性UICollisionBehavior 上
- iOS7中Objective-C和Foundation的新特性(What’s New in Objective-C and Foundation in iOS 7)
- iOS7 SDK新特性
- UITextField切换中文输入,选中所输入的中文时,iOS7不会调用textField:shouldChangeCharactersInRange:replacementString协议方法。
- iOS8新特性扩展(Extension)应用之一——Today扩展
- ct04特性批量导入、特性长文本批量导入(BAPI_CHARACT_CREATE、BAPI_CHARACT_CHANGE、BAPI_CHARACT_ADDLONGTEXT)
- iOS7中容易被忽视的新特性
- YYKit Demo