Android WifiDisplay分析三:RTSP交互以及数据传输
2014-04-14 10:08
435 查看
前面我们分析到WifiDisplaySource会调用ANetworkSession的接口去创建一个socket,并在这个socket上监听是否有客户端的连接请求。先来看看Wifi Display规范的一些流程图:

从之前的一篇文章中,当ANetworkSession创建好RTSP的listen socket后,就会把它加入到selelct中等待对方的连接,那我们首先来看ANetworkSession的threadLoop方法:
上面在selelct循环中,首先只有刚创建的RTSP的listen socket,接着如果有客户端的连接请求,就会跳出select语句,然后调用accept去接收对方的连接。接着会去创建一个新的Session会话,我们去看它的构造函数:
这里的状态mState为CONNECTED,所以会构建一个AMessage并post出去,由前一章的知识,我们知道这里的mNotify是一个kWhatRTSPNotify消息,会在WifiDisplaySource调用createRTSPServer时传进来的一个参数,所以这里创建的AMessage最终还是会被WifiDisplaySource去处理,跳过中间AMessage、ALooperRoster、ALooper的调用关系,我们直接到WifiDisplaySource的onMessageReceived去看如何处理:
这里的reason是kWhatClientConnected,跳过前面不必要的case语句。如果先前已经连上其它的Sink device,这里就先断开之前的连接;如果没有,将新的SessionID赋予给mClientSessionID,并更改状态为AWAITING_CLIENT_SETUP,接着去看sendM1消息,这时候就要开始WifiDisplay M1~M7消息的发送了。
下面列举M1~M7消息的格式,有兴趣的可以去对照代码分析,我们后面着重分析M6(SetUp)和M7(Play)两个消息。
M1 reqeust:
OPTIONS * RTSP/1.0
Date: Tue, 29 Fri 2014 02:41:24 +0000
Server: stagefright/1.2 (Linux;Android 4.4)
CSeq: 1
Require: org.wfa.wfd1.0
M1 respose:
RTSP/1.0 200 OK
CSeq: 1
Date: Fri, Jan 01 2014 09:02:37 GMT
Public: org.wfa.wfd1.0, GET_PARAMETER, SET_PARAMETER
M2 request:
OPTIONS * RTSP/1.0
CSeq: 2
Require: org.wfa.wfd1.0
M2 response:
RTSP/1.0 200 OK
Date: Tue, 29 Fri 2014 02:41:25 +0000
Server: stagefright/1.2 (Linux;Android 4.3)
CSeq: 2
Public: org.wfa.wfd1.0, SETUP, TEARDOWN, PLAY, PAUSE, GET_PARAMETER, SET_PARAMETER
M3 request:
GET_PARAMETER rtsp://localhost/wfd1.0 RTSP/1.0
Date: Tue, 29 Fri 2014 02:41:25 +0000
Server: stagefright/1.2 (Linux;Android 4.3)
CSeq: 2
Content-Type: text/parameters
Content-Length: 83
wfd_content_protection
wfd_video_formats
wfd_audio_codecs
wfd_client_rtp_ports
M3 response:
RTSP/1.0 200 OK
CSeq: 2
Content-Length: 124
Content-Type: text/parameters
wfd_audio_codecs: LPCM 00000003 00, AAC 00000007 00
wfd_video_formats: 00 00 02 02 0000FFFF 0FFFFFFF 00000FFF 00 0000 0000 01 none none
wfd_content_protection: none
wfd_client_rtp_ports: RTP/AVP/UDP;unicast 19990 0 mode=play
M4 request:
SET_PARAMETER rtsp://localhost/wfd1.0 RTSP/1.0
Date: Tue, 29 Fri 2014 02:41:25 +0000
Server: stagefright/1.2 (Linux;Android 4.3)
CSeq: 3
Content-Type: text/parameters
Content-Length: 247
wfd_video_formats: 00 00 02 02 00000020 00000000 00000000 00 0000 0000 00 none none
wfd_audio_codecs: AAC 00000001 00
wfd_presentation_URL: rtsp://192.168.5.200/wfd1.0/streamid=0 none
wfd_client_rtp_ports: RTP/AVP/UDP;unicast 19990 0 mode=play
M4 response:
RTSP/1.0 200 OK
CSeq: 3
M5 request:
SET_PARAMETER rtsp://localhost/wfd1.0 RTSP/1.0
Date: Tue, 29 Fri 2014 02:41:25 +0000
Server: stagefright/1.2 (Linux;Android 4.3)
CSeq: 4
Content-Type: text/parameters
Content-Length: 27
wfd_trigger_method: SETUP
M5 response:
RTSP/1.0 200 OK
CSeq: 4
M6 request:
SETUP rtsp://192.168.5.200/wfd1.0/streamid=0 RTSP/1.0
CSeq: 3
Transport: RTP/AVP/UDP;unicast;client_port=19990
M6 response:
RTSP/1.0 200 OK
Date: Tue, 29 Fri 2014 02:41:25 +0000
Server: stagefright/1.2 (Linux;Android 4.3)
CSeq: 3
Session: 988982966;timeout=30
Transport: RTP/AVP/UDP;unicast;client_port=19990;server_port=22220
我们先来看处理M6 request的方法,代码在onSetupRequest中:
跳过前面的关于RTSP回复消息的组织,这里还会创建一个PlaybackSession对象,并调用它的init方法做初始化。
根据前面的背景知识介绍,设备之间的交互将由Session来管理。在代码中,Session的概念由WifiDisplaySource的内部类PlaybackSession来表示。先来看和其相关的类图结构,如下图所示:
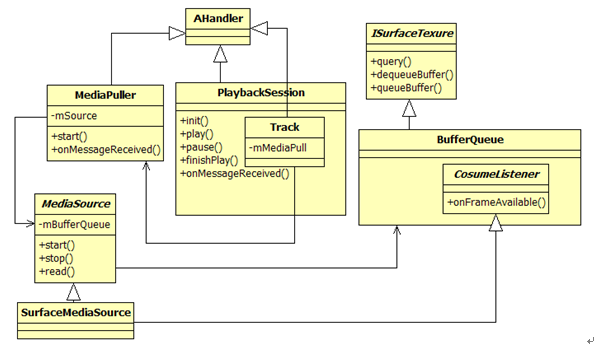
由上图可知:
PlaybackSession及其内部类Track都从AHandler派生。故它们的工作也依赖于消息循环和处理。Track代表视频流或音频流。
Track内部通过mMediaPull变量指向一个MediaPull对象。而MediaPull对象则保存了一个MediaSource对象。在PlaybackSession中,此MediaSource的真正类型为SurfaceMediaSource。它表明该Media的源来自Surface。
BufferQueue从ISurfaceTexure中派生,根据前面对SurfaceFlinger的介绍,它就是SurfaceFlinger代码示例中代表虚拟设备的State的surface变量。
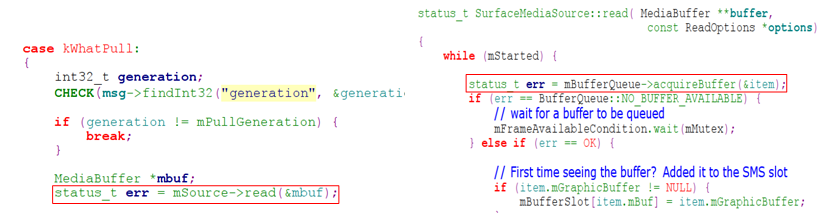
左图中,MediaPull通过kWhatPull消息不断调用MediaSource的read函数。
右图中,SurfaceMediaSource的read函数由通过mBufferQueue来读取数据。
那么mBufferQueue的数据来自什么地方呢?对,正是来自SurfaceFlinger。
当然,PlaybackSession拿到这些数据后还需要做编码,然后才能发送给远端设备。由于篇幅关系,本文就不再讨论这些问题了。
当双方设备准备就绪后,MediaPull会通过kWhatPull消息处理不断调用MediaSource的read函数。在SurfaceMediaSource实现的read函数中,来自SurfaceFlinger的混屏后的数据经由BufferQueue传递到MediaPull中。
从之前的一篇文章中,当ANetworkSession创建好RTSP的listen socket后,就会把它加入到selelct中等待对方的连接,那我们首先来看ANetworkSession的threadLoop方法:
void ANetworkSession::threadLoop() {

int res = select(maxFd + 1, &rs, &ws, NULL, NULL /* tv */);

{
Mutex::Autolock autoLock(mLock);

List<sp<Session> > sessionsToAdd;

for (size_t i = mSessions.size(); res > 0 && i-- > 0;) {
const sp<Session> &session = mSessions.valueAt(i);

int s = session->socket();

if (s < 0) {
continue;
}

if (FD_ISSET(s, &rs) || FD_ISSET(s, &ws)) {
--res;
}

if (FD_ISSET(s, &rs)) {
if (session->isRTSPServer() || session->isTCPDatagramServer()) {
struct sockaddr_in remoteAddr;
socklen_t remoteAddrLen = sizeof(remoteAddr);

int clientSocket = accept(
s, (struct sockaddr *)&remoteAddr, &remoteAddrLen);

if (clientSocket >= 0) {
status_t err = MakeSocketNonBlocking(clientSocket);

if (err != OK) {

} else {
in_addr_t addr = ntohl(remoteAddr.sin_addr.s_addr);

ALOGI("incoming connection from %d.%d.%d.%d:%d "
"(socket %d)",
(addr >> 24),
(addr >> 16) & 0xff,
(addr >> 8) & 0xff,
addr & 0xff,
ntohs(remoteAddr.sin_port),
clientSocket);

sp<Session> clientSession =
new Session(
mNextSessionID++,
Session::CONNECTED,
clientSocket,
session->getNotificationMessage());

clientSession->setMode(
session->isRTSPServer()
? Session::MODE_RTSP
: Session::MODE_DATAGRAM);

sessionsToAdd.push_back(clientSession);
}
} else {
ALOGE("accept returned error %d (%s)",
errno, strerror(errno));
}
}
}

while (!sessionsToAdd.empty()) {
sp<Session> session = *sessionsToAdd.begin();
sessionsToAdd.erase(sessionsToAdd.begin());

mSessions.add(session->sessionID(), session);

ALOGI("added clientSession %d", session->sessionID());
}
}
上面在selelct循环中,首先只有刚创建的RTSP的listen socket,接着如果有客户端的连接请求,就会跳出select语句,然后调用accept去接收对方的连接。接着会去创建一个新的Session会话,我们去看它的构造函数:
ANetworkSession::Session::Session(
int32_t sessionID,
State state,
int s,
const sp<AMessage> ¬ify)
: mSessionID(sessionID),
mState(state),
mMode(MODE_DATAGRAM),
mSocket(s),
mNotify(notify),
mSawReceiveFailure(false),
mSawSendFailure(false),
mUDPRetries(kMaxUDPRetries),
mLastStallReportUs(-1ll) {
if (mState == CONNECTED) {
struct sockaddr_in localAddr;
socklen_t localAddrLen = sizeof(localAddr);

int res = getsockname(
mSocket, (struct sockaddr *)&localAddr, &localAddrLen);
CHECK_GE(res, 0);

struct sockaddr_in remoteAddr;
socklen_t remoteAddrLen = sizeof(remoteAddr);

res = getpeername(
mSocket, (struct sockaddr *)&remoteAddr, &remoteAddrLen);
CHECK_GE(res, 0);

sp<AMessage> msg = mNotify->dup();
msg->setInt32("sessionID", mSessionID);
msg->setInt32("reason", kWhatClientConnected);
msg->setString("server-ip", localAddrString.c_str());
msg->setInt32("server-port", ntohs(localAddr.sin_port));
msg->setString("client-ip", remoteAddrString.c_str());
msg->setInt32("client-port", ntohs(remoteAddr.sin_port));
msg->post();
}
}
这里的状态mState为CONNECTED,所以会构建一个AMessage并post出去,由前一章的知识,我们知道这里的mNotify是一个kWhatRTSPNotify消息,会在WifiDisplaySource调用createRTSPServer时传进来的一个参数,所以这里创建的AMessage最终还是会被WifiDisplaySource去处理,跳过中间AMessage、ALooperRoster、ALooper的调用关系,我们直接到WifiDisplaySource的onMessageReceived去看如何处理:
case kWhatRTSPNotify:
{
int32_t reason;
CHECK(msg->findInt32("reason", &reason));

switch (reason) {
case ANetworkSession::kWhatError:
{

break;
}

case ANetworkSession::kWhatClientConnected:
{
int32_t sessionID;
CHECK(msg->findInt32("sessionID", &sessionID));

if (mClientSessionID > 0) {
ALOGW("A client tried to connect, but we already "
"have one.");

mNetSession->destroySession(sessionID);
break;
}

CHECK_EQ(mState, AWAITING_CLIENT_CONNECTION);

CHECK(msg->findString("client-ip", &mClientInfo.mRemoteIP));
CHECK(msg->findString("server-ip", &mClientInfo.mLocalIP));

if (mClientInfo.mRemoteIP == mClientInfo.mLocalIP) {
// Disallow connections from the local interface
// for security reasons.
mNetSession->destroySession(sessionID);
break;
}

CHECK(msg->findInt32(
"server-port", &mClientInfo.mLocalPort));
mClientInfo.mPlaybackSessionID = -1;

mClientSessionID = sessionID;

ALOGI("We now have a client (%d) connected.", sessionID);

mState = AWAITING_CLIENT_SETUP;

status_t err = sendM1(sessionID);
CHECK_EQ(err, (status_t)OK);
break;
}

case ANetworkSession::kWhatData:
{

break;
}

case ANetworkSession::kWhatNetworkStall:
{
break;
}

default:
TRESPASS();
}
break;
}
这里的reason是kWhatClientConnected,跳过前面不必要的case语句。如果先前已经连上其它的Sink device,这里就先断开之前的连接;如果没有,将新的SessionID赋予给mClientSessionID,并更改状态为AWAITING_CLIENT_SETUP,接着去看sendM1消息,这时候就要开始WifiDisplay M1~M7消息的发送了。
下面列举M1~M7消息的格式,有兴趣的可以去对照代码分析,我们后面着重分析M6(SetUp)和M7(Play)两个消息。
M1 reqeust:
OPTIONS * RTSP/1.0
Date: Tue, 29 Fri 2014 02:41:24 +0000
Server: stagefright/1.2 (Linux;Android 4.4)
CSeq: 1
Require: org.wfa.wfd1.0
M1 respose:
RTSP/1.0 200 OK
CSeq: 1
Date: Fri, Jan 01 2014 09:02:37 GMT
Public: org.wfa.wfd1.0, GET_PARAMETER, SET_PARAMETER
M2 request:
OPTIONS * RTSP/1.0
CSeq: 2
Require: org.wfa.wfd1.0
M2 response:
RTSP/1.0 200 OK
Date: Tue, 29 Fri 2014 02:41:25 +0000
Server: stagefright/1.2 (Linux;Android 4.3)
CSeq: 2
Public: org.wfa.wfd1.0, SETUP, TEARDOWN, PLAY, PAUSE, GET_PARAMETER, SET_PARAMETER
M3 request:
GET_PARAMETER rtsp://localhost/wfd1.0 RTSP/1.0
Date: Tue, 29 Fri 2014 02:41:25 +0000
Server: stagefright/1.2 (Linux;Android 4.3)
CSeq: 2
Content-Type: text/parameters
Content-Length: 83
wfd_content_protection
wfd_video_formats
wfd_audio_codecs
wfd_client_rtp_ports
M3 response:
RTSP/1.0 200 OK
CSeq: 2
Content-Length: 124
Content-Type: text/parameters
wfd_audio_codecs: LPCM 00000003 00, AAC 00000007 00
wfd_video_formats: 00 00 02 02 0000FFFF 0FFFFFFF 00000FFF 00 0000 0000 01 none none
wfd_content_protection: none
wfd_client_rtp_ports: RTP/AVP/UDP;unicast 19990 0 mode=play
M4 request:
SET_PARAMETER rtsp://localhost/wfd1.0 RTSP/1.0
Date: Tue, 29 Fri 2014 02:41:25 +0000
Server: stagefright/1.2 (Linux;Android 4.3)
CSeq: 3
Content-Type: text/parameters
Content-Length: 247
wfd_video_formats: 00 00 02 02 00000020 00000000 00000000 00 0000 0000 00 none none
wfd_audio_codecs: AAC 00000001 00
wfd_presentation_URL: rtsp://192.168.5.200/wfd1.0/streamid=0 none
wfd_client_rtp_ports: RTP/AVP/UDP;unicast 19990 0 mode=play
M4 response:
RTSP/1.0 200 OK
CSeq: 3
M5 request:
SET_PARAMETER rtsp://localhost/wfd1.0 RTSP/1.0
Date: Tue, 29 Fri 2014 02:41:25 +0000
Server: stagefright/1.2 (Linux;Android 4.3)
CSeq: 4
Content-Type: text/parameters
Content-Length: 27
wfd_trigger_method: SETUP
M5 response:
RTSP/1.0 200 OK
CSeq: 4
M6 request:
SETUP rtsp://192.168.5.200/wfd1.0/streamid=0 RTSP/1.0
CSeq: 3
Transport: RTP/AVP/UDP;unicast;client_port=19990
M6 response:
RTSP/1.0 200 OK
Date: Tue, 29 Fri 2014 02:41:25 +0000
Server: stagefright/1.2 (Linux;Android 4.3)
CSeq: 3
Session: 988982966;timeout=30
Transport: RTP/AVP/UDP;unicast;client_port=19990;server_port=22220
我们先来看处理M6 request的方法,代码在onSetupRequest中:
status_t WifiDisplaySource::onSetupRequest(
int32_t sessionID,
int32_t cseq,
const sp<ParsedMessage> &data) {
CHECK_EQ(sessionID, mClientSessionID);
if (mClientInfo.mPlaybackSessionID != -1) {
sendErrorResponse(sessionID, "400 Bad Request", cseq);
return ERROR_MALFORMED;
}

int32_t playbackSessionID = makeUniquePlaybackSessionID();

sp<AMessage> notify = new AMessage(kWhatPlaybackSessionNotify, id());
notify->setInt32("playbackSessionID", playbackSessionID);
notify->setInt32("sessionID", sessionID);

sp<PlaybackSession> playbackSession =
new PlaybackSession(
mNetSession, notify, mInterfaceAddr, mHDCP, mMediaPath.c_str());

looper()->registerHandler(playbackSession);

AString uri;
data->getRequestField(1, &uri);

if (strncasecmp("rtsp://", uri.c_str(), 7)) {
sendErrorResponse(sessionID, "400 Bad Request", cseq);
return ERROR_MALFORMED;
}

if (!(uri.startsWith("rtsp://") && uri.endsWith("/wfd1.0/streamid=0"))) {
sendErrorResponse(sessionID, "404 Not found", cseq);
return ERROR_MALFORMED;
}

RTPSender::TransportMode rtcpMode = RTPSender::TRANSPORT_UDP;
if (clientRtcp < 0) {
rtcpMode = RTPSender::TRANSPORT_NONE;
}

status_t err = playbackSession->init(
mClientInfo.mRemoteIP.c_str(),
clientRtp,
rtpMode,
clientRtcp,
rtcpMode,
mSinkSupportsAudio,
mUsingPCMAudio,
mSinkSupportsVideo,
mChosenVideoResolutionType,
mChosenVideoResolutionIndex,
mChosenVideoProfile,
mChosenVideoLevel);

if (err != OK) {
looper()->unregisterHandler(playbackSession->id());
playbackSession.clear();
}

mClientInfo.mPlaybackSessionID = playbackSessionID;
mClientInfo.mPlaybackSession = playbackSession;

mState = AWAITING_CLIENT_PLAY;

scheduleReaper();
scheduleKeepAlive(sessionID);

return OK;
}
跳过前面的关于RTSP回复消息的组织,这里还会创建一个PlaybackSession对象,并调用它的init方法做初始化。
根据前面的背景知识介绍,设备之间的交互将由Session来管理。在代码中,Session的概念由WifiDisplaySource的内部类PlaybackSession来表示。先来看和其相关的类图结构,如下图所示:
由上图可知:
PlaybackSession及其内部类Track都从AHandler派生。故它们的工作也依赖于消息循环和处理。Track代表视频流或音频流。
Track内部通过mMediaPull变量指向一个MediaPull对象。而MediaPull对象则保存了一个MediaSource对象。在PlaybackSession中,此MediaSource的真正类型为SurfaceMediaSource。它表明该Media的源来自Surface。
BufferQueue从ISurfaceTexure中派生,根据前面对SurfaceFlinger的介绍,它就是SurfaceFlinger代码示例中代表虚拟设备的State的surface变量。
左图中,MediaPull通过kWhatPull消息不断调用MediaSource的read函数。
右图中,SurfaceMediaSource的read函数由通过mBufferQueue来读取数据。
那么mBufferQueue的数据来自什么地方呢?对,正是来自SurfaceFlinger。
当然,PlaybackSession拿到这些数据后还需要做编码,然后才能发送给远端设备。由于篇幅关系,本文就不再讨论这些问题了。
当双方设备准备就绪后,MediaPull会通过kWhatPull消息处理不断调用MediaSource的read函数。在SurfaceMediaSource实现的read函数中,来自SurfaceFlinger的混屏后的数据经由BufferQueue传递到MediaPull中。

相关文章推荐
- Android WifiDisplay分析三:RTSP交互以及数据传输
- Android WifiDisplay分析三:RTSP交互以及数据传输
- Android WifiDisplay分析三:RTSP交互以及数据传输
- Android客户端与服务器HTTP交互,数据以json格式传输
- Miko Android自学之路 WifiDirect中文最强详解,如何传输数据,如何设置GroupOwener,如何设置客户端以及服务器端
- 【Android】【问题分析】G-sensor因数据交互问题导致手机crash
- android网络编程之json传输数据以及解析方式
- 关于Android大数据收集,埋点统计的详细讲解以及案例代码分析附github代码
- Miko Android自学之路 WifiDirect中文最强详解,如何传输数据,如何设置GroupOwener,如何设置客户端以及服务器端
- 【开源中国Android客户端】源码分析(二)网络数据传输接口
- 用.Net打造一个移动客户端(Android/IOS)的服务端框架NHM(二)——“请求”“交互”与传输数据(服务器端)
- Android项目中http数据传输加密问题方案以及NDK编译加密算法
- Android端与web端以及数据库的建立它们之间的交互详解与案例分析
- Android 6.0 AMS分析的第二条线:以Launcher启动一个Activity为例,分析应用进程的创建、Activity的启动,以及他们和AMS之间的交互等知识;
- 【开源中国Android客户端】源码分析 网络数据传输接口
- android 带header调用webservice接口,与.net交互,xml传输数据
- android中fragment简单使用以及fragment之间数据交互
- 函数数据Android(2.3+)源码分析MediaPlayer之RTSP
- Miko Android自学之路 WifiDirect中文最强详解,如何传输数据,如何设置GroupOwener,如何设置客户端以及服务器端
- android gps机制分析--定位数据传输到Java