学习OpenCV(七)——随机数发生器和绘制文字
2014-03-13 23:11
232 查看
本次范例是在上一次博客学习OpenCV范例(六)——基本绘图的基础上,加上随机数发生器和文字显示,进行更加有趣的开发,当本次范例学习完之后,基本的绘图函数也就学习完了。
点击这里还可以看我录制的关于程序运行的视频,用手机拍的,效果不是很好,希望大神们可以给点建议,如何录制视频。
密码为cool
实例化一个发生器
用数值 0xFFFFFFFF 来实例化的一个RNG对象
RNG操作
功能:产生服从均匀分布的随机数
b:随机数产生的右边界,右边界为开区间
功能:产生服从高斯分布的随机数
结构:
pts:多边形顶点集
npts:要绘制的多边形顶点数目
ncontours:要绘制的多边形数目
isClosed:绘制的曲线是否闭合
color:颜色值
thickness:线的粗细程度,如果为负数,则说明圆内被填充。
lineType:线的类型,默认为8联通
结构:
fontFace:字体的类型
fontScale:字体的缩放比例
thickness:字体的粗细
baseLine:不知
结构:
text:绘制的文本
org:文字的左下角将用点 org 指定
fontFace:字体的类型
fontScale:字体的缩放比例
color:字体的颜色
thickness:字体的粗细
1、介绍
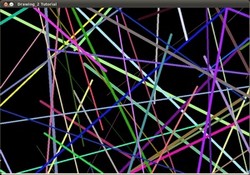
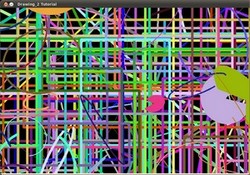
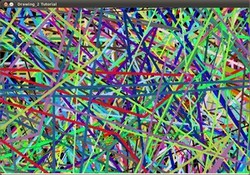
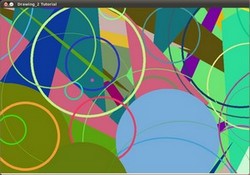
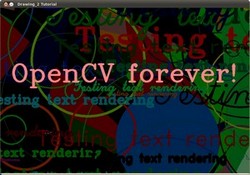
范例通过使用 随机数发生器类 (RNG) 并得到均匀分布的随机数,代入到绘制函数的参数里面,使得产生各种各样的图案,通过使用函数 putText 显示文字,最后通过循环,产生动态效果。2、代码实现
#include "stdafx.h"

/**
* @file Drawing_2.cpp
* @brief Simple sample code
*/

#include <opencv2/core/core.hpp>
#include <opencv2/highgui/highgui.hpp>
#include <iostream>
#include <stdio.h>

using namespace cv;

/// Global Variables
const int NUMBER = 100;
const int DELAY = 5;

const int window_width = 900;
const int window_height = 600;
int x_1 = -window_width/2;
int x_2 = window_width*3/2;
int y_1 = -window_height/2;
int y_2 = window_height*3/2;

/// Function headers
static Scalar randomColor( RNG& rng );
int Drawing_Random_Lines( Mat image, char* window_name, RNG rng );//画线
int Drawing_Random_Rectangles( Mat image, char* window_name, RNG rng );//画矩形
int Drawing_Random_Ellipses( Mat image, char* window_name, RNG rng );//画一些弧线
int Drawing_Random_Polylines( Mat image, char* window_name, RNG rng );// 画一些折线
int Drawing_Random_Filled_Polygons( Mat image, char* window_name, RNG rng );// 画被填充的多边形
int Drawing_Random_Circles( Mat image, char* window_name, RNG rng );// 画圆
int Displaying_Random_Text( Mat image, char* window_name, RNG rng );// 在随机的地方绘制文字
int Displaying_Big_End( Mat image, char* window_name, RNG rng );//显示最后结果

/**
* @function main
*/
int main( void )
{
int c;

/// Start creating a window
char window_name[] = "Drawing_2 Tutorial";

/// Also create a random object (RNG)
RNG rng( 0xFFFFFFFF );

/// Initialize a matrix filled with zeros
Mat image = Mat::zeros( window_height, window_width, CV_8UC3 );
/// Show it in a window during DELAY ms
imshow( window_name, image );
waitKey( DELAY );

/// Now, let's draw some lines
c = Drawing_Random_Lines(image, window_name, rng);
if( c != 0 ) return 0;

/// Go on drawing, this time nice rectangles
c = Drawing_Random_Rectangles(image, window_name, rng);
if( c != 0 ) return 0;

/// Draw some ellipses
c = Drawing_Random_Ellipses( image, window_name, rng );
if( c != 0 ) return 0;

/// Now some polylines
c = Drawing_Random_Polylines( image, window_name, rng );
if( c != 0 ) return 0;

/// Draw filled polygons
c = Drawing_Random_Filled_Polygons( image, window_name, rng );
if( c != 0 ) return 0;

/// Draw circles
c = Drawing_Random_Circles( image, window_name, rng );
if( c != 0 ) return 0;

/// Display text in random positions
c = Displaying_Random_Text( image, window_name, rng );
if( c != 0 ) return 0;

/// Displaying the big end!
c = Displaying_Big_End( image, window_name, rng );
if( c != 0 ) return 0;

waitKey(0);
return 0;
}

/// Function definitions

/**
* @function randomColor
* @brief Produces a random color given a random object
*/
static Scalar randomColor( RNG& rng )
{
int icolor = (unsigned) rng;
return Scalar( icolor&255, (icolor>>8)&255, (icolor>>16)&255 );
}

/**
* @function Drawing_Random_Lines
*/
int Drawing_Random_Lines( Mat image, char* window_name, RNG rng )
{
Point pt1, pt2;

for( int i = 0; i < NUMBER; i++ )
{
pt1.x = rng.uniform( x_1, x_2 );
pt1.y = rng.uniform( y_1, y_2 );
pt2.x = rng.uniform( x_1, x_2 );
pt2.y = rng.uniform( y_1, y_2 );

line( image, pt1, pt2, randomColor(rng), rng.uniform(1, 10), 8 );
imshow( window_name, image );
if( waitKey( DELAY ) >= 0 )
{ return -1; }
}

return 0;
}

/**
* @function Drawing_Rectangles
*/
int Drawing_Random_Rectangles( Mat image, char* window_name, RNG rng )
{
Point pt1, pt2;
int lineType = 8;
int thickness = rng.uniform( -3, 10 );

for( int i = 0; i < NUMBER; i++ )
{
pt1.x = rng.uniform( x_1, x_2 );
pt1.y = rng.uniform( y_1, y_2 );
pt2.x = rng.uniform( x_1, x_2 );
pt2.y = rng.uniform( y_1, y_2 );

rectangle( image, pt1, pt2, randomColor(rng), MAX( thickness, -1 ), lineType );

imshow( window_name, image );
if( waitKey( DELAY ) >= 0 )
{ return -1; }
}

return 0;
}

/**
* @function Drawing_Random_Ellipses
*/
int Drawing_Random_Ellipses( Mat image, char* window_name, RNG rng )
{
int lineType = 8;

for ( int i = 0; i < NUMBER; i++ )
{
Point center;
center.x = rng.uniform(x_1, x_2);
center.y = rng.uniform(y_1, y_2);

Size axes;
axes.width = rng.uniform(0, 200);
axes.height = rng.uniform(0, 200);

double angle = rng.uniform(0, 180);

ellipse( image, center, axes, angle, angle - 100, angle + 200,
randomColor(rng), rng.uniform(-1,9), lineType );

imshow( window_name, image );

if( waitKey(DELAY) >= 0 )
{ return -1; }
}

return 0;
}

/**
* @function Drawing_Random_Polylines
*/
int Drawing_Random_Polylines( Mat image, char* window_name, RNG rng )
{
int lineType = 8;

for( int i = 0; i< NUMBER; i++ )
{
Point pt[2][3];
pt[0][0].x = rng.uniform(x_1, x_2);
pt[0][0].y = rng.uniform(y_1, y_2);
pt[0][1].x = rng.uniform(x_1, x_2);
pt[0][1].y = rng.uniform(y_1, y_2);
pt[0][2].x = rng.uniform(x_1, x_2);
pt[0][2].y = rng.uniform(y_1, y_2);
pt[1][0].x = rng.uniform(x_1, x_2);
pt[1][0].y = rng.uniform(y_1, y_2);
pt[1][1].x = rng.uniform(x_1, x_2);
pt[1][1].y = rng.uniform(y_1, y_2);
pt[1][2].x = rng.uniform(x_1, x_2);
pt[1][2].y = rng.uniform(y_1, y_2);

const Point* ppt[2] = {pt[0], pt[1]};
int npt[] = {3, 3};

polylines(image, ppt, npt, 2, true, randomColor(rng), rng.uniform(1,10), lineType);

imshow( window_name, image );
if( waitKey(DELAY) >= 0 )
{ return -1; }
}
return 0;
}

/**
* @function Drawing_Random_Filled_Polygons
*/
int Drawing_Random_Filled_Polygons( Mat image, char* window_name, RNG rng )
{
int lineType = 8;

for ( int i = 0; i < NUMBER; i++ )
{
Point pt[2][3];
pt[0][0].x = rng.uniform(x_1, x_2);
pt[0][0].y = rng.uniform(y_1, y_2);
pt[0][1].x = rng.uniform(x_1, x_2);
pt[0][1].y = rng.uniform(y_1, y_2);
pt[0][2].x = rng.uniform(x_1, x_2);
pt[0][2].y = rng.uniform(y_1, y_2);
pt[1][0].x = rng.uniform(x_1, x_2);
pt[1][0].y = rng.uniform(y_1, y_2);
pt[1][1].x = rng.uniform(x_1, x_2);
pt[1][1].y = rng.uniform(y_1, y_2);
pt[1][2].x = rng.uniform(x_1, x_2);
pt[1][2].y = rng.uniform(y_1, y_2);

const Point* ppt[2] = {pt[0], pt[1]};
int npt[] = {3, 3};

fillPoly( image, ppt, npt, 2, randomColor(rng), lineType );

imshow( window_name, image );
if( waitKey(DELAY) >= 0 )
{ return -1; }
}
return 0;
}

/**
* @function Drawing_Random_Circles
*/
int Drawing_Random_Circles( Mat image, char* window_name, RNG rng )
{
int lineType = 8;

for (int i = 0; i < NUMBER; i++)
{
Point center;
center.x = rng.uniform(x_1, x_2);
center.y = rng.uniform(y_1, y_2);

circle( image, center, rng.uniform(0, 300), randomColor(rng),
rng.uniform(-1, 9), lineType );

imshow( window_name, image );
if( waitKey(DELAY) >= 0 )
{ return -1; }
}

return 0;
}

/**
* @function Displaying_Random_Text
*/
int Displaying_Random_Text( Mat image, char* window_name, RNG rng )
{
int lineType = 8;

for ( int i = 1; i < NUMBER; i++ )
{
Point org;
org.x = rng.uniform(x_1, x_2);
org.y = rng.uniform(y_1, y_2);

putText( image, "Testing text rendering", org, rng.uniform(0,8),
rng.uniform(0,100)*0.05+0.1, randomColor(rng), rng.uniform(1, 10), lineType);

imshow( window_name, image );
if( waitKey(DELAY) >= 0 )
{ return -1; }
}

return 0;
}

/**
* @function Displaying_Big_End
*/
int Displaying_Big_End( Mat image, char* window_name, RNG )
{
Size textsize = getTextSize("OpenCV forever!", FONT_HERSHEY_COMPLEX, 3, 5, 0);
Point org((window_width - textsize.width)/2, (window_height - textsize.height)/2);
int lineType = 8;

Mat image2;

for( int i = 0; i < 255; i += 2 )
{
image2 = image - Scalar::all(i);
putText( image2, "OpenCV forever!", org, FONT_HERSHEY_COMPLEX, 3,
Scalar(i, i, 255), 5, lineType );

imshow( window_name, image2 );
if( waitKey(DELAY) >= 0 )
{ return -1; }
}

return 0;
}
3、运行结果
点击这里还可以看我录制的关于程序运行的视频,用手机拍的,效果不是很好,希望大神们可以给点建议,如何录制视频。
密码为cool
4、用到的类和函数
RNG:
功能:随机数发生器实例化一个发生器
RNG rng( 0xFFFFFFFF );
用数值 0xFFFFFFFF 来实例化的一个RNG对象
RNG操作
功能:产生服从均匀分布的随机数
int RNG::uniform(int a, int b)
double RNG::gaussian(double sigma)
float RNG::uniform(float a, float b)double RNG::uniform(double a, double b)
a:随机数产生的左边界,左边界为闭区间
b:随机数产生的右边界,右边界为开区间
功能:产生服从高斯分布的随机数
double RNG::gaussian(double sigma)sigma:高斯分布的标准差
polylines:
功能:画多边形曲线结构:
void polylines(Mat& img, const Point** pts, const int* npts, int ncontours, bool isClosed, const Scalar& color, int thickness=1, int lineType=8, int shift=0 )img:输入图片
pts:多边形顶点集
npts:要绘制的多边形顶点数目
ncontours:要绘制的多边形数目
isClosed:绘制的曲线是否闭合
color:颜色值
thickness:线的粗细程度,如果为负数,则说明圆内被填充。
lineType:线的类型,默认为8联通
getTextSize:
功能:计算一个文本字符串的宽度和高度结构:
getTextSize(const string& text, int fontFace, double fontScale, int thickness, int* baseLine)text:文本字符串
fontFace:字体的类型
fontScale:字体的缩放比例
thickness:字体的粗细
baseLine:不知
putText:
功能:绘制文字结构:
void putText(Mat& img, const string& text, Point org, int fontFace, double fontScale, Scalar color, int thickness=1, int lineType=8, bool bottomLeftOrigin=false )img:输入图片
text:绘制的文本
org:文字的左下角将用点 org 指定
fontFace:字体的类型
fontScale:字体的缩放比例
color:字体的颜色
thickness:字体的粗细

相关文章推荐
- core核心模块--随机数发生器&文字绘制
- opencv 2.x学习笔记(十)随机数发生器、绘制文字
- Android drawText() 绘制多行文字
- 用drawAtPoint绘制文字
- Drawing Anti-Aliased Text and Graphics:绘制反锯齿文字和图形
- 图像的绘制,剪切,旋转,添加文字.生成图像的缩略图 --zt
- 对话框上自定义绘制文字
- 用TextPaint来绘制文字
- 自定义控件时绘制文字居中
- 【深入浅出IOS开发】绘制文字
- iOS绘图系列四:绘制文字和图像CGContextDrawImage,drawInRect:,drawAtPoint:, UIGraphicsBeginImageContext
- IOS Quartz 各种绘制图形用法---实现画图片、写文字、画线、椭圆、矩形、棱形等
- 在窗口显示文字和绘制图形
- 基础学习笔记之opencv(14):随机数发生器&绘制文字
- FMX探索之FMX下绘文字绘制
- html5中canvas中绘制渐变和绘制文字顺序问题
- 学习OpenCV2——绘制基本图形及文字
- DirectX中绘制文字效果分析(3D/c++)
- Android 通过CANVAS旋转 绘制文字 竖直方向DEMO
- OpenCV--绘制形状与文字