在CentOS上安装Oracle 11g
2014-01-25 20:02
441 查看
As we all know Oracle database is the most popular and widely used Relational
Database Management System (RDBMS) in the world. This post describes step by step installation ofOracle Database 11g Release 2 32bit
on CentOS 6.4 32bit. The installation steps should not be vary on most of the Red Hat based Linux distributions.
We use “oracle-rdbms-server-11gR2-preinstall” package offered by “Oracle
Public Yum” repository. The Oracle public yum repository provides a free and easiest way to install all the latest Oracle Linux dependencies automatically. To setup yum repository, follow the instructions provided below.
Use “wget” command to Download appropriate yum configuration file under /etc/yum.repos.d/directory
as root user.
RHEL/CentOs 6.x
Database Management System (RDBMS) in the world. This post describes step by step installation ofOracle Database 11g Release 2 32bit
on CentOS 6.4 32bit. The installation steps should not be vary on most of the Red Hat based Linux distributions.
Installing Oracle Database 11g Release 2
Step 1: Install Oracle Dependencies
We use “oracle-rdbms-server-11gR2-preinstall” package offered by “OraclePublic Yum” repository. The Oracle public yum repository provides a free and easiest way to install all the latest Oracle Linux dependencies automatically. To setup yum repository, follow the instructions provided below.
Use “wget” command to Download appropriate yum configuration file under /etc/yum.repos.d/directory
as root user.
RHEL/CentOs 6.x
# cd /etc/yum.repos.d # wget https://public-yum.oracle.com/public-yum-ol6.repo[/code]
RHEL/CentOs 5.x# cd /etc/yum.repos.d # wget https://public-yum.oracle.com/public-yum-el5.repo[/code]
RHEL/CentOs 4.x# cd /etc/yum.repos.d # wget https://public-yum.oracle.com/public-yum-el4.repo[/code]
Now perform the following “yum” command to install all the necessary prerequisites automatically.[root@oracle]# yum install oracle-rdbms-server-11gR2-preinstall
While importing GPG key, you might get “GPG
key retrieval failed” error as shown below. Here, you need to import proper GPG key for your OS release.Retrieving key from file:///etc/pki/rpm-gpg/RPM-GPG-KEY-oracle GPG key retrieval failed: [Errno 14] Could not open/read file:///etc/pki/rpm-gpg/RPM-GPG-KEY-oracle
Download and verify the appropriate Oracle Linux GPG Key that best matches yourRHEL/CentOS compatible
OS release.
RHEL/CentOs 6.x# wget https://public-yum.oracle.com/RPM-GPG-KEY-oracle-ol6 -O /etc/pki/rpm-gpg/RPM-GPG-KEY-oracle
RHEL/CentOs 5.x# wget https://public-yum.oracle.com/RPM-GPG-KEY-oracle-el5 -O /etc/pki/rpm-gpg/RPM-GPG-KEY-oracle
RHEL/CentOs 4.x# wget https://public-yum.oracle.com/RPM-GPG-KEY-oracle-el4 -O /usr/share/rhn/RPM-GPG-KEY-oracleOpen the “/etc/sysconfig/network” file and modify the HOSTNAME to
Step 2: Setting Hostname
match your FQDN (Fully
Qualified Domain Name) host name.[root@oracle]# vi /etc/sysconfig/networkHOSTNAME=oracle.tecmint.com
Open “/etc/hosts” file and add fully qualified hostname for the server.[root@oracle]# vi /etc/hosts192.168.246.128 oracle.tecmint.com oracle
Now you need to restart networking on the server to make sure that changes will be persistent on reboot.[root@oracle]# /etc/init.d/network restartSet the password for the “oracle” user.
Step 3: Oracle User Settings[root@oracle]# passwd oracle Changing password for user oracle. New password: BAD PASSWORD: it is based on a dictionary word Retype new password: passwd: all authentication tokens updated successfully.
Add the entry to file “/etc/security/limits.d/90-nproc.conf” as described below.[root@oracle]# vi /etc/security/limits.d/90-nproc.conf# Default limit for number of user's processes to prevent # accidental fork bombs. # See rhbz #432903 for reasoning. * soft nproc 1024 # To this * - nproc 16384
Set SELinux to “permissive” mode by editing the file “/etc/selinux/config“.[root@oracle]# vi /etc/selinux/configSELINUX=permissive
Once you’ve made change, don’t forger to restart the server to reflect new changes.[root@oracle]# reboot
Login as Oracle user and open file “.bash_profile“,
which is available on oracle user’s home directory, make an entries as described below. Make sure you set correct hostname to “ORACLE_HOSTNAME=oracle.tecmint.com“.[root@oracle]# su oracle[oracle@oracle ~]$ vi .bash_profile# Oracle Settings TMP=/tmp; export TMP TMPDIR=$TMP; export TMPDIR ORACLE_HOSTNAME=oracle.tecmint.com; export ORACLE_HOSTNAME ORACLE_UNQNAME=DB11G; export ORACLE_UNQNAME ORACLE_BASE=/u01/app/oracle; export ORACLE_BASE ORACLE_HOME=$ORACLE_BASE/product/11.2.0/dbhome_1; export ORACLE_HOME ORACLE_SID=DB11G; export ORACLE_SID PATH=/usr/sbin:$PATH; export PATH PATH=$ORACLE_HOME/bin:$PATH; export PATH LD_LIBRARY_PATH=$ORACLE_HOME/lib:/lib:/usr/lib; export LD_LIBRARY_PATH CLASSPATH=$ORACLE_HOME/jlib:$ORACLE_HOME/rdbms/jlib; export CLASSPATH export PATH
Switch to root user and issue the following command to allow Oracle user
to access X Server.[root@oracle]# xhost +
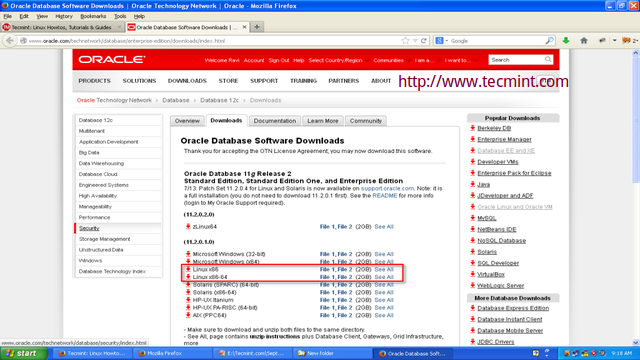
Create the directories and set the appropriate permissions in which the Oracle software will be installed.[root@oracle]# mkdir -p /u01/app/oracle/product/11.2.0/dbhome_1 [root@oracle]# chown -R oracle:oinstall /u01 [root@oracle]# chmod -R 775 /u01Sign-up and Download the Oracle software using the following link.
Step 4: Downloading Oracle Software
Oracle
Database 11g Release 2
Download Oracle 11g Release 2
The Oracle package contains 2 zip files which you must first accept the license
agreementbefore downloading. I’ve given the files names for you reference, please download these files for your system architecture somewhere under “/home/oracle/“.
For Linux x86 Systemshttp://download.oracle.com/otn/linux/oracle11g/R2/linux_11gR2_database_1of2.zip http://download.oracle.com/otn/linux/oracle11g/R2/linux_11gR2_database_2of2.zip[/code]
For Linux x86-64 Systemshttp://download.oracle.com/otn/linux/oracle11g/R2/linux.x64_11gR2_database_1of2.zip http://download.oracle.com/otn/linux/oracle11g/R2/linux.x64_11gR2_database_2of2.zip[/code]Now let’s start Oracle installation. First of all need to switch as ‘oracle’ user to install database.
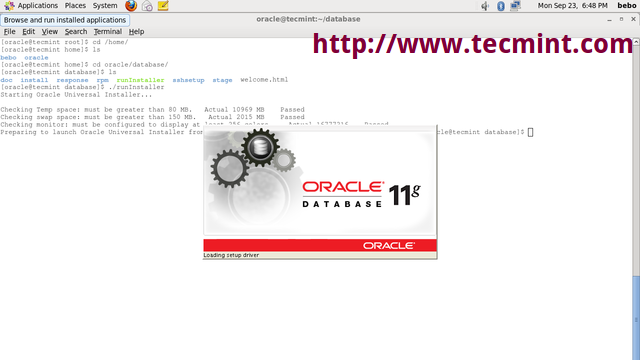
Step 5: Oracle Installation[oracle@oracle ~]$ su oracle
Extract compressed Oracle database source files to the same directory “/home/oracle/“.[oracle@oracle ~]$ unzip linux_11gR2_database_1of2.zip [oracle@oracle ~]$ unzip linux_11gR2_database_2of2.zip
Post unzip source file, directory called database will be created, go to inside the directory and execute below script to start Oracle
database installation process.[oracle@oracle database]$ cd database [oracle@oracle database]$ ./runInstaller
1. RunInstaller will
call Oracle Universal Installer (OUI), wherein look and feel & steps are the same across all the operating system.
Oracle Universal Installer
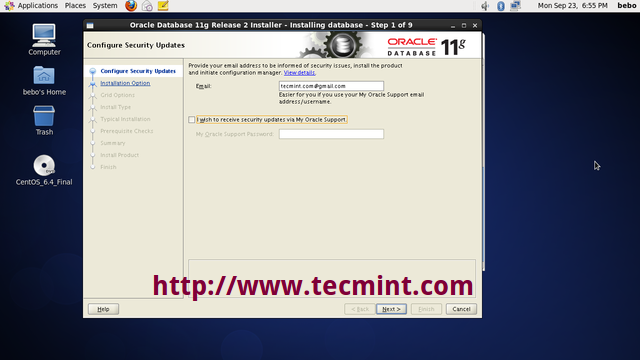
2. Provide your email
address to be informed of security issues and receive security updates.
Configure Oracle Security Updates
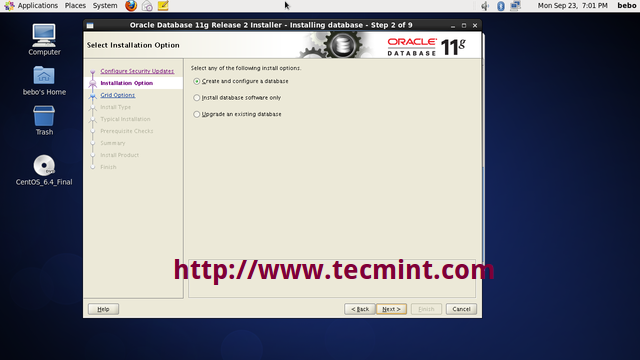
3. Create and Configure a Database
Create Oracle Database
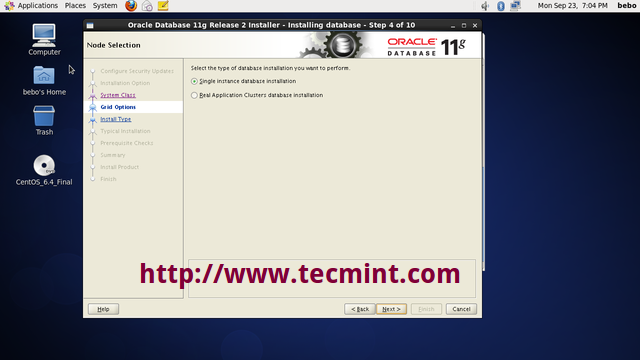
4. Choose the system class, either Desktop or Server.
Select Oracle System Class
5. Select the type of database
installation you want to perform.
Select Database Installation Type
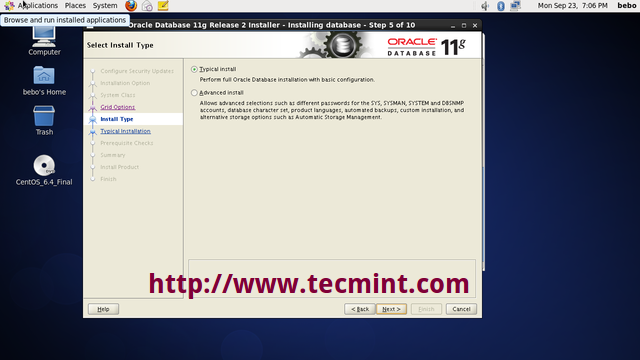
6. Select “Typical
install” option to install full oracle installation with basic configuration.
Select Typical Install
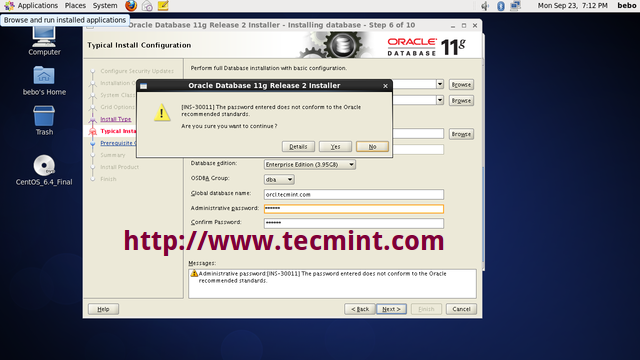
7. Set Administrative
password and perform full Database installation with basic configuration.
Set Oracle Administrative Password
8. Please click on “Yes”
to continue with installation.
Typical Install Configuration Confirm
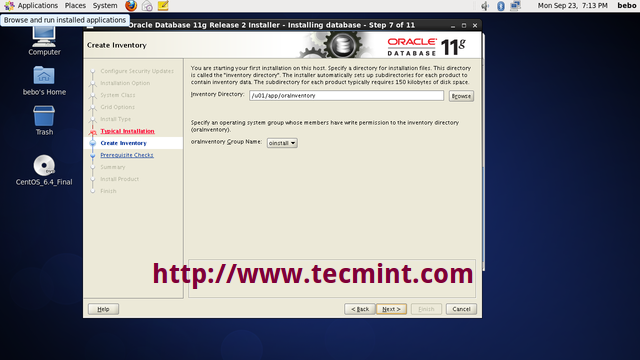
9. Create Inventory
Create Inventory
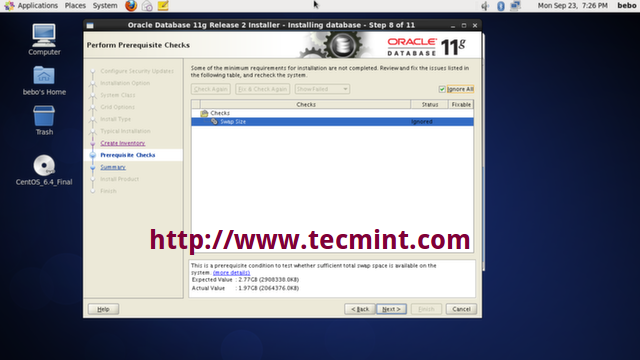
10. If you faced prerequisites warning during installation. Click on “Fix
& Check Again“. Oracle fixes Prerequisites by itself. This is the new feature of Oracle Database 11g.
Perform Prerequisite Checks
The pdksh package is not available in Oracle
repository due to which you need to download and install it manually.[root@oracle]# wget ftp://rpmfind.net/linux/redhat-archive/6.2/en/os/i386/RedHat/RPMS/pdksh-5.2.14-2.i386.rpm[/code]
During pdksh package installation you may encountered conflict error of ksh package.
Removeksh package forcefully and install the pdksh package
with given below command:-[root@oracle]# rpm -e ksh-20100621-19.el6_4.4.i686 --nodeps [root@oracle]# rpm -ivh pdksh-5.2.14-2.i386.rpm
11. Performing Prerequisite checks: It’s test whether sufficient total SWAP space
is available on the system.
Performing Prerequisite SWAP Check
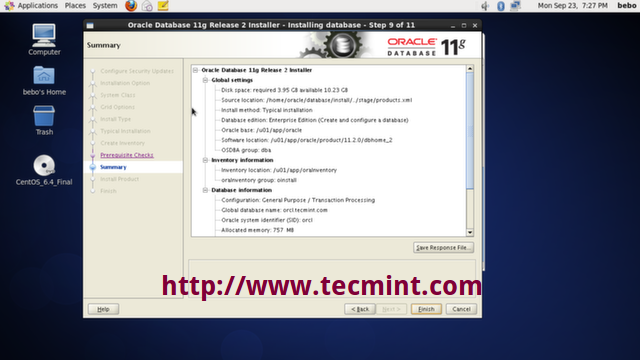
12. Installation Summary: Click on Save
Response File. This file is useful for Oracle Silent Mode Installation
Oracle Installation Summary
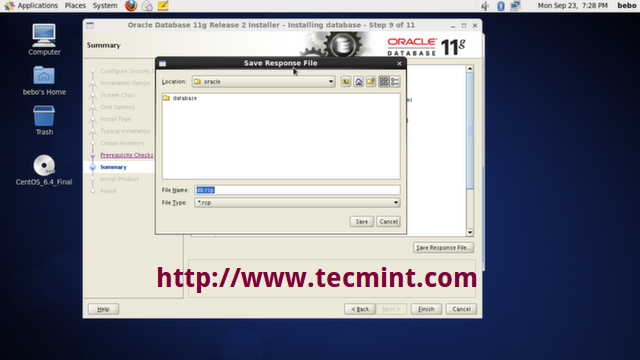
13. Save Response
File somewhere in your system.
Save Response File
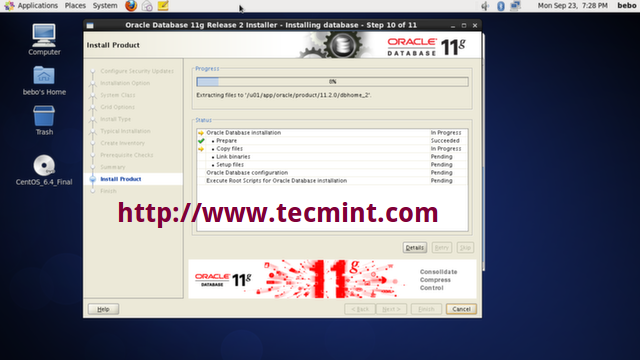
14. Product Installation Progress
Product Install
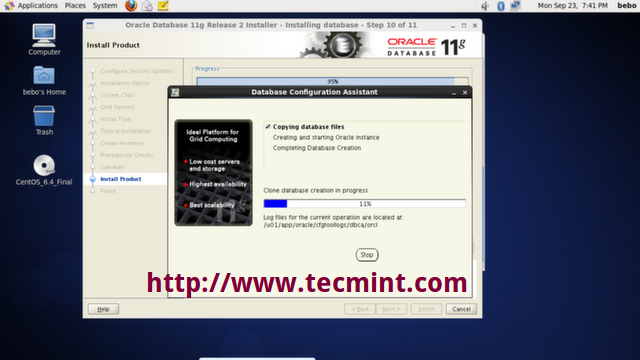
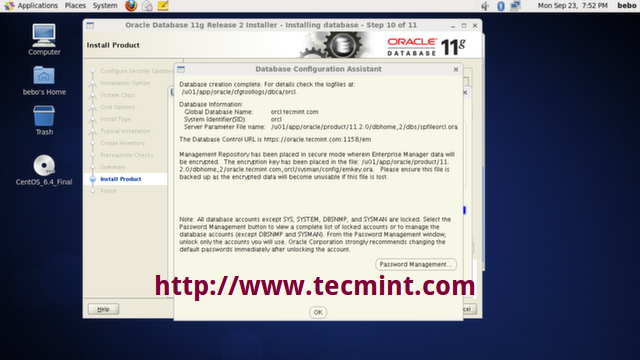
15. Copying database files
Copying Database Files
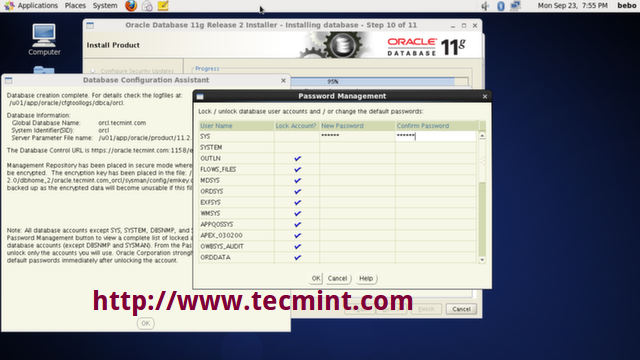
16. Click on “Password
Management“.
Oracle Password Management
17. Set password for user “SYS”
and click on OK to continue.
Set SYS User Password
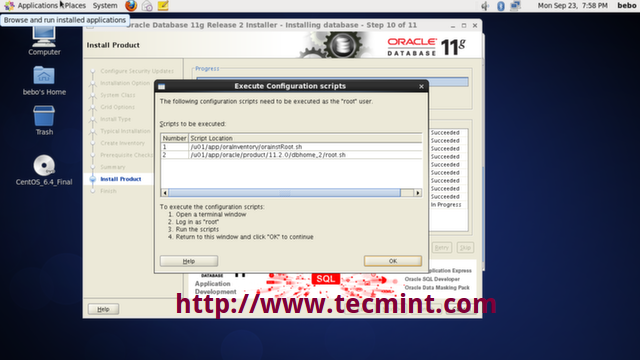
18. Configuration scripts need to be executed as the “root”
user. Go to the path given in the screen and execute the scripts one by one. Click on ‘OK‘ once scripts is executed.
Execute Configuration Scripts[root@oracle]# cd /u01/app/oraInventory [root@oracle oraInventory]# ./orainstRoot.shChanging permissions of /u01/app/oraInventory. Adding read,write permissions for group. Removing read,write,execute permissions for world. Changing groupname of /u01/app/oraInventory to oinstall. The execution of the script is complete.[root@oracle]# cd /u01/app/oracle/product/11.2.0/dbhome_2/ [root@oracle dbhome_2]# ./root.shRunning Oracle 11g root.sh script... The following environment variables are set as: ORACLE_OWNER= oracle ORACLE_HOME= /u01/app/oracle/product/11.2.0/dbhome_2 Enter the full pathname of the local bin directory: [/usr/local/bin]: Copying dbhome to /usr/local/bin ... Copying oraenv to /usr/local/bin ... Copying coraenv to /usr/local/bin ... Creating /etc/oratab file... Entries will be added to the /etc/oratab file as needed by Database Configuration Assistant when a database is created Finished running generic part of root.sh script. Now product-specific root actions will be performed. Finished product-specific root actions.
19. The installation of Oracle
Database is successful.
Oracle Installation Finish
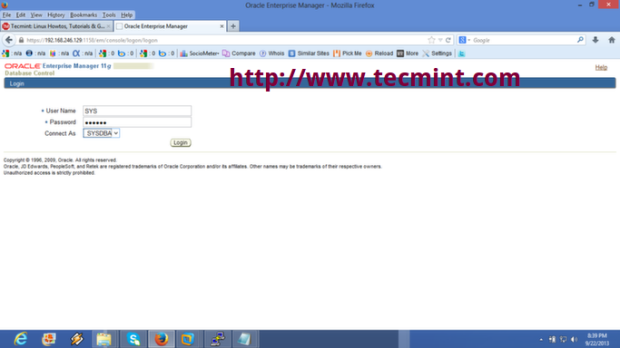
20. To test your Oracle
installation navigate to web based management interface for your system at “localhost” with the user name “SYS”
connecting as “SYSDBA” and using thepassword you
set during the install of Oracle. Remember to open port 1158 on your firewall and restart the iptables service.[root@oracle]# iptables -A INPUT -p tcp --dport 1158 -j ACCEPT [root@oracle]# service iptables restarthttps://localhost:1158/em/
Oracle Enterprise Manager Login
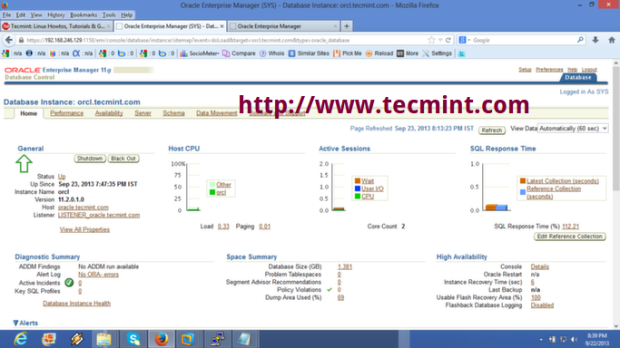
21. Oracle Enterprise Database
Control Manager
Oracle Database Control Manager
Now you can start using Oracle. I highly recommend you to follow the Oracle
Documentationfor more help. There are number of client applications out there which can help you, like the command line tool called Oracle
Instant Client and the Oracle
SQL Developer UI program.
This is end of the Oracle Database Software Installation. In our upcoming article we will be covering how to create database using DBCA and
how to Start-up and Shutdown Oracle
Database. Please stay tuned…!!!
Narad Shrestha
He has over 10 years of rich IT experience which includes various Linux Distros, FOSS
and Networking. Narad always believes sharing IT knowledge with others and adopts new technology with ease.
原文地址:http://www.tecmint.com/oracle-database-11g-release-2-installation-in-linux/
----------------------------------------------------------------------------------------------------------------------安装依赖包(Using--Oracle--Repository):
1. 使用yum安装
注意:要使用root账号!
(1) 下载repo
a). root$> cd /etc/yum.repos.d
b). root$> wget --no-check-certificate https://public-yum.oracle.com/public-yum-ol6.repo
(2) 导入GPG键
a). root$> wget --no-check-certificate https://public-yum.oracle.com/RPM-GPG-KEY-oracle-ol6 -O /etc/pki/rpm-gpg/RPM-GPG-KEY-oracle
(3) install prerequisites
a). root$> yum install oracle-rdbms-server-11gR2-preinstall
2. 移除repo
root$> mv /etc/yum.repos.d/public-yum-ol6.repo /home
只有移除了repo,CentOS才能进行系统的补丁包更新。
附:
安装过程[tdtc100@localhost ~]$ su - root Password: [root@localhost ~]# yum install oracle-rdbms-server-11gR2-preinstall Loaded plugins: fastestmirror, refresh-packagekit, security Loading mirror speeds from cached hostfile * base: mirrors.skyshe.com * extras: mirrors.skyshe.com * updates: mirrors.skyshe.com Setting up Install Process Resolving Dependencies --> Running transaction check ---> Package oracle-rdbms-server-11gR2-preinstall.x86_64 0:1.0-9.el6 will be installed --> Processing Dependency: gcc-c++ for package: oracle-rdbms-server-11gR2-preinstall-1.0-9.el6.x86_64 --> Processing Dependency: kernel-uek for package: oracle-rdbms-server-11gR2-preinstall-1.0-9.el6.x86_64 --> Processing Dependency: compat-libcap1 for package: oracle-rdbms-server-11gR2-preinstall-1.0-9.el6.x86_64 --> Processing Dependency: ksh for package: oracle-rdbms-server-11gR2-preinstall-1.0-9.el6.x86_64 --> Processing Dependency: libaio-devel for package: oracle-rdbms-server-11gR2-preinstall-1.0-9.el6.x86_64 --> Processing Dependency: compat-libstdc++-33 for package: oracle-rdbms-server-11gR2-preinstall-1.0-9.el6.x86_64 --> Processing Dependency: libstdc++-devel for package: oracle-rdbms-server-11gR2-preinstall-1.0-9.el6.x86_64 --> Processing Dependency: nfs-utils for package: oracle-rdbms-server-11gR2-preinstall-1.0-9.el6.x86_64 --> Running transaction check ---> Package compat-libcap1.x86_64 0:1.10-1 will be installed ---> Package compat-libstdc++-33.x86_64 0:3.2.3-69.el6 will be installed ---> Package gcc-c++.x86_64 0:4.4.7-4.el6 will be installed ---> Package kernel-uek.x86_64 0:2.6.39-400.212.1.el6uek will be installed --> Processing Dependency: kernel-uek-firmware = 2.6.39-400.212.1.el6uek for package: kernel-uek-2.6.39-400.212.1.el6uek.x86_64 ---> Package ksh.x86_64 0:20120801-10.el6 will be installed ---> Package libaio-devel.x86_64 0:0.3.107-10.el6 will be installed ---> Package libstdc++-devel.x86_64 0:4.4.7-4.el6 will be installed ---> Package nfs-utils.x86_64 1:1.2.3-39.el6 will be installed --> Processing Dependency: nfs-utils-lib >= 1.1.0-3 for package: 1:nfs-utils-1.2.3-39.el6.x86_64 --> Processing Dependency: keyutils >= 1.4-4 for package: 1:nfs-utils-1.2.3-39.el6.x86_64 --> Processing Dependency: rpcbind for package: 1:nfs-utils-1.2.3-39.el6.x86_64 --> Processing Dependency: libtirpc for package: 1:nfs-utils-1.2.3-39.el6.x86_64 --> Processing Dependency: libgssglue.so.1(libgssapi_CITI_2)(64bit) for package: 1:nfs-utils-1.2.3-39.el6.x86_64 --> Processing Dependency: libgssglue for package: 1:nfs-utils-1.2.3-39.el6.x86_64 --> Processing Dependency: libevent for package: 1:nfs-utils-1.2.3-39.el6.x86_64 --> Processing Dependency: libtirpc.so.1()(64bit) for package: 1:nfs-utils-1.2.3-39.el6.x86_64 --> Processing Dependency: libnfsidmap.so.0()(64bit) for package: 1:nfs-utils-1.2.3-39.el6.x86_64 --> Processing Dependency: libgssglue.so.1()(64bit) for package: 1:nfs-utils-1.2.3-39.el6.x86_64 --> Processing Dependency: libevent-1.4.so.2()(64bit) for package: 1:nfs-utils-1.2.3-39.el6.x86_64 --> Running transaction check ---> Package kernel-uek-firmware.noarch 0:2.6.39-400.212.1.el6uek will be installed ---> Package keyutils.x86_64 0:1.4-4.el6 will be installed ---> Package libevent.x86_64 0:1.4.13-4.el6 will be installed ---> Package libgssglue.x86_64 0:0.1-11.el6 will be installed ---> Package libtirpc.x86_64 0:0.2.1-6.el6_4 will be installed ---> Package nfs-utils-lib.x86_64 0:1.1.5-6.el6 will be installed ---> Package rpcbind.x86_64 0:0.2.0-11.el6 will be installed --> Finished Dependency Resolution Dependencies Resolved =================================================================================================================== Package Arch Version Repository Size =================================================================================================================== Installing: oracle-rdbms-server-11gR2-preinstall x86_64 1.0-9.el6 ol6_latest 17 k Installing for dependencies: compat-libcap1 x86_64 1.10-1 base 17 k compat-libstdc++-33 x86_64 3.2.3-69.el6 base 183 k gcc-c++ x86_64 4.4.7-4.el6 base 4.7 M kernel-uek x86_64 2.6.39-400.212.1.el6uek ol6_UEK_latest 28 M kernel-uek-firmware noarch 2.6.39-400.212.1.el6uek ol6_UEK_latest 3.6 M keyutils x86_64 1.4-4.el6 base 39 k ksh x86_64 20120801-10.el6 base 756 k libaio-devel x86_64 0.3.107-10.el6 base 13 k libevent x86_64 1.4.13-4.el6 base 66 k libgssglue x86_64 0.1-11.el6 base 23 k libstdc++-devel x86_64 4.4.7-4.el6 base 1.6 M libtirpc x86_64 0.2.1-6.el6_4 base 78 k nfs-utils x86_64 1:1.2.3-39.el6 base 320 k nfs-utils-lib x86_64 1.1.5-6.el6 base 67 k rpcbind x86_64 0.2.0-11.el6 base 51 k Transaction Summary =================================================================================================================== Install 16 Package(s) Total download size: 39 M Installed size: 133 M Is this ok [y/N]: Y Downloading Packages: (1/16): compat-libcap1-1.10-1.x86_64.rpm | 17 kB 00:00 (2/16): compat-libstdc++-33-3.2.3-69.el6.x86_64.rpm | 183 kB 00:09 http://mirrors.skyshe.com/centos/6.5/os/x86_64/Packages/gcc-c%2B%2B-4.4.7-4.el6.x86_64.rpm: [Errno 12] Timeout on http://mirrors.skyshe.com/centos/6.5/os/x86_64/Packages/gcc-c%2B%2B-4.4.7-4.el6.x86_64.rpm: (28, 'Operation too slow. Less than 1 bytes/sec transfered the last 30 seconds') Trying other mirror. (3/16): gcc-c++-4.4.7-4.el6.x86_64.rpm | 4.7 MB 00:03 (4/16): kernel-uek-2.6.39-400.212.1.el6uek.x86_64.rpm | 28 MB 01:16 (5/16): kernel-uek-firmware-2.6.39-400.212.1.el6uek.noarch.rpm | 3.6 MB 00:11 (6/16): keyutils-1.4-4.el6.x86_64.rpm | 39 kB 00:00 (7/16): ksh-20120801-10.el6.x86_64.rpm | 756 kB 00:00 (8/16): libaio-devel-0.3.107-10.el6.x86_64.rpm | 13 kB 00:00 (9/16): libevent-1.4.13-4.el6.x86_64.rpm | 66 kB 00:00 (10/16): libgssglue-0.1-11.el6.x86_64.rpm | 23 kB 00:00 (11/16): libstdc++-devel-4.4.7-4.el6.x86_64.rpm | 1.6 MB 00:01 (12/16): libtirpc-0.2.1-6.el6_4.x86_64.rpm | 78 kB 00:00 (13/16): nfs-utils-1.2.3-39.el6.x86_64.rpm | 320 kB 00:00 (14/16): nfs-utils-lib-1.1.5-6.el6.x86_64.rpm | 67 kB 00:00 (15/16): oracle-rdbms-server-11gR2-preinstall-1.0-9.el6.x86_64.rpm | 17 kB 00:00 (16/16): rpcbind-0.2.0-11.el6.x86_64.rpm | 51 kB 00:00 ------------------------------------------------------------------------------------------------------------------------------------ Total 160 kB/s | 39 MB 04:11 warning: rpmts_HdrFromFdno: Header V3 RSA/SHA256 Signature, key ID ec551f03: NOKEY Retrieving key from file:///etc/pki/rpm-gpg/RPM-GPG-KEY-oracle Importing GPG key 0xEC551F03: Userid: "Oracle OSS group (Open Source Software group) <build@oss.oracle.com>" From : /etc/pki/rpm-gpg/RPM-GPG-KEY-oracle Is this ok [y/N]: Y Running rpm_check_debug Running Transaction Test Transaction Test Succeeded Running Transaction Installing : libgssglue-0.1-11.el6.x86_64 1/16 Installing : libtirpc-0.2.1-6.el6_4.x86_64 2/16 Installing : libstdc++-devel-4.4.7-4.el6.x86_64 3/16 Installing : gcc-c++-4.4.7-4.el6.x86_64 4/16 Installing : rpcbind-0.2.0-11.el6.x86_64 5/16 Installing : keyutils-1.4-4.el6.x86_64 6/16 Installing : ksh-20120801-10.el6.x86_64 7/16 Installing : kernel-uek-firmware-2.6.39-400.212.1.el6uek.noarch 8/16 Installing : kernel-uek-2.6.39-400.212.1.el6uek.x86_64 9/16 Installing : compat-libstdc++-33-3.2.3-69.el6.x86_64 10/16 Installing : libaio-devel-0.3.107-10.el6.x86_64 11/16 Installing : libevent-1.4.13-4.el6.x86_64 12/16 Installing : nfs-utils-lib-1.1.5-6.el6.x86_64 13/16 Installing : 1:nfs-utils-1.2.3-39.el6.x86_64 14/16 Installing : compat-libcap1-1.10-1.x86_64 15/16 Installing : oracle-rdbms-server-11gR2-preinstall-1.0-9.el6.x86_64 16/16 Verifying : compat-libcap1-1.10-1.x86_64 1/16 Verifying : libgssglue-0.1-11.el6.x86_64 2/16 Verifying : libstdc++-devel-4.4.7-4.el6.x86_64 3/16 Verifying : libevent-1.4.13-4.el6.x86_64 4/16 Verifying : libaio-devel-0.3.107-10.el6.x86_64 5/16 Verifying : nfs-utils-lib-1.1.5-6.el6.x86_64 6/16 Verifying : oracle-rdbms-server-11gR2-preinstall-1.0-9.el6.x86_64 7/16 Verifying : compat-libstdc++-33-3.2.3-69.el6.x86_64 8/16 Verifying : kernel-uek-firmware-2.6.39-400.212.1.el6uek.noarch 9/16 Verifying : kernel-uek-2.6.39-400.212.1.el6uek.x86_64 10/16 Verifying : rpcbind-0.2.0-11.el6.x86_64 11/16 Verifying : 1:nfs-utils-1.2.3-39.el6.x86_64 12/16 Verifying : ksh-20120801-10.el6.x86_64 13/16 Verifying : gcc-c++-4.4.7-4.el6.x86_64 14/16 Verifying : keyutils-1.4-4.el6.x86_64 15/16 Verifying : libtirpc-0.2.1-6.el6_4.x86_64 16/16 Installed: oracle-rdbms-server-11gR2-preinstall.x86_64 0:1.0-9.el6 Dependency Installed: compat-libcap1.x86_64 0:1.10-1 compat-libstdc++-33.x86_64 0:3.2.3-69.el6 gcc-c++.x86_64 0:4.4.7-4.el6 kernel-uek.x86_64 0:2.6.39-400.212.1.el6uek kernel-uek-firmware.noarch 0:2.6.39-400.212.1.el6uek keyutils.x86_64 0:1.4-4.el6 ksh.x86_64 0:20120801-10.el6 libaio-devel.x86_64 0:0.3.107-10.el6 libevent.x86_64 0:1.4.13-4.el6 libgssglue.x86_64 0:0.1-11.el6 libstdc++-devel.x86_64 0:4.4.7-4.el6 libtirpc.x86_64 0:0.2.1-6.el6_4 nfs-utils.x86_64 1:1.2.3-39.el6 nfs-utils-lib.x86_64 0:1.1.5-6.el6 rpcbind.x86_64 0:0.2.0-11.el6 Complete! [root@localhost ~]#


相关文章推荐
- CentOS 6.5 安装Oracle 11g R2
- CentOS 7静默(无图形化界面)安装Oracle 11g
- CentOS 7静默(无图形化界面)远程xshell安装Oracle 11g
- CentOS/RHEL安装oracle 11G
- centOS学习part5:oracle 11g安装之环境准备
- 基于CentOS与VmwareStation10搭建Oracle11G RAC 64集群环境:4.安装Oracle RAC FAQ-4.7.Oracle 11G R2 RAC修改public网络IP
- CentOS 5.5上安装配置oracle 11g R2
- CentOS6.5下安装Oracle 11g R2
- Centos 6.5安装oracle 11g
- 在centos 5.1下安装oracle 11g
- 新手教你centOS 6.5下面如何安装Oracle 11g(通用版)
- Linux(CentOS)安装Oracle_11g_r2数据库(三)验证安装
- centos 6.x 下oracle 11g 安装配置 [简单记录]
- CentOS 5.5上安装配置oracle 11g R2
- CentOS 5.5上安装配置oracle 11g R2
- Centos6.5安装JDK8+tomcat8.0.22+oracle-11g
- Centos 7 64位 minimal 最小化安装的系统中静默安装oracle 11g r2
- CentOS_6安装Oracle_11g_R2手记
- centos 完美安装 Linux安装 oracle 11g r2