Centos6.4系统文件服务之NFS
2014-01-13 11:02
429 查看
1.查看nfs软件是否安装和启动服务
[root@localhost ~]# rpm -aq |egrep 'nfs|rpcbind'
rpcbind-0.2.0-11.el6.i686
nfs-utils-1.2.3-36.el6.i686
nfs-utils-lib-1.1.5-6.el6.i686
[root@localhost ~]# /etc/init.d/rpcbind restart
Stopping rpcbind: [ OK ]
Starting rpcbind: [ OK ]
[root@localhost ~]# /etc/init.d/nfs restart
Shutting down NFS daemon: [ OK ]
Shutting down NFS mountd: [ OK ]
Shutting down NFS quotas: [ OK ]
Shutting down NFS services: [ OK ]
Starting NFS services: [ OK ]
Starting NFS quotas: [ OK ]
Starting NFS mountd: [ OK ]
Starting NFS daemon: [ OK ]
[root@localhost ~]#
2.修改配置文件
[root@localhost ~]# vim /etc/exports
/home/nfs 2.2.2.10(ro) --这个IP是能读不能写
/home/nfs *(rw,sync,no_root_squash) --其它IP可以读写
3.关于nfs服务端的端口管理
[root@localhost ~]# vim /etc/sysconfig/nfs
RQUOTAD_PORT=875 --开户以下四行
LOCKD_TCPPORT=32803
LOCKD_UDPPORT=32769
MOUNTD_PORT=892
[root@localhost ~]#
4.开启包过滤
[root@localhost ~]# iptables -I INPUT -p tcp -m multiport --ports 111,875,892,2049,32769 -j ACCEPT
[root@localhost ~]# iptables -I INPUT -p udp -m multiport --ports 111,875,892,2049,32769 -j ACCEPT
[root@localhost ~]#
5.查看服务器共享的文件
[root@localhost ~]# showmount -e
Export list for node1:
/home/nfs (everyone)
[root@localhost ~]#
6.客户端挂载
[root@centos media]# /etc/init.d/rpcbind restart
Stopping rpcbind: [ OK ]
Starting rpcbind: [ OK ]
[root@centos media]# showmount -e 2.2.2.27
Export list for 2.2.2.27:
/home/nfs (everyone)
[root@centos media]# mount -t nfs 2.2.2.27:/home/nfs /media/
[root@centos media]# mkdir 2
[root@centos media]# ll
total 4
drwxr-xr-x 2 root root 4096 Jan 13 10:22 2
[root@centos media]#
7.在客户端安装autofs服务自动挂载
[root@centos media]# yum install autofs
[root@centos nfs1]# vim /etc/auto.master
/mnt/nfs /etc/auto.nfs --timeout=60 --60秒没有连接就断开
[root@centos nfs1]# cp /etc/auto.misc /etc/auto.nfs
[root@centos nfs1]# vim /etc/auto.nfs
nfs1 -rw,sort,intr 2.2.2.27:/home/nfs --nfs1是/mnt/nfs下的目录,IP是服务器的IP
[root@centos nfs1]# /etc/init.d/autofs restart
Stopping automount: [ OK ]
Starting automount: [ OK ]
[root@centos nfs1]#
8.Windows7系统与Linux实现nfs文件共享
(1)打开Windows7系统程序--->控制面板--->程序和功能--->打开或关闭windows功能--->选中nfs安装
(2)在Windows7系统中可以挂载Linux文件
9.nfs服务的忧化
[root@localhost ~]# showmount -a --在服务端查看有哪些客户端挂载
[root@localhost ~]# showmount -d --在服务端查看客户端连接的所有输出目录
[root@localhost ~]# showmount -e --在服务端或者客户端查看共享目录
[root@localhost ~]# exportfs -a --全部挂载和卸载
[root@localhost ~]# exportfs -r --重新挂载
[root@localhost ~]# exportfs -v --输出目录时输出到屏幕上
[root@centos nfs1]# nfsiostat /mnt/nfs/nfs1 --在客户端查看nfs详细参数
[root@centos nfs1]# nfsstat --查看nfs的状态
[root@centos nfs1]# rpcinfo -p localhost |grep nfs --查看rpc端口连接
[root@centos nfs1]# cat /var/lib/nfs/etab --查看nfs默认的参数
[root@centos nfs1]# cat /var/lib/nfs/xtab --nfs服务器被挂载的信息
本文出自 “一起走过的日子” 博客,请务必保留此出处http://tongcheng.blog.51cto.com/6214144/1351145
[root@localhost ~]# rpm -aq |egrep 'nfs|rpcbind'
rpcbind-0.2.0-11.el6.i686
nfs-utils-1.2.3-36.el6.i686
nfs-utils-lib-1.1.5-6.el6.i686
[root@localhost ~]# /etc/init.d/rpcbind restart
Stopping rpcbind: [ OK ]
Starting rpcbind: [ OK ]
[root@localhost ~]# /etc/init.d/nfs restart
Shutting down NFS daemon: [ OK ]
Shutting down NFS mountd: [ OK ]
Shutting down NFS quotas: [ OK ]
Shutting down NFS services: [ OK ]
Starting NFS services: [ OK ]
Starting NFS quotas: [ OK ]
Starting NFS mountd: [ OK ]
Starting NFS daemon: [ OK ]
[root@localhost ~]#
2.修改配置文件
[root@localhost ~]# vim /etc/exports
/home/nfs 2.2.2.10(ro) --这个IP是能读不能写
/home/nfs *(rw,sync,no_root_squash) --其它IP可以读写
3.关于nfs服务端的端口管理
[root@localhost ~]# vim /etc/sysconfig/nfs
RQUOTAD_PORT=875 --开户以下四行
LOCKD_TCPPORT=32803
LOCKD_UDPPORT=32769
MOUNTD_PORT=892
[root@localhost ~]#
4.开启包过滤
[root@localhost ~]# iptables -I INPUT -p tcp -m multiport --ports 111,875,892,2049,32769 -j ACCEPT
[root@localhost ~]# iptables -I INPUT -p udp -m multiport --ports 111,875,892,2049,32769 -j ACCEPT
[root@localhost ~]#
5.查看服务器共享的文件
[root@localhost ~]# showmount -e
Export list for node1:
/home/nfs (everyone)
[root@localhost ~]#
6.客户端挂载
[root@centos media]# /etc/init.d/rpcbind restart
Stopping rpcbind: [ OK ]
Starting rpcbind: [ OK ]
[root@centos media]# showmount -e 2.2.2.27
Export list for 2.2.2.27:
/home/nfs (everyone)
[root@centos media]# mount -t nfs 2.2.2.27:/home/nfs /media/
[root@centos media]# mkdir 2
[root@centos media]# ll
total 4
drwxr-xr-x 2 root root 4096 Jan 13 10:22 2
[root@centos media]#
7.在客户端安装autofs服务自动挂载
[root@centos media]# yum install autofs
[root@centos nfs1]# vim /etc/auto.master
/mnt/nfs /etc/auto.nfs --timeout=60 --60秒没有连接就断开
[root@centos nfs1]# cp /etc/auto.misc /etc/auto.nfs
[root@centos nfs1]# vim /etc/auto.nfs
nfs1 -rw,sort,intr 2.2.2.27:/home/nfs --nfs1是/mnt/nfs下的目录,IP是服务器的IP
[root@centos nfs1]# /etc/init.d/autofs restart
Stopping automount: [ OK ]
Starting automount: [ OK ]
[root@centos nfs1]#
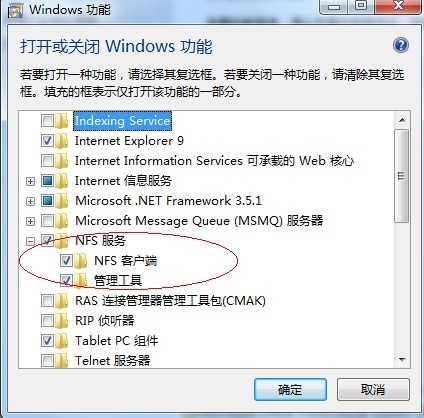
8.Windows7系统与Linux实现nfs文件共享
(1)打开Windows7系统程序--->控制面板--->程序和功能--->打开或关闭windows功能--->选中nfs安装
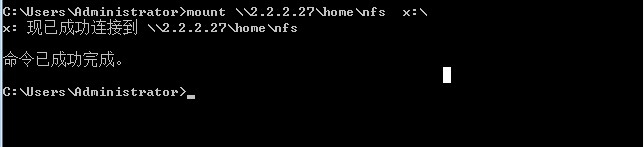
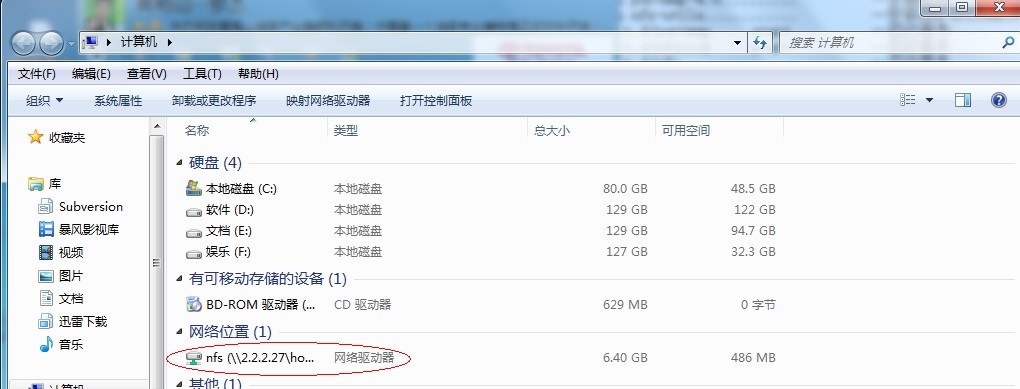
(2)在Windows7系统中可以挂载Linux文件
9.nfs服务的忧化
[root@localhost ~]# showmount -a --在服务端查看有哪些客户端挂载
[root@localhost ~]# showmount -d --在服务端查看客户端连接的所有输出目录
[root@localhost ~]# showmount -e --在服务端或者客户端查看共享目录
[root@localhost ~]# exportfs -a --全部挂载和卸载
[root@localhost ~]# exportfs -r --重新挂载
[root@localhost ~]# exportfs -v --输出目录时输出到屏幕上
[root@centos nfs1]# nfsiostat /mnt/nfs/nfs1 --在客户端查看nfs详细参数
[root@centos nfs1]# nfsstat --查看nfs的状态
[root@centos nfs1]# rpcinfo -p localhost |grep nfs --查看rpc端口连接
[root@centos nfs1]# cat /var/lib/nfs/etab --查看nfs默认的参数
[root@centos nfs1]# cat /var/lib/nfs/xtab --nfs服务器被挂载的信息
本文出自 “一起走过的日子” 博客,请务必保留此出处http://tongcheng.blog.51cto.com/6214144/1351145

相关文章推荐
- Centos6.4系统文件服务之SAMBA
- centos6.4 64位下安装nfs文件共享系统
- centos6.4 64位下安装nfs文件共享系统
- Centos 7网络文件系统nfs服务的安装与配置
- Centos6.4系统文件服务之VSFTP
- centOS6.4 64位下安装nfs文件共享系统
- centOS6.4 64位下安装nfs文件共享系统
- centos6.4 64位下安装nfs文件共享系统
- centos6.4 64位下安装nfs文件共享系统
- CentOS下部署NFS文件系统
- 配置linux集群中的NFS文件共享服务 centos6.5Final
- CentOS 6.4安装和配置NFS服务
- NFS服务挂接根文件系统
- NFS网络文件系统服务介绍与实战
- Centos 7网络文件系统nfs搭建
- 如何开启Centos6.4系统的SSH服务
- 【未整理】文件系统挂载服务NFS安装和使用
- 配置网络文件系统NFS服务
- Linux系统之工具篇(一)DRBD 单双主模式区别详解,Centos6.5(64bit)与nfs文件系统使用结合测试
- 配置网络文件系统NFS服务 及其自启动