在Ubuntu上安装KVM并搭建虚拟环境
2014-01-09 15:45
393 查看
原文:http://blog.fens.me/vps-kvm/
1. 环境准备
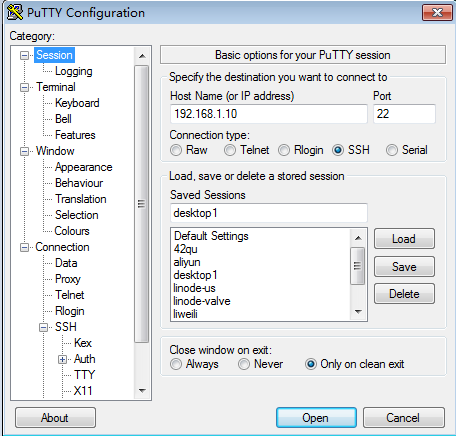
1) 两台计算机,一台是操作计算机Client, 一台是服务器Server
Client: 笔记本电脑, Win7旗舰版,64位,内网ip: 192.168.1.101
Server(Host): 服务器, Ubuntu 12.04LTS 64位,2核CPU,4G内存,内网ip:192.168.1.10,
2) 在server启动时,进入BIOS中开起CPU虚拟化的支持
进入BIOS中,在config –> CPU选项中
Intel(R) Virtualization Technology (Enabled)
Intel(R) VT-d Feature (Enabled)
不同BIOS菜单稍有不同。
3) Server上,先安装Openssh-server,Client才能连接
~ sudo apt-get install openssh-server
Clinet通过Putty回家连接Server。
注:以下的所有操作都通过SSH进行。
4) Server系统环境
~ uname -a

Linux conan 3.5.0-23-generic #35~precise1-Ubuntu SMP Fri Jan 25 17:13:26 UTC 2013 x86_64 x86_64 x86_64 GNU/Linux

~ cat /etc/issue

Ubuntu 12.04.2 LTS \n \l
5) 查看CPU的虚拟化支持
~ egrep 'svm|vmx' /proc/cpuinfo

flags : fpu vme de pse tsc msr pae mce cx8 apic sep mtrr pge mca cmov pat pse36 clflush dts acpi mmx fxsr sse sse2 ss ht tm pbe syscall nx lm constant_tsc arch_perfmon pebs bts nopl aperfmperf pni dtes64 monitor ds_cpl vmx smx est tm2 ssse3 cx16 xtpr pdcm sse4_1
xsave lahf_lm ida dtherm tpr_shadow vnmi flexpriority
我机器是intel的CPU,可以查看vmx的标识
6) Server上,配置ubuntu下载源sources.list,我用的是sohu源。
~ sudo vi /etc/apt/sources.list

deb http://mirrors.sohu.com/ubuntu/ precise main restricted

deb-src http://mirrors.sohu.com/ubuntu/ precise main restricted

deb http://mirrors.sohu.com/ubuntu/ precise-updates main restricted

deb-src http://mirrors.sohu.com/ubuntu/ precise-updates main restricted

deb http://mirrors.sohu.com/ubuntu/ precise universe

deb-src http://mirrors.sohu.com/ubuntu/ precise universe

deb http://mirrors.sohu.com/ubuntu/ precise-updates universe

deb-src http://mirrors.sohu.com/ubuntu/ precise-updates universe

deb http://mirrors.sohu.com/ubuntu/ precise multiverse

deb-src http://mirrors.sohu.com/ubuntu/ precise multiverse

deb http://mirrors.sohu.com/ubuntu/ precise-updates multiverse

deb-src http://mirrors.sohu.com/ubuntu/ precise-updates multiverse

deb http://mirrors.sohu.com/ubuntu/ precise-backports main restricted universe multiverse

deb-src http://mirrors.sohu.com/ubuntu/ precise-backports main restricted universe multiverse

deb http://mirrors.sohu.com/ubuntu/ precise-security main restricted

deb-src http://mirrors.sohu.com/ubuntu/ precise-security main restricted

deb http://mirrors.sohu.com/ubuntu/ precise-security universe

deb-src http://mirrors.sohu.com/ubuntu/ precise-security universe

deb http://mirrors.sohu.com/ubuntu/ precise-security multiverse

deb-src http://mirrors.sohu.com/ubuntu/ precise-security multiverse

deb http://extras.ubuntu.com/ubuntu precise main

deb-src http://extras.ubuntu.com/ubuntu precise main
#更新源
~ sudo apt-get update
2. 安装KVM软件
1) Server上,安装KVM及virt管理软件~ sudo apt-get install kvm qemu ~ sudo apt-get install virtinst python-libvirt virt-viewer virt-manager
在ubuntu上安装,真的很简单。
3. 配置桥接网卡
1) 在这里我们使用网卡桥接的方式~ sudo apt-get install bridge-utils
2) 查看网卡的设置
~ ifconfig

eth0 Link encap:Ethernet HWaddr 00:1c:25:a1:99:fc

inet addr:192.168.1.10 Bcast:192.168.1.255 Mask:255.255.255.0

inet6 addr: fe80::21c:25ff:fea1:99fc/64 Scope:Link

UP BROADCAST RUNNING MULTICAST MTU:1500 Metric:1

RX packets:736674 errors:0 dropped:0 overruns:0 frame:0

TX packets:1098750 errors:0 dropped:0 overruns:0 carrier:0

collisions:0 txqueuelen:1000

RX bytes:63783787 (63.7 MB) TX bytes:1540374899 (1.5 GB)

Interrupt:20 Memory:fc200000-fc220000
lo Link encap:Local Loopback

inet addr:127.0.0.1 Mask:255.0.0.0

inet6 addr: ::1/128 Scope:Host

UP LOOPBACK RUNNING MTU:16436 Metric:1

RX packets:1156 errors:0 dropped:0 overruns:0 frame:0

TX packets:1156 errors:0 dropped:0 overruns:0 carrier:0

collisions:0 txqueuelen:0

RX bytes:114090 (114.0 KB) TX bytes:114090 (114.0 KB)
virbr0 Link encap:Ethernet HWaddr be:65:ec:88:86:3d

inet addr:192.168.122.1 Bcast:192.168.122.255 Mask:255.255.255.0

UP BROADCAST MULTICAST MTU:1500 Metric:1

RX packets:0 errors:0 dropped:0 overruns:0 frame:0

TX packets:0 errors:0 dropped:0 overruns:0 carrier:0

collisions:0 txqueuelen:0

RX bytes:0 (0.0 B) TX bytes:0 (0.0 B)
3) 已有的网卡
eth0是直接插入网线的以太网卡,
lo是本地网络,本机内部资源
virbr0是刚才我们装完KVM后,自己生成的虚拟网卡
4) 网卡桥接
我们增加一个叫br0的虚拟网卡,让这个网卡可以和eth0以太网的网卡做桥接
~ sudo vi /etc/network/interfaces

auto lo

iface lo inet loopback

auto eth0

iface eth0 inet manual

auto br0

iface br0 inet static

address 192.168.1.10

netmask 255.255.255.0

gateway 192.168.1.1

bridge_ports eth0
保存,重起网卡设置
~ sudo /etc/init.d/networking restart
再查看网卡的设置
~ ifconfig

br0 Link encap:Ethernet HWaddr 00:1c:25:a1:99:fc

inet addr:192.168.1.10 Bcast:192.168.1.255 Mask:255.255.255.0

inet6 addr: fe80::21c:25ff:fea1:99fc/64 Scope:Link

UP BROADCAST RUNNING MULTICAST MTU:1500 Metric:1

RX packets:91 errors:0 dropped:0 overruns:0 frame:0

TX packets:100 errors:0 dropped:0 overruns:0 carrier:0

collisions:0 txqueuelen:0

RX bytes:6260 (6.2 KB) TX bytes:15470 (15.4 KB)
eth0 Link encap:Ethernet HWaddr 00:1c:25:a1:99:fc

UP BROADCAST RUNNING MULTICAST MTU:1500 Metric:1

RX packets:605 errors:0 dropped:0 overruns:0 frame:0

TX packets:425 errors:0 dropped:0 overruns:0 carrier:0

collisions:0 txqueuelen:1000

RX bytes:112441 (112.4 KB) TX bytes:61529 (61.5 KB)

Interrupt:20 Memory:fc200000-fc220000
lo Link encap:Local Loopback

inet addr:127.0.0.1 Mask:255.0.0.0

inet6 addr: ::1/128 Scope:Host

UP LOOPBACK RUNNING MTU:16436 Metric:1

RX packets:36 errors:0 dropped:0 overruns:0 frame:0

TX packets:36 errors:0 dropped:0 overruns:0 carrier:0

collisions:0 txqueuelen:0

RX bytes:2100 (2.1 KB) TX bytes:2100 (2.1 KB)
virbr0 Link encap:Ethernet HWaddr 2a:b8:36:cf:cc:c6

inet addr:192.168.122.1 Bcast:192.168.122.255 Mask:255.255.255.0

UP BROADCAST MULTICAST MTU:1500 Metric:1

RX packets:0 errors:0 dropped:0 overruns:0 frame:0

TX packets:0 errors:0 dropped:0 overruns:0 carrier:0

collisions:0 txqueuelen:0

RX bytes:0 (0.0 B) TX bytes:0 (0.0 B)
这个时候eth0,已经没有具体的IP地址。IP地址出在了br0的虚拟网上面。
我们ping一下公网ip,看看是不是通的。
~ ping 8.8.8.8

PING 8.8.8.8 (8.8.8.8) 56(84) bytes of data.

64 bytes from 8.8.8.8: icmp_req=1 ttl=46 time=51.7 ms

64 bytes from 8.8.8.8: icmp_req=2 ttl=46 time=50.8 ms
4. 创建虚拟机
通过virt虚拟机管理软件,创建虚拟机(Guest)。上传2个安装镜像到Server: u1204.iso, xp.iso
放在/home/conan/os目录下面。
1)创建Guest1, Ubuntu 64位LTS 12.04版本(命令行,无可视化界面)
把u1204.iso文件mount一个目录
~ sudo mount -o loop /home/conan/os/u1204.iso /home/conan/os/ubuntu
~ ls /home/conan/os/ubuntu

boot dists EFI isolinux pics preseed ubuntu

cdromupgrade doc install md5sum.txt pool README.diskdefines
创建虚拟机
~ sudo virt-install --connect=qemu:///system \

--name g1 \

--ram 2048 \

--vcpus=2 \

--os-type=linux \

--os-variant=ubuntuprecise \

--accelerate \

--hvm \

--disk path=/home/conan/os/g1.img,size=6,bus=virtio \

--location /home/conan/os/ubuntu \

--extra-args='console=tty0 console=ttyS0' \

--network bridge=br0,model=virtio \

--graphics none
进入安装界面
lqqqqqqqqqqqqqqqqqqqqqqqu [!!] Select a language tqqqqqqqqqqqqqqqqqqqqqqqqk

x x

x Choose the language to be used for the installation process. The x

x selected language will also be the default language for the installed x

x system. x

x x

x Language: x

x x

x C x

x English x

x x

x <Go Back> x

x x

mqqqqqqqqqqqqqqqqqqqqqqqqqqqqqqqqqqqqqqqqqqqqqqqqqqqqqqqqqqqqqqqqqqqqqqqqqj

<Tab> moves; <Space> selects; <Enter> activates buttons
安装系统
lqqqqqqqqqqqqqqqqqqqqqu [!] Configure the network tqqqqqqqqqqqqqqqqqqqqqk

x x

x Please enter the hostname for this system. x

x x

x The hostname is a single word that identifies your system to the x

x network. If you don't know what your hostname should be, consult your x

x network administrator. If you are setting up your own home network, x

x you can make something up here. x

x x

x Hostname: x

x x

x localhost____________________________________________________________ x

x x

x <Go Back> <Continue> x

x x

mqqqqqqqqqqqqqqqqqqqqqqqqqqqqqqqqqqqqqqqqqqqqqqqqqqqqqqqqqqqqqqqqqqqqqqqj

<Tab> moves; <Space> selects; <Enter> activates buttons
安装完成
2). 创建Guest2, Ubuntu 64位LTS 12.04版本(通过VNC,有可视化界面)
在server端,我要打开vnc_listen的端口支持
~ vi /etc/libvirt/qemu.conf

#打开注释

vnc_listen="0.0.0.0"
重启virt软件
~ sudo /etc/init.d/libvirt-bin restart

~ netstat -nlt|grep 5900

tcp 0 0 0.0.0.0:5900 0.0.0.0:* LISTEN
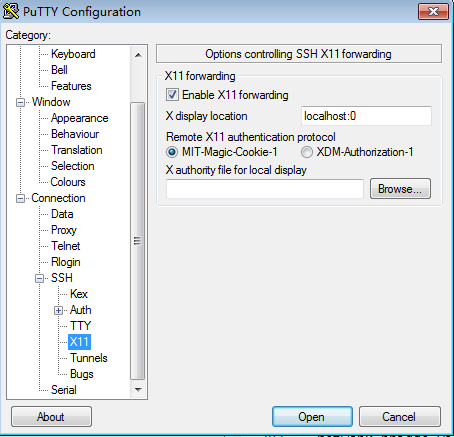
我们需要使用到Xming和putty配合,可以让putty远程传输的VNC信号通过Xming显示出来。
在putty里面,我们要修改一下配置。
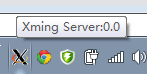
启动Xming软件
执行命令
~ sudo virt-install --connect=qemu:///system \

--name g2 \

--ram 2048 \

--vcpus=2 \

--os-type=linux \

--os-variant=ubuntuprecise \

--accelerate \

--hvm \

--disk path=/home/conan/os/g2.img,size=6,bus=virtio \

--cdrom /home/conan/os/u1204.iso \

--network bridge=br0,model=virtio \

--graphics vnc
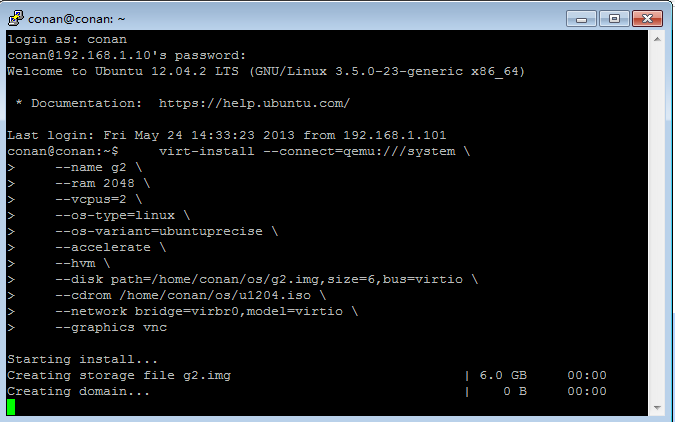
通过Xming显示了VNC的界面,ubuntu安装画面

安装完成
3. 创建Guest3, Winxp(通过VNC,有可视化界面)
注1:这里的winxp必须安装版,ghost是不行的。
注2:windows的安装,必须要使用VNC界面方式,没有命令直接安装的方法
执行命令
sudo virt-install --connect=qemu:///system \

--name g3 \

--ram 1024 \

--vcpus=1 \

--os-type=windows \

--os-variant=winxp \

--accelerate \

--hvm \

--disk path=/home/conan/os/g3.img,size=4 \

--cdrom /home/conan/os/xp.iso \

--network bridge=br0,model=ne2k_pci \

--graphics vnc
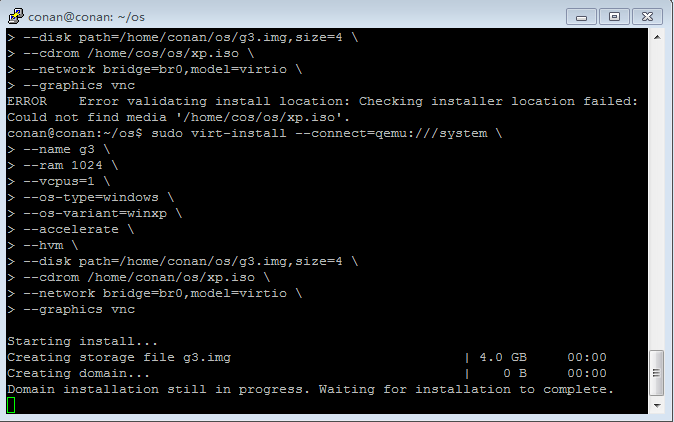
通过Xming显示了VNC的界面,WinXP安装画面
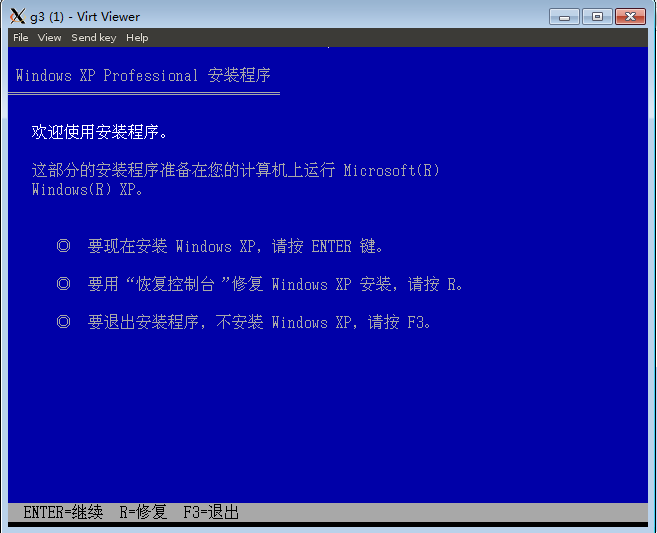
安装完成
虚拟机互相通信
我们启动Guest1(ubuntu), Guest3(winxp).Client: ip: 192.168.1.101
Server: ip: 192.168.1.10
Guest1: ip: 192.168.1.11
Guest3: ip: 192.168.1.12
他们都在同一网段,相互可以ping通,也可以相互调用。
如果你实验结果和我一样,那么恭喜你,已经实现了通过KVM搭建自己的VPS过程。
错误解决方案
1. 错误代码:libvirtError: internal error Process exited while reading console log output: char device redirected to /dev/pts/4 Could not access KVM kernel module: Permission denied failed to initialize KVM: Permission denied No accelerator found!
解决办法:
~ sudo rmmod kvm_intel

~ sudo modprobe -r kvm_intel

~ sudo modprobe kvm_intel nested=1
http://blog.fens.me/vps-kvm/
http://blog.fens.me/vps-kvm/

相关文章推荐
- Ubuntu下安装搭建KVM环境完整版
- Ubuntu 17.10 用 apt 搭建 lamp 环境、安装 phpmyadmin、redis 服务+扩展、mysql 扩展、开启错误提示、配置虚拟主机
- ubuntu14.04安装及web环境的搭建
- VMware安装Ubuntu教程,Linux下搭建Android开发环境
- Ubuntu 14.04下搭建 Android 开发环境(1) -JDK安装
- ubuntu系统安装jdk,搭建android环境
- Ubuntu中安装不上pip(亲测,很有效)+安装python虚拟环境virtualenv
- 在虚拟机以及pc机上安装ubuntu 9.10_x86_64系统搭建android开发环境
- ubuntu下virtualenv安装python虚拟环境
- Ubuntu16.04下伪分布式环境搭建之hadoop2.6.0、jdk1.7、Hbase0.98的安装与配置
- Ubuntu 搭建LNMP环境图文教程 安装PHP
- Linux开发环境搭建与使用——ubuntu物理机安装方法-U盘安装
- Caffe安装笔记一:VMWare11+Ubuntu14.04搭建Linux安装环境
- ubuntu安装到搭建lamp环境所遇到的问题
- ubuntu 12.04 64位 安装ADT搭建安卓开发环境
- [转]一步步搭建Ubuntu环境——dpkg 被中断,您必须手工运行 sudo dpkg --configure -a 解决此问题——安装Flashplayer出错 ------不错
- VirtualBox安装Ubuntu搭建js环境的注意事项
- 【Tensorflow】 第三节 环境搭建一 Ubuntu16.04LTS安装Python/pip/ANACONDA
- Linux开发环境搭建 二 (Ubuntu串口工具minicom的安装及使用)
- vmware ubuntu linux tomcat Xshell Xftp 搭建网站后台——(二)环境搭建-ubuntu 下载安装