Android中AIDL使用例子
2013-12-24 21:45
411 查看
本文提供了一个关于AIDL使用的简单易懂的例子,分为客户端和服务端两部分,分别为客户端和服务端新建一个eclipse工程,实现了从客户端向服务端发送请求,服务端打印log的功能。
客户端和服务端的源码结构如下:
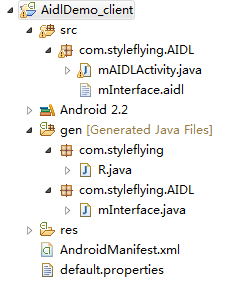
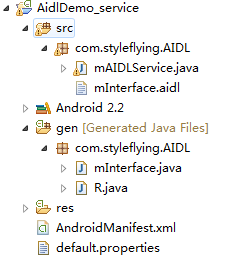
注意,由于客户端和服务端的aidl文件所在包名必须一样,而两个包名一样的程序在安装时会产生冲突,所以这里用了一个技巧,在客户端工程的AndroidManifest.xml里把包名指定为com.styleflying,所以大家就会看到gen目录下的R.java所在的包是com.styleflying而不是com.styleflying.AIDL
正文
现在客户端和服务端工程分别新建一个aidl接口,所在包和文件名必须一样。两个aidl接口是一样的,内容如下:
客户端的mAIDLActivity.java如下:
注意onBind()函数,返回了mBinder,而mBinder实现了mInterface.Stub,实现了mInterface接口,执行了打印log的操作。
整个交互流程如下:
1.客户端通过绑定服务,获取了服务的句柄(本地代理对象);
2.客户端执行onClick(),调用本地代理对象的invokTest()函数,本地代理对象调用mRemote.transact()发出远程调用请求(见 mInterface.java);
3.服务端响应onTransact()执行this.invokTest(),并将执行结果返回;
由于客户端只和本地代理对象即服务句柄通信,由代理对象进行真正的IPC操作,所以对客户端来说,IPC过程是透明的,调用远程操作如同调用本地操作一样。在客户端调用transact()时,会将服务描述DSCRIPTION写入到data里,在客户端onTransact时会验证,如果两个不一样,则不能通信。而DSCRIPTION是根据mInterface包名和接口名自动生成的,这就是为什么两个工程里的mInterface.aidl要在同一个包的原因。
在这个过程中,mInterface.aidl起到了桥梁的作用,规定统一了客户端和服务端的通信接口,使得客户端和服务端得以成功的通信。
具体的通信transact和onTransact的过程也就是利用Binder驱动通信的过程,在这里就不多叙述。
最后补上两个工程的AndroidManifest.xml
<?xml version="1.0" encoding="utf-8"?>
<manifest xmlns:android="http://schemas.android.com/apk/res/android"
package="com.styleflying"
android:versionCode="1"
android:versionName="1.0">
<application android:icon="@drawable/icon" android:label="@string/app_name">
<activity android:name=".AIDL.mAIDLActivity"
android:label="@string/app_name">
<intent-filter>
<action android:name="android.intent.action.MAIN" />
<category android:name="android.intent.category.LAUNCHER" />
</intent-filter>
</activity>
</application>
<uses-sdk android:minSdkVersion="8" />
</manifest>
客户端和服务端的源码结构如下:
注意,由于客户端和服务端的aidl文件所在包名必须一样,而两个包名一样的程序在安装时会产生冲突,所以这里用了一个技巧,在客户端工程的AndroidManifest.xml里把包名指定为com.styleflying,所以大家就会看到gen目录下的R.java所在的包是com.styleflying而不是com.styleflying.AIDL
正文
现在客户端和服务端工程分别新建一个aidl接口,所在包和文件名必须一样。两个aidl接口是一样的,内容如下:
/*
* This file is auto-generated.  DO NOT MODIFY.
* Original file: G://workspace//AidlDemo_client//src//com//styleflying//AIDL//mInterface.aidl
*/
package com.styleflying.AIDL;
public interface mInterface extends android.os.IInterface
{
/** Local-side IPC implementation stub class. */
public static abstract class Stub extends android.os.Binder implements com.styleflying.AIDL.mInterface
{
private static final java.lang.String DESCRIPTOR = "com.styleflying.AIDL.mInterface";
/** Construct the stub at attach it to the interface. */
public Stub()
{
this.attachInterface(this, DESCRIPTOR);
}
/**
* Cast an IBinder object into an com.styleflying.AIDL.mInterface interface,
* generating a proxy if needed.
*/
public static com.styleflying.AIDL.mInterface asInterface(android.os.IBinder obj)
{
if ((obj==null)) {
return null;
}
android.os.IInterface iin = (android.os.IInterface)obj.queryLocalInterface(DESCRIPTOR);
if (((iin!=null)&&(iin instanceof com.styleflying.AIDL.mInterface))) {
return ((com.styleflying.AIDL.mInterface)iin);
}
return new com.styleflying.AIDL.mInterface.Stub.Proxy(obj);
}
public android.os.IBinder asBinder()
{
return this;
}
@Override public boolean onTransact(int code, android.os.Parcel data, android.os.Parcel reply, int flags) throws android.os.RemoteException
{
switch (code)
{
case INTERFACE_TRANSACTION:
{
reply.writeString(DESCRIPTOR);
return true;
}
case TRANSACTION_invokTest:
{
data.enforceInterface(DESCRIPTOR);
this.invokTest();
reply.writeNoException();
return true;
}
}
return super.onTransact(code, data, reply, flags);
}
private static class Proxy implements com.styleflying.AIDL.mInterface
{
private android.os.IBinder mRemote;
Proxy(android.os.IBinder remote)
{
mRemote = remote;
}
public android.os.IBinder asBinder()
{
return mRemote;
}
public java.lang.String getInterfaceDescriptor()
{
return DESCRIPTOR;
}
public void invokTest() throws android.os.RemoteException
{
android.os.Parcel _data = android.os.Parcel.obtain();
android.os.Parcel _reply = android.os.Parcel.obtain();
try {
_data.writeInterfaceToken(DESCRIPTOR);
mRemote.transact(Stub.TRANSACTION_invokTest, _data, _reply, 0);
_reply.readException();
}
finally {
_reply.recycle();
_data.recycle();
}
}
}
static final int TRANSACTION_invokTest = (android.os.IBinder.FIRST_CALL_TRANSACTION + 0);
}
public void invokTest() throws android.os.RemoteException;
}
客户端的mAIDLActivity.java如下:
package com.styleflying.AIDL;
import android.app.Service;
import android.content.Intent;
import android.os.IBinder;
import android.os.Looper;
import android.os.RemoteException;
import android.util.Log;
import android.widget.Toast;
public class mAIDLService extends Service{
private static final String TAG = "AIDLService";

private void Log(String str){
Log.i(TAG,"----------" + str + "----------");
}

public void onCreate(){
Log("service created");
}

public void onStart(Intent intent, int startId){
Log("service started id = " + startId);
}

public IBinder onBind(Intent t){
Log("service on bind");
return mBinder;
}

public void onDestroy(){
Log("service on destroy");
super.onDestroy();
}

public boolean onUnbind(Intent intent){
Log("service on unbind");
return super.onUnbind(intent);
}

public void onRebind(Intent intent){
Log("service on rebind");
super.onRebind(intent);
}

private final mInterface.Stub mBinder = new mInterface.Stub() {
public void invokTest() throws RemoteException {
// TODO Auto-generated method stub
Log.e(TAG, "remote call from client! current thread id = " + Thread.currentThread().getId());
}
};
}
注意onBind()函数,返回了mBinder,而mBinder实现了mInterface.Stub,实现了mInterface接口,执行了打印log的操作。
整个交互流程如下:
1.客户端通过绑定服务,获取了服务的句柄(本地代理对象);
2.客户端执行onClick(),调用本地代理对象的invokTest()函数,本地代理对象调用mRemote.transact()发出远程调用请求(见 mInterface.java);
3.服务端响应onTransact()执行this.invokTest(),并将执行结果返回;
由于客户端只和本地代理对象即服务句柄通信,由代理对象进行真正的IPC操作,所以对客户端来说,IPC过程是透明的,调用远程操作如同调用本地操作一样。在客户端调用transact()时,会将服务描述DSCRIPTION写入到data里,在客户端onTransact时会验证,如果两个不一样,则不能通信。而DSCRIPTION是根据mInterface包名和接口名自动生成的,这就是为什么两个工程里的mInterface.aidl要在同一个包的原因。
在这个过程中,mInterface.aidl起到了桥梁的作用,规定统一了客户端和服务端的通信接口,使得客户端和服务端得以成功的通信。
具体的通信transact和onTransact的过程也就是利用Binder驱动通信的过程,在这里就不多叙述。
最后补上两个工程的AndroidManifest.xml
<?xml version="1.0" encoding="utf-8"?>
<manifest xmlns:android="http://schemas.android.com/apk/res/android"
package="com.styleflying"
android:versionCode="1"
android:versionName="1.0">
<application android:icon="@drawable/icon" android:label="@string/app_name">
<activity android:name=".AIDL.mAIDLActivity"
android:label="@string/app_name">
<intent-filter>
<action android:name="android.intent.action.MAIN" />
<category android:name="android.intent.category.LAUNCHER" />
</intent-filter>
</activity>
</application>
<uses-sdk android:minSdkVersion="8" />
</manifest>
<?xml version="1.0" encoding="utf-8"?>
<manifest xmlns:android="http://schemas.android.com/apk/res/android"
package="com.styleflying.AIDL"
android:versionCode="1"
android:versionName="1.0">
<application android:icon="@drawable/icon" android:label="@string/app_name">
<service android:name=".mAIDLService">
<intent-filter>
<action android:name="com.styleflying.AIDL.service" />
<category android:name="android.intent.category.DEFAULT" />
</intent-filter>
</service>
</application>
<uses-sdk android:minSdkVersion="8" />
</manifest>

相关文章推荐
- Android中AIDL使用例子
- Android中AIDL使用例子
- Android中AIDL使用例子
- Android中AIDL使用例子
- Android中AIDL使用例子
- Android中AIDL使用例子
- android AIDL使用的小例子
- Android中AIDL使用例子
- Android中AIDL使用例子
- Android AIDL使用详解
- Android跨进程通信_aidl使用
- Android使用AIDL远程通信
- android使用AIDL实现跨进程通讯(IPC)
- Android基础--使用AIDL实现进程间的通信之复杂类型传递
- android跨进程通信(IPC):使用AIDL
- Android进程间通信-AIDL的简单使用
- android简单的AIDL使用示例
- Android 使用【AIDL】调用外部服务
- Android 使用【AIDL】调用外部服务 .
- Android AIDL使用