通过归档永久存储数据
2013-12-17 11:45
211 查看
想要永久保存数据,我们当然可以使用plist文件,当退出程序时,我们执行将数据写入plist文件的操作,使用writeToFile:atomically:方法。
具有这个方法的类有:
例如,我们的数据存储在NSArray的一个对象array中,保存数据时执行:
其中filePath是放在SandBox中的一个plist文件的完整路径。
不过,使用plist文件还是有局限性的,例如,我们不好将一个图片存储在plist中。
这次的小例子中,我们将会通过归档实现数据的保存。当程序运行时,先检查归档文件是否存在,如果存在的话就从归档文件中读取数据显示在界面上;如果归档文件不存在,就使用默认设置。当程序关闭时,会将数据存储在归档文件中,这样下次运行程序时就会显示上次的设置了。
1、运行Xcode 4.3,新建一个Single View Application,名称为:Archiving Test:

然后将准备好的两张图片添加到工程中。
2、先进行界面设计:
单击ViewController.xib,向其中添加控件:
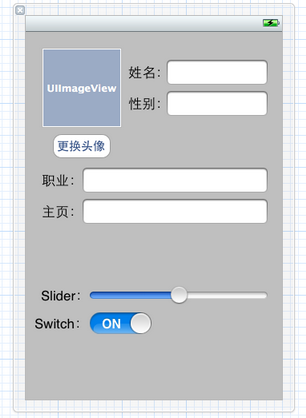
然后向ViewController.h中为控件建立Outlet映射和Action映射,具体是为所有的TextField、ImageView、UISlider控件和UISwitch控件建立Outlet映射,为Button建立Action映射:

3、新建一个类,用于存储我们的数据:
在菜单栏依次选择File — New — File…,在打开的窗口选择Objective-C Class:

单击Next,输入类名:ArchivingData,选择super class为NSObject:

单击Next,选好位置和分组,点击创建,完成类的建立。
4、打开ArchivingData.h,向其中添加属性,以及协议:
5、打开ArchivingData.m,向其中添加代码:
5.1 在@implementation之前添加代码:
5.2 在@implementation之后添加代码:
5.3 在@end之前添加代码:
5.4 在@end之前添加代码:
在ArchivingData类中,我们添加了几个属性,这些属性与上面创建的控件是一一对应的。之后实现了几个协议方法,这些方法分别用于编码、解码和复制。
6、打开ViewController.h,向其中添加属性和方法:
7、打开ViewController.m,添加代码:
7.1 在@implementation之后添加代码:
7.2 在#import之后添加代码:
7.3 在viewDidLoad方法中添加代码:
7.4 找到switchImage方法,添加代码:
7.5 在@end之前添加代码:
8、最后,为了使得键盘可以关闭,我们还要添加关闭键盘的操作,参考《iOS开发4:关闭键盘》中的第2步。
9、运行程序
刚运行程序如下左图:


我们添加一些数据,更换头像,再调整Silder和Switch,如上图右。
之后,按模拟器上的Home建,使得程序在后台运行。
此时,查看程序的SandBox,可以看到程序的Documents目录下出现了文件archivingFile:

之后使用Xcode结束运行,再运行程序。程序第二次运行时,显示如上图左,这说明我们实现了数据的永久存储。
具有这个方法的类有:
NSArray
NSMutableArray
NSDictionary
NSMutableDictionary
NSData
NSMutableData
NSString
NSMutableString
NSNumber
NSDate
例如,我们的数据存储在NSArray的一个对象array中,保存数据时执行:
[array writeToFile:filePath atomically:YES];
其中filePath是放在SandBox中的一个plist文件的完整路径。
不过,使用plist文件还是有局限性的,例如,我们不好将一个图片存储在plist中。
这次的小例子中,我们将会通过归档实现数据的保存。当程序运行时,先检查归档文件是否存在,如果存在的话就从归档文件中读取数据显示在界面上;如果归档文件不存在,就使用默认设置。当程序关闭时,会将数据存储在归档文件中,这样下次运行程序时就会显示上次的设置了。
1、运行Xcode 4.3,新建一个Single View Application,名称为:Archiving Test:
然后将准备好的两张图片添加到工程中。
2、先进行界面设计:
单击ViewController.xib,向其中添加控件:
然后向ViewController.h中为控件建立Outlet映射和Action映射,具体是为所有的TextField、ImageView、UISlider控件和UISwitch控件建立Outlet映射,为Button建立Action映射:
3、新建一个类,用于存储我们的数据:
在菜单栏依次选择File — New — File…,在打开的窗口选择Objective-C Class:
单击Next,输入类名:ArchivingData,选择super class为NSObject:
单击Next,选好位置和分组,点击创建,完成类的建立。
4、打开ArchivingData.h,向其中添加属性,以及协议:
#import <Foundation/Foundation.h>

@interface ArchivingData : NSObject <NSCoding, NSCopying>

@property (copy, nonatomic) UIImage *image;
@property (copy, nonatomic) NSString *name;
@property (copy, nonatomic) NSString *gender;
@property (copy, nonatomic) NSString *vocation;
@property (copy, nonatomic) NSString *page;
@property float theSlider;
@property BOOL isSwitchOn;

@end
5、打开ArchivingData.m,向其中添加代码:
5.1 在@implementation之前添加代码:
#define kImageKey @"ImageKey"
#define kNameKey @"NameKey"
#define kGenderKey @"GenderKey"
#define kVocationKey @"VocationKey"
#define kPageKey @"PageKey"
#define kTheSliderKey @"TheSliderKey"
#define kIsSwitchOn @"IsSwitchOnKey"
5.2 在@implementation之后添加代码:
@synthesize image;
@synthesize name;
@synthesize gender;
@synthesize vocation;
@synthesize page;
@synthesize theSlider;
@synthesize isSwitchOn;
5.3 在@end之前添加代码:
#pragma mark NSCoding
- (void)encodeWithCoder:(NSCoder *)aCoder {
[aCoder encodeObject:image forKey:kImageKey];
[aCoder encodeObject:name forKey:kNameKey];
[aCoder encodeObject:gender forKey:kGenderKey];
[aCoder encodeObject:vocation forKey:kVocationKey];
[aCoder encodeObject:page forKey:kPageKey];
[aCoder encodeFloat:theSlider forKey:kTheSliderKey];
[aCoder encodeBool:isSwitchOn forKey:kIsSwitchOn];

}

- (id)initWithCoder:(NSCoder *)aDecoder {
if (self = [super init]) {
image = [aDecoder decodeObjectForKey:kImageKey];
name = [aDecoder decodeObjectForKey:kNameKey];
gender = [aDecoder decodeObjectForKey:kGenderKey];
vocation = [aDecoder decodeObjectForKey:kVocationKey];
page = [aDecoder decodeObjectForKey:kPageKey];
theSlider = [aDecoder decodeFloatForKey:kTheSliderKey];
isSwitchOn = [aDecoder decodeBoolForKey:kIsSwitchOn];
}
return self;
}
5.4 在@end之前添加代码:
#pragma mark NSCoping
- (id)copyWithZone:(NSZone *)zone {
ArchivingData *copy = [[[self class] allocWithZone:zone] init];
copy.image = self.image;
copy.name = [self.name copyWithZone:zone];
copy.gender = [self.gender copyWithZone:zone];
copy.vocation = [self.vocation copyWithZone:zone];
copy.page = [self.page copyWithZone:zone];
copy.theSlider = self.theSlider;
copy.isSwitchOn = self.isSwitchOn;
return copy;
}
在ArchivingData类中,我们添加了几个属性,这些属性与上面创建的控件是一一对应的。之后实现了几个协议方法,这些方法分别用于编码、解码和复制。
6、打开ViewController.h,向其中添加属性和方法:
@property (copy, nonatomic) NSString *archivingFilePath;

- (void)applicationWillResignActive:(NSNotification *)notification;
7、打开ViewController.m,添加代码:
7.1 在@implementation之后添加代码:
@synthesize archivingFilePath;
7.2 在#import之后添加代码:
#import "ArchivingData.h"

#define kArchivingFileKey @"archivingFile"
#define kArchivingDataKey @"ArchivingDataKey"
7.3 在viewDidLoad方法中添加代码:
- (void)viewDidLoad
{
[super viewDidLoad];
// Do any additional setup after loading the view, typically from a nib.
NSArray *paths = NSSearchPathForDirectoriesInDomains(NSDocumentDirectory, NSUserDomainMask, YES);
NSString *documentsDirectory = [paths objectAtIndex:0];
self.archivingFilePath = [documentsDirectory stringByAppendingPathComponent:kArchivingFileKey];
NSFileManager *fileManager = [NSFileManager defaultManager];

if ([fileManager fileExistsAtPath:self.archivingFilePath]) {
//如果归档文件存在,则读取其中内容,显示在界面上
NSData *data = [[NSMutableData alloc] initWithContentsOfFile:self.archivingFilePath];
NSKeyedUnarchiver *unarchiver = [[NSKeyedUnarchiver alloc] initForReadingWithData:data];
ArchivingData *archivingData = [unarchiver decodeObjectForKey:kArchivingDataKey];
[unarchiver finishDecoding];
theImageView.image = archivingData.image;
nameTextField.text = archivingData.name;
genderTextField.text = archivingData.gender;
vocationTextField.text = archivingData.vocation;
pageTextField.text = archivingData.page;
theSlider.value = archivingData.theSlider;
theSwitch.on = archivingData.isSwitchOn;
} else {
//如果归档文件不存在,则设置imageView为boy.png
theImageView.image = [UIImage imageNamed:@"boy.png"];
}

//当程序进入后台时,将当前设置项写入归档文件
UIApplication *app = [UIApplication sharedApplication];
[[NSNotificationCenter defaultCenter] addObserver:self
selector:@selector(applicationWillResignActive:)
name:UIApplicationWillResignActiveNotification
object:app];
}
7.4 找到switchImage方法,添加代码:
- (IBAction)switchImage:(id)sender {
UIImage *image1 = [UIImage imageNamed:@"boy.png"];
UIImage *image2 = theImageView.image;
if (![image1 isEqual:image2]) {
theImageView.image = image1;
} else {
theImageView.image = [UIImage imageNamed:@"gemini.png"];
}
}
7.5 在@end之前添加代码:
//程序进入后台时,保存设置
- (void)applicationWillResignActive:(NSNotification *)notification {
ArchivingData *archivingData = [[ArchivingData alloc] init];
archivingData.image = self.theImageView.image;
archivingData.name = self.nameTextField.text;
archivingData.gender = self.genderTextField.text;
archivingData.vocation = self.vocationTextField.text;
archivingData.page = self.pageTextField.text;
archivingData.theSlider = theSlider.value;
archivingData.isSwitchOn = theSwitch.on;
NSMutableData *data = [[NSMutableData alloc] init];
NSKeyedArchiver *archiver = [[NSKeyedArchiver alloc] initForWritingWithMutableData:data];
[archiver encodeObject:archivingData forKey:kArchivingDataKey];
[archiver finishEncoding];
[data writeToFile:self.archivingFilePath atomically:YES];
}8、最后,为了使得键盘可以关闭,我们还要添加关闭键盘的操作,参考《iOS开发4:关闭键盘》中的第2步。
9、运行程序
刚运行程序如下左图:
我们添加一些数据,更换头像,再调整Silder和Switch,如上图右。
之后,按模拟器上的Home建,使得程序在后台运行。
此时,查看程序的SandBox,可以看到程序的Documents目录下出现了文件archivingFile:
之后使用Xcode结束运行,再运行程序。程序第二次运行时,显示如上图左,这说明我们实现了数据的永久存储。

相关文章推荐
- iOS开发22:通过归档永久存储数据
- 通过归档永久存储数据
- 通过归档永久存储数据
- 通过归档永久存储数据
- iOS开发22:通过归档永久存储数据
- 通过归档永久存储数据
- 通过归档永久存储数据
- lotusscript通过ODBC实现与关系型数据库SQL的数据存储
- Script:创建一个job,通过存储过程定期删除数据的脚本
- 数据存储+归档
- ios-day12-04(ios开发中数据存储之NSKeyedArchiver归档(NSCoding)、普通对象如何归档、普通对象的子类如何归档)
- ios 沙盒 NSCoding(相当于JAVA对象序列化) 归档 数据存储
- proc 存储过程,通过存储过程往数据库的某个表中插入指定数据量的纪录,表中有primary key
- iOS数据持久化存储 (1)-- Plist 、归档、NSUserDefaults、NSFileManager
- (非常小的技巧)利用范型List存储数据并通过Contains查询字符串是否包含在范型中
- 通过百度地图API获取坐标并将数据存储在数据库内。
- Flex中DataGrid通过存储在List中的JAVABEAN提供数据时候,数据不能正常显示的问题
- ios数据存储——对象归档
- 将list中的数据通过某一个字段来分类存储的实例
- 数据存储之归档-NSCoding协议