CentOS 6 VirtualBox 配置网络(截图)
2013-12-15 13:54
411 查看
http://extr3metech.wordpress.com/2013/05/23/configuring-network-in-centos-6-3-virtual-box-screenshots/
This is a guide on configuring network in CentOS in Virtual Box with screenshots (using terminal).
So, here I have used CentOS 6.3 minimal and will be discussing on configuring the Virtual Box and CentOS for network access. If you need help installing CentOS minimal in the Virtual Box, you can find the instructions in my earlier post here.
Requirements:
Virtual Box
CentOS 6.3 or 6.4
Step 1: Configure Virtual Box Network Settings:
There are different modes or ways you can configure your Virtual box network settings.
Not Attached
NAT
Bridged Adapter
Internal Network
Host-Only Adapter
Generic Driver
You can find more details about the different modes here.
I will be using the Bridged Adapter mode for this guide. It is faster as it treat the VM as an individual host within the network.
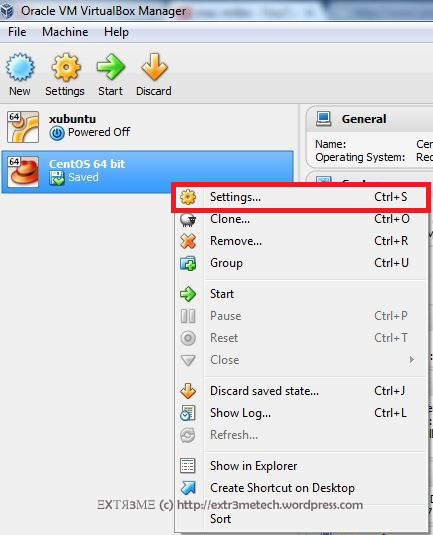
Open Virtual Box and right click on your CentOS VM, and click on “Settings“.
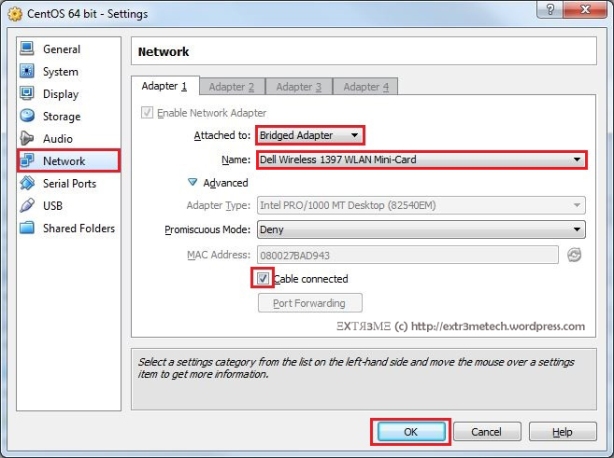
Now, go to the tab Network and change the “Attached to” field to “Bridged Adapter”. Then choose the “Name” to your network interface. For example, I have a dell wireless adapter, so I choose the Name as “Dell Wireless” from the drop down menu. And finally check the field “Cable Connected”. Finally, click on OK when you are done.
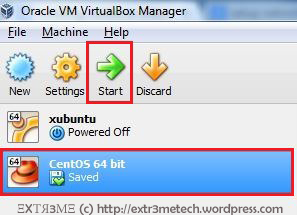
So, you have now configured the Virtual Box. Now, you can start your CentOS VM by selecting you VM and clicking on “Start”.
Step 2: Configure CentOS network settings:
You can configure your network either by using Dynamic IP addressing assigned by your DHCP server or you can manually configure your IP Address statically. You can choose either static or dynamic method and can do so by editing the file /etc/sysconfig/network-scripts/ifcfg-eth0.
Method 1: Dynamic IP
We can configure the network by using Dynamic IP address which are assigned automatically by the DHCP server. This is the simplest way to configure your network.
NOTE: You will have a line that starts with HWADDR in the your config file, do not change or modify that line.
In your terminal, type the following:
vi /etc/sysconfig/network-scripts/ifcfg-eth0
Now, add/modify the file as follows (DO NOT CHANGE the HWADDR line your config file):
DEVICE=eth0
BOOTPROTO=dhcp
ONBOOT=yes
NM_CONTROLLED=no
HWADDR=08:00:27:08:47:E9
Now, save the file by pressing “ESC” and typing :wq and hit ENTER.
To view your network config file. type the following in the terminal:
cat /etc/sysconfig/network-scripts/ifcfg-eth0

Now, you will have to restart your network. You can do so by typing the following in the terminal:
service network restart

To view your IP address, type the following in your terminal:
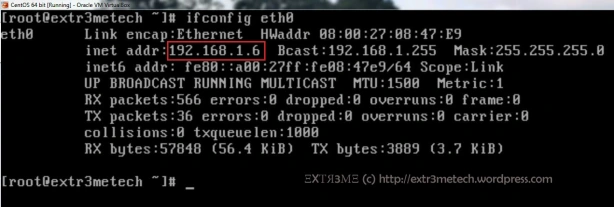
ifconfig eth0
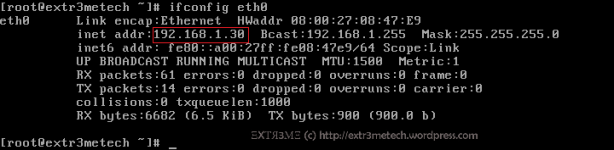
You can see your IP Address of the interface eth0 next to the field “inet addr:” as shown below:
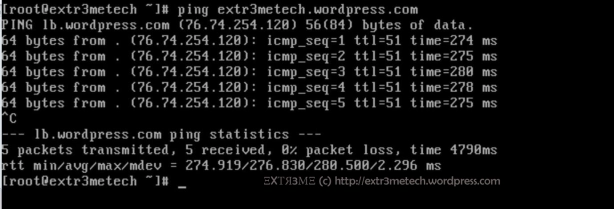
Now, if you have internet access, then you can check if you are able to ping any website. And you should be able to get the reply. For example, in your terminal type:
ping extr3metech.wordpress.com
You can press CTRL+ C to stop the ping command.
So, Hurray! you have successfully setup up your network in your CentOS Virtual Box.
Method 2: Static IP
We can also assign the network information manually by assigning the IP Address, NETMASK , GATEWAY in the network interface config file.
NOTE: You will have a line that starts with HWADDR in your config file, do not change or modify that line.
Step1 : In you terminal, type:
vi /etc/sysconfig/network-scripts/ifcfg-eth0
Now, edit/merge the file to the following
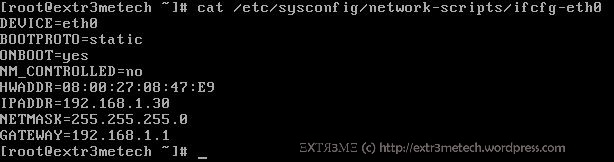
DEVICE=eth0
BOOTPROTO=static
ONBOOT=yes
NM_CONTROLLED=no
HWADDR=08:00:27:08:47:E9
IPADDR=192.168.1.30
NETMASK=255.255.255.0
GATEWAY=192.168.1.1
Now, press ESC and type :wq and hit ENTER to save and exit the configuration file.
To view the config file. type the following in the terminal:
cat /etc/sysconfig/network-scripts/ifcfg-eth0
Step 2: Change Host name:
To change host name , you have to edit the config file /etc/sysconfig/network. If you want to know to change the host name manually, you can follow the guide I have posted earlier here.
Step 3: Assign DNS Server IP
To manually assign primary and secondary DNS Server IP addresses, in your terminal type:
vi /etc/resolv.conf
Now, edit this file to the following:
nameserver 8.8.8.8
nameserver 8.8.4.4
Now, press ESC and type :wq and hit ENTER to save and exit the configuration file.
Now, if you want you can make sure you have entered and saved the correct configuration(It is a good practice to double check

). To view your dns config file, in your terminal type:
cat /etc/resolv.conf

Step 4: Restart network:
Finally, all you have to do is to restart your network service. To so so, type the following in the terminal:
service network restart
Now, you can check your Current IP configuration, by typing the following in the terminal:
ifconfig eth0
Now, if you have internet access, then you can check if you are able to ping any website. And you should be able to get the reply. For example, In your terminal type:
ping extr3metech.wordpress.com
You can press CTRL+ C to stop the ping command.
So, Hurray! you have successfully setup up your network manually in your CentOS Virtual Box.
Hope this guide helped you to configure network in your CentOS Virtual Machine.
If you have any queries or suggestions regarding this guide, feel free to leave a comment and will get back at you. Don’t forget to follow my blog to get future updates!

This is a guide on configuring network in CentOS in Virtual Box with screenshots (using terminal).
So, here I have used CentOS 6.3 minimal and will be discussing on configuring the Virtual Box and CentOS for network access. If you need help installing CentOS minimal in the Virtual Box, you can find the instructions in my earlier post here.
Requirements:
Virtual Box
CentOS 6.3 or 6.4
Step 1: Configure Virtual Box Network Settings:
There are different modes or ways you can configure your Virtual box network settings.
Not Attached
NAT
Bridged Adapter
Internal Network
Host-Only Adapter
Generic Driver
You can find more details about the different modes here.
I will be using the Bridged Adapter mode for this guide. It is faster as it treat the VM as an individual host within the network.
Open Virtual Box and right click on your CentOS VM, and click on “Settings“.

Now, go to the tab Network and change the “Attached to” field to “Bridged Adapter”. Then choose the “Name” to your network interface. For example, I have a dell wireless adapter, so I choose the Name as “Dell Wireless” from the drop down menu. And finally check the field “Cable Connected”. Finally, click on OK when you are done.

So, you have now configured the Virtual Box. Now, you can start your CentOS VM by selecting you VM and clicking on “Start”.

Step 2: Configure CentOS network settings:
You can configure your network either by using Dynamic IP addressing assigned by your DHCP server or you can manually configure your IP Address statically. You can choose either static or dynamic method and can do so by editing the file /etc/sysconfig/network-scripts/ifcfg-eth0.
Method 1: Dynamic IP
We can configure the network by using Dynamic IP address which are assigned automatically by the DHCP server. This is the simplest way to configure your network.
NOTE: You will have a line that starts with HWADDR in the your config file, do not change or modify that line.
In your terminal, type the following:
vi /etc/sysconfig/network-scripts/ifcfg-eth0
Now, add/modify the file as follows (DO NOT CHANGE the HWADDR line your config file):
DEVICE=eth0
BOOTPROTO=dhcp
ONBOOT=yes
NM_CONTROLLED=no
HWADDR=08:00:27:08:47:E9
Now, save the file by pressing “ESC” and typing :wq and hit ENTER.
To view your network config file. type the following in the terminal:
cat /etc/sysconfig/network-scripts/ifcfg-eth0

Now, you will have to restart your network. You can do so by typing the following in the terminal:
service network restart

To view your IP address, type the following in your terminal:
ifconfig eth0
You can see your IP Address of the interface eth0 next to the field “inet addr:” as shown below:

Now, if you have internet access, then you can check if you are able to ping any website. And you should be able to get the reply. For example, in your terminal type:
ping extr3metech.wordpress.com

You can press CTRL+ C to stop the ping command.
So, Hurray! you have successfully setup up your network in your CentOS Virtual Box.
Method 2: Static IP
We can also assign the network information manually by assigning the IP Address, NETMASK , GATEWAY in the network interface config file.
NOTE: You will have a line that starts with HWADDR in your config file, do not change or modify that line.
Step1 : In you terminal, type:
vi /etc/sysconfig/network-scripts/ifcfg-eth0
Now, edit/merge the file to the following
DEVICE=eth0
BOOTPROTO=static
ONBOOT=yes
NM_CONTROLLED=no
HWADDR=08:00:27:08:47:E9
IPADDR=192.168.1.30
NETMASK=255.255.255.0
GATEWAY=192.168.1.1
Now, press ESC and type :wq and hit ENTER to save and exit the configuration file.
To view the config file. type the following in the terminal:
cat /etc/sysconfig/network-scripts/ifcfg-eth0

Step 2: Change Host name:
To change host name , you have to edit the config file /etc/sysconfig/network. If you want to know to change the host name manually, you can follow the guide I have posted earlier here.
Step 3: Assign DNS Server IP
To manually assign primary and secondary DNS Server IP addresses, in your terminal type:
vi /etc/resolv.conf
Now, edit this file to the following:
nameserver 8.8.8.8
nameserver 8.8.4.4
Now, press ESC and type :wq and hit ENTER to save and exit the configuration file.
Now, if you want you can make sure you have entered and saved the correct configuration(It is a good practice to double check
). To view your dns config file, in your terminal type:
cat /etc/resolv.conf

Step 4: Restart network:
Finally, all you have to do is to restart your network service. To so so, type the following in the terminal:
service network restart
Now, you can check your Current IP configuration, by typing the following in the terminal:
ifconfig eth0

Now, if you have internet access, then you can check if you are able to ping any website. And you should be able to get the reply. For example, In your terminal type:
ping extr3metech.wordpress.com
You can press CTRL+ C to stop the ping command.
So, Hurray! you have successfully setup up your network manually in your CentOS Virtual Box.
Hope this guide helped you to configure network in your CentOS Virtual Machine.
If you have any queries or suggestions regarding this guide, feel free to leave a comment and will get back at you. Don’t forget to follow my blog to get future updates!

相关文章推荐
- VirtualBox中centos网络配置
- vm virtualbox 虚拟安装centos,安装nginx,mysql,PHP,及网络配置
- 在Centos6.3中桥接方式配置vm virtualbox中的系统网络
- VirtualBox安装Centos,配置网络(主机可以通过SSH连接虚拟机系统,同时虚拟机系统可以访问外网)
- virtualBox 安装CentOS6.9之后的网络配置
- VirtualBox环境下配置CentOS网络
- VirtualBox中centos网络配置
- virtualbox下安装centos7 网络配置
- VirtualBox下CentOS的网络配置
- VirtualBox下CentOS7网络配置教程(可连外网)
- VirtualBox安装Centos之网络配置
- virtualBox 安装 CentOs 6.8 以及网络配置
- virtualbox中centos虚拟机网络配置
- virtualbox中安装centos7 mininal,配置网络
- win7 virtualbox centos 网络配置
- hadoop安装配置1之CentOS与VirtualBox的网络配置
- VirtualBox上CentOS系统网络配置
- VirtualBox下Centos6.9网络配置教程
- 一张图带你看懂virtualbox下centos7server的网络配置