android游戏物理引擎开发——粒子系统(二)
2013-11-13 12:30
671 查看
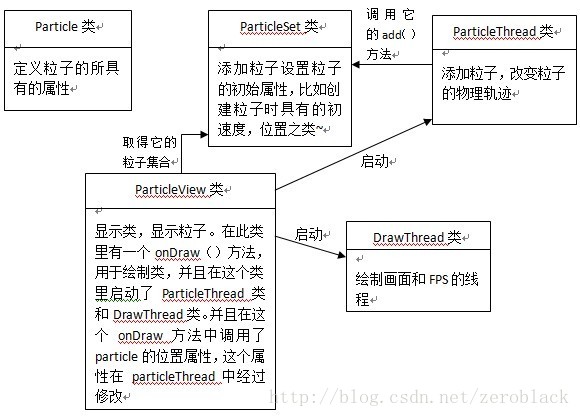
我先画了个图,感觉有图的话比较直观,是这个demo的各类间的关系~

直接上代码吧~~做了非常详细的注释~
particle类
particleSet类
ParticleThread类
particleView类
DrawThread类
MainActivity类
源码下载地址:http://download.csdn.net/detail/lxtalx/6544431
直接上代码吧~~做了非常详细的注释~
particle类
/*
* 这个类的作用就是定义粒子,并写构造函数把粒子初始化
*/
public class Particle {
int color;	//设置粒子的颜色
int r;	//粒子半径
double vertical_v;	//粒子的竖向速度
double horizontal_v;	//水平速度
int startX;	//初始X位置
int startY;	//初始Y位置
int currentX;	//实时X位置
int currentY;	//实时Y位置
double startTime;	//起始时间

public Particle(int color, int r, double vertical_v, double horizontal_v,
int currentX, int currentY, double startTime){
this.color = color;
this.r = r;
this.vertical_v = vertical_v;
this.horizontal_v = horizontal_v;
this.startX = currentX;
this.startY = currentY;
this.currentX = currentX;
this.currentY = currentY;
this.startTime = startTime;
}
}
particleSet类
/*
* 这个类的作用有两个
* (1)给存粒子的容器放粒子,并以一定范围的随机速度和一定范围内的随机坐标给他初始化
* (2)以一定的规律给粒子赋予不同的颜色
*/
public class ParticleSet {

ArrayList<Particle> particleSet;	//声明一个存放particle的容器

public ParticleSet(){
particleSet = new ArrayList<Particle>();
}

//向存粒子的容器particleSet添加指定个数的粒子并给每个粒子传入一个起始时间
//添加进容器的粒子 已经给予完盐水,半径和他们的速度 以及产生的初始坐标了
public void add(int count, double startTime){
for(int i = 0; i < count; i++){
int tempColor = this.getColor(i);	//获得粒子颜色,见后面的getColor方法
int tempR = 1;	//粒子半径
double tempv_v = -30 + 10 *(Math.random());	//随机产生粒子竖向方向上的速度
//random()方法随机生成0~1之间的数
double tempv_h = 10 - 20 * (Math.random());	//随机产生粒子水平方向的速度
int tempX = 360;	//粒子的X坐标固定;
int tempY = (int)(200 - 10 * (Math.random()));	//随机产生粒子的Y坐标(90~100之间)

Particle particle = new Particle(tempColor, tempR,
tempv_v, tempv_h, tempX, tempY, startTime);	//创建粒子对象
particleSet.add(particle);
}
}

//这个方法是根据i得到一种颜色,i循环增加
//具体很简单,如果不懂switch~case~的话,估计你也看不到这篇博客
public int getColor(int i){
int color = Color.RED;
switch(i % 4){	//对任何一个数取4的余数的话,只能得到0,1,2,3四个数
case 0:
color = Color.RED;
break;
case 1:
color = Color.BLUE;
break;
case 2:
color = Color.GREEN;
break;
case 3:
color = Color.YELLOW;
}
return color;
}
}
ParticleThread类
/*
* 这个类是整个demo里最重要的类,一个物理引擎类,有一个作用
* (1)改变每个粒子的物理轨迹
* 这是最重要的作用
*/
public class ParticleThread extends Thread {

boolean flag;	//按照国际惯例,这是线程执行的标志位
ParticleView particleView;	//声明一个particelView类
int sleepSpan = 80;	//按照国际惯例,这是线程休眠时间
double time = 0;	//物理引擎的时间轴
double span = 0.15;	//每次计算粒子的位移时采用的时间间隔

public ParticleThread(ParticleView particleView){
this.particleView = particleView;
this.flag = true;	//按照国际惯例~~~~初始化线程就代表线程执行了~~
}

//线程中最重要的方法
public void run(){
while(flag){
particleView.ps.add(5, time);	//每次添加5个粒子
ArrayList<Particle> tempSet = particleView.ps.particleSet;
int count = tempSet.size();	//取得上面这个集合的大小
for(int i = 0; i < count; i++)
{	//遍历整个粒子集合,修改每一个的轨迹
Particle particle = tempSet.get(i);		//取得要修改的粒子对象(依次取)
/*
* 下面这行代码是计算时间的,我纠结了好久~~~~
* 上面的add把粒子数和时间一起添加到了容器里,粒子的起始时间即time,开始为0
* 在下一次循环生成的5个粒子时,上一次生成的5个粒子,startTime任然为0,
* 但time变成了0.15,于是有了位置的变化,再下一次又生成5个粒子
* 上一次的startTime=0.15,上上次的startTime=0
* 上一次的time变为0.3,上上次的time也变为了3,于是又开始运动~~~
* ---------------好复杂的样子----------------我在这个地方纠结了好久
* 懵圈了
*/
double timeSpan = time - particle.startTime;
System.out.println("time-------" + time);
System.out.println("StartTime-------" + particle.startTime);
/*
* 下面两行是计算粒子的位置,初中物理有木有?
* S = 初始位置 + vt + 1/2a*t
*/
int tempx = (int)(particle.startX + particle.horizontal_v * timeSpan);
int tempy = (int)(particle.startY + particle.vertical_v * timeSpan +
1/2 * 9.8 * timeSpan * timeSpan);
if(tempy > particleView.DIE_OUT_LINE){	//如果粒子超过屏幕下沿
tempSet.remove(particle);	//就从集合里移除该particle对象
count = tempSet.size();	//?
}
particle.currentX = tempx;
particle.currentY = tempy;	//修改粒子的坐标
}
time += span;
try{
Thread.sleep(sleepSpan);
}catch(Exception e){
e.printStackTrace();
}
}
}
}
particleView类
/*
* 显示粒子的类
* 通过android的绘制类将粒子绘制出
* 通过这个类调用绘制粒子的线程和
*/
public class ParticleView extends SurfaceView implements Callback {

public static int DIE_OUT_LINE;	//死亡线,意思就是屏幕底部的坐标(取屏幕高度)
DrawThread dt;
ParticleSet ps;
ParticleThread pt;
SurfaceHolder holder;
String fps = "FPS:N/A";

public ParticleView(Context Activity) {
super(Activity);
// TODO Auto-generated constructor stub
holder = this.getHolder();
holder.addCallback(this);
dt = new DrawThread(this, holder);
ps = new ParticleSet();
pt = new ParticleThread(this);
}

public void onDraw(Canvas canvas){
canvas.drawColor(Color.BLACK);	//每次绘制都把画面清空,然后绘制新的点,
//因为点是不断移动的嘛,如果上一个循环画的点不清空
//这个循环又往上画,不就乱套了么。。
ArrayList<Particle> particleSet = ps.particleSet;	//获取particleSet中的粒子集合
Paint paint = new Paint();
for(int i = 0; i < particleSet.size(); i++){
Particle p = particleSet.get(i);
paint.setColor(p.color);	//设置画笔颜色为粒子颜色
int tempX = p.currentX;
int tempY = p.currentY;	//物理引擎线程里一直在更新粒子的X,Y坐标,
//所以每画一次都是不一样的位置
int tempRadius = p.r;
RectF oval = new RectF(tempX, tempY,
tempX + 2 * tempRadius, tempY + 2 * tempRadius);
canvas.drawOval(oval, paint);
}
paint.setColor(Color.WHITE);
paint.setTextSize(18);
paint.setAntiAlias(true);
canvas.drawText(fps, 15, 15, paint);
}

@Override
public void surfaceChanged(SurfaceHolder arg0, int arg1, int arg2, int arg3) {
// TODO Auto-generated method stub

}

@Override
public void surfaceCreated(SurfaceHolder arg0) {
// TODO Auto-generated method stub
DIE_OUT_LINE = this.getHeight();
if(!dt.isAlive()){	//如果dt这个线程没有启动,就启动它
dt.start();
}
if(!pt.isAlive()){	//同上
pt.start();
}
}

@Override
public void surfaceDestroyed(SurfaceHolder arg0) {
// TODO Auto-generated method stub
dt.flag = false;
dt = null;
pt.flag = false;
pt = null;
}
}
DrawThread类
/*
* (1)这个类是一个绘制的线程类,线程不断执行,不断的绘制粒子
* 通过surfaceHolder取得画布,让surfaceView类不断的改变
* (2)另一个作用是绘制FPS用于程序的调试
*/
public class DrawThread extends Thread{
ParticleView pv;	//要把粒子绘制到这个类里显示,所以要声明他
SurfaceHolder holder;	//需要调用surfaceHolder的画布,来更改particleView,所以需要声明它
boolean flag = false;	//万年不变的线程执行标志位
int sleepSpan = 30;	//万年不变的线程休眠时间
long start = System.nanoTime();	//取得当前系统的时间,用于计算时间差
int count = 0;	//记录帧数,用于计算帧数率

public DrawThread(ParticleView pv, SurfaceHolder holder){
this.pv = pv;
this.holder = holder;
this.flag = true;	//线程执行了,标志位改成true
}

public void run(){
Canvas canvas = null;
while(flag){
try{
canvas = holder.lockCanvas();	//给particleView锁定画布
synchronized (holder) {	//对象锁
pv.onDraw(canvas);	//开始不断的绘制
}
}catch(Exception e){
e.printStackTrace();
}finally{
if(canvas != null){
holder.unlockCanvasAndPost(canvas);	//解锁并传回画布对象
}
}
this.count++;	//每执行一次加一帧
if(count == 20){
count = 0;	//首先清空计数器
long tempStamp = System.nanoTime();	//记录记满20帧的时间
long Span = tempStamp - start;	//获取时间间隔
start = tempStamp;	//要重新计数计算,所以在这里给start重新赋值
double fps = Math.round(100000000000.0 / Span * 20) / 100.0;	//计算fps的公式
pv.fps = "FPS:" + fps;
}
try{
Thread.sleep(sleepSpan);	//线程休眠嘛~~~
}catch(Exception e){
e.printStackTrace();
}
}
}
}
MainActivity类
public class MainActivity extends Activity {

@Override
protected void onCreate(Bundle savedInstanceState) {
super.onCreate(savedInstanceState);
requestWindowFeature(Window.FEATURE_NO_TITLE);	//设置不显示应用标题
getWindow().setFlags(WindowManager.LayoutParams.FLAG_FULLSCREEN,
WindowManager.LayoutParams.FLAG_FULLSCREEN);	//设置我i全屏
setContentView(new ParticleView(this));
}

@Override
public boolean onCreateOptionsMenu(Menu menu) {
// Inflate the menu; this adds items to the action bar if it is present.
getMenuInflater().inflate(R.menu.main, menu);
return true;
}

}源码下载地址:http://download.csdn.net/detail/lxtalx/6544431

相关文章推荐
- android游戏物理引擎开发——碰撞检测(三)
- android游戏物理引擎开发——粒子系统(三)
- 【Android游戏开发二十】物理游戏之重力系统开发,让你的游戏变得有质有量!
- 【Android游戏开发二十】物理游戏之重力系统开发,让你的游戏变得有质有量!
- 【Android游戏开发二十】物理游戏之重力系统开发,让你的游戏变得有质有量!
- Android游戏开发20:物理游戏之重力系统开发--圆形自由落体Demo
- Android游戏开发:物理游戏之重力系统开发--圆形自由落体Demo
- Android 物理游戏之重力系统开发示例代码
- (转)【Android游戏开发二十】物理游戏之重力系统开发,让你的游戏变得有质有量!
- 【Android游戏开发二十】物理游戏之重力系统开发,让你的游戏变得有质有量!
- 【Android游戏开发二十】物理游戏之重力系统开发,让你的游戏变得有质有量!
- 【Android游戏开发二十】物理游戏之重力系统开发,让你的游戏变得有质有量!
- 【Android游戏开发二十】物理游戏之重力系统开发,让你的游戏变得有质有量!
- android 游戏开发之粒子系统应用
- 【Android游戏开发二十】物理游戏之重力系统开发,让你的游戏变得有质有量!
- 【Android游戏开发二十】物理游戏之重力系统开发,让你的游戏变得有质有量!
- android游戏物理引擎开发——重力引擎(一)
- 23、Cocos2dx 3.0游戏开发找小三之粒子系统:你那里下雪了吗?
- Game.Physics.Engine.Development(游戏物理引擎开发)
- 【Visual C++】游戏开发笔记二十 游戏基础物理建模(二) 重力系统的模拟