Gallery组件基本用法以及实现循环显示图像
2013-11-11 20:11
537 查看
Gallery组件主要用于横向显示图像列表,不过按常规做法。Gallery组件只能有限地显示指定的图像。也就是说,如果为Gallery组件指定了10张图像,那么当Gallery组件显示到第10张时,就不会再继续显示了。这虽然在大多数时候没有什么关系,但在某些情况下,我们希望图像显示到最后一张时再重第1张开始显示,也就是循环显示。要实现这种风格的Gallery组件,就需要对Gallery的Adapter对象进行一番改进。
Gallery组件的传统用法
在实现可循环显示图像的Gallery组件之前先来回顾一下Gallery组件的传统用法。Gallery组件可以横向显示一个图像列表,当单击当前图像的后一个图像时,这个图像列表会向左移动一格,当单击当前图像的前一个图像时,这个图像列表会向右移动一样。也可以通过拖动的方式来向左和向右移动图像列表。当前显示的是第1个图像的效果如图1所示。Gallery组件显示到最后一个图像的效果如图2所示
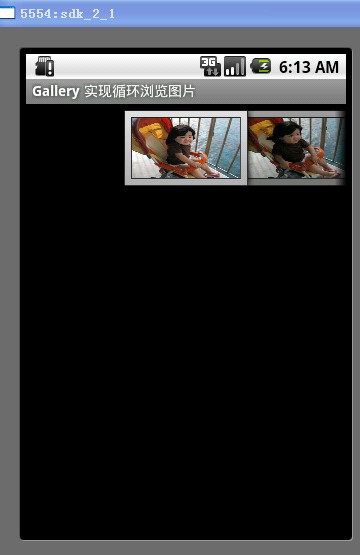
图1
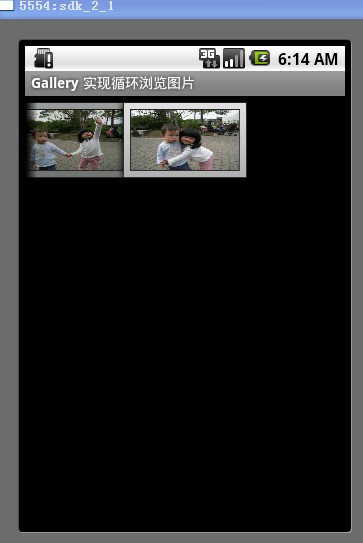
图2
从图2可以看出,当显示到最后一个图像时,列表后面就没有图像的,这也是Gallery组件的基本显示效果。在本文后面的部分将详细介绍如何使Gallery组件显示到最后一个图像时会从第1个图像开始显示。
好了,现在我们来看一下图1和图2的效果是如何做出来的吧。Gallery既然用于显示图像,那第1步就必须要有一些图像文件用来显示。现在可以随意准备一些图像。在本文的例子中准备了6个jpg文件(item1.jpg至item15.jpg)。将这些文件都放在res/drawable目录中
下面将这些图像的资源ID都保存在int数组中,代码如下:
[java]
view plaincopyprint?
private int[] myImageIds = {R.drawable.photo1,
R.drawable.photo2,
R.drawable.photo3,
R.drawable.photo4,
R.drawable.photo5,
R.drawable.photo6,};
现在在onCreate方法中装载这个组件,代码如下:
[java]
view plaincopyprint?
public void onCreate(Bundle savedInstanceState)
{
super.onCreate(savedInstanceState);
setContentView(R.layout.main);
// 装载Gallery组件
Gallery gallery = (Gallery) findViewById(R.id.gallery);
// 创建用于描述图像数据的ImageAdapter对象
ImageAdapter imageAdapter = new ImageAdapter(this);
// 设置Gallery组件的Adapter对象
gallery.setAdapter(imageAdapter);
}
在编写ImageAdapter类时应注意的两点:
1. 在ImageAdapter类的构造方法中获得了Gallery组件的属性信息。这些信息被定义在res/values/attrs.xml文件中,代码如下:
[java]
view plaincopyprint?
<?xml version="1.0" encoding="utf-8"?>
<resources>
<declare-styleable name="Gallery">
<attr name="android:galleryItemBackground" />
</declare-styleable>
</resources>
在本节对ImageAdapter类做了如下两个改进:
1. 使getCount方法返回一个很大的值。建议返回Integer.MAX_VALUE。
2. 在getView方法中通过取余来循环取得resIds数组中的图像资源ID。
通过上面两点改进,可以使图像列表在向右移动时会循环显示图像。当然,这种方法从本质上说只是伪循环,也就是说,如果真把图像移动到getCount方法返回的值那里,那也就显示到最后一个图像的。不过在这里getCount方法返回的是Integer.MAX_VALUE,这个值超过了20亿,除非有人真想把图像移动到第20亿的位置,否则Gallery组件看着就是一个循环显示图像的组件。
实现循环显示图像的Gallery组件
在本节将组出与循环显示图像相关的ImageAdapter类的完整代码。读者可以从中看到上一节介绍的两点改进。为了使界面看上去更丰满,本例还在单击某一个Gallery组件中的图像时在下方显示一个放大的图像(使用ImageSwitcher组件)。本例的显示效果如图3所示。当不断向后移动图像时,图像可不断显示,读者可以自己运行本例来体验一下。
本例中Main类的完整代码如下:
[java]
view plaincopyprint?
package irdc.EX04_10;
import android.app.Activity;
import android.os.Bundle; /*本范例需使用到的class*/
import android.content.Context;
import android.content.res.TypedArray;
import android.view.View;
import android.view.ViewGroup;
import android.widget.AdapterView;
import android.widget.BaseAdapter;
import android.widget.Gallery;
import android.widget.ImageView;
import android.widget.Toast;
import android.widget.AdapterView.OnItemClickListener;
public class EX04_10 extends Activity
{
/** Called when the activity is first created. */
@Override
public void onCreate(Bundle savedInstanceState)
{
super.onCreate(savedInstanceState);
setContentView(R.layout.main); /* 透过findViewById取得 */
Gallery g = (Gallery) findViewById(R.id.mygallery); /* 新增一ImageAdapter并设定给Gallery对象 */
g.setAdapter(new ImageAdapter(this)); /* 设定一个itemclickListener并Toast被点选图片的位置 */
setTitle("Gallery 实现循环浏览图片");
g.setOnItemClickListener(new OnItemClickListener()
{
public void onItemClick(AdapterView parent, View v, int position, long id)
{
Toast.makeText(EX04_10.this, getString(R.string.my_gallery_text_pre) + position + getString(R.string.my_gallery_text_post), Toast.LENGTH_SHORT).show();
}
});
}
public class ImageAdapter extends BaseAdapter /* 改写BaseAdapter自定义一ImageAdapter class */
{
int mGalleryItemBackground;
private Context mContext; /* ImageAdapter的建构子 */
private int[] myImageIds = {R.drawable.photo1,
R.drawable.photo2,
R.drawable.photo3,
R.drawable.photo4,
R.drawable.photo5,
R.drawable.photo6,};
public ImageAdapter(Context c)
{
mContext = c;
TypedArray a = obtainStyledAttributes(R.styleable.Gallery); /* 使用在res/values/attrs.xml中的定义 的Gallery属性. */
mGalleryItemBackground = a.getResourceId(R.styleable.Gallery_android_galleryItemBackground, 0); ///*取得Gallery属性的Index
a.recycle();/* 让对象的styleable属性能够反复使用 */
}
public int getCount() /* 一定要重写的方法getCount,传回图片数目总数 */
{
//return myImageIds.length;
return Integer.MAX_VALUE;
}
public Object getItem(int position) /* 一定要重写的方法getItem,传回position */
{
return position;
}
public long getItemId(int position) /* 一定要重写的方法getItemId,传回position */
{
return position;
}
public View getView(int position, View convertView, ViewGroup parent)/* 一定要重写的方法getView,传回一View对象 */
{
// if (position == getCount())
// {
// position = 0;
// }
ImageView i = new ImageView(mContext);
i.setImageResource(myImageIds[position%myImageIds.length]); /* 设定图片给imageView对象 */
i.setScaleType(ImageView.ScaleType.FIT_XY); /* 重新设定图片的宽高 */
i.setLayoutParams(new Gallery.LayoutParams(136, 88)); /* 重新设定Layout的宽高 */
i.setBackgroundResource(mGalleryItemBackground); /* 设定Gallery背景图 */
return i; /* 传回imageView物件 */
}
}
}
Gallery组件的传统用法
在实现可循环显示图像的Gallery组件之前先来回顾一下Gallery组件的传统用法。Gallery组件可以横向显示一个图像列表,当单击当前图像的后一个图像时,这个图像列表会向左移动一格,当单击当前图像的前一个图像时,这个图像列表会向右移动一样。也可以通过拖动的方式来向左和向右移动图像列表。当前显示的是第1个图像的效果如图1所示。Gallery组件显示到最后一个图像的效果如图2所示
图1
图2
从图2可以看出,当显示到最后一个图像时,列表后面就没有图像的,这也是Gallery组件的基本显示效果。在本文后面的部分将详细介绍如何使Gallery组件显示到最后一个图像时会从第1个图像开始显示。
好了,现在我们来看一下图1和图2的效果是如何做出来的吧。Gallery既然用于显示图像,那第1步就必须要有一些图像文件用来显示。现在可以随意准备一些图像。在本文的例子中准备了6个jpg文件(item1.jpg至item15.jpg)。将这些文件都放在res/drawable目录中
下面将这些图像的资源ID都保存在int数组中,代码如下:
[java]
view plaincopyprint?
private int[] myImageIds = {R.drawable.photo1,
R.drawable.photo2,
R.drawable.photo3,
R.drawable.photo4,
R.drawable.photo5,
R.drawable.photo6,};
[java]
view plaincopyprint?

<?xml version="1.0" encoding="utf-8"?>
<LinearLayout xmlns:android="http://schemas.android.com/apk/res/android"
    android:orientation="vertical" android:layout_width="fill_parent"
    android:layout_height="fill_parent">
    <Gallery android:id="@+id/gallery" android:layout_width="fill_parent"
        android:layout_height="wrap_content" android:layout_marginTop="30dp" />
</LinearLayout>
现在在onCreate方法中装载这个组件,代码如下:
[java]
view plaincopyprint?
public void onCreate(Bundle savedInstanceState)
{
super.onCreate(savedInstanceState);
setContentView(R.layout.main);
// 装载Gallery组件
Gallery gallery = (Gallery) findViewById(R.id.gallery);
// 创建用于描述图像数据的ImageAdapter对象
ImageAdapter imageAdapter = new ImageAdapter(this);
// 设置Gallery组件的Adapter对象
gallery.setAdapter(imageAdapter);
}
[java]
view plaincopyprint?

 public class ImageAdapter extends BaseAdapter
    {
        int mGalleryItemBackground;
        private Context mContext;
        public ImageAdapter(Context context)
        {
            mContext = context;
              // 获得Gallery组件的属性

            TypedArray typedArray = obtainStyledAttributes(R.styleable.Gallery);
            mGalleryItemBackground = typedArray.getResourceId(
                    R.styleable.Gallery_android_galleryItemBackground, 0);
        }
         // 返回图像总数

        public int getCount()
        {
            return resIds.length;
        }
        public Object getItem(int position)
        {
            return position;
        }
        public long getItemId(int position)
        {
            return position;
        }
         // 返回具体位置的ImageView对象

        public View getView(int position, View convertView, ViewGroup parent)
        {
            ImageView imageView = new ImageView(mContext);
             // 设置当前图像的图像(position为当前图像列表的位置)

            imageView.setImageResource(myImageIds[position]);
            imageView.setScaleType(ImageView.ScaleType.FIT_XY);
            imageView.setLayoutParams(new Gallery.LayoutParams(163, 106));
            // 设置Gallery组件的背景风格

            imageView.setBackgroundResource(mGalleryItemBackground);
            return imageView;
        }
    }

 public class ImageAdapter extends BaseAdapter
    {
        int mGalleryItemBackground;
        private Context mContext;
        public ImageAdapter(Context context)
        {
            mContext = context;
              // 获得Gallery组件的属性
            TypedArray typedArray = obtainStyledAttributes(R.styleable.Gallery);
            mGalleryItemBackground = typedArray.getResourceId(
                    R.styleable.Gallery_android_galleryItemBackground, 0);
        }
         // 返回图像总数
        public int getCount()
        {
            return resIds.length;
        }
        public Object getItem(int position)
        {
            return position;
        }
        public long getItemId(int position)
        {
            return position;
        }
         /
10ba9
/ 返回具体位置的ImageView对象
        public View getView(int position, View convertView, ViewGroup parent)
        {
            ImageView imageView = new ImageView(mContext);
             // 设置当前图像的图像(position为当前图像列表的位置)
            imageView.setImageResource(myImageIds[position]);
            imageView.setScaleType(ImageView.ScaleType.FIT_XY);
            imageView.setLayoutParams(new Gallery.LayoutParams(163, 106));
            // 设置Gallery组件的背景风格
            imageView.setBackgroundResource(mGalleryItemBackground);
            return imageView;
        }
    }
在编写ImageAdapter类时应注意的两点:
1. 在ImageAdapter类的构造方法中获得了Gallery组件的属性信息。这些信息被定义在res/values/attrs.xml文件中,代码如下:
[java]
view plaincopyprint?
<?xml version="1.0" encoding="utf-8"?>
<resources>
<declare-styleable name="Gallery">
<attr name="android:galleryItemBackground" />
</declare-styleable>
</resources>
[c-sharp]
view plaincopyprint?

myImageIds[position % myImageIds.length]

myImageIds[position % myImageIds.length]
在本节对ImageAdapter类做了如下两个改进:
1. 使getCount方法返回一个很大的值。建议返回Integer.MAX_VALUE。
2. 在getView方法中通过取余来循环取得resIds数组中的图像资源ID。
通过上面两点改进,可以使图像列表在向右移动时会循环显示图像。当然,这种方法从本质上说只是伪循环,也就是说,如果真把图像移动到getCount方法返回的值那里,那也就显示到最后一个图像的。不过在这里getCount方法返回的是Integer.MAX_VALUE,这个值超过了20亿,除非有人真想把图像移动到第20亿的位置,否则Gallery组件看着就是一个循环显示图像的组件。
实现循环显示图像的Gallery组件
在本节将组出与循环显示图像相关的ImageAdapter类的完整代码。读者可以从中看到上一节介绍的两点改进。为了使界面看上去更丰满,本例还在单击某一个Gallery组件中的图像时在下方显示一个放大的图像(使用ImageSwitcher组件)。本例的显示效果如图3所示。当不断向后移动图像时,图像可不断显示,读者可以自己运行本例来体验一下。
本例中Main类的完整代码如下:
[java]
view plaincopyprint?
package irdc.EX04_10;
import android.app.Activity;
import android.os.Bundle; /*本范例需使用到的class*/
import android.content.Context;
import android.content.res.TypedArray;
import android.view.View;
import android.view.ViewGroup;
import android.widget.AdapterView;
import android.widget.BaseAdapter;
import android.widget.Gallery;
import android.widget.ImageView;
import android.widget.Toast;
import android.widget.AdapterView.OnItemClickListener;
public class EX04_10 extends Activity
{
/** Called when the activity is first created. */
@Override
public void onCreate(Bundle savedInstanceState)
{
super.onCreate(savedInstanceState);
setContentView(R.layout.main); /* 透过findViewById取得 */
Gallery g = (Gallery) findViewById(R.id.mygallery); /* 新增一ImageAdapter并设定给Gallery对象 */
g.setAdapter(new ImageAdapter(this)); /* 设定一个itemclickListener并Toast被点选图片的位置 */
setTitle("Gallery 实现循环浏览图片");
g.setOnItemClickListener(new OnItemClickListener()
{
public void onItemClick(AdapterView parent, View v, int position, long id)
{
Toast.makeText(EX04_10.this, getString(R.string.my_gallery_text_pre) + position + getString(R.string.my_gallery_text_post), Toast.LENGTH_SHORT).show();
}
});
}
public class ImageAdapter extends BaseAdapter /* 改写BaseAdapter自定义一ImageAdapter class */
{
int mGalleryItemBackground;
private Context mContext; /* ImageAdapter的建构子 */
private int[] myImageIds = {R.drawable.photo1,
R.drawable.photo2,
R.drawable.photo3,
R.drawable.photo4,
R.drawable.photo5,
R.drawable.photo6,};
public ImageAdapter(Context c)
{
mContext = c;
TypedArray a = obtainStyledAttributes(R.styleable.Gallery); /* 使用在res/values/attrs.xml中的定义 的Gallery属性. */
mGalleryItemBackground = a.getResourceId(R.styleable.Gallery_android_galleryItemBackground, 0); ///*取得Gallery属性的Index
a.recycle();/* 让对象的styleable属性能够反复使用 */
}
public int getCount() /* 一定要重写的方法getCount,传回图片数目总数 */
{
//return myImageIds.length;
return Integer.MAX_VALUE;
}
public Object getItem(int position) /* 一定要重写的方法getItem,传回position */
{
return position;
}
public long getItemId(int position) /* 一定要重写的方法getItemId,传回position */
{
return position;
}
public View getView(int position, View convertView, ViewGroup parent)/* 一定要重写的方法getView,传回一View对象 */
{
// if (position == getCount())
// {
// position = 0;
// }
ImageView i = new ImageView(mContext);
i.setImageResource(myImageIds[position%myImageIds.length]); /* 设定图片给imageView对象 */
i.setScaleType(ImageView.ScaleType.FIT_XY); /* 重新设定图片的宽高 */
i.setLayoutParams(new Gallery.LayoutParams(136, 88)); /* 重新设定Layout的宽高 */
i.setBackgroundResource(mGalleryItemBackground); /* 设定Gallery背景图 */
return i; /* 传回imageView物件 */
}
}
}

相关文章推荐
- Android Gallery组件传统用法实现循环显示图像
- Android可循环显示图像的Android Gallery组件用法实例
- Android Gallery组件实现循环显示图像
- Android Gallery组件实现循环显示图像
- Gallery组件实现循环显示图像
- Android Gallery组件实现循环显示图像
- Android Gallery组件实现循环显示图像
- 【Android】使用Gallery组件实现循环显示图像
- Gallery组件实现循环显示图像
- Android Gallery组件实现循环显示图像
- Android Gallery组件实现循环显示图像
- Android Gallery组件实现循环显示图像
- 【Android】使用Gallery组件实现循环显示图像
- 可循环显示图像的Android Gallery组件
- 可循环显示图像的Android Gallery组件
- 可循环显示图像的Android Gallery组件
- Android Gallery组件实现循环显示图像
- 可循环显示图像的Android Gallery组件
- 可循环显示图像的Android Gallery组件
- android--可循环显示图像的Android Gallery组件