Module development Template for DNN 7.0
2013-10-26 15:12
453 查看
本文转自:http://www.chrishammond.com/blog/itemid/2616/using-the-new-module-development-templates-for-dot.aspx 在此,特别感谢Chris的DNN开发模板
原文更新日期为:Thursday, September 19, 2013 4:20 PM
With the release of
DotNetNuke 7.0 (and now the more recent 7.0.2), it was time to update my
module development project templates. If you have worked with my module development templates before, here are the major changes for this release. If you haven’t worked with them before please read this whole blog post as I discuss how to get up and running
with the templates.
features in the templates.
you can see by the name, they use the new DAL2 data access layer available in DotNetNuke 7. Basically you can create a project from one of these two templates and you will have a functioning module (after you build and install of course, see below for those
steps) that allows you to create/edit/delete an Item. The Item in the module is pretty simple, with just a few properties, and an ItemController that provides the interaction with the DAL2 and the database. These two templates are a change from previous releases
of my template project where the projects you create from the template are empty modules that you have to populate for functionality. With the DAL2 templates it only made sense to provide some out of the box functionality to get you going. You can obviously
change the names of the object (Item) and objectcontroller (ItemController) and add additional properties as necessary, be sure to update the SQL script though for any new properties, it can be found in the providers/dataprovider/sqldataprovider folder. For
more information on DAL2 check out some of Charles Nurse’s posts
here,
here,
here and
here.

For
some people getting the development environment setup has been the most difficult part of the use of these templates. The old templates used a URL that required you to configure your HOSTS file to spoof a DNS entry, with the new templates you don’t have to
do that. The new templates use DNNDEV.ME as the website name/domain name. The public DNS for dnndev.me actually points to 127.0.0.1, so no matter where you try to access that domain from it will always resolve to your loopback address, perfect for people who
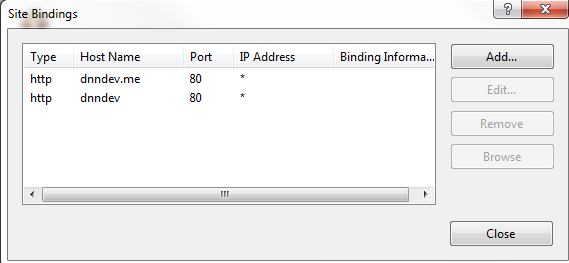
have trouble modifying the DNS via the HOSTS file. If you already have your environment setup at DNNDEV you can simply add another host binding in IIS to that same website with the name DNNDEV.ME. If you are new to development, see more information below about
configuring your environment.
for Visual Studio 2012. I have however come up with a work around for this. If you download the VSIX file from Codeplex you can install the templates in a way that they should work with Express. If you download the template from the Visual Studio Gallery however
they won’t. If you don’t need the Express support you can still grab the templates from the gallery which should actually prompt you to upgrade now that a new release is out, if you had the previous release installed.
problems.
Wiki page, but the easiest approach would likely be to watch this
4 part video series I created for DNN7, as it walks you through setting up a website at
http://dnndev.me. The important thing for the new release of the templates is that you must have DNN 7.0.2 (or a newer release as they come) running at dnndev.me, unless of course you modify the templates yourself,
but that is outside of the scope of this blog post.
Install using the Tools\Extensions and Updates menu in Visual Studio 2012
Mouse over the Tools menu
Click on Extensions and Updates
Search for DotNetNuke
Choose the Install button for the DotNetNuke Project Templates option
Install manually by downloading the
VSIX file from the online gallery
Visit the
Visual Studio Gallery – DotNetNuke Project Templates page
Download the VSIX file via the Download link.
Double click on the downloaded file to install the templates.
Install manually by
downloading from Codeplex
Download the
VSIX file from Codeplex
UPDATED - Right Click on the downloaded VSIX and choose Properties
Click on the UNBLOCK button before proceeding
Double click on the downloaded file to install the templates.
Install Visual Studio 2012 (you should have this done already)
Install the project templates as instructed above
Setup your DotNetNuke Development Environment as instructed above
Run Visual Studio 2012 as an Administrator (right click on the shortcut to do so)
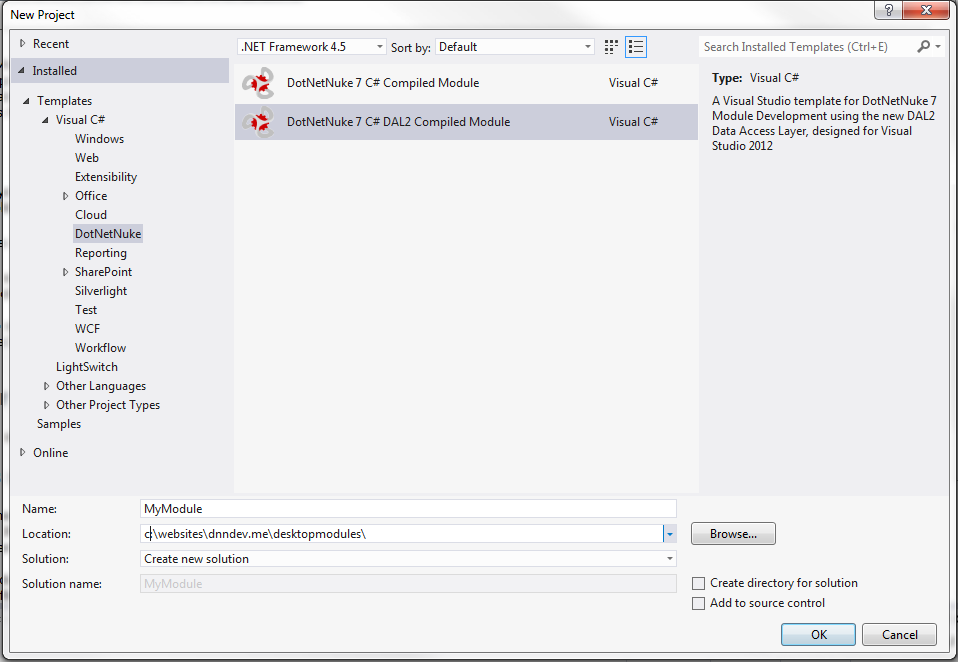
File –> New Project
Choose either C# or VB.Net from the Languages section of the new project dialog
Select the DotNetNuke Folder under your preferred language (C# or Visual Basic)
Choose either DotNetNuke C# Compiled Module, DotNetNuke VB.Net Compiled Module, DotNetNuke 7 C# DAL2 Compiled Module or DotNetNuke 7 VB.Net DAL2 Compiled Module for your project template.

For
the new project creation screen using the following settings
Name: ModuleName (something unique here, example MyModule)
Location: c:\websites\dnndev.me\desktopmodules\ (this assumes you setup your development environment as instructed in Step 3)
Solution: Create new solution (this option might not be displayed, that is okay)
Create directory for solution : Unchecked (this will cause path problems if checked, the templates assume the SLN is in the same folder as the project file)
Add to source control: Unchecked (I typically get my project running before adding it to source control)
Click OK
In some cases Visual Studio will turn the DesktopModules folder in to a Virtual Directory, this will cause problems with your DNNDEV.me environment, load IIS Manager (start>run>INETMGR) and remove the Virtual Directory if it appears as one there.
Build your project in DEBUG mode.
Change to Release mode and build again.
Login to your development website in a browser, using a HOST/SuperUser account.
Navigate to the Host/Extensions page
Choose the Install Extension Wizard option
Click Choose File
Browse to your c:\websites\dnndev.me\desktopmodules\MyModule\Install\ and choose either the INSTALL or SOURCE package to upload.
Go through the steps for the installation wizard (if the module fails to install, try closing Visual Studio first, then install the module)
Place your module on a page (I typically create a new page for each module in my development environment for testing purposes).
原文更新日期为:Thursday, September 19, 2013 4:20 PM
With the release of
DotNetNuke 7.0 (and now the more recent 7.0.2), it was time to update my
module development project templates. If you have worked with my module development templates before, here are the major changes for this release. If you haven’t worked with them before please read this whole blog post as I discuss how to get up and running
with the templates.
What’s New
This section will cover some of the “new” features of this template release. If you’re familiar with my previous releases this will hopefully get you up to speed on what is new. If you are new to the whole process it will help you understand a few of thefeatures in the templates.
New DAL2 Templates
The biggest change for the project is that I have added two new DAL2 templates to the project, one for C# and one for VB.Net. These new templates are called DotNetNuke 7 C# DAL2 Compiled Module and DotNetNuke 7 VB.Net DAL2 Compiled Module respectively. Asyou can see by the name, they use the new DAL2 data access layer available in DotNetNuke 7. Basically you can create a project from one of these two templates and you will have a functioning module (after you build and install of course, see below for those
steps) that allows you to create/edit/delete an Item. The Item in the module is pretty simple, with just a few properties, and an ItemController that provides the interaction with the DAL2 and the database. These two templates are a change from previous releases
of my template project where the projects you create from the template are empty modules that you have to populate for functionality. With the DAL2 templates it only made sense to provide some out of the box functionality to get you going. You can obviously
change the names of the object (Item) and objectcontroller (ItemController) and add additional properties as necessary, be sure to update the SQL script though for any new properties, it can be found in the providers/dataprovider/sqldataprovider folder. For
more information on DAL2 check out some of Charles Nurse’s posts
here,
here,
here and
here.
New URL (dnndev.me)
For
some people getting the development environment setup has been the most difficult part of the use of these templates. The old templates used a URL that required you to configure your HOSTS file to spoof a DNS entry, with the new templates you don’t have to
do that. The new templates use DNNDEV.ME as the website name/domain name. The public DNS for dnndev.me actually points to 127.0.0.1, so no matter where you try to access that domain from it will always resolve to your loopback address, perfect for people who
have trouble modifying the DNS via the HOSTS file. If you already have your environment setup at DNNDEV you can simply add another host binding in IIS to that same website with the name DNNDEV.ME. If you are new to development, see more information below about
configuring your environment.
Support for Visual Studio 2012 Express for Web
One of the requests for the last few releases of the templates has been support for the Visual Studio Express sku. After quite a bit of testing I figured out that the Visual Studio Gallery will not allow my templates to work for both the paid and free SKUsfor Visual Studio 2012. I have however come up with a work around for this. If you download the VSIX file from Codeplex you can install the templates in a way that they should work with Express. If you download the template from the Visual Studio Gallery however
they won’t. If you don’t need the Express support you can still grab the templates from the gallery which should actually prompt you to upgrade now that a new release is out, if you had the previous release installed.
How to use the Templates
Getting up and running with the templates is actually fairly easy, but you should follow some very specific steps, not following the steps makes it hard for anyone else to be able to assist you as you can configure things any number of ways that might causeproblems.
Configuring your Development Environment
This is one of the most important steps of the process, the templates are configured to run in a website under the URL http://dnndev.me/ There are a couple of resources for setting up your environment, including thisWiki page, but the easiest approach would likely be to watch this
4 part video series I created for DNN7, as it walks you through setting up a website at
http://dnndev.me. The important thing for the new release of the templates is that you must have DNN 7.0.2 (or a newer release as they come) running at dnndev.me, unless of course you modify the templates yourself,
but that is outside of the scope of this blog post.
Installing the Templates
Installation of the templates is pretty easy, there are multiple ways to do this, choose one of the three options below and perform the steps listed for the option you choose. You only need to do one of these options, not all three.Install using the Tools\Extensions and Updates menu in Visual Studio 2012
Mouse over the Tools menu
Click on Extensions and Updates
Search for DotNetNuke
Choose the Install button for the DotNetNuke Project Templates option
Install manually by downloading the
VSIX file from the online gallery
Visit the
Visual Studio Gallery – DotNetNuke Project Templates page
Download the VSIX file via the Download link.
Double click on the downloaded file to install the templates.
Install manually by
downloading from Codeplex
Download the
VSIX file from Codeplex
UPDATED - Right Click on the downloaded VSIX and choose Properties
Click on the UNBLOCK button before proceeding
Double click on the downloaded file to install the templates.
Creating your Visual Studio Project
Once you’ve installed the templates, you can setup a project based on the templates. To do so you should follow the steps belowInstall Visual Studio 2012 (you should have this done already)
Install the project templates as instructed above
Setup your DotNetNuke Development Environment as instructed above
Run Visual Studio 2012 as an Administrator (right click on the shortcut to do so)
File –> New Project
Choose either C# or VB.Net from the Languages section of the new project dialog
Select the DotNetNuke Folder under your preferred language (C# or Visual Basic)
Choose either DotNetNuke C# Compiled Module, DotNetNuke VB.Net Compiled Module, DotNetNuke 7 C# DAL2 Compiled Module or DotNetNuke 7 VB.Net DAL2 Compiled Module for your project template.
For
the new project creation screen using the following settings
Name: ModuleName (something unique here, example MyModule)
Location: c:\websites\dnndev.me\desktopmodules\ (this assumes you setup your development environment as instructed in Step 3)
Solution: Create new solution (this option might not be displayed, that is okay)
Create directory for solution : Unchecked (this will cause path problems if checked, the templates assume the SLN is in the same folder as the project file)
Add to source control: Unchecked (I typically get my project running before adding it to source control)
Click OK
In some cases Visual Studio will turn the DesktopModules folder in to a Virtual Directory, this will cause problems with your DNNDEV.me environment, load IIS Manager (start>run>INETMGR) and remove the Virtual Directory if it appears as one there.
Installing your Module in Development
After you create your project in Visual Studio 2012 the module will exist in the c:\websites\dnndev.me\desktopmodules\MyModule folder, but it is not technically installed and registered with DotNetNuke. To do that you need to perform the follow steps.Build your project in DEBUG mode.
Change to Release mode and build again.
Login to your development website in a browser, using a HOST/SuperUser account.
Navigate to the Host/Extensions page
Choose the Install Extension Wizard option
Click Choose File
Browse to your c:\websites\dnndev.me\desktopmodules\MyModule\Install\ and choose either the INSTALL or SOURCE package to upload.
Go through the steps for the installation wizard (if the module fails to install, try closing Visual Studio first, then install the module)
Place your module on a page (I typically create a new page for each module in my development environment for testing purposes).
Installing your Module in Production
To install your module in production you will follow the same steps as installing it in your development environment, except you will almost NEVER use the SOURCE package of a module in production, it just isn’t necessary.
相关文章推荐
- SCOM2012R2 APM系列(一)配置.NET应用程序监控
- popmenu的用法
- jbpm4.4碰到的错误处理收集
- jbpm-jpdl-3.2.3 的学习之路_第一天
- PM Related Topic 5
- PM Related Topic 4
- PM Related Topic 3
- PM Related Topic 2
- PM Related Topic 1
- 如果你是腾讯电商的产品经理,你该如何设计她?
- 如果你是淘宝的产品经理,你该如何设计淘宝?
- 异常驱动的开发(Exception-Driven Development)
- 异常驱动的开发(Exception-Driven Development)
- 代码审查工具之PMD操作指南
- jbpm与OA项目开发过程实录 (四)
- ALSA声卡驱动中的DAPM详解之三:如何定义各种widget
- IPMDA:week 1
- jbpm 对已有流程实例的流程定义进行更改 并马上使其生效
- pm runtime
- rpmdb: unable to join the environment