使用Canvas把照片转换成素描画
2013-09-24 13:37
260 查看
原文:http://www.alloyteam.com/2012/07/convert-picture-to-sketch-by-canvas/
腾讯的alloy team写的一个素描效果,挺不错的。
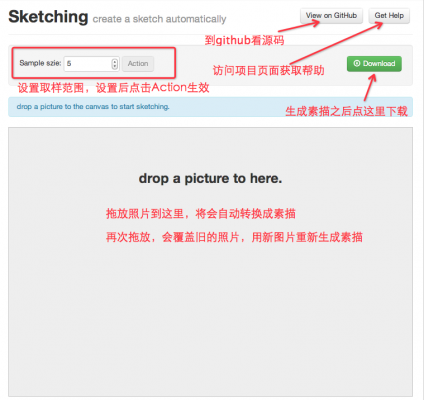
说起用法啊,那你可以问对人了,哈哈。狠狠的敲入app的网址:http://apps.imatlas.com/sketching/(注意只能用现代浏览器(Chrome,Firefox,Opera,Safari等)打开哦,IE9以前的老古董就甭来啦),然后拖拽一张图片到画布区(就是下面打开的灰色地带~),然后……就没有然后啦,最多2秒之后自动生成素描画。点击download按钮可以下载生成的图片。
如果感觉效果不太好,可以改下取样的半径(Sample size),为正整数,最小为1。如果你一定要填负数、小数,也会被取正取整(抠鼻)。之后点下action按钮,生成新的素描图。
如果你还不明白,下面来看图说明(点击图片可以查看大图)。
<img class="size-medium wp-image-1269" title="sketching" src="http://www.alloyteam.com/wp-content/uploads/auto_save_image/2012/07/020848a60.png" alt="sketching" width="424" height="400" />
sketching 图示
斋说都没益啦,实牙实齿效果才是王道,看看下面的原图:

<img class="size-full wp-image-1272" title="示例图" src="http://www.alloyteam.com/wp-content/uploads/auto_save_image/2012/07/020850Svs.jpg" alt="" width="534" height="398" />
原图
转换后的素描图:
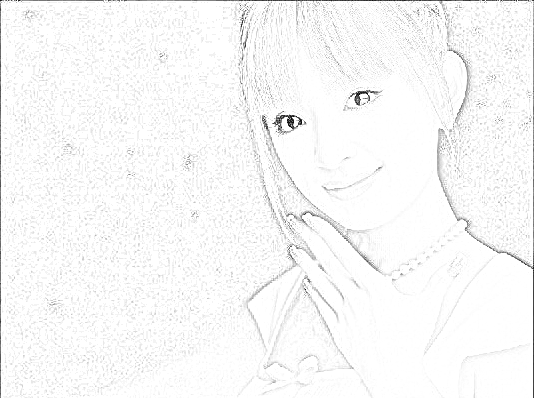
<img class="size-full wp-image-1274" title="sketch" src="http://www.alloyteam.com/wp-content/uploads/auto_save_image/2012/07/0208516qY.png" alt="" width="534" height="398" />
素描
怎么样,效果是不是还不错咧,嘎嘎嘎。当然,这个算法未必是最好的,欢迎各位童鞋踊跃拍砖,^_^
腾讯的alloy team写的一个素描效果,挺不错的。
(function() {

/**
* 把图像变成黑白色
* Y = 0.299R + 0.587G + 0.114B
* @param  {Array} pixes pix array
* @return {Array}
* @link {http://www.61ic.com/Article/DaVinci/DM64X/200804/19645.html}
*/
function discolor(pixes) {
var grayscale;
for (var i = 0, len = pixes.length; i < len; i += 4) {
grayscale = pixes[i] * 0.299 + pixes[i + 1] * 0.587 + pixes[i + 2] * 0.114;
pixes[i] = pixes[i + 1] = pixes[i + 2] = grayscale;
}
return pixes;
}

/**
* 把图片反相, 即将某个颜色换成它的补色
* @param  {Array} pixes pix array
* @return {Array}
*/
function invert(pixes) {
for (var i = 0, len = pixes.length; i < len; i += 4) {
pixes[i] = 255 - pixes[i]; //r
pixes[i + 1] = 255 - pixes[i + 1]; //g
pixes[i + 2] = 255 - pixes[i + 2]; //b
}
return pixes;
}
/**
* 颜色减淡,
* 结果色 = 基色 + (混合色 * 基色) / (255 - 混合色)
* @param  {Array} basePixes 基色
* @param  {Array} mixPixes  混合色
* @return {Array}
*/
function dodgeColor(basePixes, mixPixes) {
for (var i = 0, len = basePixes.length; i < len; i += 4) {
basePixes[i] = basePixes[i] + (basePixes[i] * mixPixes[i]) / (255 - mixPixes[i]);
basePixes[i + 1] = basePixes[i + 1] + (basePixes[i + 1] * mixPixes[i + 1]) / (255 - mixPixes[i + 1]);
basePixes[i + 2] = basePixes[i + 2] + (basePixes[i + 2] * mixPixes[i + 2]) / (255 - mixPixes[i + 2]);
}
return basePixes;
}

/**
* 高斯模糊
* @param  {Array} pixes  pix array
* @param  {Number} width 图片的宽度
* @param  {Number} height 图片的高度
* @param  {Number} radius 取样区域半径, 正数, 可选, 默认为 3.0
* @param  {Number} sigma 标准方差, 可选, 默认取值为 radius / 3
* @return {Array}
*/
function gaussBlur(pixes, width, height, radius, sigma) {
var gaussMatrix = [],
gaussSum = 0,
x, y,
r, g, b, a,
i, j, k, len;

radius = Math.floor(radius) || 3;
sigma = sigma || radius / 3;

a = 1 / (Math.sqrt(2 * Math.PI) * sigma);
b = -1 / (2 * sigma * sigma);
//生成高斯矩阵
for (i = 0, x = -radius; x <= radius; x++, i++){
g = a * Math.exp(b * x * x);
gaussMatrix[i] = g;
gaussSum += g;

}
//归一化, 保证高斯矩阵的值在[0,1]之间
for (i = 0, len = gaussMatrix.length; i < len; i++) {
gaussMatrix[i] /= gaussSum;
}
//x 方向一维高斯运算
for (y = 0; y < height; y++) {
for (x = 0; x < width; x++) {
r = g = b = a = 0;
gaussSum = 0;
for(j = -radius; j <= radius; j++){
k = x + j;
if(k >= 0 && k < width){//确保 k 没超出 x 的范围
//r,g,b,a 四个一组
i = (y * width + k) * 4;
r += pixes[i] * gaussMatrix[j + radius];
g += pixes[i + 1] * gaussMatrix[j + radius];
b += pixes[i + 2] * gaussMatrix[j + radius];
// a += pixes[i + 3] * gaussMatrix[j];
gaussSum += gaussMatrix[j + radius];
}
}
i = (y * width + x) * 4;
// 除以 gaussSum 是为了消除处于边缘的像素, 高斯运算不足的问题
// console.log(gaussSum)
pixes[i] = r / gaussSum;
pixes[i + 1] = g / gaussSum;
pixes[i + 2] = b / gaussSum;
// pixes[i + 3] = a ;
}
}
//y 方向一维高斯运算
for (x = 0; x < width; x++) {
for (y = 0; y < height; y++) {
r = g = b = a = 0;
gaussSum = 0;
for(j = -radius; j <= radius; j++){
k = y + j;
if(k >= 0 && k < height){//确保 k 没超出 y 的范围
i = (k * width + x) * 4;
r += pixes[i] * gaussMatrix[j + radius];
g += pixes[i + 1] * gaussMatrix[j + radius];
b += pixes[i + 2] * gaussMatrix[j + radius];
// a += pixes[i + 3] * gaussMatrix[j];
gaussSum += gaussMatrix[j + radius];
}
}
i = (y * width + x) * 4;
pixes[i] = r / gaussSum;
pixes[i + 1] = g / gaussSum;
pixes[i + 2] = b / gaussSum;
// pixes[i] = r ;
// pixes[i + 1] = g ;
// pixes[i + 2] = b ;
// pixes[i + 3] = a ;
}
}
//end
return pixes;
}

var canvas = document.createElement('canvas'),
ctx = canvas.getContext('2d');

/**
* 素描
* @param  {Object} imgData
* @param  {Number} radius 取样区域半径, 正数, 可选, 默认为 3.0
* @param  {Number} sigma 标准方差, 可选, 默认取值为 radius / 3
* @return {Array}
*/
function sketch(imgData, radius, sigma){
var pixes = imgData.data,
width = imgData.width,
height = imgData.height,
copyPixes;

discolor(pixes);//去色
canvas.width = width, canvas.height = height;
//复制一份
ctx.clearRect(0, 0, width, height);
ctx.putImageData(imgData, 0, 0);
copyPixes = ctx.getImageData(0, 0, width, height).data;
// 拷贝数组太慢
// copyPixes = Array.prototype.slice.call(pixes, 0);
invert(copyPixes);//反相
gaussBlur(copyPixes, width, height, radius, sigma);//高斯模糊
dodgeColor(pixes, copyPixes);//颜色减淡
return pixes;
}

window.sketching = {
discolor: discolor,
invert: invert,
dodgeColor: dodgeColor,
gaussBlur: gaussBlur,
sketch: sketch
};

if(typeof window.sk === 'undefined'){
window.sk = window.sketching;
}

})();
View Code
拖动加入图片(可以获取到图片base64串):
(function(){
var $ = window.$ || function(id){
return document.getElementById(id);
}

var toggleActionButton = function(status){
if(status){
action.classList.add('btn-primary');
action.disabled = false;
}else{
action.classList.remove('btn-primary');
action.disabled = true;
}
}

var doSketch = function(){
var st = Math.abs(strangth.value || 5);
var imgData = ctx.getImageData(0, 0, canvas.width, canvas.height);
sk.sketch(imgData, st);
ctx.putImageData(imgData, 0, 0);
}

var defaultWidth = 640, defaultHeight = 480;
var setCanvasSize = function(width, height){
var scale = height / width,
defaultScale = defaultHeight / defaultWidth;
if(scale >= defaultScale && height >= defaultHeight){
height = defaultHeight;
width = height / scale;
}
if(scale <= defaultScale && width >= defaultWidth){
width = defaultWidth;
height = width * scale;
}
// console.log(width, height);
canvas.width = width;
canvas.height = height;
}

var drawImage = function(img){
toggleActionButton(false);
setTimeout(function(){
//set the width/height will clear the canvas
// canvas.width = img.width;
// canvas.height = 640 * img.height / img.width;
setCanvasSize(img.width, img.height);
ctx.clearRect(0, 0, canvas.width, canvas.height);
ctx.drawImage(img, 0, 0, canvas.width, canvas.height);
doSketch();
download.href = canvas.toDataURL();
toggleActionButton(true);
}, 0);
}

var canvas = $('canvas'),
action = $('action'),
download = $('download'),
strangth = $('strength'),
dropper = $('dropper'),

ctx = canvas.getContext('2d'),
cacheImg;

dropper.addEventListener('drop', function(e){
e.preventDefault();
dropper.innerHTML = '';
var file = e.dataTransfer.files[0];
var reader = new FileReader();
reader.onload = function(e){
var img = new Image();
img.onload = function(){
cacheImg = this;
drawImage(this);
}
img.src = e.target.result;
}
reader.onerror = function(e){
var code = e.target.error.code;
if(code === 2){
alert('please don\'t open this page using protocol fill:///');
}else{
alert('error code: ' + code);
}
}
reader.readAsDataURL(file);
}, false);
dropper.addEventListener('dragover', function(e){
e.preventDefault();
}, false);
dropper.addEventListener('dragenter', function(e){
e.preventDefault();
}, false);

action.addEventListener('click', function(e){
if(cacheImg){
drawImage(cacheImg);
}else{
alert('please select a picture first')
}
}, false);

})();
四、怎么用
说起用法啊,那你可以问对人了,哈哈。狠狠的敲入app的网址:http://apps.imatlas.com/sketching/(注意只能用现代浏览器(Chrome,Firefox,Opera,Safari等)打开哦,IE9以前的老古董就甭来啦),然后拖拽一张图片到画布区(就是下面打开的灰色地带~),然后……就没有然后啦,最多2秒之后自动生成素描画。点击download按钮可以下载生成的图片。如果感觉效果不太好,可以改下取样的半径(Sample size),为正整数,最小为1。如果你一定要填负数、小数,也会被取正取整(抠鼻)。之后点下action按钮,生成新的素描图。
如果你还不明白,下面来看图说明(点击图片可以查看大图)。
&lt;img class="size-medium wp-image-1269" title="sketching" src="http://www.alloyteam.com/wp-content/uploads/auto_save_image/2012/07/020848a60.png" alt="sketching" width="424" height="400" /&gt;
sketching 图示
斋说都没益啦,实牙实齿效果才是王道,看看下面的原图:
&lt;img class="size-full wp-image-1272" title="示例图" src="http://www.alloyteam.com/wp-content/uploads/auto_save_image/2012/07/020850Svs.jpg" alt="" width="534" height="398" /&gt;
原图
转换后的素描图:
&lt;img class="size-full wp-image-1274" title="sketch" src="http://www.alloyteam.com/wp-content/uploads/auto_save_image/2012/07/0208516qY.png" alt="" width="534" height="398" /&gt;
素描
怎么样,效果是不是还不错咧,嘎嘎嘎。当然,这个算法未必是最好的,欢迎各位童鞋踊跃拍砖,^_^

相关文章推荐
- 使用Canvas把照片转换成素描画
- #479 – 对Canvas面板中的子元素使用布局转换(Using a Layout Transform on Child Elements in a Canvas)
- 使用的是html5的canvas将文字转换成图片
- 使用canvas 将img 的url 转换为base64格式
- 使用canvas做出红包照片的效果
- 使用字节码asm将pojo转换成Map,直接构造mongodb bsonobject
- 使用prism将网络程序转换成桌面程序
- CodeProject - 使用GDI+ for .NET创建一个含有水印效果的照片
- VC常用数据类型使用转换
- 最好使用c++风格的转换操作符号
- 如何使用AdminStudio软件把.exe转换成.msi
- Android自定义View(Paint和Canvas的基本使用)
- QT+OpenCV照片动画风格转换
- [转] 小tip: 使用CSS将图片转换成黑白(灰色、置灰) ---张鑫旭
- 11-198 使用atoi()函数把字符串转换为整数
- 数据字典到SQL语句的转换(使用word与VBA)
- 使用GDAL下载并转换SRTM的DEM数据
- canvas使用注意点
- spring mvc4使用及json 日期转换解决方案
- 代码清单5-3 使用raw_input()转换温度