Android4.0新特性----Fragment与ActionBar
2013-09-20 15:57
295 查看
Android的1.x和2.x适用于手机,3.x适用于平板,而从4.0开始整合了手机与平板的系统,让4.x的系统适用于手机与平板。
一:Fragment
Fragment是Android的一个重要的特性,从字面意思理解为“碎片”,实质上就是可以让Activity有多个显示区域来显示内容,他有自己的生命周期,但是他的生命周期依赖于他所附属的Activity的生命周期。
1:生命周期
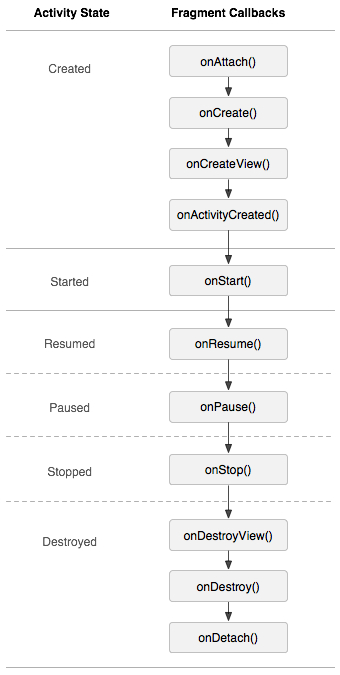
通过上面的图片我们可总结出如下的几条规律:
(1)Activity的生命周期将直接影响Fragment的生命周期
(2)Fragment实质上是将Activity划分成了几个部分
(3)Fragment可以处于Activity状态与之对应的状态及以下状态。如:Activity处于stopped状态时,Fragment可以处于onStop、onDestoryView及以下状态。
2:管理与操作Fragment
(1)管理Fragment
通过getFragmentManager获得管理对象,主要方法有
findFragmentById(int id):通过id查找到Fragment
findFragmentByTag(String tag):通过Tag找到Fragment
(2)操作Fragment
通过FragmentManager对象的getTranscation获得操作对象
add(int containerViewID,Fragment fragment,String tag):向Activity中添加一个Fragment对象
show(Fragment fragment):显示已经隐藏的Fragment
remove(Fragment fragment):移除已经存在的Fragment
hide(Fragment fragment):隐藏显示的Fragment
commit():注册这个Transcation
二:ActionBar
在2.x版本中的实现导航样式的TabHost,在4.x的版本中对齐又进行了美化。原来用2.x开发的导航可以运行在4.x版本的设备上,但是4.x开发的导航却无法运行在2.x版本的设备上。
用途之一:做导航标签
使用ActionBar设计的导航可以自适应屏幕的分辨率,可以避免适配的问题。具体实现主要由以下几个步骤
(1)实现ActionBar.TabListener接口,重写其中的几个方法以响应用户切换导航标签的操作。也就是说,一个标签注册一个监听,添加一个Fragment到Activity上,完成一个操作。
(2)实例化ActionBar.Tab对象,一个对象就是一个标签,可以调用set系列方法设置标签的样式及操作等
(3)调用addTab()将标签添加到导航ActionBar中。
三:结合两大特性制作导航
这里想达到的效果是:在一个Activity上添加一个导航,随着单击导航标签,在同一个Activity上的不同区域上切换显示内容。
1:界面布局
主界面就是一个LinearLayout,且给这个布局一个id;另外的2个界面,随意添加什么控件均可以(这里我添加的一个是TextVIew一个是ImageView)。
主界面布局:
布局1:textfragment.xml
布局2:imagefragment.xml
2:Fragment类
有多少个转换的界面就有多少个继承自Fragment的类,重写onCreateView方法,加载对应界面要显示的xml文件,获得界面上的视图View
区域1:TextFragment.java
区域2:ImageFragment.java
3:主界面
创建导航,导航标签对象,设置导航标签的监听以响应操作等,添加标签到导航上。
4:结果
和2.x版本中的导航类似,单击不同的标签时,下方会显示出不同的界面。
快要崩溃。。。

本文出自 “辛德瑞拉” 博客,请务必保留此出处http://cinderella7.blog.51cto.com/7607653/1299181
一:Fragment
Fragment是Android的一个重要的特性,从字面意思理解为“碎片”,实质上就是可以让Activity有多个显示区域来显示内容,他有自己的生命周期,但是他的生命周期依赖于他所附属的Activity的生命周期。
1:生命周期
通过上面的图片我们可总结出如下的几条规律:
(1)Activity的生命周期将直接影响Fragment的生命周期
(2)Fragment实质上是将Activity划分成了几个部分
(3)Fragment可以处于Activity状态与之对应的状态及以下状态。如:Activity处于stopped状态时,Fragment可以处于onStop、onDestoryView及以下状态。
2:管理与操作Fragment
(1)管理Fragment
通过getFragmentManager获得管理对象,主要方法有
findFragmentById(int id):通过id查找到Fragment
findFragmentByTag(String tag):通过Tag找到Fragment
(2)操作Fragment
通过FragmentManager对象的getTranscation获得操作对象
add(int containerViewID,Fragment fragment,String tag):向Activity中添加一个Fragment对象
show(Fragment fragment):显示已经隐藏的Fragment
remove(Fragment fragment):移除已经存在的Fragment
hide(Fragment fragment):隐藏显示的Fragment
commit():注册这个Transcation
二:ActionBar
在2.x版本中的实现导航样式的TabHost,在4.x的版本中对齐又进行了美化。原来用2.x开发的导航可以运行在4.x版本的设备上,但是4.x开发的导航却无法运行在2.x版本的设备上。
用途之一:做导航标签
使用ActionBar设计的导航可以自适应屏幕的分辨率,可以避免适配的问题。具体实现主要由以下几个步骤
(1)实现ActionBar.TabListener接口,重写其中的几个方法以响应用户切换导航标签的操作。也就是说,一个标签注册一个监听,添加一个Fragment到Activity上,完成一个操作。
(2)实例化ActionBar.Tab对象,一个对象就是一个标签,可以调用set系列方法设置标签的样式及操作等
(3)调用addTab()将标签添加到导航ActionBar中。
三:结合两大特性制作导航
这里想达到的效果是:在一个Activity上添加一个导航,随着单击导航标签,在同一个Activity上的不同区域上切换显示内容。
1:界面布局
主界面就是一个LinearLayout,且给这个布局一个id;另外的2个界面,随意添加什么控件均可以(这里我添加的一个是TextVIew一个是ImageView)。
主界面布局:
<?xml version="1.0" encoding="utf-8"?> <LinearLayout xmlns:android="http://schemas.android.com/apk/res/android" xmlns:tools="http://schemas.android.com/tools" android:id="@+id/layout" android:layout_width="match_parent" android:layout_height="match_parent" android:orientation="horizontal" tools:context=".MainActivity" > </LinearLayout> |
<?xml version="1.0" encoding="utf-8"?> <LinearLayout xmlns:android="http://schemas.android.com/apk/res/android" android:layout_width="match_parent" android:layout_height="match_parent" android:orientation="vertical" > <TextView android:id="@+id/textView1" android:layout_width="wrap_content" android:layout_height="wrap_content" android:text="TextView" /> </LinearLayout> |
<?xml version="1.0" encoding="utf-8"?> <LinearLayout xmlns:android="http://schemas.android.com/apk/res/android" android:layout_width="match_parent" android:layout_height="match_parent" android:orientation="vertical" > <ImageView android:id="@+id/imageView1" android:layout_width="wrap_content" android:layout_height="wrap_content" android:src="@drawable/ic_launcher" /> </LinearLayout> |
有多少个转换的界面就有多少个继承自Fragment的类,重写onCreateView方法,加载对应界面要显示的xml文件,获得界面上的视图View
区域1:TextFragment.java
//继承自Fragment
public class TextFragment extends Fragment{
private View view;//声明视图

@Override
public View onCreateView(LayoutInflater inflater, ViewGroup container,
Bundle savedInstanceState) {
//加载对应界面的布局,获得视图View
view = inflater.inflate(R.layout.textfragment, container,false);
//返回View
return view;
}
} |
//继承自Fragment
public class ImageFragment extends Fragment{
//声明视图
private View imageview;
@Override
public View onCreateView(LayoutInflater inflater, ViewGroup container,
Bundle savedInstanceState) {
//加载布局,返回视图
imageview = inflater.inflate(R.layout.imagefragment, container, false);

return imageview;
}
} |
创建导航,导航标签对象,设置导航标签的监听以响应操作等,添加标签到导航上。
public class MainActivity extends Activity {
// 声明导航对象
private ActionBar actionBar;
@Override
protected void onCreate(Bundle savedInstanceState) {
super.onCreate(savedInstanceState);
// 加载视图
setContentView(R.layout.activity_main);
// 实例化导航对象
actionBar = getActionBar();
// 设置导航的显示样式
actionBar.setNavigationMode(ActionBar.NAVIGATION_MODE_TABS);
// 创建第一个区域
TextFragment textFragment = new TextFragment();
// 实例化第一个标签对象
Tab tab1 = actionBar.newTab();
tab1.setIcon(R.drawable.ic_launcher);// 设置标签的图标样式
tab1.setText("选项卡1");// 设置图标显示的文字
tab1.setTabListener(new TextListener(textFragment));// 给标签添加相应的监听
actionBar.addTab(tab1);// 添加标签到导航上
// 创建第二个区域
ImageFragment imageFragment = new ImageFragment();
// 创建第二个标签
Tab tab2 = actionBar.newTab();
tab2.setIcon(R.drawable.ic_launcher);// 设置标签的图标样式
tab2.setText("选项卡2");// 设置标签的文字
tab2.setTabListener(new IamgeListener(imageFragment));// 给标签添加相应的监听
actionBar.addTab(tab2);// 添加标签到导航上
}
// 内部类形式        实现监听第一个区域的类
class TextListener implements android.app.ActionBar.TabListener {
private TextFragment textFragment;// 声明区域
// 构造方法
public TextListener(TextFragment textFragment) {
this.textFragment = textFragment;
}
// 重写的三个方法
// 当标签重新选中时触发的方法
@Override
public void onTabReselected(Tab tab, FragmentTransaction ft) {
}
// 当标签选中时触发的方法
@Override
public void onTabSelected(Tab tab, FragmentTransaction ft) {
ft.add(R.id.layout, textFragment, null);// 添加区域到Activity上的布局上
}
// 当标签取消选中时触发的方法
@Override
public void onTabUnselected(Tab tab, FragmentTransaction ft) {
ft.remove(textFragment);// 移除区域
}
}
// 内部类形式        实现监听第二个区域的类
class IamgeListener implements android.app.ActionBar.TabListener {
private ImageFragment imageFragment;// 声明区域
// 构造方法
public IamgeListener(ImageFragment imageFragment) {
this.imageFragment = imageFragment;
}
// 当标签重新选中时触发的方法
@Override
public void onTabReselected(Tab tab, FragmentTransaction ft) {
}
// 当标签选中时触发的方法
@Override
public void onTabSelected(Tab tab, FragmentTransaction ft) {
ft.add(R.id.layout, imageFragment, null);// 添加区域到Activity上的布局上
}
// 当标签取消选中时触发的方法
@Override
public void onTabUnselected(Tab tab, FragmentTransaction ft) {
ft.remove(imageFragment);// 移除区域
}
}
} |
和2.x版本中的导航类似,单击不同的标签时,下方会显示出不同的界面。
快要崩溃。。。
本文出自 “辛德瑞拉” 博客,请务必保留此出处http://cinderella7.blog.51cto.com/7607653/1299181

相关文章推荐
- Android开发随记(4)-- activity加载Fragment、Android 5.0 去除actionBar下面的阴影
- Android 4.0 新特性
- Android 4.0的12大新特性
- Android 4.0自定义ActionBar
- Android 4.0以上如何去掉ActionBar
- android 4.0新特性
- 图解冰淇淋三明治Android 4.0的21项新特性
- android 3.0的新特性ActionBar的使用
- android 4.0 取内外置SD卡新特性
- Android开发之基础新特性-------------Fragment&帧动画(一知识点)
- Android 4.0的12大新特性
- Android 4.0 30大特性功能
- Android 4.0操作系统21项新特性