kvm虚拟化学习笔记(十)之kvm虚拟机快照备份
2013-09-08 15:47
465 查看
KVM虚拟化学习笔记系列文章列表
----------------------------------------
kvm虚拟化学习笔记(一)之kvm虚拟化环境安装
/article/4403901.html
kvm虚拟化学习笔记(二)之linux kvm虚拟机安装
/article/4403812.html
kvm虚拟化学习笔记(三)之windows kvm虚拟机安装
/article/4403813.html
kvm虚拟化学习笔记(四)之kvm虚拟机日常管理与配置
/article/4403814.html
kvm虚拟化学习笔记(五)之windows虚拟机性能调整
/article/4403815.html
kvm虚拟化学习笔记(六)之kvm虚拟机控制台登录配置
/article/4403816.html
kvm虚拟化学习笔记(七)之kvm虚拟机克隆
/article/4403817.html
kvm虚拟化学习笔记(八)之kvm虚拟机vnc配置
/article/4403818.html
kvm虚拟化学习笔记(九)之kvm虚拟机时间配置
/article/4403819.html
kvm虚拟化学习笔记(十)之kvm虚拟机快照备份
/article/4403820.html
kvm虚拟化学习笔记(十一)之kvm虚拟机扩展磁盘空间
/article/4403821.html
kvm虚拟化学习笔记(十二)之kvm linux虚拟机在线扩展磁盘
/article/4403822.html
kvm虚拟化学习笔记(十三)之kvm虚拟机磁盘文件读取小结
/article/4403823.html
kvm虚拟化学习笔记(十四)之kvm虚拟机静态迁移
/article/4403824.html
kvm虚拟化学习笔记(十五)之kvm虚拟机动态迁移
/article/4403825.html
kvm虚拟化学习笔记(十六)之kvm虚拟化存储池配置
/article/4403830.html
kvm虚拟化学习笔记(十七)之KVM到KVM之v2v迁移
/article/4403831.html
kvm虚拟化学习笔记(十八)之ESXi到KVM之v2v迁移
/article/4403832.html
kvm虚拟化学习笔记(十九)之convirt集中管理平台搭建
/article/4403836.html
kvm虚拟化学习笔记(二十)之convirt安装linux系统
/article/4403837.html
kvm虚拟机默认使用raw格式的镜像格式,性能最好,速度最快,它的缺点就是不支持一些新的功能,如支持镜像,zlib磁盘压缩,AES加密等。
要使用镜像功能,磁盘格式必须为qcow2。下面开始kvm虚拟机快照备份的过程。
本文出自:http://koumm.blog.51cto.com
进一步的学习参考:kvm+libvirt虚拟机快照浅析 http://itxx.sinaapp.com/blog/content/130
# qemu-img info test01.img
raw格式需要转换成qcow2

(2) 关闭虚拟机并转换磁盘
# virsh shutdown oeltest01

(3) 转换磁盘格式
# qemu-img convert -f raw -O qcow2 test01.img test01.qcow2
-f 源镜像的格式
-O 目标镜像的格式

查看转换后的格式,已经转换成了qcow2, 这里是拷贝一份,并将格式转成qcow2
# qemu-img info test01.qcow2


也可以virsh snapshot-create as oeltest01 snap1 创建后个快照别名。

(2) 查看虚拟机镜像快照的版本

(3) 查看当前虚拟机镜像快照的版本
可以看到为当前最新的快照版本。
[root@node1 data]#
[root@node1 data]# virsh snapshot-current oeltest01
<domainsnapshot>
<name>1378579737</name>
<state>shutoff</state>
<creationTime>1378579737</creationTime>
<memory snapshot='no'/>
<disks>
<disk name='hda' snapshot='internal'/>
<disk name='hdc' snapshot='no'/>
</disks>
<domain type='kvm'>
<name>oeltest01</name>
<uuid>8f2bb4a7-c7ed-32aa-3676-9fb05923269d</uuid>
<memory unit='KiB'>524288</memory>
<currentMemory unit='KiB'>524288</currentMemory>
<vcpu placement='static'>1</vcpu>
<os>
<type arch='x86_64' machine='rhel6.4.0'>hvm</type>
<boot dev='hd'/>
</os>
<features>
<acpi/>
<apic/>
<pae/>
</features>
<clock offset='localtime'/>
<on_poweroff>destroy</on_poweroff>
<on_reboot>restart</on_reboot>
<on_crash>restart</on_crash>
<devices>
<emulator>/usr/libexec/qemu-kvm</emulator>
<disk type='file' device='disk'>
<driver name='qemu' type='qcow2' cache='none'/>
<source file='/data/test01.qcow2'/>
<target dev='hda' bus='ide'/>
<address type='drive' controller='0' bus='0' target='0' unit='0'/>
</disk>
<disk type='block' device='cdrom'>
<driver name='qemu' type='raw'/>
<target dev='hdc' bus='ide'/>
<readonly/>
<address type='drive' controller='0' bus='1' target='0' unit='0'/>
</disk>
<controller type='ide' index='0'>
<address type='pci' domain='0x0000' bus='0x00' slot='0x01' function='0x1'/>
</controller>
<controller type='usb' index='0'/>
<interface type='bridge'>
<mac address='52:54:00:82:39:01'/>
<source bridge='br0'/>
<model type='virtio'/>
<address type='pci' domain='0x0000' bus='0x00' slot='0x03' function='0x0'/>
</interface>
<serial type='pty'>
<target port='0'/>
</serial>
<console type='pty'>
<target type='serial' port='0'/>
</console>
<input type='tablet' bus='usb'/>
<input type='mouse' bus='ps2'/>
<graphics type='vnc' port='5910' autoport='no' listen='0.0.0.0'>
<listen type='address' address='0.0.0.0'/>
</graphics>
<video>
<model type='cirrus' vram='9216' heads='1'/>
<address type='pci' domain='0x0000' bus='0x00' slot='0x02' function='0x0'/>
</video>
<memballoon model='virtio'>
<address type='pci' domain='0x0000' bus='0x00' slot='0x04' function='0x0'/>
</memballoon>
</devices>
</domain>
</domainsnapshot>
[root@node1 data]#
(4) 查看当前虚拟机镜像文件
又创建了一个,快照的版本也记录在镜像文件中了。

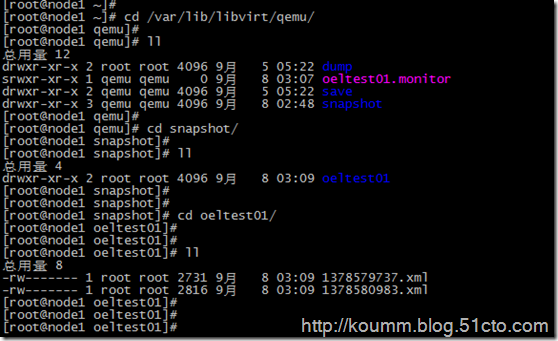
快照配置文件在/var/lib/libvirt/qemu/snapshot/虚拟机名称/下


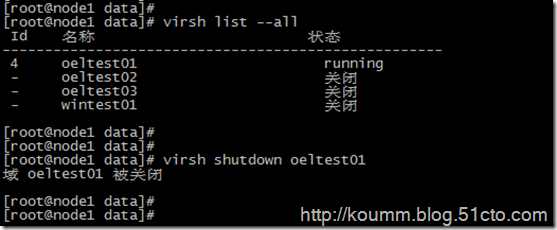
确认虚拟机是关机状态

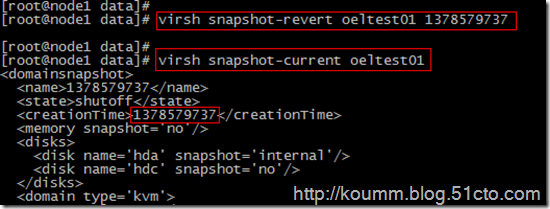
(2) 确认需要恢复的快照时间,这里恢复到1378579737

(3) 执行恢复,并确认恢复版本
# virsh snapshot-revert oeltest01 1378579737

# qemu-img info test01.qcow2

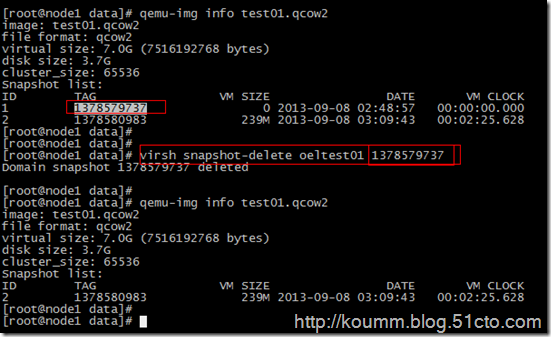
这里删除第一个快照1378579737
(2) 删除快照

到此kvm虚拟机快照测试完毕。kvm虚拟化学习笔记进行到这里了,感觉到kvm虚拟化的内容真的很多。水是越来越深了。
本文出自 “koumm的linux技术博客” 博客,请务必保留此出处/article/4403820.html
----------------------------------------
kvm虚拟化学习笔记(一)之kvm虚拟化环境安装
/article/4403901.html
kvm虚拟化学习笔记(二)之linux kvm虚拟机安装
/article/4403812.html
kvm虚拟化学习笔记(三)之windows kvm虚拟机安装
/article/4403813.html
kvm虚拟化学习笔记(四)之kvm虚拟机日常管理与配置
/article/4403814.html
kvm虚拟化学习笔记(五)之windows虚拟机性能调整
/article/4403815.html
kvm虚拟化学习笔记(六)之kvm虚拟机控制台登录配置
/article/4403816.html
kvm虚拟化学习笔记(七)之kvm虚拟机克隆
/article/4403817.html
kvm虚拟化学习笔记(八)之kvm虚拟机vnc配置
/article/4403818.html
kvm虚拟化学习笔记(九)之kvm虚拟机时间配置
/article/4403819.html
kvm虚拟化学习笔记(十)之kvm虚拟机快照备份
/article/4403820.html
kvm虚拟化学习笔记(十一)之kvm虚拟机扩展磁盘空间
/article/4403821.html
kvm虚拟化学习笔记(十二)之kvm linux虚拟机在线扩展磁盘
/article/4403822.html
kvm虚拟化学习笔记(十三)之kvm虚拟机磁盘文件读取小结
/article/4403823.html
kvm虚拟化学习笔记(十四)之kvm虚拟机静态迁移
/article/4403824.html
kvm虚拟化学习笔记(十五)之kvm虚拟机动态迁移
/article/4403825.html
kvm虚拟化学习笔记(十六)之kvm虚拟化存储池配置
/article/4403830.html
kvm虚拟化学习笔记(十七)之KVM到KVM之v2v迁移
/article/4403831.html
kvm虚拟化学习笔记(十八)之ESXi到KVM之v2v迁移
/article/4403832.html
kvm虚拟化学习笔记(十九)之convirt集中管理平台搭建
/article/4403836.html
kvm虚拟化学习笔记(二十)之convirt安装linux系统
/article/4403837.html
kvm虚拟机默认使用raw格式的镜像格式,性能最好,速度最快,它的缺点就是不支持一些新的功能,如支持镜像,zlib磁盘压缩,AES加密等。
要使用镜像功能,磁盘格式必须为qcow2。下面开始kvm虚拟机快照备份的过程。
本文出自:http://koumm.blog.51cto.com
进一步的学习参考:kvm+libvirt虚拟机快照浅析 http://itxx.sinaapp.com/blog/content/130
1. 查看现有磁盘镜像格式与转换
(1) 查看磁盘格式# qemu-img info test01.img
raw格式需要转换成qcow2

(2) 关闭虚拟机并转换磁盘
# virsh shutdown oeltest01

(3) 转换磁盘格式
# qemu-img convert -f raw -O qcow2 test01.img test01.qcow2
-f 源镜像的格式
-O 目标镜像的格式

查看转换后的格式,已经转换成了qcow2, 这里是拷贝一份,并将格式转成qcow2
# qemu-img info test01.qcow2

2. 修改虚拟机配置文件
修改磁盘格式,与新qcow2格式的磁盘。
3. 对虚拟机进行快照管理
(1) 对oeltest01虚拟机创建快照也可以virsh snapshot-create as oeltest01 snap1 创建后个快照别名。

(2) 查看虚拟机镜像快照的版本

(3) 查看当前虚拟机镜像快照的版本
可以看到为当前最新的快照版本。
[root@node1 data]#
[root@node1 data]# virsh snapshot-current oeltest01
<domainsnapshot>
<name>1378579737</name>
<state>shutoff</state>
<creationTime>1378579737</creationTime>
<memory snapshot='no'/>
<disks>
<disk name='hda' snapshot='internal'/>
<disk name='hdc' snapshot='no'/>
</disks>
<domain type='kvm'>
<name>oeltest01</name>
<uuid>8f2bb4a7-c7ed-32aa-3676-9fb05923269d</uuid>
<memory unit='KiB'>524288</memory>
<currentMemory unit='KiB'>524288</currentMemory>
<vcpu placement='static'>1</vcpu>
<os>
<type arch='x86_64' machine='rhel6.4.0'>hvm</type>
<boot dev='hd'/>
</os>
<features>
<acpi/>
<apic/>
<pae/>
</features>
<clock offset='localtime'/>
<on_poweroff>destroy</on_poweroff>
<on_reboot>restart</on_reboot>
<on_crash>restart</on_crash>
<devices>
<emulator>/usr/libexec/qemu-kvm</emulator>
<disk type='file' device='disk'>
<driver name='qemu' type='qcow2' cache='none'/>
<source file='/data/test01.qcow2'/>
<target dev='hda' bus='ide'/>
<address type='drive' controller='0' bus='0' target='0' unit='0'/>
</disk>
<disk type='block' device='cdrom'>
<driver name='qemu' type='raw'/>
<target dev='hdc' bus='ide'/>
<readonly/>
<address type='drive' controller='0' bus='1' target='0' unit='0'/>
</disk>
<controller type='ide' index='0'>
<address type='pci' domain='0x0000' bus='0x00' slot='0x01' function='0x1'/>
</controller>
<controller type='usb' index='0'/>
<interface type='bridge'>
<mac address='52:54:00:82:39:01'/>
<source bridge='br0'/>
<model type='virtio'/>
<address type='pci' domain='0x0000' bus='0x00' slot='0x03' function='0x0'/>
</interface>
<serial type='pty'>
<target port='0'/>
</serial>
<console type='pty'>
<target type='serial' port='0'/>
</console>
<input type='tablet' bus='usb'/>
<input type='mouse' bus='ps2'/>
<graphics type='vnc' port='5910' autoport='no' listen='0.0.0.0'>
<listen type='address' address='0.0.0.0'/>
</graphics>
<video>
<model type='cirrus' vram='9216' heads='1'/>
<address type='pci' domain='0x0000' bus='0x00' slot='0x02' function='0x0'/>
</video>
<memballoon model='virtio'>
<address type='pci' domain='0x0000' bus='0x00' slot='0x04' function='0x0'/>
</memballoon>
</devices>
</domain>
</domainsnapshot>
[root@node1 data]#
(4) 查看当前虚拟机镜像文件
又创建了一个,快照的版本也记录在镜像文件中了。

快照配置文件在/var/lib/libvirt/qemu/snapshot/虚拟机名称/下

4. 恢复虚拟机快照
(1) 恢复虚拟机快照必须关闭虚拟机。
确认虚拟机是关机状态

(2) 确认需要恢复的快照时间,这里恢复到1378579737

(3) 执行恢复,并确认恢复版本
# virsh snapshot-revert oeltest01 1378579737

5. 删除虚拟机快照
(1) 查看虚拟机快照# qemu-img info test01.qcow2

这里删除第一个快照1378579737
(2) 删除快照

到此kvm虚拟机快照测试完毕。kvm虚拟化学习笔记进行到这里了,感觉到kvm虚拟化的内容真的很多。水是越来越深了。
本文出自 “koumm的linux技术博客” 博客,请务必保留此出处/article/4403820.html
相关文章推荐
- kvm虚拟化学习笔记(十)之kvm虚拟机快照备份
- kvm虚拟化学习笔记(十)之kvm虚拟机快照备份
- kvm虚拟化学习笔记(十五)之kvm虚拟机动态迁移
- kvm虚拟化学习笔记(三)之windows kvm虚拟机安装
- kvm虚拟化学习笔记(九)之kvm虚拟机时间配置
- kvm虚拟化学习笔记(二)之linux kvm虚拟机安装
- kvm虚拟化学习笔记(二)之linux kvm虚拟机安装
- kvm虚拟化学习笔记(十四)之kvm虚拟机静态迁移
- kvm虚拟化学习笔记(六)之kvm虚拟机控制台登录配置
- kvm虚拟化学习笔记(二)之linux kvm虚拟机安装
- kvm虚拟化学习笔记(十三)之kvm虚拟机磁盘文件读取小结
- kvm虚拟化学习笔记(四)之kvm虚拟机日常管理与配置
- kvm虚拟化学习笔记(八)之kvm虚拟机vnc配置
- kvm虚拟化学习笔记(四)之kvm虚拟机日常管理与配置
- kvm虚拟化学习笔记(九)之kvm虚拟机时间配置
- kvm虚拟化学习笔记(三)之windows kvm虚拟机安装
- kvm虚拟化学习笔记(四)之kvm虚拟机日常管理与配置
- kvm虚拟化学习笔记(四)之kvm虚拟机日常管理与配置
- kvm虚拟化学习笔记(六)之kvm虚拟机控制台登录配置
- kvm虚拟化学习笔记(四)之kvm虚拟机日常管理与配置
