ios创建两色线性径向渐变扇形
2013-08-27 12:03
495 查看
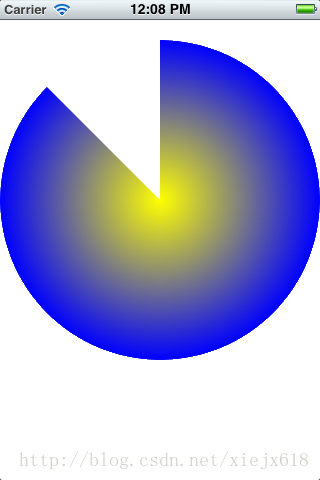
设计:创建一个扇形遮罩,再创建一个两色径向渐变圆,用扇形遮罩去剪切径向渐变圆,就得到一个两色线性径向渐变扇形.
一.先创建一个扇形遮罩.(里面的函数代码什么意义,按住command,点函数名就可进去看了)
1.创建一个四分之七(这个数随便定)的扇形.下面代码放入- (void)drawRect:(CGRect)rect方法,如果在init赋初值(_c为中心点,_radius为半径),运行就可看到一个红色的四分七扇形了.这里的color不要用black和white哦
二.创建一个两色径向渐变圆,(把上面的代码注释,专心画渐变圆吧).主要使用CGContextDrawRadialGradient,它需要一个gradient,所以先创建吧.
1.使用CGGradientCreateWithColorComponents创建渐变需要四参数.space,components[], locations[],count.使用CGColorSpaceCreateDeviceRGB()就可得到一个space;创建的是线性(均匀)的,将locations[]设为NULL;count是两色,设为2;components[]就看下面代码,两种方法创建:
方法A:
方法B:
2.CGContextDrawRadialGradient方法需要7参数,上面只搞定了gradient,剩下一个一个给吧.
将上面两小段代码拼在一起,运行就可以看到一个两色径向渐变圆了.也不要忘了release gradient.

三.最后调整,拼接.画扇形的color改为black,起始弧度,结束弧度,画弧方向都调整下.
再运吧.
完整代码下载:
http://download.csdn.net/detail/xiejx618/6018683
参考的文章有:
http://www.thinkandbuild.it/how-to-build-a-custom-control-in-ios/
http://kongkongbrain.blog.163.com/blog/static/178199013201110233366847/
一.先创建一个扇形遮罩.(里面的函数代码什么意义,按住command,点函数名就可进去看了)
1.创建一个四分之七(这个数随便定)的扇形.下面代码放入- (void)drawRect:(CGRect)rect方法,如果在init赋初值(_c为中心点,_radius为半径),运行就可看到一个红色的四分七扇形了.这里的color不要用black和white哦
CGContextRef imgCtx = UIGraphicsGetCurrentContext();
CGContextMoveToPoint(imgCtx, _c.x,_c.y);
CGContextSetFillColor(imgCtx, CGColorGetComponents([UIColor redColor].CGColor));
CGContextAddArc(imgCtx, _c.x, _c.y, _r,  -M_PI/2, 5*M_PI/4, 0);
CGContextFillPath(imgCtx);
2.把它放入到一个ImageContext,并保留下来,就算一个遮罩mask了.不用去运行,运行什么也看不到.
UIGraphicsBeginImageContext(rect.size);
CGContextRef imgCtx = UIGraphicsGetCurrentContext();
CGContextMoveToPoint(imgCtx, _c.x,_c.y);
CGContextSetFillColor(imgCtx, CGColorGetComponents([UIColor redColor].CGColor));
CGContextAddArc(imgCtx, _c.x, _c.y, _r,  -M_PI/2, 5*M_PI/4, 0);
CGContextFillPath(imgCtx);
//save the context content into the image mask
CGImageRef mask = CGBitmapContextCreateImage(UIGraphicsGetCurrentContext());
UIGraphicsEndImageContext();
3.顺便也把剪切写好吧.运行一样,什么也看不了.注意ctx和上面的imgCtx是两个context
CGContextRef ctx = UIGraphicsGetCurrentContext();
UIGraphicsBeginImageContext(rect.size);
CGContextRef imgCtx = UIGraphicsGetCurrentContext();
CGContextMoveToPoint(imgCtx, _c.x,_c.y);
CGContextSetFillColor(imgCtx, CGColorGetComponents([UIColor redColor].CGColor));
CGContextAddArc(imgCtx, _c.x, _c.y, _r,  -M_PI/2, 5*M_PI/4, 0);
CGContextFillPath(imgCtx);
//save the context content into the image mask
CGImageRef mask = CGBitmapContextCreateImage(UIGraphicsGetCurrentContext());
UIGraphicsEndImageContext();
CGContextClipToMask(ctx, self.bounds, mask);
CGImageRelease(mask);
二.创建一个两色径向渐变圆,(把上面的代码注释,专心画渐变圆吧).主要使用CGContextDrawRadialGradient,它需要一个gradient,所以先创建吧.
1.使用CGGradientCreateWithColorComponents创建渐变需要四参数.space,components[], locations[],count.使用CGColorSpaceCreateDeviceRGB()就可得到一个space;创建的是线性(均匀)的,将locations[]设为NULL;count是两色,设为2;components[]就看下面代码,两种方法创建:
方法A:
UIColor *startColor=[UIColor yellowColor];
UIColor *endColor= [UIColor blueColor];
UIColor *colors[2] = {startColor,endColor};
CGFloat components[2*4];
for (int i = 0; i < 2; i++) {
CGColorRef tmpcolorRef = colors[i].CGColor;
const CGFloat *tmpcomponents = CGColorGetComponents(tmpcolorRef);
for (int j = 0; j < 4; j++) {
components[i * 4 + j] = tmpcomponents[j];
}
}
方法B:
CGFloat components[8]={
1.0, 1.0, 0.0, 1.0,     //start color(r,g,b,alpha)
0.0, 0.0, 1.0, 1.0      //end color
};这两种方法的颜色rgb和alpha都好控制.那我就用B方法创建渐变吧,不要忘了release.终于创建了gradient.这段时间运行看不到效果,不必去运行了.CGFloat components[8]={
1.0, 1.0, 0.0, 1.0, //start color(r,g,b,alpha)
0.0, 0.0, 1.0, 1.0 //end color
};
CGColorSpaceRef space = CGColorSpaceCreateDeviceRGB();
CGGradientRef gradient = CGGradientCreateWithColorComponents(space, components, NULL,2);
CGColorSpaceRelease(space),space=NULL;//release2.CGContextDrawRadialGradient方法需要7参数,上面只搞定了gradient,剩下一个一个给吧.
CGPoint start = _c; CGPoint end = _c; CGFloat startRadius = 0.0f; CGFloat endRadius = _r; CGContextRef graCtx = UIGraphicsGetCurrentContext(); CGContextDrawRadialGradient(graCtx, gradient, start, startRadius, end, endRadius, 0); CGGradientRelease(gradient),gradient=NULL;//release
将上面两小段代码拼在一起,运行就可以看到一个两色径向渐变圆了.也不要忘了release gradient.
三.最后调整,拼接.画扇形的color改为black,起始弧度,结束弧度,画弧方向都调整下.
CGContextRef ctx = UIGraphicsGetCurrentContext();
UIGraphicsBeginImageContext(rect.size);
CGContextRef imgCtx = UIGraphicsGetCurrentContext();
CGContextMoveToPoint(imgCtx, _c.x,_c.y);
CGContextSetFillColor(imgCtx, CGColorGetComponents([UIColor blackColor].CGColor));
CGContextAddArc(imgCtx, _c.x, _c.y, _r, M_PI/2, -5*M_PI/4, 1);
CGContextFillPath(imgCtx);
//save the context content into the image mask
CGImageRef mask = CGBitmapContextCreateImage(UIGraphicsGetCurrentContext());
UIGraphicsEndImageContext();
CGContextClipToMask(ctx, self.bounds, mask);
CGFloat components[8]={
1.0, 1.0, 0.0, 1.0,     //start color(r,g,b,alpha)
0.0, 0.0, 1.0, 1.0      //end color
};
CGColorSpaceRef space = CGColorSpaceCreateDeviceRGB();
CGGradientRef gradient = CGGradientCreateWithColorComponents(space, components, NULL,2);
CGColorSpaceRelease(space),space=NULL;//release
CGPoint start = _c;
CGPoint end = _c;
CGFloat startRadius = 0.0f;
CGFloat endRadius = _r;
CGContextRef graCtx = UIGraphicsGetCurrentContext();
CGContextDrawRadialGradient(graCtx, gradient, start, startRadius, end, endRadius, 0);
CGGradientRelease(gradient),gradient=NULL;//release再运吧.
完整代码下载:
http://download.csdn.net/detail/xiejx618/6018683
参考的文章有:
http://www.thinkandbuild.it/how-to-build-a-custom-control-in-ios/
http://kongkongbrain.blog.163.com/blog/static/178199013201110233366847/

相关文章推荐
- 详解CSS3渐变(线性和径向)
- css3创建一个上下线性渐变色背景的div
- css3-颜色渐变 线性 径向
- IOS之Quartz2D绘图4.径向渐变和线性渐变
- HTML5创建一个径向/圆渐变
- HTML5 Canvas渐变图形绘制[线性、径向]
- 对ios创建渐变组件进行点触交互
- iOS创建自定义相册
- iOS开发:创建真机调试证书
- iOS设计模式——单例模式,你看我就够了.两行代码创建单例(兼容ARC/MRC)
- iOS UIImage扩展方法(category):放大、旋转、合并UIImage、增加渐变层、添加阴影、调节透明度、保存到相册
- iOS 数据库篇(二) CoreData创建与使用
- iOS 烟花撒花效果,图层渐变,图层倒影特效。CAEmitterLayer粒子发射器
- iOS使用xib文件创建一个组件为子控件,进行复用
- IOS Xmpp 创建固定房间
- ios之Xcode6手动创建Prefix.pch文件/PCH FileF创建/图文教程
- IOS开发中怎样生成PDF文件和绘制渐变?
- iOS实现UIView渐变的几种方法以及实现渐变透明功能
- iOS 8创建交互式通知
- iOS之UI--指示器HUD的创建和设置