android:layout_gravity 和 android:gravity 的区别
2013-08-20 19:12
591 查看
gravity 这个英文单词是重心的意思,在这里就表示停靠位置的意思。
android:layout_gravity 和 android:gravity 的区别
从名字上可以看到,android:gravity是对元素本身说的,元素本身的文本显示在什么地方靠着换个属性设置,不过不
设置默认是在左侧的。
android:layout_gravity是相对于它的父元素说的,说明元素显示在父元素的什么位置。
比如说button:
android:layout_gravity 表示按钮在界面上的位置。 android:gravity表示button上的字在button上的位
置。
可选值
这两个属性可选的值有:top、bottom、left、right、center_vertical、fill_vertical、center_horizontal、fill_horizontal、
center、fill、clip_vertical。
而且这些属性是可以多选的,用“|”分开。
默认这个的值是:Gravity.LEFT
对这些属性的描述:
出自:
http://androidmirror.com/guide/topics/resources/drawable-resource.html
http://android.toolib.net/reference/android/graphics/drawable/ClipDrawable.html
简单记忆 : horizontal 都是操作的水平方向,即横向, vertical 都是操作的垂直方向,即纵向。
对于LinearLayout何时生效的问题
参看:也谈layout_gravity和gravity
http://www.lephone.net/viewthread.php?tid=325
对于 LinearLayout
当 android:orientation="vertical" 时, 只有水平方向的设置才起作用,垂直方向的设置不起作用。即:left,right,center_horizontal 是生效的。
当 android:orientation="horizontal" 时, 只有垂直方向的设置才起作用,水平方向的设置不起作用。即:top,bottom,center_vertical 是生效的。
android:gravity用于设置View中内容相对于View组件的对齐方式,而android:layout_gravity用于设置View组件相对于Container的对齐方式。
原理跟android:paddingLeft、android:layout_marginLeft有点类似。如果在按钮上同时设置这两个属性。
android:paddingLeft="30px" 按钮上设置的内容离按钮左边边界30个像素
android:layout_marginLeft="30px" 整个按钮离左边设置的内容30个像素
下面回到正题, 我们可以通过设置android:gravity="center"来让EditText中的文字在EditText组件中居中显示;同时我们设置EditText的android:layout_gravity="right"来让EditText组件在LinearLayout中居右显示。看下效果:
正如我们所看到的,在EditText中,其中的文字已经居中显示了,而EditText组件自己也对齐到了LinearLayout的右侧。
附上布局文件:
那么上面是通过布局文件的方式来设置的。,相信大家都曾写过,那么如何通过Java代码来设置组件的位置呢?
依然考虑实现上述效果。
通过查看SDK,发现有一个setGravity方法, 顾名思义, 这个应该就是用来设置Button组件中文字的对齐方式的方法了。
仔细找了一圈,没有发现setLayoutgravity方法, 有点失望。 不过想想也对, 如果这边有了这个方法, 将Button放在不支持Layout_Gravity属性的Container中如何是好!
于是想到, 这个属性有可能在Layout中 , 于是仔细看了看LinearLayout 的 LayoutParams, 果然有所发现, 里面有一个 gravity 属性,相信这个就是用来设置组件相对于容器本身的位置了,没错,应该就是他了。
实践后发现,如果如此, 附上代码,各位自己看下。
代码比较简单,但是发现它们还是花了我一点时间的。
或者这样也可以:
好了,效果图就不上了,跟上面的一样。 就讲这么多。
另外,要设置在RelativeLayout中的位置时使用addRule方法,如下:
参考文章:
点击打开链接
点击打开链接
android:layout_gravity 和 android:gravity 的区别
从名字上可以看到,android:gravity是对元素本身说的,元素本身的文本显示在什么地方靠着换个属性设置,不过不
设置默认是在左侧的。
android:layout_gravity是相对于它的父元素说的,说明元素显示在父元素的什么位置。
比如说button:
android:layout_gravity 表示按钮在界面上的位置。 android:gravity表示button上的字在button上的位
置。
可选值
这两个属性可选的值有:top、bottom、left、right、center_vertical、fill_vertical、center_horizontal、fill_horizontal、
center、fill、clip_vertical。
而且这些属性是可以多选的,用“|”分开。
默认这个的值是:Gravity.LEFT
对这些属性的描述:
出自:
http://androidmirror.com/guide/topics/resources/drawable-resource.html
http://android.toolib.net/reference/android/graphics/drawable/ClipDrawable.html
| Value | Description |
| top | Put the object at the top of its container, not changing its size. 将对象放在其容器的顶部,不改变其大小. |
| bottom | Put the object at the bottom of its container, not changing its size. 将对象放在其容器的底部,不改变其大小. |
| left | Put the object at the left edge of its container, not changing its size. 将对象放在其容器的左侧,不改变其大小. |
| right | Put the object at the right edge of its container, not changing its size. 将对象放在其容器的右侧,不改变其大小. |
| center_vertical | Place object in the vertical center of its container, not changing its size. 将对象纵向居中,不改变其大小. 垂直对齐方式:垂直方向上居中对齐。 |
| fill_vertical | Grow the vertical size of the object if needed so it completely fills its container. 必要的时候增加对象的纵向大小,以完全充满其容器. 垂直方向填充 |
| center_horizontal | Place object in the horizontal center of its container, not changing its size. 将对象横向居中,不改变其大小. 水平对齐方式:水平方向上居中对齐 |
| fill_horizontal | Grow the horizontal size of the object if needed so it completely fills its container. 必要的时候增加对象的横向大小,以完全充满其容器. 水平方向填充 |
| center | Place the object in the center of its container in both the vertical and horizontal axis, not changing its size. 将对象横纵居中,不改变其大小. |
| fill | Grow the horizontal and vertical size of the object if needed so it completely fills its container. This is the default. 必要的时候增加对象的横纵向大小,以完全充满其容器. |
| clip_vertical | Additional option that can be set to have the top and/or bottom edges of the child clipped to its container's bounds. The clip is based on the vertical gravity: a top gravity clips the bottom edge, a bottom gravity clips the top edge, and neither clips both edges. 附加选项,用于按照容器的边来剪切对象的顶部和/或底部的内容. 剪切基于其纵向对齐设置:顶部对齐时,剪切底部;底部对齐时剪切顶部;除此之外剪切顶部和底部. 垂直方向裁剪 |
| clip_horizontal | Additional option that can be set to have the left and/or right edges of the child clipped to its container's bounds. The clip is based on the horizontal gravity: a left gravity clips the right edge, a right gravity clips the left edge, and neither clips both edges. 附加选项,用于按照容器的边来剪切对象的左侧和/或右侧的内容. 剪切基于其横向对齐设置:左侧对齐时,剪切右侧;右侧对齐时剪切左侧;除此之外剪切左侧和右侧. 水平方向裁剪 |
对于LinearLayout何时生效的问题
参看:也谈layout_gravity和gravity
http://www.lephone.net/viewthread.php?tid=325
对于 LinearLayout
当 android:orientation="vertical" 时, 只有水平方向的设置才起作用,垂直方向的设置不起作用。即:left,right,center_horizontal 是生效的。
当 android:orientation="horizontal" 时, 只有垂直方向的设置才起作用,水平方向的设置不起作用。即:top,bottom,center_vertical 是生效的。
android:gravity用于设置View中内容相对于View组件的对齐方式,而android:layout_gravity用于设置View组件相对于Container的对齐方式。
原理跟android:paddingLeft、android:layout_marginLeft有点类似。如果在按钮上同时设置这两个属性。
android:paddingLeft="30px" 按钮上设置的内容离按钮左边边界30个像素
android:layout_marginLeft="30px" 整个按钮离左边设置的内容30个像素
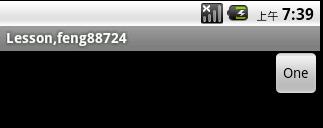
下面回到正题, 我们可以通过设置android:gravity="center"来让EditText中的文字在EditText组件中居中显示;同时我们设置EditText的android:layout_gravity="right"来让EditText组件在LinearLayout中居右显示。看下效果:
正如我们所看到的,在EditText中,其中的文字已经居中显示了,而EditText组件自己也对齐到了LinearLayout的右侧。
附上布局文件:
<LinearLayout
   xmlns:android="http://schemas.android.com/apk/res/android"
    android:orientation="vertical"
    android:layout_width="fill_parent"
    android:layout_height="fill_parent">
    <EditText
        android:layout_width="wrap_content"
        android:gravity="center"
        android:layout_height="wrap_content"
        android:text="one"
        android:layout_gravity="right"/>
</LinearLayout>
那么上面是通过布局文件的方式来设置的。,相信大家都曾写过,那么如何通过Java代码来设置组件的位置呢?
依然考虑实现上述效果。
通过查看SDK,发现有一个setGravity方法, 顾名思义, 这个应该就是用来设置Button组件中文字的对齐方式的方法了。
仔细找了一圈,没有发现setLayoutgravity方法, 有点失望。 不过想想也对, 如果这边有了这个方法, 将Button放在不支持Layout_Gravity属性的Container中如何是好!
于是想到, 这个属性有可能在Layout中 , 于是仔细看了看LinearLayout 的 LayoutParams, 果然有所发现, 里面有一个 gravity 属性,相信这个就是用来设置组件相对于容器本身的位置了,没错,应该就是他了。
实践后发现,如果如此, 附上代码,各位自己看下。
代码比较简单,但是发现它们还是花了我一点时间的。
Button button  = new Button(this);
button.setText("One");
LinearLayout.LayoutParams lp = new LinearLayout.LayoutParams(LayoutParams.WRAP_CONTENT,LayoutParams.WRAP_CONTENT);
//此处相当于布局文件中的Android:layout_gravity属性
lp.gravity = Gravity.RIGHT;
button.setLayoutParams(lp);
//此处相当于布局文件中的Android:gravity属性
button.setGravity(Gravity.CENTER);

LinearLayout linear = new LinearLayout(this);
//注意,对于LinearLayout布局来说,设置横向还是纵向是必须的!否则就看不到效果了。
linear.setOrientation(LinearLayout.VERTICAL);
linear.addView(button);
setContentView(linear);
或者这样也可以:
Button button  = new Button(this);
button.setText("One");
//此处相当于布局文件中的Android:gravity属性
button.setGravity(Gravity.CENTER);

LinearLayout linear = new LinearLayout(this);
//注意,对于LinearLayout布局来说,设置横向还是纵向是必须的!否则就看不到效果了。
linear.setOrientation(LinearLayout.VERTICAL);

LinearLayout.LayoutParams lp = new LinearLayout.LayoutParams(LayoutParams.WRAP_CONTENT,LayoutParams.WRAP_CONTENT);
//此处相当于布局文件中的Android:layout_gravity属性
lp.gravity = Gravity.RIGHT;

linear.addView(button, lp);
setContentView(linear);
好了,效果图就不上了,跟上面的一样。 就讲这么多。
另外,要设置在RelativeLayout中的位置时使用addRule方法,如下:
params = new RelativeLayout.LayoutParams(LayoutParams.WRAP_CONTENT, LayoutParams.WRAP_CONTENT);
        params.addRule(RelativeLayout.CENTER_IN_PARENT);
        mContainer.addView(progress,params);
参考文章:
点击打开链接
点击打开链接

相关文章推荐
- Android ui基础——gravity 与 layout_gravity 的区别
- android:layout_gravity 和 android:gravity的区别
- android布局属性中layout_gravity和gravity区别
- android:gravity和android:layout_gravity区别
- Android中gravity与layout_gravity的区别 http://www.cnblogs.com/linjiqin/archive/2011/02/20/1959239.html
- android:layout_gravity 和 android:gravity 的区别
- android:layout_gravity和android:gravity的区别
- 【整理】Android中的gravity和layout_gravity区别
- android:layout_gravity和android:gravity属性的区别
- 【Android】android:layout_gravity 和android:gravit的区别?
- android:layout_gravity 和 android:gravity 的区别
- linearlayout 中android:gravity与android:layout_gravity的区别以及用代码布局实现
- android:layout_gravity和android:gravity的区别
- android:layout_gravity和android:gravity属性的区别
- android:layout_gravity和android:gravity的区别
- android layout_gravity和gravity的区别
- 兔子--android:layout_gravity与android:gravity的区别
- android:layout_gravity和android:gravity的区别
- android:layout_gravity与gravity的区别
- android:layout_gravity 和 android:gravity 的区别