iOS学习笔记05—数据持久化
2013-08-07 20:56
477 查看
一.为什么需要数据持久化
很简单,保存在程序的数据(对象或者变量)都存储在内存中,当程序退出时,数据就会被释放。想要将一些数据,就必须将其保存当文件中。二.常用方法
常见的方法有:文件读写, 属性列表、对象归档、SQLite3。1.文件读写
iPhone文件系统:创建、重命名以及删除文件,NSFileManager中包含了用来查询单词库目录、创建、重命名、删除目录以及获取/设置文件属性的方法(可读性,可编写性等等)。每个程序都会有它自己的沙盒,通过它你可以阅读/编写文件。写入沙盒的文件在程序的进程中将会保持稳定,即便实在程序更新的情况下。如下所示,你可以在沙盒中定位文件目录:
//对于错误信息
NSError *error;
// 创建文件管理器
NSFileManager *fileMgr = [NSFileManagerdefaultManager];
//指向文件目录
NSString *documentsDirectory= [NSHomeDirectory()
stringByAppendingPathComponent:@"Documents"];
//创建一个目录
[[NSFileManager defaultManager] createDirectoryAtPath: [NSString stringWithFormat:@"%@/myFolder", NSHomeDirectory()] attributes:nil];
创建一个文件
现在我们已经有了文件目录,我们就能使用这个路径在沙盒中创建一个新文件并编写一段代码:
// File we want to create in the documents directory我们想要创建的文件将会出现在文件目录中
// Result is: /Documents/file1.txt结果为:/Documents/file1.txt
NSString *filePath= [documentsDirectory
stringByAppendingPathComponent:@"file1.txt"];
//需要写入的字符串
NSString *str= @"iPhoneDeveloper Tips\nhttp://iPhoneDevelopTips,com";
//写入文件
[str writeToFile:filePath atomically:YES
encoding:NSUTF8StringEncoding error:&error];
//显示文件目录的内容
NSLog(@"Documentsdirectory: %@",
[fileMgr contentsOfDirectoryAtPath:documentsDirectoryerror:&error]);
我们为想要创建的文件构建一条路径(file1.txt),初始化一个字符串来写入文件,并列出目录。最后一行显示了在我们创建文件之后出现在文件目录下的一个目录列表:对一个文件重命名想要重命名一个文件,我们需要把文件移到一个新的路径下。下面的代码创建了我们所期望的目标文件的路径,然后请求移动文件以及在移动之后显示文件目录。
//通过移动该文件对文件重命名
NSString *filePath2= [documentsDirectory
stringByAppendingPathComponent:@"file2.txt"];
//判断是否移动
if ([fileMgr moveItemAtPath:filePath toPath:filePath2 error:&error] != YES)
NSLog(@"Unable to move file: %@", [error localizedDescription]);
//显示文件目录的内容
NSLog(@"Documentsdirectory: %@",
[fileMgr contentsOfDirectoryAtPath:documentsDirectoryerror:&error]);
在移动了文件之后,输出结果应该如下图所示:
删除一个文件为了使这个技巧完整,让我们再一起看下如何删除一个文件:
//在filePath2中判断是否删除这个文件
if ([fileMgr removeItemAtPath:filePath2 error:&error] != YES)
NSLog(@"Unable to delete file: %@", [error localizedDescription]);
//显示文件目录的内容
NSLog(@"Documentsdirectory: %@",
[fileMgr contentsOfDirectoryAtPath:documentsDirectoryerror:&error]);
一旦文件被删除了,正如你所预料的那样,文件目录就会被自动清空:这些示例能教你的,仅仅只是文件处理上的一些皮毛。想要获得更全面、详细的讲解,你就需要掌握NSFileManager文件的知识。在开发iPhone程序时,有时候要对文件进行一些操作。而获取某一个目录中的所有文件列表,是基本操作之一。通过下面这段代码,就可以获取一个目录内的文件及文件夹列表。
NSFileManager *fileManager = [NSFileManager defaultManager];
//在这里获取应用程序Documents文件夹里的文件及文件夹列表
NSArray *documentPaths = NSSearchPathForDirectoriesInDomains(NSDocumentDirectory, NSUserDomainMask, YES);
NSString *documentDir = [documentPaths objectAtIndex:0];
NSError *error = nil;
NSArray *fileList = [[NSArray alloc] init];
//fileList便是包含有该文件夹下所有文件的文件名及文件夹名的数组
fileList = [fileManager contentsOfDirectoryAtPath:documentDir error:&error];
以下这段代码则可以列出给定一个文件夹里的所有子文件夹名
NSMutableArray *dirArray = [[NSMutableArray alloc] init];
BOOL isDir = NO;
//在上面那段程序中获得的fileList中列出文件夹名
for (NSString *file in fileList) {
NSString *path = [documentDir stringByAppendingPathComponent:file];
[fileManager fileExistsAtPath:path isDirectory:(&isDir)];
if (isDir) {
[dirArray addObject:file];
}
isDir = NO;
}
NSLog(@"Every Thing in the dir:%@",fileList);
NSLog(@"All folders:%@",dirArray);
2.属性列表(plist)
在做iOS开发时,经常用到到plist文件, 那plist文件是什么呢? 它全名是:Property List,属性列表文件,它是一种用来存储串行化后的对象的文件。属性列表文件的扩展名为.plist ,因此通常被称为 plist文件。文件是xml格式的。
Plist文件通常用于储存用户设置,也可以用于存储捆绑的信息
我们创建一个项目来学习plist文件的读写。
1、创建项目Plistdemo
项目创建之后可以找到项目对应的plist文件,打开如下图所示:
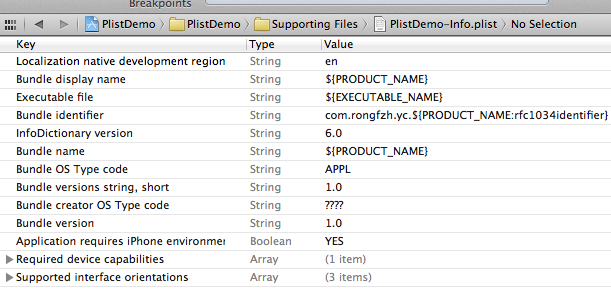
在编辑器中显示类似与表格的形式,可以在plist上右键,用源码方式打开,就能看到plist文件的xml格式了。
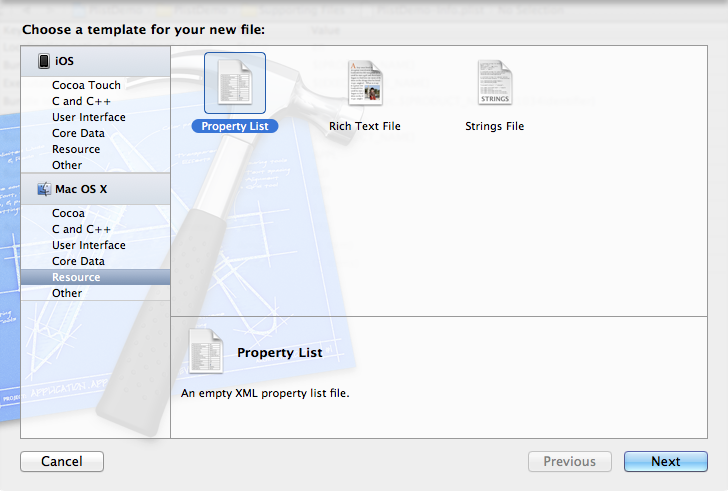
2、创建plist文件。
按command +N快捷键创建,或者File —> New —> New File,选择Mac OS X下的Property List
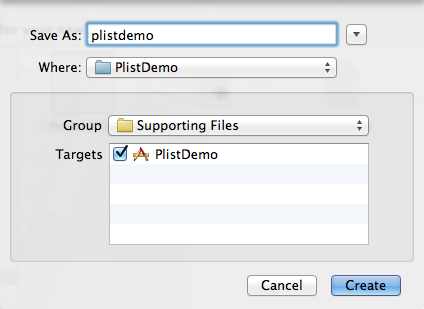
创建plist文件名为plistdemo。
打开plistdemo文件,在空白出右键,右键选择Add row 添加数据,添加成功一条数据后,在这条数据上右键看到 value Type选择Dictionary。点加号添加这个Dictionary下的数据
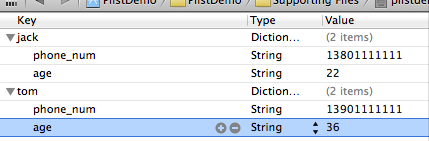
添加完key之后在后面添加Value的值,添加手机号和年龄
创建完成之后用source code查看到plist文件是这样的:
[cpp] view
plaincopy
<?xml version="1.0" encoding="UTF-8"?>
<!DOCTYPE plist PUBLIC "-//Apple//DTD PLIST 1.0//EN" "http://www.apple.com/DTDs/PropertyList-1.0.dtd">
<plist version="1.0">
<dict>
<key>jack</key>
<dict>
<key>phone_num</key>
<string>13801111111</string>
<key>age</key>
<string>22</string>
</dict>
<key>tom</key>
<dict>
<key>phone_num</key>
<string>13901111111</string>
<key>age</key>
<string>36</string>
</dict>
</dict>
</plist>
3、读取plist文件的数据
现在文件创建成功了,如何读取呢,实现代码如下:
[cpp] view
plaincopy
- (void)viewDidLoad
{
[super viewDidLoad];
//读取plist
NSString *plistPath = [[NSBundle mainBundle] pathForResource:@"plistdemo" ofType:@"plist"];
NSMutableDictionary *data = [[NSMutableDictionary alloc] initWithContentsOfFile:plistPath];
NSLog(@"%@", data);//直接打印数据。
}
打印出来的结果:
[cpp] view
plaincopy
PlistDemo[6822:f803] {
jack = {
age = 22;
"phone_num" = 13801111111;
};
tom = {
age = 36;
"phone_num" = 13901111111;
};
}
这样就把数据读取出来了。
4、创建和写入plist文件
在开发过程中,有时候需要把程序的一些配置保存下来,或者游戏数据等等。 这时候需要写入Plist数据。
写入的plist文件会生成在对应程序的沙盒目录里。
接着上面读取plist数据的代码,加入了写入数据的代码,
[cpp] view
plaincopy
<strong>- (void)viewDidLoad
{
[super viewDidLoad];
//读取plist
NSString *plistPath = [[NSBundle mainBundle] pathForResource:@"plistdemo" ofType:@"plist"];
NSMutableDictionary *data = [[NSMutableDictionary alloc] initWithContentsOfFile:plistPath];
NSLog(@"%@", data);
//添加一项内容
[data setObject:@"add some content" forKey:@"c_key"];
//获取应用程序沙盒的Documents目录
NSArray *paths=NSSearchPathForDirectoriesInDomains(NSDocumentDirectory,NSUserDomainMask,YES);
NSString *plistPath1 = [paths objectAtIndex:0];
//得到完整的文件名
NSString *filename=[plistPath1 stringByAppendingPathComponent:@"test.plist"];
//输入写入
[data writeToFile:filename atomically:YES];
//那怎么证明我的数据写入了呢?读出来看看
NSMutableDictionary *data1 = [[NSMutableDictionary alloc] initWithContentsOfFile:filename];
NSLog(@"%@", data1);
// Do any additional setup after loading the view, typically from a nib.
}
</strong>
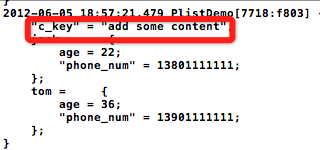
在获取到自己手工创建的plistdemo.plist数据后,在这些数据后面加了一项内容,证明输入写入了。
怎么证明添加的内容写入了呢?下面是打印结果:
3.归档
想要永久保存数据,我们当然可以使用plist文件,当退出程序时,我们执行将数据写入plist文件的操作,使用writeToFile:atomically:方法。
具有这个方法的类有:
NSArray
NSMutableArray
NSDictionary
NSMutableDictionary
NSData
NSMutableData
NSString
NSMutableString
NSNumber
NSDate
例如,我们的数据存储在NSArray的一个对象array中,保存数据时执行:
[array writeToFile:filePath atomically:YES];
其中filePath是放在SandBox中的一个plist文件的完整路径。
不过,使用plist文件还是有局限性的,例如,我们不好将一个图片存储在plist中。
这次的小例子中,我们将会通过归档实现数据的保存。当程序运行时,先检查归档文件是否存在,如果存在的话就从归档文件中读取数据显示在界面上;如果归档文件不存在,就使用默认设置。当程序关闭时,会将数据存储在归档文件中,这样下次运行程序时就会显示上次的设置了。
1、运行Xcode 4.3,新建一个Single View Application,名称为:Archiving Test:

然后将准备好的两张图片添加到工程中。
2、先进行界面设计:
单击ViewController.xib,向其中添加控件:
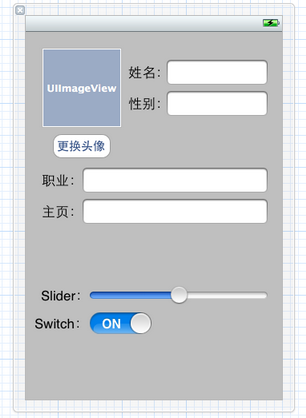
然后向ViewController.h中为控件建立Outlet映射和Action映射,具体是为所有的TextField、ImageView、UISlider控件和UISwitch控件建立Outlet映射,为Button建立Action映射:

3、新建一个类,用于存储我们的数据:
在菜单栏依次选择File — New — File…,在打开的窗口选择Objective-C Class:

单击Next,输入类名:ArchivingData,选择super class为NSObject:

单击Next,选好位置和分组,点击创建,完成类的建立。
4、打开ArchivingData.h,向其中添加属性,以及协议:
#import <Foundation/Foundation.h>

@interface ArchivingData : NSObject <NSCoding, NSCopying>

@property (copy, nonatomic) UIImage *image;
@property (copy, nonatomic) NSString *name;
@property (copy, nonatomic) NSString *gender;
@property (copy, nonatomic) NSString *vocation;
@property (copy, nonatomic) NSString *page;
@property float theSlider;
@property BOOL isSwitchOn;

@end
5、打开ArchivingData.m,向其中添加代码:
5.1 在@implementation之前添加代码:
#define kImageKey @"ImageKey"
#define kNameKey @"NameKey"
#define kGenderKey @"GenderKey"
#define kVocationKey @"VocationKey"
#define kPageKey @"PageKey"
#define kTheSliderKey @"TheSliderKey"
#define kIsSwitchOn @"IsSwitchOnKey"
5.2 在@implementation之后添加代码:
@synthesize image;
@synthesize name;
@synthesize gender;
@synthesize vocation;
@synthesize page;
@synthesize theSlider;
@synthesize isSwitchOn;
5.3 在@end之前添加代码:
#pragma mark NSCoding
- (void)encodeWithCoder:(NSCoder *)aCoder {
[aCoder encodeObject:image forKey:kImageKey];
[aCoder encodeObject:name forKey:kNameKey];
[aCoder encodeObject:gender forKey:kGenderKey];
[aCoder encodeObject:vocation forKey:kVocationKey];
[aCoder encodeObject:page forKey:kPageKey];
[aCoder encodeFloat:theSlider forKey:kTheSliderKey];
[aCoder encodeBool:isSwitchOn forKey:kIsSwitchOn];

}

- (id)initWithCoder:(NSCoder *)aDecoder {
if (self = [super init]) {
image = [aDecoder decodeObjectForKey:kImageKey];
name = [aDecoder decodeObjectForKey:kNameKey];
gender = [aDecoder decodeObjectForKey:kGenderKey];
vocation = [aDecoder decodeObjectForKey:kVocationKey];
page = [aDecoder decodeObjectForKey:kPageKey];
theSlider = [aDecoder decodeFloatForKey:kTheSliderKey];
isSwitchOn = [aDecoder decodeBoolForKey:kIsSwitchOn];
}
return self;
}
5.4 在@end之前添加代码:
#pragma mark NSCoping
- (id)copyWithZone:(NSZone *)zone {
ArchivingData *copy = [[[self class] allocWithZone:zone] init];
copy.image = self.image;
copy.name = [self.name copyWithZone:zone];
copy.gender = [self.gender copyWithZone:zone];
copy.vocation = [self.vocation copyWithZone:zone];
copy.page = [self.page copyWithZone:zone];
copy.theSlider = self.theSlider;
copy.isSwitchOn = self.isSwitchOn;
return copy;
}
在ArchivingData类中,我们添加了几个属性,这些属性与上面创建的控件是一一对应的。之后实现了几个协议方法,这些方法分别用于编码、解码和复制。
6、打开ViewController.h,向其中添加属性和方法:
@property (copy, nonatomic) NSString *archivingFilePath;

- (void)applicationWillResignActive:(NSNotification *)notification;
7、打开ViewController.m,添加代码:
7.1 在@implementation之后添加代码:
@synthesize archivingFilePath;
7.2 在#import之后添加代码:
#import "ArchivingData.h"

#define kArchivingFileKey @"archivingFile"
#define kArchivingDataKey @"ArchivingDataKey"
7.3 在viewDidLoad方法中添加代码:
- (void)viewDidLoad
{
[super viewDidLoad];
// Do any additional setup after loading the view, typically from a nib.
NSArray *paths = NSSearchPathForDirectoriesInDomains(NSDocumentDirectory, NSUserDomainMask, YES);
NSString *documentsDirectory = [paths objectAtIndex:0];
self.archivingFilePath = [documentsDirectory stringByAppendingPathComponent:kArchivingFileKey];
NSFileManager *fileManager = [NSFileManager defaultManager];

if ([fileManager fileExistsAtPath:self.archivingFilePath]) {
//如果归档文件存在,则读取其中内容,显示在界面上
NSData *data = [[NSMutableData alloc] initWithContentsOfFile:self.archivingFilePath];
NSKeyedUnarchiver *unarchiver = [[NSKeyedUnarchiver alloc] initForReadingWithData:data];
ArchivingData *archivingData = [unarchiver decodeObjectForKey:kArchivingDataKey];
[unarchiver finishDecoding];
theImageView.image = archivingData.image;
nameTextField.text = archivingData.name;
genderTextField.text = archivingData.gender;
vocationTextField.text = archivingData.vocation;
pageTextField.text = archivingData.page;
theSlider.value = archivingData.theSlider;
theSwitch.on = archivingData.isSwitchOn;
} else {
//如果归档文件不存在,则设置imageView为boy.png
theImageView.image = [UIImage imageNamed:@"boy.png"];
}

//当程序进入后台时,将当前设置项写入归档文件
UIApplication *app = [UIApplication sharedApplication];
[[NSNotificationCenter defaultCenter] addObserver:self
selector:@selector(applicationWillResignActive:)
name:UIApplicationWillResignActiveNotification
object:app];
}
7.4 找到switchImage方法,添加代码:
- (IBAction)switchImage:(id)sender {
UIImage *image1 = [UIImage imageNamed:@"boy.png"];
UIImage *image2 = theImageView.image;
if (![image1 isEqual:image2]) {
theImageView.image = image1;
} else {
theImageView.image = [UIImage imageNamed:@"gemini.png"];
}
}
7.5 在@end之前添加代码:
//程序进入后台时,保存设置
- (void)applicationWillResignActive:(NSNotification *)notification {
ArchivingData *archivingData = [[ArchivingData alloc] init];
archivingData.image = self.theImageView.image;
archivingData.name = self.nameTextField.text;
archivingData.gender = self.genderTextField.text;
archivingData.vocation = self.vocationTextField.text;
archivingData.page = self.pageTextField.text;
archivingData.theSlider = theSlider.value;
archivingData.isSwitchOn = theSwitch.on;
NSMutableData *data = [[NSMutableData alloc] init];
NSKeyedArchiver *archiver = [[NSKeyedArchiver alloc] initForWritingWithMutableData:data];
[archiver encodeObject:archivingData forKey:kArchivingDataKey];
[archiver finishEncoding];
[data writeToFile:self.archivingFilePath atomically:YES];
}8、最后,为了使得键盘可以关闭,我们还要添加关闭键盘的操作,参考《iOS开发4:关闭键盘》中的第2步。
9、运行程序
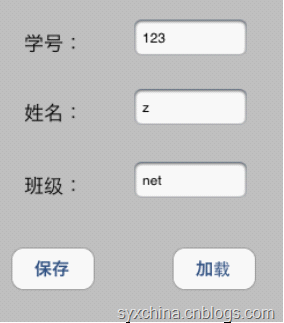
刚运行程序如下左图:


我们添加一些数据,更换头像,再调整Silder和Switch,如上图右。
之后,按模拟器上的Home建,使得程序在后台运行。
此时,查看程序的SandBox,可以看到程序的Documents目录下出现了文件archivingFile:

之后使用Xcode结束运行,再运行程序。程序第二次运行时,显示如上图左,这说明我们实现了数据的永久存储。
4.SQLite
SQLite是一个开源的嵌入式关系数据库,它在2000年由D. Richard Hipp发布,它的减少应用程序管理数据的开销,SQLite可移植性好,很容易使用,很小,高效而且可靠。
SQLite嵌入到使用它的应用程序中,它们共用相同的进程空间,而不是单独的一个进程。从外部看,它并不像一个RDBMS,但在进程内部,它却是完整的,自包含的数据库引擎。 嵌入式数据库的一大好处就是在你的程序内部不需要网络配置,也不需要管理。因为客户端和服务器在同一进程空间运行。SQLite 的数据库权限只依赖于文件系统,没有用户帐户的概念。SQLite 有数据库级锁定,没有网络服务器。它需要的内存,其它开销很小,适合用于嵌入式设备。你需要做的仅仅是把它正确的编译到你的程序。
在iOS中使用SQLite3
为了能够在iOS中使用SQLite3需要是将libsqlite3.dylib类库添加到Xcode工程中,在工程的Frameworks(框架) 文件夹右键添加存在Frameworks

或者导航到 /Developer/Platforms/iPhoneSimulator.platform/Developer/SDKs/ iPhoneSimulator<version>.sdk/usr/lib 目录下面找到libsqlite3.dylib.
实例:StudentSQLite3
StudentSQLite3ViewController.h
#import "sqlite3.h"

#define DATA_FILE @"data.sqlite3"
#define TABLE_NAME @"student"
#define FIELDS_NAME_SID @"studentId"
#define FIELDS_NAME_SNAME @"studentName"
#define FIELDS_NAME_SCLASS @"studentClass"

@interface ViewController : UIViewController {
sqlite3* db;
}
@property (retain, nonatomic) IBOutlet UITextField *studentId;
@property (retain, nonatomic) IBOutlet UITextField *studentName;
@property (retain, nonatomic) IBOutlet UITextField *studentClass;
- (IBAction)saveFromSqlite:(id)sender;
- (IBAction)loadFromSqlite:(id)sender;

-(NSString*)dataFile;
-(IBAction)textFieldDoneEditing:(id)sender;

@end
StudentSQLite3ViewController.m
@synthesize studentId;
@synthesize studentName;
@synthesize studentClass;

-(NSString*)dataFile {
NSArray* myPaths = NSSearchPathForDirectoriesInDomains(NSDocumentDirectory, NSUserDomainMask, YES);
NSString* myDocPath = [myPaths objectAtIndex:0];
NSString* fileName = [myDocPath stringByAppendingFormat:DATA_FILE];
return fileName;
}
无参数SQLite3处理过程
1、打开数据库sqlite3_open。
2、创建数据库表和执行SQL语句sqlite3_exec。
3、释放资源sqlite3_close。
创建数据库
- (void)viewDidLoad {
[super viewDidLoad];
NSString* fileName = [self dataFile];
NSLog(@"%@", fileName);
if (sqlite3_open([fileName UTF8String], &db) != SQLITE_OK) {
sqlite3_close(db);
NSAssert(NO, @"OPEN SQLITE DATABASE ERROR!");
} else {
char* error;
NSString* createSQL = [NSString stringWithFormat:@"CREATE TABLE IF NOT EXISTS %@(%@ TEXT PRIMARY KEY, %@ TEXT, %@% TEXT);",
                                  TABLE_NAME, FIELDS_NAME_SID, FIELDS_NAME_SNAME, FIELDS_NAME_SCLASS];
if (sqlite3_exec(db, [createSQL UTF8String], NULL, NULL, &error)) {
sqlite3_close(db);
NSAssert1(NO, @"CREATE TABLE ERROR", error);
} else {
sqlite3_close(db);
}
}
}
sqlite3_open([[self dataFilePath] UTF8String], &db) != SQLITE_OK sqlite3_open打开数据库,注意:在sqlite3中的函数都是使用C字符串[self dataFilePath] UTF8String]是将NSString字符串转换为C字符串,&db是sqlite3指针(* db)的地址。
该函数sqlite3_open返回SQLITE_OK打开成功。
sqlite3_exec(db, [tablesql UTF8String], NULL, NULL, &err) != SQLITE_OK
sqlite3_exec是执行任何不带返回值sql语句,第2个参数是要执行的sql语句,第3个参数是要回调函数,第4个参数是要回调函数的参数,第5个参数是执行出错的字符串。
sqlite3_close(db); 是关闭数据库。
NSAssert是断言函数,当断言失败时候打印信息。
NSAssert1是带有一个参数的NSAssert函数,此外还有NSAssert2等函数。
有参数的SQLite3处理过程
1、打开数据库sqlite3_open。
2、预处理SQL语句sqlite3_prepare_v2。
3、绑定参数sqlite3_bind_text。
4、执行语句sqlite3_step(statement) 。
5、释放资源sqlite3_finalizesqlite3_close。
数据保存
- (IBAction)saveFromSqlite:(id)sender {
NSString* fileName = [self dataFile];
NSLog(@"%@", fileName);
if (sqlite3_open([fileName UTF8String], &db)) {
sqlite3_close(db);
NSAssert(NO, @"OPEN DATABASE ERROR");
} else {
NSString* sqlStr = [NSString stringWithFormat:@"INSERT OR REPLACE INTO %@(%@, %@, %@) VALUES(?, ?, ?)",TABLE_NAME, FIELDS_NAME_SID, FIELDS_NAME_SNAME, FIELDS_NAME_SCLASS];
sqlite3_stmt* statement;
//预处理过程
if (sqlite3_prepare(db, [sqlStr UTF8String], -1, &statement, NULL) == SQLITE_OK) {
//绑定参数开始
sqlite3_bind_text(statement, 1, [studentId.text UTF8String], -1, NULL);
sqlite3_bind_text(statement, 2, [studentName.text UTF8String], -1, NULL);
sqlite3_bind_text(statement, 3, [studentClass.text UTF8String], -1, NULL);
//执行插入
if (sqlite3_step(statement) != SQLITE_DONE) {
NSAssert(0, @"INSERT DATABASE ERROR!");
}
}
sqlite3_finalize(statement);
sqlite3_close(db);
}
}
sqlite3_prepare_v2(db, [sqlStr UTF8String], -1, &statement, nil) == SQLITE_OK
sqlite3_prepare_v2执行sql语句,第3个参数-1代表全部sql字符串长度,第4个参数&statement是sqlite3_stmt指针(* statement)的地址,第5个参数是sql语句没有被执行的部分语句。
sqlite3_bind_text(statement, 1, [studentId.text UTF8String], -1, NULL);
是绑定参数,第2个参数为序号(从1开始),第3个参数为字符串值,第4个参数为字符串长度。 第5个参数为一个函数指针,SQLITE3执行完操作后回调此函数,通常用于释放字符串占用的内存。
sqlite3_step(statement) != SQLITE_DONE判断是否执行完成sql语句执行。
sqlite3_finalize(statement)和sqlite3_close(db)释放资源。
查询数据
- (IBAction)loadFromSqlite:(id)sender {
NSString* fileName = [self dataFile];
NSLog(@"%@", fileName);
if (sqlite3_open([fileName UTF8String], &db) != SQLITE_OK) {
sqlite3_close(db);
NSAssert(NO, @"OPEN DATABASE ERROR!");
} else {
NSString* sqlStr = [NSString stringWithFormat:@"SELECT %@,%@,%@ FROM %@ WHERE %@=?",
FIELDS_NAME_SID, FIELDS_NAME_SNAME, FIELDS_NAME_SCLASS, TABLE_NAME, FIELDS_NAME_SID];
sqlite3_stmt* statement;
//预处理过程
if (sqlite3_prepare_v2(db, [sqlStr UTF8String], -1, &statement, NULL) == SQLITE_OK) {
//绑定参数开始
sqlite3_bind_text(statement, 1, "1000", -1, NULL);
//执行
while (sqlite3_step(statement) == SQLITE_ROW) {
char* field1 = (char*)sqlite3_column_text(statement, 0);
NSString* field1Str = [[NSString alloc]initWithUTF8String:field1];
studentId.text = field1Str;

char* field2 = (char*)sqlite3_column_text(statement, 1);
NSString* field2Str = [[NSString alloc]initWithUTF8String:field2];
studentName.text = field2Str;

char* field3 = (char*)sqlite3_column_text(statement, 2);
NSString* field3Str = [[NSString alloc]initWithUTF8String:field3];
studentClass.text = field3Str;

[field1Str release];
[field2Str release];
[field3Str release];
}
}
sqlite3_finalize(statement);
sqlite3_close(db);
}
}
while (sqlite3_step(statement) == SQLITE_ROW) sqlite3_step(statement) == SQLITE_ROW单步执行并判断sql语句执行的状态。
char *field1 = (char *) sqlite3_column_text(statement, 0); sqlite3_column_text(statement, 0);取出字段值,第2个参数是列的顺序,序号是从0开始。
NSString *field1Str = [[NSString alloc] initWithUTF8String: field1];构建NSSting字符串。
其它部分代码
-(IBAction)textFieldDoneEditing:(id)sender {
[sender resignFirstResponder];
}
- (void)viewDidUnload
{
[self setStudentId:nil];
[self setStudentName:nil];
[self setStudentClass:nil];
[super viewDidUnload];
}

- (void)dealloc {
[studentId release];
[studentName release];
[studentClass release];
[super dealloc];
}

相关文章推荐
- iOS学习笔记-数据持久化
- iOS学习笔记05—Key-Value-Observing(KVO,键值观察)
- xamarin学习笔记B05(ios的UIScrollView)
- iOS学习笔记-090.彩票05——购彩大厅2_自定义蒙版、popMenu、UIView分类抽取
- iOS学习笔记—— 数据持久化(Plist)
- iOS SDK 4.3 ( Xcode 4 )学习笔记 iPhone101 (05)
- iOS Programming 学习笔记 - 05 UINavigationController
- iOS学习笔记-145.网络05——NSURLConnection02_使用相关
- 05.IOS学习笔记之printf与scanf
- IOS学习笔记05_2-Swift-命名空间
- IOS学习笔记05---C语言程序的开发运行过程
- iOS学习笔记--05 KVO
- iOS学习笔记05-触摸事件
- ios学习笔记 (4)数据持久化
- iOS学习笔记05-触摸事件
- ios学习笔记——数据持久化
- ios学习笔记:ios数据持久化
- iOS学习笔记05-触摸事件
- ios学习笔记-05-渐变动画和button布局和kvc-kvo
- iOS学习笔记-079.核心动画05——CAAnimationGroup(动画组)