Nagios+Cacti+NCP+NConf整合安装
2013-08-04 18:51
501 查看
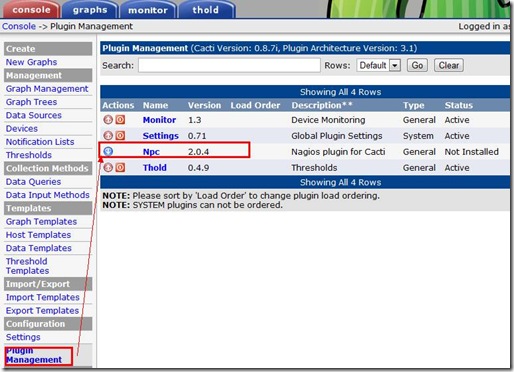
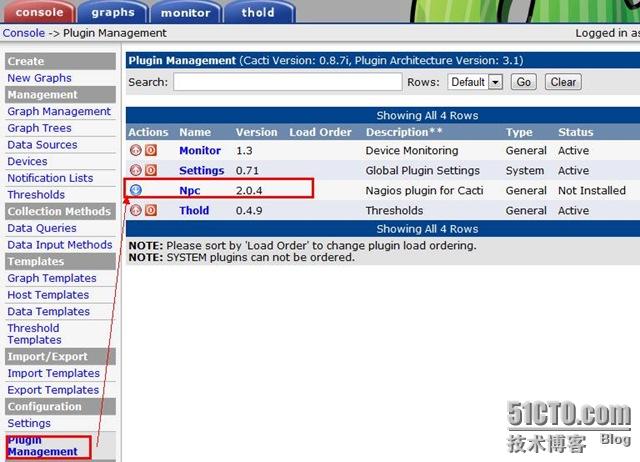
nagios和cacti参考之前的文章nagios: http://sangh.blog.51cto.com/6892345/1263981cacti: http://sangh.blog.51cto.com/6892345/1261721 整合需要安装插件NDoutils和NPCNDoutils作用:把Nagios的数据写到mysql,所以它是集成nagios到cacti的关健的一部分NPC作用:将nagios的数据通过ndo2db导入到mysql数据库,然后cacti读取数据库信息将nagios的结果通过NPC展示出来安装ndoutils:[root@study ~]# tar zxf ndoutils-1.4b9.tar.gz[root@study ~]# cd ndoutils-1.4b9[root@study ndoutils-1.4b9]# ./configure --prefix=/usr/local/nagios[root@study ndoutils-1.4b9]# make[root@study ndoutils-1.4b9]# cd src/[root@study src]# cp ndomod-3x.o ndo2db-3x file2sock log2ndo /usr/local/nagios/bin/#拷贝这四个文件到bin目录[root@study src]# cd ../db/[root@study db]# ./installdb -ucacti -pcacti123 -d cacti准备配置文件:[root@study ndoutils-1.4b9]# cd config[root@study config]# cp ndo2db.cfg-sample /usr/local/nagios/etc/ndo2db.cfg[root@study config]# cp ndomod.cfg-sample /usr/local/nagios/etc/ndomod.cfg[root@study config]# chmod 644 /usr/local/nagios/etc/ndo*[root@study config]# chown nagios:nagios /usr/local/nagios/etc/*[root@study config]# chown nagios:nagios /usr/local/nagios/bin/*在nagios中添加关联ndounil配置:[root@study ~]# vim /usr/local/nagios/etc/nagios.cfgbroker_module=/usr/local/nagios/bin/ndomod-3x.o config_file=/usr/local/nagios/etc/ndomod.cfg配置ndo2db.cfg、ndomod.cfg连接参数:[root@study ~]# vim /usr/local/nagios/etc/ndo2db.cfgsocket_type=tcpdb_prefix=npc_db_name=cactidb_user=cactidb_pass=cacti123修改以上几个参数,其他保持默认[root@study ~]# vim /usr/local/nagios/etc/ndomod.cfgoutput_type=tcpsocketoutput=127.0.0.1修改以上两个文件使用tcp连接模式,默认为unix。如果安装完成后npc的状态为off的话,可以试着修改这些值。配置ndoutil启动:[root@study ndoutils-1.4b9]# cp ./daemon-init /etc/init.d/ndo2db[root@study ndoutils-1.4b9]# chmod a+x /etc/init.d/ndo2db[root@study ndoutils-1.4b9]# vim /etc/init.d/ndo2db修改为:Ndo2dbBin=/usr/local/nagios//bin/ndo2db-3x[root@study ~]# chkconfig ndo2db on[root@study ~]# /etc/init.d/ndo2db start这里启动服务时,可能会提示路径错误,可根据实现情况修改安装NPC:安装NPC之前需要确认json、pdo_mysql对php的支持,否则安装完成NPC后会显示空白无数据。[root@study ~]# php -m | egrep 'json|pdo_mysql'pdo_mysql安装json[root@study ~]# tar zxf json-1.2.1.tgz[root@study ~]# cd json-1.2.1[root@study json-1.2.1]# phpize #如果没有此命令,安装php-devel[root@study json-1.2.1]# ./configure[root@study json-1.2.1]# make && make install配置php.ini添加支持json:[root@study ~]# vim /etc/php.iniextension=json.so查看php是否支持json[root@study ~]# php -m | egrep 'json|pdo_mysql'jsonpdo_mysql安装NPC插件:[root@study ~]# tar zxf npc-2.0.4.tar.gz[root@study ~]# mv npc /var/www/html/plugins[root@study ~]# chown -R apache:apache /var/www/html/plugins/npc/打开cacti的web页面,激活插件
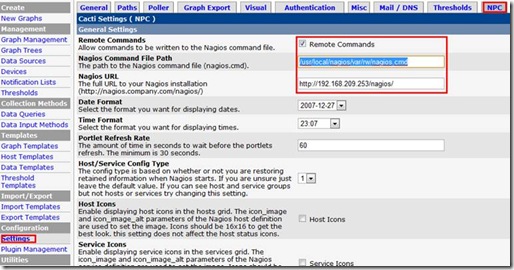
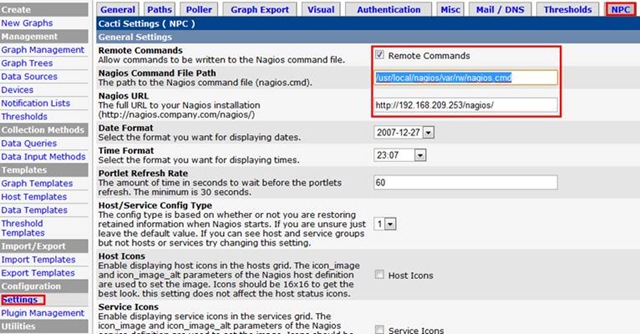
配置路径(/usr/local/nagios/var/rw/nagios.cmd)
修改cacti数据库中的npc表结构:[root@study ~]# mysql -ucacti -pcacti123mysql> use cacti;mysql> alter table npc_eventhandlers add long_output TEXT NOT NULL default '' after output;mysql> alter table npc_hostchecks add long_output TEXT NOT NULL default '' after output;mysql> alter table npc_hoststatus add long_output TEXT NOT NULL default '' after output;mysql> alter table npc_notifications add long_output TEXT NOT NULL default '' after output;mysql> alter table npc_servicechecks add long_output TEXT NOT NULL default '' after output;mysql> alter table npc_servicestatus add long_output TEXT NOT NULL default '' after output;mysql> alter table npc_statehistory add long_output TEXT NOT NULL default '' after output;mysql> alter table npc_systemcommands add long_output TEXT NOT NULL default '' after output;重新启动服务:[root@study ~]# /etc/init.d/httpd restart[root@study ~]# /etc/init.d/ndo2db restart[root@study ~]# /etc/init.d/nagios restart[root@study ~]# /etc/init.d/mysqld restart

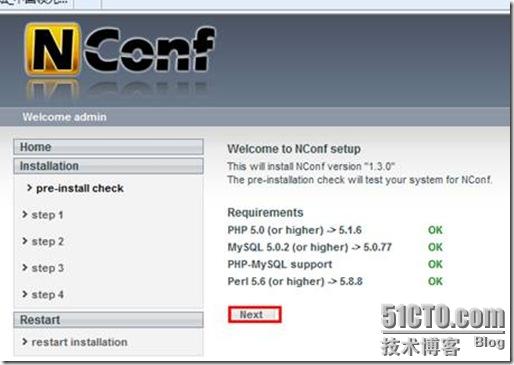
二、安装nconf安装前准备,创建nconf数据库,建立用户及分配权限:[root@study ~]# mysql -urootmysql> create database nconf;mysql> grant all privileges on nconf.* to nconf@localhost identified by 'nconf';mysql> flush privileges;安装nconf:[root@study ~]# tar zxf nconf-1.3.0-0.gz[root@study ~]# mv nconf/ /var/www/html/[root@study ~]# cd /var/www/html/nconf/[root@study nconf]# chown -R apache:apache config/ temp/ static_cfg/ output/打开:http://192.168.209.253/nconf/INSTALL.php
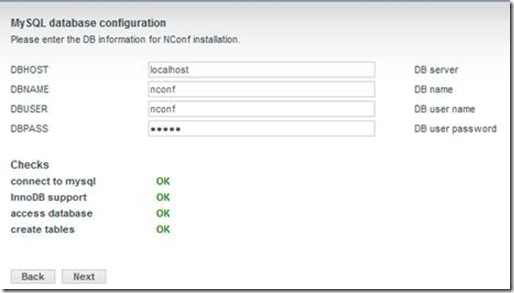
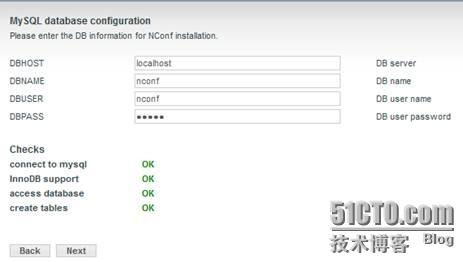
设置连接数据库的参数:
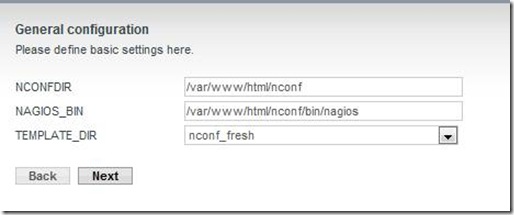
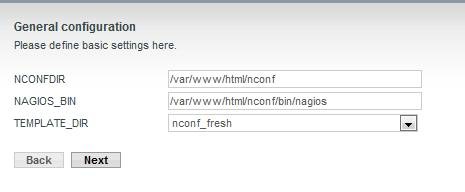
配置nconft和nagiso路径(默认):
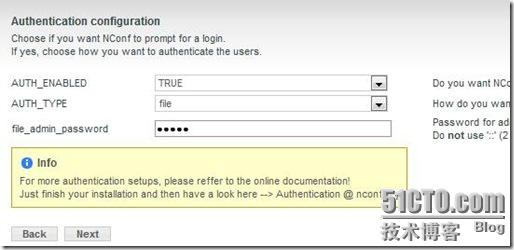
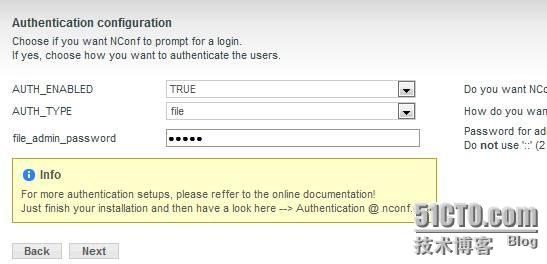
设置nconf管理密码:
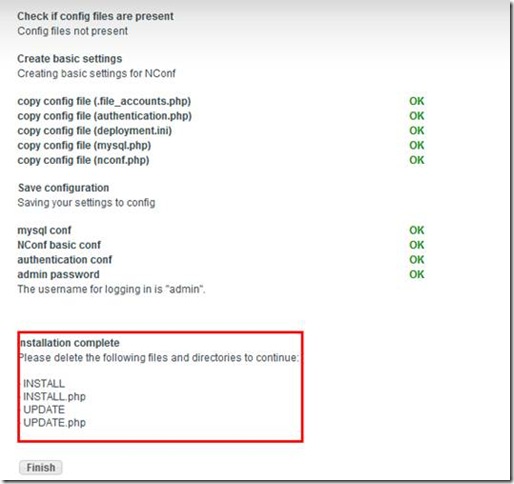
[root@study nconf]# rm -rf INSTALL INSTALL.php UPDATE UPDATE.php[root@study nconf]# ln -s /usr/local/nagios/bin/nagios bin/nagios修改完成后点“Finish”修改配置文件:[root@study nconf]# chmod +x /var/www/html/nconf/bin/generate_config.pl[root@study nconf]# chown -R apache:apache temp[root@study nconf]# chown -R apache:apache bin[root@study nconf]# chmod +x /usr/local/nagios/bin/nagios[root@study nconf]# chmod +x /var/www/html/nconf/ADD-ONS/deploy_local.sh登录测试:
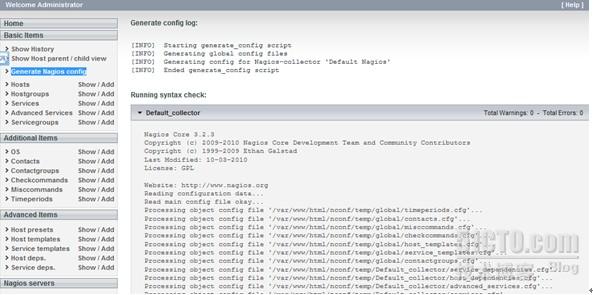
点击“Generate Nagios config”测试生成配置文件
导入配置文件:[root@study ~]# sh /var/www/html/nconf/ADD-ONS/deploy_local.sh之后会在/usr/local/nagios/etc/目录中生成以下目录Default_collector与global修改nagios配置文件:将原来的配置文件(cfg_file=***)注释加上最后两行[root@study etc]# vim nagios.cfg#cfg_file=/usr/local/nagios/etc/objects/commands.cfg#cfg_file=/usr/local/nagios/etc/objects/contacts.cfg#cfg_file=/usr/local/nagios/etc/objects/timeperiods.cfg#cfg_file=/usr/local/nagios/etc/objects/templates.cfg#cfg_file=/usr/local/nagios/etc/objects/localhost.cfgcfg_dir=/usr/local/nagios/etc/Default_collectorcfg_dir=/usr/local/nagios/etc/global[root@study ~]# /etc/init.d/nagios restart每分钟检测是否有更新:[root@study ~]# crontab -e*/1 * * * * /var/www/html/nconf/ADD-ONS/deploy_local.sh > /dev/null 2>&1 本文出自 “网络收藏夹” 博客,请务必保留此出处http://liyaoyi.blog.51cto.com/442933/851562
配置路径(/usr/local/nagios/var/rw/nagios.cmd)
修改cacti数据库中的npc表结构:[root@study ~]# mysql -ucacti -pcacti123mysql> use cacti;mysql> alter table npc_eventhandlers add long_output TEXT NOT NULL default '' after output;mysql> alter table npc_hostchecks add long_output TEXT NOT NULL default '' after output;mysql> alter table npc_hoststatus add long_output TEXT NOT NULL default '' after output;mysql> alter table npc_notifications add long_output TEXT NOT NULL default '' after output;mysql> alter table npc_servicechecks add long_output TEXT NOT NULL default '' after output;mysql> alter table npc_servicestatus add long_output TEXT NOT NULL default '' after output;mysql> alter table npc_statehistory add long_output TEXT NOT NULL default '' after output;mysql> alter table npc_systemcommands add long_output TEXT NOT NULL default '' after output;重新启动服务:[root@study ~]# /etc/init.d/httpd restart[root@study ~]# /etc/init.d/ndo2db restart[root@study ~]# /etc/init.d/nagios restart[root@study ~]# /etc/init.d/mysqld restart

二、安装nconf安装前准备,创建nconf数据库,建立用户及分配权限:[root@study ~]# mysql -urootmysql> create database nconf;mysql> grant all privileges on nconf.* to nconf@localhost identified by 'nconf';mysql> flush privileges;安装nconf:[root@study ~]# tar zxf nconf-1.3.0-0.gz[root@study ~]# mv nconf/ /var/www/html/[root@study ~]# cd /var/www/html/nconf/[root@study nconf]# chown -R apache:apache config/ temp/ static_cfg/ output/打开:http://192.168.209.253/nconf/INSTALL.php

设置连接数据库的参数:
配置nconft和nagiso路径(默认):
设置nconf管理密码:
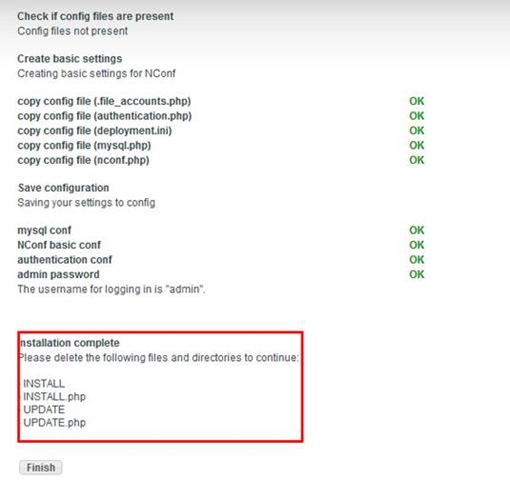
[root@study nconf]# rm -rf INSTALL INSTALL.php UPDATE UPDATE.php[root@study nconf]# ln -s /usr/local/nagios/bin/nagios bin/nagios修改完成后点“Finish”修改配置文件:[root@study nconf]# chmod +x /var/www/html/nconf/bin/generate_config.pl[root@study nconf]# chown -R apache:apache temp[root@study nconf]# chown -R apache:apache bin[root@study nconf]# chmod +x /usr/local/nagios/bin/nagios[root@study nconf]# chmod +x /var/www/html/nconf/ADD-ONS/deploy_local.sh登录测试:
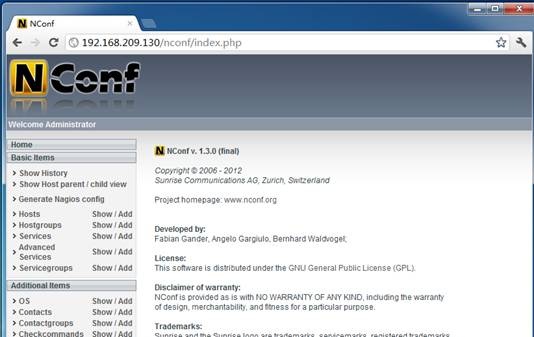
点击“Generate Nagios config”测试生成配置文件
导入配置文件:[root@study ~]# sh /var/www/html/nconf/ADD-ONS/deploy_local.sh之后会在/usr/local/nagios/etc/目录中生成以下目录Default_collector与global修改nagios配置文件:将原来的配置文件(cfg_file=***)注释加上最后两行[root@study etc]# vim nagios.cfg#cfg_file=/usr/local/nagios/etc/objects/commands.cfg#cfg_file=/usr/local/nagios/etc/objects/contacts.cfg#cfg_file=/usr/local/nagios/etc/objects/timeperiods.cfg#cfg_file=/usr/local/nagios/etc/objects/templates.cfg#cfg_file=/usr/local/nagios/etc/objects/localhost.cfgcfg_dir=/usr/local/nagios/etc/Default_collectorcfg_dir=/usr/local/nagios/etc/global[root@study ~]# /etc/init.d/nagios restart每分钟检测是否有更新:[root@study ~]# crontab -e*/1 * * * * /var/www/html/nconf/ADD-ONS/deploy_local.sh > /dev/null 2>&1 本文出自 “网络收藏夹” 博客,请务必保留此出处http://liyaoyi.blog.51cto.com/442933/851562

相关文章推荐
- Nagios+Cacti+NCP+NConf整合安装
- Nagios+Cacti+NCP+NConf整合安装
- 64位 CentOS 5.6 中 Nagios 3.3.1 的编译安装 并 与Cacti 0.8.7i进行整合
- 在CentOs linux 6.0 x86_64 server上安装实现cacti+nagios+ntop整合+nagiosql图形界面管理nagios配置文件
- Cacti+Nagios完全攻略(二)整合cacti与nagios安装部署
- Nagios的安装部署和与Cacti的整合
- 生产环境下搭建 nagios+nconf+cacti+npc的整合
- Nagios的安装部署和与Cacti的整合
- Cacti+Nagios完全攻略(二)整合cacti与nagios安装部署
- Cacti的安装并整合nagios
- 生产环境监控系统Nginx+Nagios+Cacti+Nconf大整合(最新源码安装)【转载】
- cacti_nagios<at>centos(redhat)整合安装简要记录
- Nagios安装部署与Cacti整合文档超精细版本
- 生产环境下搭建 nagios+nconf+cacti+npc的整合
- Nagios安装部署与 Cacti整合文档
- 【APP】nagios&cacti完全安装与整合 推荐
- Nagios安装部署与Cacti整合文档超精细版本
- nagios+cacti+nrpe+nconf整合最后报错解决
- Cacti+Nagios完全攻略(二)整合cacti与nagios安装部署
- Cacti+Nagios整合中在安装NPC支持--json时出错!