linux设备驱动--HelloWorld
2013-07-04 21:40
387 查看
linux设备驱动--HelloWorld
最近正在学习设备驱动开发,因此打算写一个系列博客,即是对自己学习的一个总结,也是对自己的一个督促,有不对,不足,需要改正的地方还望大家指出,而且希望结识志同道合的朋友一起学习技术,共同进步。作者:liufei_learning(转载请注明出处)
email:flying0216@foxmail.com
IT学习交流群:160855096
开发环境:Win7(主机) + VisualBox + ubuntu10.10(虚拟机) + TQ2440开发板(2.6.30.4内核)
功能:
1.ubuntu下helloworld模块的实现
2.TQ2440下helloworld模块的实现
目录: 1.源码
2.实现步骤Ubuntu下helloworld模块的实现
遇到的问题及解决方案
TQ2440下helloworld模块的实现
遇到的问题及解决方案
3.分析
1)__init__exit
2)module_init() 与 module_exit()
3)MODULE_LICENSE
4)Makefile解析
5)printk()解析
源码:
/* hello.c */
#include <linux/module.h>
#include <linux/init.h>

MODULE_LICENSE("GPL");
MODULE_AUTHOR("liufei_learning");
MODULE_DESCRIPTION("Hello world module");

static int __init hello_init(void)
{
printk(KERN_NOTICE "hello world!\n");
return 0;
}
static void __exit hello_exit(void)
{
printk(KERN_NOTICE "hello exit!\n");
}

module_init(hello_init);
module_exit(hello_exit);
Makefile
ifneq ($(KERNELRELEASE),)

obj-m :=hello.o

else
KDIR:= /lib/modules/2.6.35-22-generic/build

all:
make -C $(KDIR) M=$(PWD) modules
clean:
rm -f *.ko *.o *.mod.o *.mod.c .symvers

endif
实现步骤:
ubuntu下helloworld模块的实现
1.建立hello.c Makefile文件
Makefile文件注意红色部分,2.6.35-22-generic改为本机的ifneq($(KERNELRELEASE),)
obj-m :=hello.o
else
KDIR:= /lib/modules/2.6.35-22-generic/build
2.进入所在目录执行 make命令
3.加载模块insmod hello.ko
4.查看以安装模块 lsmod
实验结果: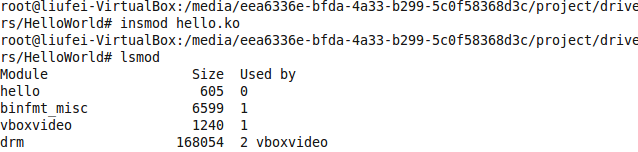
5.卸载模块rmmod
遇到的问题:
printk无法打印,这是因为printk无法再图形界面下显示在ubuntu里使用printk函数打印的信息被写到/var/log/syslog里,使用dmesg-c 也可查看
实验结果:

TQ2440下helloworld模块的实现
1.在内核源码 drivers/char/下建立一个
fly_hello.c文件(内容同上)
2.修改同目录下Kconfig
在menu "Character devices"后添加config FLY_HELLO tristate"TQ2440 Hello Driver" dependson ARCH_S3C2440 ---help--- TQ2440 Hello Driver
3.修改同目录下Makefile文件
obj-y += mem.o random.o tty_io.o n_tty.o tty_ioctl.o tty_ldisc.o tty_buffer.otty_port.o后添加obj-$(CONFIG_FLY_HELLO) +=fly_hello.o
4.配置内核make menuconfig
DeviceDrivers--->Character device---->
<M>TQ2440 Hello Driver
5.makeSUBDIR=drivers/char/ modules
6.复制drivers/char/下的fly_hello.ko开发板/lib/modules/2.6.30.4-EmbedSky下
7.insmod rmmod
结果截图: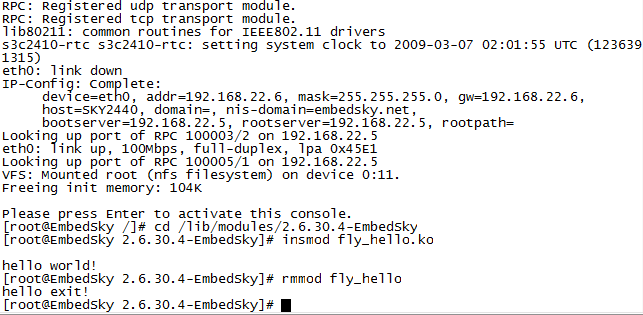
遇到的问题:
卸载的时候出现rmmod: chdir(/lib/modules): No such file or directory错误现在的内核模块在插入卸载时都会要转到/lib/modules/内核版本号/这个目录里。所以只要建立这个目录并且把要使用的模块.ko文件复制到这个目录就行了。
分析:
一.__init __exit
/* These macros are used to mark some functions or
* initialized data (doesn't apply to uninitialized data)
* as `initialization' functions. The kernel can take this
* as hint that the function is used only during the initialization
* phase and free up used memory resources after

* Usage:
* For functions:
*
* You should add __init immediately before the function name, like:
*
* static void __init initme(int x, int y)
* {
*    extern int z; z = x * y;
* }
*
* If the function has a prototype somewhere, you can also add
* __init between closing brace of the prototype and semicolon:
*
* extern int initialize_foobar_device(int, int, int) __init;
*
* For initialized data:
* You should insert __initdata between the variable name and equal
* sign followed by value, e.g.:
*
* static int init_variable __initdata = 0;
* static const char linux_logo[] __initconst = { 0x32, 0x36, ... };
*
* Don't forget to initialize data not at file scope, i.e. within a function,
* as gcc otherwise puts the data into the bss section and not into the init
* section.
*
* Also note, that this data cannot be "const".
*/

/* These are for everybody (although not all archs will actually discard it in modules) */
#define __init          __section(.init.text) __cold notrace
#define __initdata      __section(.init.data)
#define __initconst     __section(.init.rodata)
#define __exitdata      __section(.exit.data)
#define __exit_call     __used __section(.exitcall.exit)
这些宏被用来标记一些函数或者初始化数据(不适用于未初始化数据)作为初始化函数。此功能仅仅被用在初始化阶段,内核以此作为线索在使用后释放内存资源
用法:
static void __initinitme(int x, int y)
{
extern int z; z = x * y;
}
extern intinitialize_foobar_device(int, int, int) __init;
static intinit_variable __initdata = 0;
static const char
宏 __init的使用会在初始化完成后丢弃该函数并收回所占内存,如果该模块被编译进内核,而不是动态加载。
宏__initdata同__init 类似,只不过对变量有效。
宏__exit将忽略“清理收尾”的函数如果该模块被编译进内核。同宏 __init一样,对动态加载模块是无效的。这很容易理解。编译进内核的模块是没有清理收尾工作的,而动态加载的却需要自己完成这些工作。
这些宏在头文件linux/init.h定义,用来释放内核占用的内存。 当你在启动时看到这样的Freeingunused kernel memory: 236k freed内核输出,上面的 那些正是内核所释放的。
二.module_init()与module_exit()
258/** 259 * module_init() - driver initialization entry point
260 * @x: function to be run at kernel boot time or module insertion
261 *
262 * module_init() will either be called during do_initcalls() (if
263 * builtin) or at module insertion time (if a module).  There can only
264 * be one per module.
265 */
266#define module_init(x)  __initcall(x);
267
268/**
269 * module_exit() - driver exit entry point
270 * @x: function to be run when driver is removed
271 *
272 * module_exit() will wrap the driver clean-up code
273 * with cleanup_module() when used with rmmod when
274 * the driver is a module.  If the driver is statically
275 * compiled into the kernel, module_exit() has no effect.
276 * There can only be one per module.
277 */
278#define module_exit(x)  __exitcall(x);
module_init():驱动的入口点,在内核启动或动态加载模块时被调用
module_exit():驱动的结束点,动态卸载模块时被调用,如果被静态链接在内核,则module_exit()没有效果
三.MODULE_LICENSE
/*
115 * The following license idents are currently accepted as indicating free
116 * software modules
117 *
118 *      "GPL"                           [GNU Public License v2 or later]
119 *      "GPL v2"                        [GNU Public License v2]
120 *      "GPL and additional rights"     [GNU Public License v2 rights and more]
121 *      "Dual BSD/GPL"                  [GNU Public License v2
122 *                                       or BSD license choice]
123 *      "Dual MIT/GPL"                  [GNU Public License v2
124 *                                       or MIT license choice]
125 *      "Dual MPL/GPL"                  [GNU Public License v2
126 *                                       or Mozilla license choice]
127 *
128 * The following other idents are available
129 *
130 *      "Proprietary"                   [Non free products]
131 *
132 * There are dual licensed components, but when running with Linux it is the
133 * GPL that is relevant so this is a non issue. Similarly LGPL linked with GPL
134 * is a GPL combined work.
135 *
136 * This exists for several reasons
137 * 1.   So modinfo can show license info for users wanting to vet their setup
138 *      is free
139 * 2.   So the community can ignore bug reports including proprietary modules
140 * 3.   So vendors can do likewise based on their own policies
141 */
142#define MODULE_LICENSE(_license) MODULE_INFO(license, _license)
143
144/*
145 * Author(s), use "Name <email>" or just "Name", for multiple
146 * authors use multiple MODULE_AUTHOR() statements/lines.
147 */
148#define MODULE_AUTHOR(_author) MODULE_INFO(author, _author)
149
150/* What your module does. */
151#define MODULE_DESCRIPTION(_description) MODULE_INFO(description, _description)
宏MODULE_DESCRIPTION()用来描述模块的用途。
宏MODULE_AUTHOR()用来声明模块的作者。
宏MODULE_SUPPORTED_DEVICE() 声明模块支持的设备….
四.Makefile解析
KERNELRELEASE是在内核源码的顶层Makefile中定义的一个变量,在第一次读取执行此Makefile时,KERNELRELEASE没有被定义,所以make将读取执行else之后的内容,如果make的目标是clean,直接执行clean操作,然后结束。当make的目标为all时,-C$(KDIR)指明跳转到内核源码目录下读取那里的Makefile;M=$(PWD)表明然后返回到当前目录继续读入、执行当前的Makefile。当从内核源码目录返回时,KERNELRELEASE已被定义,kbuild也被启动去解析kbuild语法的语句,make将继续读取else之前的内容。else之前的内容为kbuild语法的语句,指明模块源码中各文件的依赖关系,以及要生成的目标模块名。
五.printk()
内核通过printk() 输出的信息具有日志级别,日志级别是通过在 printk() 输出的字符串前加一个带尖括号的整数来控制的,如printk("<6>Hello, world!/n");。内核中共提供了八种不同的日志级别,在linux/kernel.h中有相应的宏对应。
#defineKERN_EMERG    "<0>"    /* systemis unusable */
#defineKERN_ALERT    "<1>"    /* actionmust be taken immediately */
#defineKERN_CRIT     "<2>"    /*critical conditions */
#defineKERN_ERR      "<3>"   /* error conditions */
#defineKERN_WARNING  "<4>"    /* warningconditions */
#defineKERN_NOTICE   "<5>"    /* normal butsignificant */
#defineKERN_INFO     "<6>"    /*informational */
#defineKERN_DEBUG    "<7>"    /*debug-level messages */
所以 printk()可以这样用:printk(KERN_INFO "Hello, world!/n");。
未指定日志级别的 printk()采用的默认级别是 DEFAULT_MESSAGE_LOGLEVEL,这个宏在 kernel/printk.c 中被定义为整数4,即对应KERN_WARNING。
在/proc/sys/kernel/printk 会显示4个数值(可由 echo修改),分别表示当前控制台日志级别、未明确指定日志级别的默认消息日志级别、最小(最高)允许设置的控制台日志级别、引导时默认的日志级别。当 printk()中的消息日志级别小于当前控制台日志级别时,printk 的信息(要有/n符)就会在控制台上显示。但无论当前控制台日志级别是何值,通过
/proc/kmsg(或使用dmesg)总能查看。另外如果配置好并运行了 syslogd 或 klogd,没有在控制台上显示的 printk 的信息也会追加到 /var/log/syslog 中。

相关文章推荐
- linux设备驱动--HelloWorld
- 实战Linux设备驱动--万事开头难--HelloWorld
- 手把手教你写Linux I2C设备驱动
- 乾坤合一:Linux设备驱动之USB主机和设备驱动
- linux下的总线设备驱动模型分析
- Linux 设备驱动 如何自动创建设备文件
- 基于mini6410的linux驱动学习总结(五 字符设备驱动程序实例分析(虚拟设备驱动))
- [linux驱动]linux块设备学习笔记(二)
- Linux设备驱动之——serio总线
- Linux驱动之设备模型(6)-驱动
- Linux查看硬件信息以及驱动设备的命令
- 手把手教你学linux驱动开发”OK6410系列之02---虚拟字符设备
- Linux学习:platform平台总线、平台设备、平台驱动
- linux查看硬件信息及驱动设备
- LINUX设备驱动之Intel8042芯片驱动(一)
- ·LINUX设备驱动之tty及console驱动(一)
- Linux高级字符设备驱动 poll方法(select多路监控原理与实现)
- Linux音频设备两种框架OSS和ALSA驱动
- Linux 设备驱动 ====> 字符驱动
- 学习笔记 --- LINUX MTD设备之NANDFLASH驱动分析