iphone ios uiview uilabel 边框,圆角,阴影实现
2013-06-26 11:19
627 查看
Fun with layers
In this post, I’ll explain how to add a border, rounded corners, and drop shadow to any UIViewusing
some simple
CALayerproperties.
I’m not a
CALayerguru,
but these few tricks from the layer world are particularly nice to know about.
These properties are present for every
UIView,
since every view is actually drawn using an underlying
CALayerobject
owned by the UIView. You can do a lot without even knowing about
CALayers
because
UIViews
encapsulate a lot of their functionality. These properties, however, are useful pieces that are not available directly through the
UIViewinterface.
To use these properties, you need to include the QuartzCore header:
#import <QuartzCore/QuartzCore.h>
Borders
To get a border, just set theborderColorand
borderWidthproperties
of the layer, for example:
label.layer.borderColor = [UIColor blueColor].CGColor;
label.layer.borderWidth = 1;
The
borderColoris
a
CGColorRef,
which you can easily extract from any
UIColoras
in the above example, which generates a border like this:
The border is just inside the frame of the view. Fractional values are allowed for the
borderWidthas
well.
Corners
You can create rounded corners with code like this:label.layer.cornerRadius = 20;
label.layer.borderColor = [UIColor grayColor].CGColor;
label.layer.borderWidth = 3;
just the
cornerRadiusproperty
is needed; I’ve also set the border to show how these properties work together:
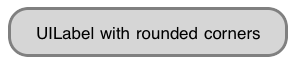
As you can see in the example screenshot, the
backgroundColorof
the
UIViewis
also restricted by the corner radius. You need to have
clipsToBoundsset
to
YESon
your
UIViewfor
rounded corners to work.
Shadows
You can also create a drop shadow that will be based on the alpha component of whatever is drawn in your view. Often this will result in a shadow just around the edges of the view. This examplecode on a
UILabel:
label.layer.shadowColor = [UIColor blackColor].CGColor;
label.layer.shadowOpacity = 1.0;
label.layer.shadowRadius = 5.0;
label.layer.shadowOffset = CGSizeMake(0, 3);
label.clipsToBounds = NO;
results in this appearance:
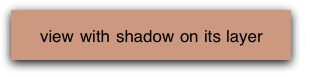
In this case, you need
clipsToBoundsto
be
NOin
order for a shadow outside the frame of your view to show up. Next I’ll show you how you can actually combine rounded corners and drop shadows, since I’m sure that’s what you really want to do now.
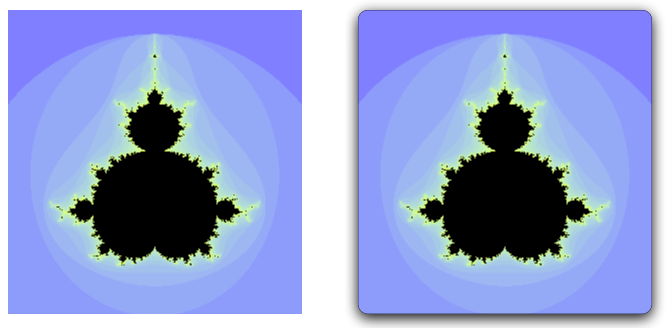
All together
Let’s say you want to present an image with a border, rounded corners, and a drop shadow. The obvious problem from the above explanations is thatclipsToBoundsneeds
to be
YESfor
the rounded corners to work and
NOfor
the drop shadows. What’s a coder to do?
We can get around this apparent paradox by using the fact that the
CALayertreats
its own background color (which may be image-based) differently than the
UIView‘s
background color. Specifically, we can set
clipsToBoundsto
NOand
still achieve rounded corners by using direct properties of the layer instead of the
UIView.
This code:
UIView *imgView = [[[UIView
alloc] initWithFrame:imgFrame] autorelease];
imgView.backgroundColor = [UIColor clearColor];
UIImage *image = [UIImage
imageNamed:@"mandel.png"];
imgView.layer.backgroundColor = [UIColor colorWithPatternImage:image].CGColor;
// Rounded corners.
imgView.layer.cornerRadius = 10;
// A thin border.
imgView.layer.borderColor = [UIColor blackColor].CGColor;
imgView.layer.borderWidth = 0.3;
// Drop shadow.
imgView.layer.shadowColor = [UIColor blackColor].CGColor;
imgView.layer.shadowOpacity = 1.0;
imgView.layer.shadowRadius = 7.0;
imgView.layer.shadowOffset = CGSizeMake(0, 4);
Generates the image on the right, using the left image as the source (mandel.png):
Reference
I originally learned about this stuff from thisblog post.

相关文章推荐
- iphone ios uiview uilabel 边框,圆角,阴影实现
- iphone ios uiview uilabel 边框,圆角,阴影实现
- IOS--UIView 视觉效果:圆角、阴影、边框、渐变光泽
- IOS--UIViewUIButtonUIImageView设置圆角、阴影、边框的方法
- IOS UIView圆角,阴影,边框,渐增光泽
- IOS UIView圆角,阴影,边框,渐增光泽
- iphone-- UIView 加入边框,阴影,圆角
- IOS--UIViewUIButtonUIImageView设置圆角、阴影、边框的方法
- iOS UIView的圆角加阴影效果的实现
- IOS UIView圆角,阴影,边框,渐增光泽
- 纯代码利用CSS3 圆角边框和盒子阴影 制作 iphone 手机效果
- iOS 设置UIView的边框和阴影
- IOS设置UIView的边框为圆角
- UIVIEW 设置圆角 +边框阴影
- IOS开发入门基本知识——实现小猫招呼UIView UILabel UIButton NSTimer层级关系
- 纯CSS实现漂亮圆角阴影边框
- IOS设置UIView的边框为圆角
- UIView设置圆角、边框和阴影
- iOS效果 :(1) CALayer 图层阴影,边框,圆角,圆型图片的阴影
- CALayer控件(通过操作这个CALayer对象,可以很方便地调整UIView的一些界面属性,比如:阴影、圆角大小、边框宽度和颜色等)