Android 3D旋转动画效果
2013-06-19 10:35
756 查看
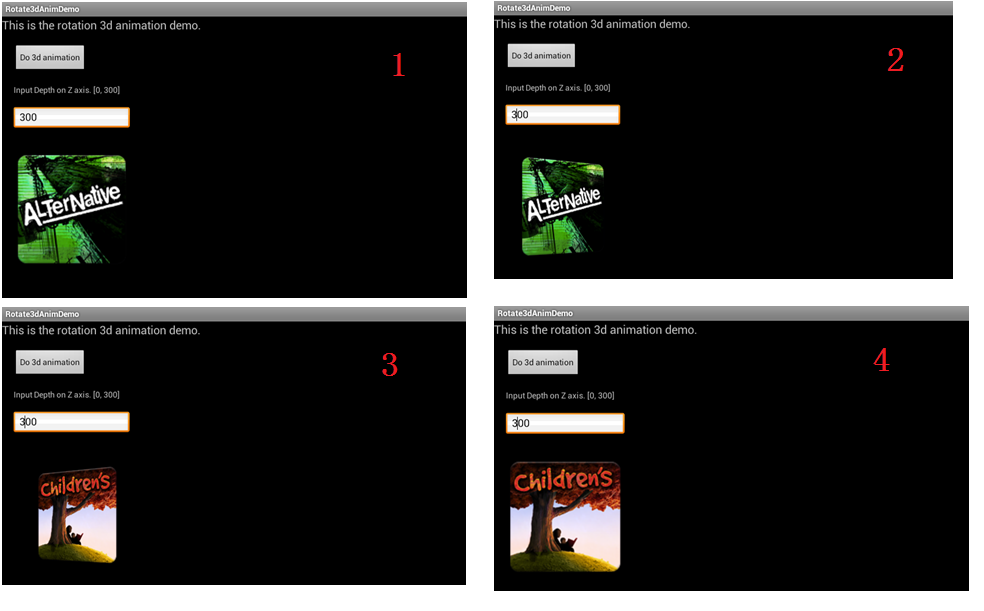
这篇文章主要介绍一下如何实现View的3D旋转效果,实现的主要原理就是围绕Y轴旋转,同时在Z轴方面上有一个深入的缩放。
演示的demo主要有以下几个重点:
1,自定义旋转动画
2,动画做完后,重置ImageView
先看一下程序的运行效果:
动画的listener实现如下:
动画做完后,执行的代码如下:
点击Button的事件处理实现:
applyRotation的实现如下:
各位,请想一想,为实现applyTransformation方法时,最后的为什么要有这两句话:
matrix.preTranslate(-centerX, -centerY);
matrix.postTranslate(centerX, centerY);
演示的demo主要有以下几个重点:
1,自定义旋转动画
2,动画做完后,重置ImageView
先看一下程序的运行效果:
1,自定义动画类
这里实现了一个Rotate3dAnimation的类,它扩展了Animation类,重写applyTransformation()方法,提供指定时间的矩阵变换,我们在这个方法里,就可以利用Camera类得得到一个围绕Y轴旋转的matrix,把这个matrix设置到Transformation对象中。 具体的实现代码如下:@Override
protected void applyTransformation(float interpolatedTime, Transformation t)
{
final float fromDegrees = mFromDegrees;
float degrees = fromDegrees + ((mToDegrees - fromDegrees) * interpolatedTime);
final float centerX = mCenterX;
final float centerY = mCenterY;
final Camera camera = mCamera;
final Matrix matrix = t.getMatrix();
camera.save();
if (mReverse) {
camera.translate(0.0f, 0.0f, mDepthZ * interpolatedTime);
} else {
camera.translate(0.0f, 0.0f, mDepthZ * (1.0f - interpolatedTime));
}
camera.rotateY(degrees);
camera.getMatrix(matrix);
camera.restore();
matrix.preTranslate(-centerX, -centerY);
matrix.postTranslate(centerX, centerY);
}2,如何使用这个动画类
在Activity中,我们有两个大小一样的ImageView,它们都放在FrameLayout中,这样他们位置是重叠的,对最上面的ImageView做动画(旋转角度从0到90),当动画做完后,再对后面的ImageView做动画(旋转角度从90到180),在这里,要控制相应的ImageView隐藏或显示。动画的listener实现如下:
private final class DisplayNextView implements Animation.AnimationListener {
public void onAnimationStart(Animation animation) {
}
public void onAnimationEnd(Animation animation) {
mContainer.post(new SwapViews());
}
public void onAnimationRepeat(Animation animation) {
}
}动画做完后,执行的代码如下:
private final class SwapViews implements Runnable
{
@Override
public void run()
{
mImageView1.setVisibility(View.GONE);
mImageView2.setVisibility(View.GONE);
mIndex++;
if (0 == mIndex % 2)
{
mStartAnimView = mImageView1;
}
else
{
mStartAnimView = mImageView2;
}
mStartAnimView.setVisibility(View.VISIBLE);
mStartAnimView.requestFocus();
Rotate3dAnimation rotation = new Rotate3dAnimation(
-90,
0,
mCenterX,
mCenterY, mDepthZ, false);
rotation.setDuration(mDuration);
rotation.setFillAfter(true);
rotation.setInterpolator(new DecelerateInterpolator());
mStartAnimView.startAnimation(rotation);
}
}点击Button的事件处理实现:
@Override
public void onClick(View v)
{
mCenterX = mContainer.getWidth() / 2;
mCenterY = mContainer.getHeight() / 2;
getDepthZ();
applyRotation(mStartAnimView, 0, 90);
}applyRotation的实现如下:
private void applyRotation(View animView, float startAngle, float toAngle)
{
float centerX = mCenterX;
float centerY = mCenterY;
Rotate3dAnimation rotation = new Rotate3dAnimation(
startAngle, toAngle, centerX, centerY, mDepthZ, true);
rotation.setDuration(mDuration);
rotation.setFillAfter(true);
rotation.setInterpolator(new AccelerateInterpolator());
rotation.setAnimationListener(new DisplayNextView());
animView.startAnimation(rotation);
}3,完整代码如下
Rotate3dAnimActivity.java
public class Rotate3dAnimActivity extends Activity
{
ImageView mImageView1 = null;
ImageView mImageView2 = null;
ImageView mStartAnimView = null;
View mContainer = null;
int mDuration = 500;
float mCenterX = 0.0f;
float mCenterY = 0.0f;
float mDepthZ = 0.0f;
int mIndex = 0;
@Override
public void onCreate(Bundle savedInstanceState)
{
super.onCreate(savedInstanceState);
setContentView(R.layout.rotate_anim);
mImageView1 = (ImageView) findViewById(R.id.imageView1);
mImageView2 = (ImageView) findViewById(R.id.imageView2);
mContainer = findViewById(R.id.container);
mStartAnimView = mImageView1;
findViewById(R.id.button1).setOnClickListener(new View.OnClickListener()
{
@Override
public void onClick(View v)
{
mCenterX = mContainer.getWidth() / 2;
mCenterY = mContainer.getHeight() / 2;
getDepthZ();
applyRotation(mStartAnimView, 0, 90);
}
});
InputMethodManager imm = (InputMethodManager)getSystemService(INPUT_METHOD_SERVICE);
imm.hideSoftInputFromWindow(getWindow().getDecorView().getWindowToken(), InputMethodManager.HIDE_NOT_ALWAYS);
}
private void getDepthZ()
{
EditText editText = (EditText) findViewById(R.id.edit_depthz);
String string = editText.getText().toString();
try
{
mDepthZ = (float)Integer.parseInt(string);
//mDepthZ = Math.min(mDepthZ, 300.0f);
}
catch (Exception e)
{
e.printStackTrace();
}
}
private void applyRotation(View animView, float startAngle, float toAngle) { float centerX = mCenterX; float centerY = mCenterY; Rotate3dAnimation rotation = new Rotate3dAnimation( startAngle, toAngle, centerX, centerY, mDepthZ, true); rotation.setDuration(mDuration); rotation.setFillAfter(true); rotation.setInterpolator(new AccelerateInterpolator()); rotation.setAnimationListener(new DisplayNextView()); animView.startAnimation(rotation); }
/**
* This class listens for the end of the first half of the animation.
* It then posts a new action that effectively swaps the views when the container
* is rotated 90 degrees and thus invisible.
*/
private final class DisplayNextView implements Animation.AnimationListener { public void onAnimationStart(Animation animation) { } public void onAnimationEnd(Animation animation) { mContainer.post(new SwapViews()); } public void onAnimationRepeat(Animation animation) { } }
private final class SwapViews implements Runnable { @Override public void run() { mImageView1.setVisibility(View.GONE); mImageView2.setVisibility(View.GONE); mIndex++; if (0 == mIndex % 2) { mStartAnimView = mImageView1; } else { mStartAnimView = mImageView2; } mStartAnimView.setVisibility(View.VISIBLE); mStartAnimView.requestFocus(); Rotate3dAnimation rotation = new Rotate3dAnimation( -90, 0, mCenterX, mCenterY, mDepthZ, false); rotation.setDuration(mDuration); rotation.setFillAfter(true); rotation.setInterpolator(new DecelerateInterpolator()); mStartAnimView.startAnimation(rotation); } }
}
rotate_anim.xml
<?xml version="1.0" encoding="utf-8"?> <LinearLayout xmlns:android="http://schemas.android.com/apk/res/android" android:layout_width="fill_parent" android:layout_height="fill_parent" android:orientation="vertical" > <Button android:id="@+id/button1" android:layout_width="wrap_content" android:layout_height="wrap_content" android:layout_margin="20dp" android:text="Do 3d animation" /> <TextView android:layout_width="wrap_content" android:layout_height="wrap_content" android:layout_marginLeft="20px" android:text="Input Depth on Z axis. [0, 300]" /> <EditText android:id="@+id/edit_depthz" android:layout_width="200dp" android:layout_height="wrap_content" android:layout_margin="20dp" android:text="0"/> <FrameLayout android:id="@+id/container" android:layout_width="wrap_content" android:layout_height="wrap_content"> <ImageView android:id="@+id/imageView1" android:layout_width="200dp" android:layout_height="200dp" android:layout_margin="20dp" android:src="@drawable/f" /> <ImageView android:id="@+id/imageView2" android:layout_width="200dp" android:layout_height="200dp" android:layout_margin="20dp" android:src="@drawable/s" android:visibility="gone"/> </FrameLayout> </LinearLayout>
Rotate3dAnimation.java
package com.nj1s.lib.anim;
import android.graphics.Camera;
import android.graphics.Matrix;
import android.view.animation.Animation;
import android.view.animation.Transformation;
/**
* An animation that rotates the view on the Y axis between two specified angles.
* This animation also adds a translation on the Z axis (depth) to improve the effect.
*/
public class Rotate3dAnimation extends Animation {
private final float mFromDegrees;
private final float mToDegrees;
private final float mCenterX;
private final float mCenterY;
private final float mDepthZ;
private final boolean mReverse;
private Camera mCamera;
/**
* Creates a new 3D rotation on the Y axis. The rotation is defined by its
* start angle and its end angle. Both angles are in degrees. The rotation
* is performed around a center point on the 2D space, definied by a pair
* of X and Y coordinates, called centerX and centerY. When the animation
* starts, a translation on the Z axis (depth) is performed. The length
* of the translation can be specified, as well as whether the translation
* should be reversed in time.
*
* @param fromDegrees the start angle of the 3D rotation
* @param toDegrees the end angle of the 3D rotation
* @param centerX the X center of the 3D rotation
* @param centerY the Y center of the 3D rotation
* @param reverse true if the translation should be reversed, false otherwise
*/
public Rotate3dAnimation(float fromDegrees, float toDegrees,
float centerX, float centerY, float depthZ, boolean reverse) {
mFromDegrees = fromDegrees;
mToDegrees = toDegrees;
mCenterX = centerX;
mCenterY = centerY;
mDepthZ = depthZ;
mReverse = reverse;
}
@Override
public void initialize(int width, int height, int parentWidth, int parentHeight) {
super.initialize(width, height, parentWidth, parentHeight);
mCamera = new Camera();
}
@Override
protected void applyTransformation(float interpolatedTime, Transformation t)
{
final float fromDegrees = mFromDegrees;
float degrees = fromDegrees + ((mToDegrees - fromDegrees) * interpolatedTime);

final float centerX = mCenterX;
final float centerY = mCenterY;
final Camera camera = mCamera;

final Matrix matrix = t.getMatrix();

camera.save();
if (mReverse) {
camera.translate(0.0f, 0.0f, mDepthZ * interpolatedTime);
} else {
camera.translate(0.0f, 0.0f, mDepthZ * (1.0f - interpolatedTime));
}
camera.rotateY(degrees);
camera.getMatrix(matrix);
camera.restore();

matrix.preTranslate(-centerX, -centerY);
matrix.postTranslate(centerX, centerY);
}
}各位,请想一想,为实现applyTransformation方法时,最后的为什么要有这两句话:
matrix.preTranslate(-centerX, -centerY);
matrix.postTranslate(centerX, centerY);

相关文章推荐
- android 实现3D动画旋转效果
- Android使用Rotate3dAnimation实现3D旋转动画效果的实例代码
- Android 3D旋转动画效果
- Android 3D旋转动画效果
- Android 3D旋转动画效果实现分解
- Android动画3D立体旋转,属性动画与View动画效果区别
- Android酷炫动画效果之3D星体旋转效果
- Android 3D旋转动画效果
- Android 3D旋转动画效果
- Android酷炫动画效果之3D星体旋转效果
- Android酷炫动画效果之3D星体旋转效果
- Android 3D旋转动画效果
- Android动画 —— 十几行代码的简单3D旋转动画
- AndroidUI 视图动画-旋转动画效果 (RotateAnimation)
- android 实现控件的旋转动画效果
- Android 滑动效果进阶篇(五)—— 3D旋转
- Android动画分析之3D翻转效果
- Android之ViewFlipper:平移、旋转、伸缩、翻页四种动画效果
- Android基础-简单的动画实现 *补间动画 *透明度渐变 *旋转动画 *位移动画 *如果需要几个效果整合到一起,需要将所有效果全部放到set里
- Android——ViewPager实现3D画廊效果(ViewPager的加载动画)