使用SVM进行非线性回归(Do non-linear regression with OpenCV's SVM tool)
2013-06-04 16:24
603 查看
OpenCV集成的东西越来越多了,不用费劲去配置很多环境,这点还是挺方便的,原来一直用SVM进行分类,最近了研究一下使用SVM进行回归,发现还是很好用的。
下面就用OpenCV的SVM工具对Sinc函数的样本进行回归,代码比较简单,效果还不错。
本文为原创,转载请注明,本文地址:http://blog.csdn.net/houston11235/article/details/9023229。
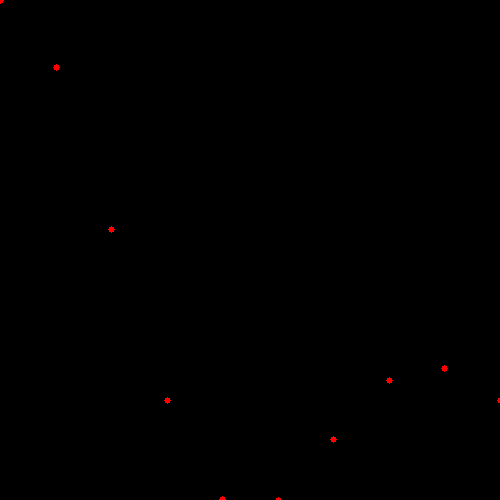
从Sinc函数获得的样本点如下图所示,这是没有噪声时候的情形(Data without noise)
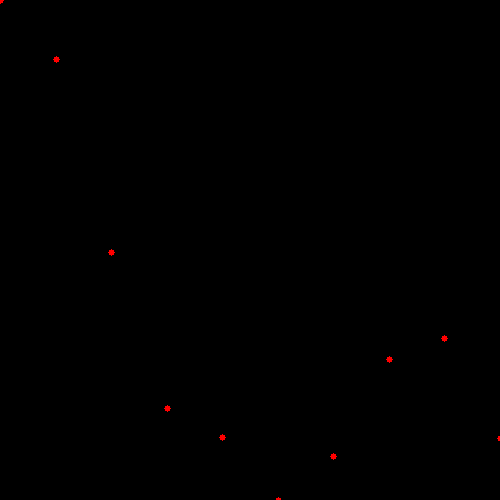
加入噪声之后的样本如下图(Add noise to data)
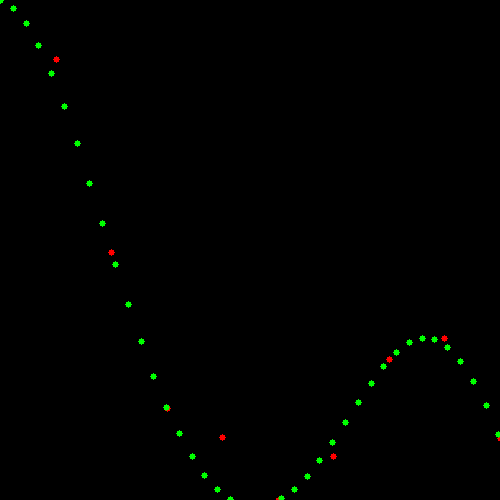
使用SVM进行回归之后的结果如下图(Result)
最后附上源代码,其中的参数设置参考了以下链接:http://dlib.net/svr_ex.cpp.html
// draw some samples from sinc function and do a non-linear regression
#include <opencv2/opencv.hpp>
#include <iostream>
using namespace std;
using namespace cv;
// the sinc function
float sinc(float x)
{
return static_cast<float>( x==0 ? 1.0 : sin(x) / x );
}
int main(int argc, char* argv[])
{
RNG rng;
int ndata = 10;
Mat traindata(ndata, 1, CV_32FC1); // train data
Mat label(ndata, 1, CV_32FC1); // train response
for (int i = 0; i < ndata; ++i)
{
traindata.at<float>(i, 0) = static_cast<float>(i);
float noise = static_cast<float>(rng.gaussian(0.1));
//noise = 0.0; // uncomment to eliminate the noise
label.at<float>(i, 0) = static_cast<float>(sinc(i) + noise);
}
// show the train data
int width = 500;
int height = 500;
Mat canvas(height, width, CV_8UC3, Scalar(0,0,0));
double minV;
double maxV;
Point minId;
Point maxId;
minMaxLoc(traindata, &minV, &maxV, &minId, &maxId);
float X_shift = static_cast<float>(minV);
float X_ratio = static_cast<float>(width) / static_cast<float>(maxV - minV);
minMaxLoc(label, &minV, &maxV, &minId, &maxId);
float Y_shift = static_cast<float>(minV);
float Y_ratio = static_cast<float>(height) / static_cast<float>(maxV - minV);
for (int idx = 0; idx < traindata.rows; ++idx)
{
float x = (traindata.at<float>(idx, 0) - X_shift) * X_ratio;
float y = static_cast<float>(height) - (label.at<float>(idx, 0) - Y_shift) * Y_ratio;
circle(canvas, Point2f(x, y), 3, Scalar(0,0,255), -1);
}
imshow("train", canvas);
//imwrite("train_noise.png", canvas);
CvSVMParams param;
param.svm_type = CvSVM::EPS_SVR;
param.kernel_type = CvSVM::RBF;
param.C = 5;
param.p = 1e-3;
param.gamma = 0.1;
CvSVM regresser;
regresser.train(traindata, label, Mat(), Mat(), param);
// predict the responses of the samples and show them
for (float i = 0; i < 10; i+=0.23f)
{
Mat sample(1,1, CV_32FC1);
sample.at<float>(0, 0) = static_cast<float>(i);
float response = regresser.predict(sample);
//cout<<response<<endl;
float x = (sample.at<float>(0, 0) - X_shift) * X_ratio;
float y = static_cast<float>(height) - (response - Y_shift) * Y_ratio;
circle(canvas, Point2f(x, y), 3, Scalar(0,255,0), -1);
}
imshow("predict", canvas);
//imwrite("regress.png", canvas);
waitKey(0);
return 0;
}
下面就用OpenCV的SVM工具对Sinc函数的样本进行回归,代码比较简单,效果还不错。
本文为原创,转载请注明,本文地址:http://blog.csdn.net/houston11235/article/details/9023229。
从Sinc函数获得的样本点如下图所示,这是没有噪声时候的情形(Data without noise)
加入噪声之后的样本如下图(Add noise to data)
使用SVM进行回归之后的结果如下图(Result)
最后附上源代码,其中的参数设置参考了以下链接:http://dlib.net/svr_ex.cpp.html
// draw some samples from sinc function and do a non-linear regression
#include <opencv2/opencv.hpp>
#include <iostream>
using namespace std;
using namespace cv;
// the sinc function
float sinc(float x)
{
return static_cast<float>( x==0 ? 1.0 : sin(x) / x );
}
int main(int argc, char* argv[])
{
RNG rng;
int ndata = 10;
Mat traindata(ndata, 1, CV_32FC1); // train data
Mat label(ndata, 1, CV_32FC1); // train response
for (int i = 0; i < ndata; ++i)
{
traindata.at<float>(i, 0) = static_cast<float>(i);
float noise = static_cast<float>(rng.gaussian(0.1));
//noise = 0.0; // uncomment to eliminate the noise
label.at<float>(i, 0) = static_cast<float>(sinc(i) + noise);
}
// show the train data
int width = 500;
int height = 500;
Mat canvas(height, width, CV_8UC3, Scalar(0,0,0));
double minV;
double maxV;
Point minId;
Point maxId;
minMaxLoc(traindata, &minV, &maxV, &minId, &maxId);
float X_shift = static_cast<float>(minV);
float X_ratio = static_cast<float>(width) / static_cast<float>(maxV - minV);
minMaxLoc(label, &minV, &maxV, &minId, &maxId);
float Y_shift = static_cast<float>(minV);
float Y_ratio = static_cast<float>(height) / static_cast<float>(maxV - minV);
for (int idx = 0; idx < traindata.rows; ++idx)
{
float x = (traindata.at<float>(idx, 0) - X_shift) * X_ratio;
float y = static_cast<float>(height) - (label.at<float>(idx, 0) - Y_shift) * Y_ratio;
circle(canvas, Point2f(x, y), 3, Scalar(0,0,255), -1);
}
imshow("train", canvas);
//imwrite("train_noise.png", canvas);
CvSVMParams param;
param.svm_type = CvSVM::EPS_SVR;
param.kernel_type = CvSVM::RBF;
param.C = 5;
param.p = 1e-3;
param.gamma = 0.1;
CvSVM regresser;
regresser.train(traindata, label, Mat(), Mat(), param);
// predict the responses of the samples and show them
for (float i = 0; i < 10; i+=0.23f)
{
Mat sample(1,1, CV_32FC1);
sample.at<float>(0, 0) = static_cast<float>(i);
float response = regresser.predict(sample);
//cout<<response<<endl;
float x = (sample.at<float>(0, 0) - X_shift) * X_ratio;
float y = static_cast<float>(height) - (response - Y_shift) * Y_ratio;
circle(canvas, Point2f(x, y), 3, Scalar(0,255,0), -1);
}
imshow("predict", canvas);
//imwrite("regress.png", canvas);
waitKey(0);
return 0;
}

相关文章推荐
- 整理《Mastering OpenCV with Practical Computer Vision Projects》中第5章用SVM和神经网络进行车牌识别操作流程
- 整理《Mastering OpenCV with Practical Computer Vision Projects》中第5章用SVM和神经网络进行车牌识别操作流程
- opencv下使用SVM进行简单颜色分类
- 利用SVM支持向量机对彩色图像进行分割并使用OpenCV进行实现
- 使用OpenCV+PCA+KNN/SVM进行人脸检测和识别-Python
- 使用OpenCV读、操作、写图像并与bash合作对某个目录下所有图像进行类似处理
- 机器学习:多变量线性回归(Linear Regression with Multiple Variables)
- opencv knn,svm,ann,人脸识别类的使用总结
- 使用OpenCV进行图片模糊处理(高斯滤波器)
- 使用Microsoft Web Application Stress Tool对web进行压力测试
- 使用SignTool对软件安装包进行数字签名(二)--进行数字签名
- 机器学习 Machine Learning(by Andrew Ng)----第二章 单变量线性回归(Linear Regression with One Variable)
- OpenCV使用迭代器对像素进行快速操作
- 使用opencv的SVM实现车牌区域识别
- 【成长笔记】Linear Regression with Multiple Variables
- Stanford机器学习 -- Linear Regression with one variable
- C#中使用OpenCV等库进行图像处理
- 计算机视觉 | Python OpenCV 3 使用背景减除进行目标检测
- 使用Microsoft Web Application Stress Tool对web进行压力测试
- 使用判别训练的部件模型进行目标检测 Object Detection with Discriminatively Trained Part Based Models