在SpringSide 3 中使用多个数据库的方法
2013-06-04 00:40
253 查看
在SpringSide 3社区中,不断有人提出多数据源配置的问题,但是时至今日却一直没有一个完美的答案。经过一个星期的折腾,我总算搞清楚了在SpringSide 3中配置多数据源的各种困难并加以解决,在这里,特地把我配置SpringSide 3项目中多数据源的过程写出来,与大家分享。
我使用的SpringSide的版本是江南白衣最新发布的3.1.4翻墙版,在上一篇博文中,记录了我折腾的全过程,感兴趣的朋友可以看看:
http://www.blogjava.net/youxia/archive/2009/07/12/286454.html
下面进入正题:
结论:在基于SpringSide 3的项目中,如果要使用多个数据库,首先要配置多个数据源,然后配置多个SessionFactory,这本身没有问题,但是一涉及到事务,问题就来了,在多数据源的环境下,必须使用JTATransactionManager,而使用JTATransactionManager,就必须得有提供JTA功能的应用服务器或提供JTA功能的别的什么组件。
以上结论绝对正确,是属于SpringSide 3中关于使用多个数据库的最权威解答,下面来看具体过程:
方法一、使用GlassFish应用服务器
1、准备GlassFish服务器,下载地址为http://download.java.net/glassfish/v3/promoted/,我选择的是08-Jul-2009
17:20发布的大小为72M的latest-glassfish.zip,这里需要强调的一点是千万不要选择latest-glassfish-windows.exe这个版本,因为这个版本在Windows环境中只安装GlassFish而不提供合理的初始化配置,对于新手来说使用门槛太高,而ZIP版一解压缩就可以使用,其服务器是配置好了的;
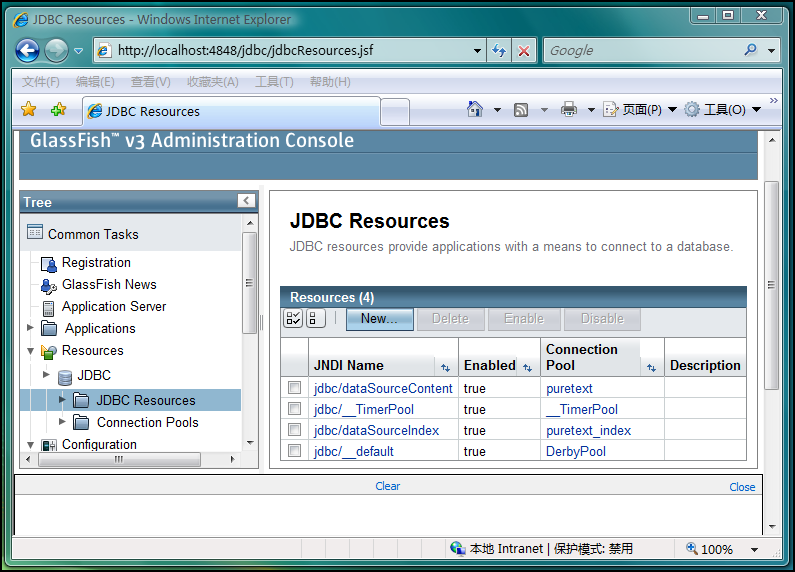
2、在GlassFish中配置多个数据源,启动GlassFish后,访问4848端口就可以进入到GlassFish的管理界面,在其中配置两个数据源,其资源名称分别为jdbc/dataSourceContent和jdbc/dataSourceIndex,如下图:
3、在项目中配置多个DataSource和多个SessionFactory,并选择JTATransactionManager作为事务管理器,这里的DataSource是使用JNDI查找从应用服务器中获得的。下面是我项目中的applicationContext.xml文件:

<?xml version="1.0" encoding="UTF-8"?>
<beans xmlns="http://www.springframework.org/schema/beans" xmlns:xsi="http://www.w3.org/2001/XMLSchema-instance"
xmlns:jee="http://www.springframework.org/schema/jee" xmlns:tx="http://www.springframework.org/schema/tx"
xmlns:context="http://www.springframework.org/schema/context"
xsi:schemaLocation="http://www.springframework.org/schema/beans http://www.springframework.org/schema/beans/spring-beans-2.5.xsd http://www.springframework.org/schema/tx http://www.springframework.org/schema/tx/spring-tx-2.5.xsd http://www.springframework.org/schema/jee http://www.springframework.org/schema/jee/spring-jee-2.5.xsd http://www.springframework.org/schema/context http://www.springframework.org/schema/context/spring-context-2.5.xsd"
default-lazy-init="true">
<description>Spring公共配置文件 </description>
<!-- 定义受环境影响易变的变量 -->
<bean class="org.springframework.beans.factory.config.PropertyPlaceholderConfigurer">
<property name="systemPropertiesModeName" value="SYSTEM_PROPERTIES_MODE_OVERRIDE" />
<property name="ignoreResourceNotFound" value="true" />
<property name="locations">
<list>
<!-- 标准配置 -->
<value>classpath*:/application.properties</value>
</list>
</property>
</bean>
<!-- 使用annotation 自动注册bean,并保证@Required,@Autowired的属性被注入 -->
<context:component-scan base-package="cn.puretext" />
<!-- 数据源配置,使用应用服务器的数据库连接池 -->
<jee:jndi-lookup id="dataSourceContent" jndi-name="jdbc/dataSourceContent" />
<jee:jndi-lookup id="dataSourceIndex" jndi-name="jdbc/dataSourceIndex" />
<!-- Hibernate配置 -->
<bean id="sessionFactoryContent" class="org.springframework.orm.hibernate3.annotation.AnnotationSessionFactoryBean">
<property name="dataSource" ref="dataSourceContent" />
<property name="namingStrategy">
<bean class="org.hibernate.cfg.ImprovedNamingStrategy" />
</property>
<property name="hibernateProperties">
<props>
<prop key="hibernate.dialect">org.hibernate.dialect.MySQL5InnoDBDialect</prop>
<prop key="hibernate.show_sql">${hibernate.show_sql}</prop>
<prop key="hibernate.format_sql">${hibernate.format_sql}</prop>
<prop key="hibernate.cache.provider_class">org.hibernate.cache.EhCacheProvider
</prop>
<prop key="hibernate.cache.provider_configuration_file_resource_path">${hibernate.ehcache_config_file}</prop>
</props>
</property>
<property name="packagesToScan" value="cn.puretext.entity.*" />
</bean>
<bean id="sessionFactoryIndex" class="org.springframework.orm.hibernate3.annotation.AnnotationSessionFactoryBean">
<property name="dataSource" ref="dataSourceIndex" />
<property name="namingStrategy">
<bean class="org.hibernate.cfg.ImprovedNamingStrategy" />
</property>
<property name="hibernateProperties">
<props>
<prop key="hibernate.dialect">org.hibernate.dialect.MySQL5InnoDBDialect</prop>
<prop key="hibernate.show_sql">${hibernate.show_sql}</prop>
<prop key="hibernate.format_sql">${hibernate.format_sql}</prop>
<prop key="hibernate.cache.provider_class">org.hibernate.cache.EhCacheProvider
</prop>
<prop key="hibernate.cache.provider_configuration_file_resource_path">${hibernate.ehcache_config_file}</prop>
</props>
</property>
<property name="packagesToScan" value="cn.puretext.entity.*" />
</bean>
<!-- 事务管理器配置,多数据源JTA事务-->
<bean id="transactionManager" class="org.springframework.transaction.jta.JtaTransactionManager" />
<!-- 使用annotation定义事务 -->
<tx:annotation-driven transaction-manager="transactionManager" />
</beans>
4、由于配置了多个SessionFactory,所以需要在web.xml中配置两个OpenSessionInViewFilter,下面是我的web.xml文件:
<?xml version="1.0" encoding="UTF-8"?>
<web-app version="2.4" xmlns="http://java.sun.com/xml/ns/j2ee" xmlns:xsi="http://www.w3.org/2001/XMLSchema-instance"
xsi:schemaLocation="http://java.sun.com/xml/ns/j2ee http://java.sun.com/xml/ns/j2ee/web-app_2_4.xsd">
<display-name>PureText</display-name>
<!-- Spring ApplicationContext配置文件的路径,可使用通配符,多个路径用,号分隔
此参数用于后面的Spring Context Loader -->
<context-param>
<param-name>contextConfigLocation</param-name>
<param-value>classpath*:/applicationContext*.xml</param-value>
</context-param>
<!-- Character Encoding filter -->
<filter>
<filter-name>encodingFilter</filter-name>
<filter-class>org.springframework.web.filter.CharacterEncodingFilter</filter-class>
<init-param>
<param-name>encoding</param-name>
<param-value>UTF-8</param-value>
</init-param>
<init-param>
<param-name>forceEncoding</param-name>
<param-value>true</param-value>
</init-param>
</filter>
<filter>
<filter-name>hibernateOpenSessionInViewFilterContent</filter-name>
<filter-class>org.springside.modules.orm.hibernate.OpenSessionInViewFilter</filter-class>
<init-param>
<param-name>excludeSuffixs</param-name>
<param-value>js,css,jpg,gif</param-value>
</init-param>
<init-param>
<param-name>sessionFactoryBeanName</param-name>
<param-value>sessionFactoryContent</param-value>
</init-param>
</filter>
<filter>
<filter-name>hibernateOpenSessionInViewFilterIndex</filter-name>
<filter-class>org.springside.modules.orm.hibernate.OpenSessionInViewFilter</filter-class>
<init-param>
<param-name>excludeSuffixs</param-name>
<param-value>js,css,jpg,gif</param-value>
</init-param>
<init-param>
<param-name>sessionFactoryBeanName</param-name>
<param-value>sessionFactoryIndex</param-value>
</init-param>
</filter>
<!-- SpringSecurity filter-->
<filter>
<filter-name>springSecurityFilterChain</filter-name>
<filter-class>org.springframework.web.filter.DelegatingFilterProxy</filter-class>
</filter>
<!-- Struts2 filter -->
<filter>
<filter-name>struts2Filter</filter-name>
<filter-class>org.apache.struts2.dispatcher.ng.filter.StrutsPrepareAndExecuteFilter</filter-class>
</filter>
<filter-mapping>
<filter-name>encodingFilter</filter-name>
<url-pattern>/*</url-pattern>
</filter-mapping>
<filter-mapping>
<filter-name>springSecurityFilterChain</filter-name>
<url-pattern>/*</url-pattern>
</filter-mapping>
<filter-mapping>
<filter-name>hibernateOpenSessionInViewFilterContent</filter-name>
<url-pattern>/*</url-pattern>
</filter-mapping>
<filter-mapping>
<filter-name>hibernateOpenSessionInViewFilterIndex</filter-name>
<url-pattern>/*</url-pattern>
</filter-mapping>
<filter-mapping>
<filter-name>struts2Filter</filter-name>
<url-pattern>/*</url-pattern>
</filter-mapping>
<!--Spring的ApplicationContext 载入 -->
<listener>
<listener-class>org.springframework.web.context.ContextLoaderListener</listener-class>
</listener>
<!-- Spring 刷新Introspector防止内存泄露 -->
<listener>
<listener-class>org.springframework.web.util.IntrospectorCleanupListener</listener-class>
</listener>
<!-- session超时定义,单位为分钟 -->
<session-config>
<session-timeout>20</session-timeout>
</session-config>
<!-- 出错页面定义 -->
<error-page>
<exception-type>java.lang.Throwable</exception-type>
<location>/common/500.jsp</location>
</error-page>
<error-page>
<error-code>500</error-code>
<location>/common/500.jsp</location>
</error-page>
<error-page>
<error-code>404</error-code>
<location>/common/404.jsp</location>
</error-page>
<error-page>
<error-code>403</error-code>
<location>/common/403.jsp</location>
</error-page>
</web-app>
5、由于项目中有多个SessionFactory,所以编写Dao层的时候需要使用@Resource注解来明确指定使用哪一个SessionFactory,如下面代码所示,ArticleDao使用sessionFactoryContent,而ArticleIndexDao使用sessionFactoryIndex:
package cn.puretext.dao;
import javax.annotation.Resource;
import org.hibernate.SessionFactory;
import org.springframework.stereotype.Repository;
import org.springside.modules.orm.hibernate.HibernateDao;
import cn.puretext.entity.web.Article;
@Repository
public class ArticleDao extends HibernateDao<Article, Long> {
@Override
@Resource(name = "sessionFactoryContent")
public void setSessionFactory(SessionFactory sessionFactory) {
// TODO Auto-generated method stub
super.setSessionFactory(sessionFactory);
}
}
package cn.puretext.dao;
import javax.annotation.Resource;
import org.hibernate.SessionFactory;
import org.springframework.stereotype.Repository;
import org.springside.modules.orm.hibernate.HibernateDao;
import cn.puretext.entity.web.ArticleIndex;
@Repository
public class ArticleIndexDao extends HibernateDao<ArticleIndex, Long> {
@Override
@Resource(name = "sessionFactoryIndex")
public void setSessionFactory(SessionFactory sessionFactory) {
// TODO Auto-generated method stub
super.setSessionFactory(sessionFactory);
}
}
6、在GlassFish中部署项目,部署项目的时候依然使用前面提到的GlassFish的管理界面,这里不赘述。
经过以上六步,就可以成功的在基于SpringSide 3的项目中使用多个数据库。如果你确实很不相使用GlassFish,而对Tomcat情有独钟的话,就要使用我前面提到的“提供JTA功能的其它组件”了。在这里,我推荐使用Atomikos,这是一个很优秀的JTA实现,它的官方网站为www.atomikos.com,它提供开源版和商业版,下面是从其官方网站上截取的图片:

很烦人的是,该网站不直接提供下载地址,如果要下载,就必须先填写姓名邮箱和电话,如果大家不想填写这些信息,可以直接进入这个网址下载http://www.atomikos.com/Main/InstallingTransactionsEssentials,我选择的是3.5.5版。
方法二、使用Tomcat服务器和Atomikos
1、将Atomikos整合到Tomcat服务器中,其步骤可以参考Atomikos的文档,如下:
http://www.atomikos.com/Documentation/Tomcat6Integration33
2、在Tomcat中配置JNDI数据源,方法是修改Tomcat的content.xml文件,在文件中加入如下两个<Resource/>和一个<Transaction/>:
<Transaction factory="com.atomikos.icatch.jta.UserTransactionFactory" />
<Resource name="jdbc/dataSourceContent" auth="Container"
type="com.atomikos.jdbc.AtomikosDataSourceBean" factory="com.atomikos.tomcat.BeanFactory"
uniqueResourceName="jdbc/myDB" xaDataSourceClassName="com.mysql.jdbc.jdbc2.optional.MysqlXADataSource"
xaProperties.databaseName="puretext" xaProperties.serverName="localhost"
xaProperties.port="3306" xaProperties.user="USER"
xaProperties.password="PASSWORD" xaProperties.url="jdbc:mysql://localhost:3306/puretext" />
<Resource name="jdbc/dataSourceIndex" auth="Container"
type="com.atomikos.jdbc.AtomikosDataSourceBean" factory="com.atomikos.tomcat.BeanFactory"
uniqueResourceName="jdbc/myDB" xaDataSourceClassName="com.mysql.jdbc.jdbc2.optional.MysqlXADataSource"
xaProperties.databaseName="puretext_index" xaProperties.serverName="localhost"
xaProperties.port="3306" xaProperties.user="USER"
xaProperties.password="PASSWORD" xaProperties.url="jdbc:mysql://localhost:3306/puretext_index" />
剩下的四步就和使用GlassFish的第3、4、5、6步一模一样了,这里不赘述。
以上Atomikos和Tomcat的整合方案有时候或多或少出现一点问题,这些问题基本上都和JNDI有关,我想可能是Tomcat实现的JNDI配置有问题。如果出现这样的问题无法解决的话,还有第三种方案,那就是直接在Spring的配置文件中配置Atomikos的JTA相关组件。
方法三、直接在Spring的配置文件中配置Atomikos的JTA相关组件
1、将下载的Atomikos中的jta.properties拷贝到项目的classpath中,将Atomikos的相关jar文件拷贝到项目的classpath中。
2、在项目的applicationContext.xml文件中配置JTA的相关组件,配置文件如下:
<?xml version="1.0" encoding="UTF-8"?>
<beans xmlns="http://www.springframework.org/schema/beans" xmlns:xsi="http://www.w3.org/2001/XMLSchema-instance"
xmlns:jee="http://www.springframework.org/schema/jee" xmlns:tx="http://www.springframework.org/schema/tx"
xmlns:context="http://www.springframework.org/schema/context"
xsi:schemaLocation="http://www.springframework.org/schema/beans http://www.springframework.org/schema/beans/spring-beans-2.5.xsd http://www.springframework.org/schema/tx http://www.springframework.org/schema/tx/spring-tx-2.5.xsd http://www.springframework.org/schema/jee http://www.springframework.org/schema/jee/spring-jee-2.5.xsd http://www.springframework.org/schema/context http://www.springframework.org/schema/context/spring-context-2.5.xsd"
default-lazy-init="true">
<description>Spring公共配置文件 </description>
<!-- 定义受环境影响易变的变量 -->
<bean class="org.springframework.beans.factory.config.PropertyPlaceholderConfigurer">
<property name="systemPropertiesModeName" value="SYSTEM_PROPERTIES_MODE_OVERRIDE" />
<property name="ignoreResourceNotFound" value="true" />
<property name="locations">
<list>
<!-- 标准配置 -->
<value>classpath*:/application.properties</value>
</list>
</property>
</bean>
<!-- 使用annotation 自动注册bean,并保证@Required,@Autowired的属性被注入 -->
<context:component-scan base-package="cn.puretext" />
<bean id="dataSourceContent" class="com.atomikos.jdbc.AtomikosDataSourceBean" init-method="init" destroy-method="close">
<property name="uniqueResourceName">
<value>jdbc/dataSourceContent</value>
</property>
<property name="xaDataSourceClassName">
<value>com.mysql.jdbc.jdbc2.optional.MysqlXADataSource</value>
</property>
<property name="xaProperties">
<props>
<prop key="serverName">localhost</prop>
<prop key="portNumber">3306</prop>
<prop key="databaseName">puretext</prop>
<prop key="user">***</prop>
<prop key="password">***</prop>
</props>
</property>
<property name="poolSize">
<value>3</value>
</property>
</bean>
<bean id="dataSourceIndex" class="com.atomikos.jdbc.AtomikosDataSourceBean" init-method="init" destroy-method="close">
<property name="uniqueResourceName">
<value>jdbc/dataSourceIndex</value>
</property>
<property name="xaDataSourceClassName">
<value>com.mysql.jdbc.jdbc2.optional.MysqlXADataSource</value>
</property>
<property name="xaProperties">
<props>
<prop key="serverName">localhost</prop>
<prop key="portNumber">3306</prop>
<prop key="databaseName">puretext_index</prop>
<prop key="user">***</prop>
<prop key="password">***</prop>
</props>
</property>
<property name="poolSize">
<value>3</value>
</property>
</bean>
<!-- Hibernate配置 -->
<bean id="sessionFactoryContent" class="org.springframework.orm.hibernate3.annotation.AnnotationSessionFactoryBean">
<property name="dataSource" ref="dataSourceContent" />
<property name="namingStrategy">
<bean class="org.hibernate.cfg.ImprovedNamingStrategy" />
</property>
<property name="hibernateProperties">
<props>
<prop key="hibernate.dialect">org.hibernate.dialect.MySQL5InnoDBDialect</prop>
<prop key="hibernate.show_sql">${hibernate.show_sql}</prop>
<prop key="hibernate.format_sql">${hibernate.format_sql}</prop>
<prop key="hibernate.cache.provider_class">org.hibernate.cache.EhCacheProvider
</prop>
<prop key="hibernate.cache.provider_configuration_file_resource_path">${hibernate.ehcache_config_file}</prop>
</props>
</property>
<property name="packagesToScan" value="cn.puretext.entity.*" />
</bean>
<bean id="sessionFactoryIndex" class="org.springframework.orm.hibernate3.annotation.AnnotationSessionFactoryBean">
<property name="dataSource" ref="dataSourceIndex" />
<property name="namingStrategy">
<bean class="org.hibernate.cfg.ImprovedNamingStrategy" />
</property>
<property name="hibernateProperties">
<props>
<prop key="hibernate.dialect">org.hibernate.dialect.MySQL5InnoDBDialect</prop>
<prop key="hibernate.show_sql">${hibernate.show_sql}</prop>
<prop key="hibernate.format_sql">${hibernate.format_sql}</prop>
<prop key="hibernate.cache.provider_class">org.hibernate.cache.EhCacheProvider
</prop>
<prop key="hibernate.cache.provider_configuration_file_resource_path">${hibernate.ehcache_config_file}</prop>
</props>
</property>
<property name="packagesToScan" value="cn.puretext.entity.*" />
</bean>
<!-- 事务管理器配置,多数据源JTA事务-->
<bean id="atomikosTransactionManager" class="com.atomikos.icatch.jta.UserTransactionManager" init-method="init" destroy-method="close">
<property name="forceShutdown"><value>true</value></property>
</bean>
<bean id="atomikosUserTransaction" class="com.atomikos.icatch.jta.UserTransactionImp">
<property name="transactionTimeout" value="300"/>
</bean>
<bean id="transactionManager" class="org.springframework.transaction.jta.JtaTransactionManager">
<property name="transactionManager" ref="atomikosTransactionManager" />
<property name="userTransaction" ref="atomikosUserTransaction"/>
</bean>
<!-- 使用annotation定义事务 -->
<tx:annotation-driven transaction-manager="transactionManager" />
</beans>
3、在web.xml中配置多个OpenSessionInViewFilter,其配置方法同前。
4、在Dao类中使用@Resource指定使用哪一个sessionFactory。
5、运行项目,成功。
在以上的三个方法中,我强烈推荐第三种,因为该方法只需要将Atomikos的相关文件拷贝到项目的classpath中,并在applicationContext.xml文件中完成配置即可,不需要修改应用服务器的任何文件,是非侵入性的,是最轻量级的,同时,也是配置起来最容易成功的,在我的测试过程中基本上是一次成功,没有报错。
好了,就写到这里了,希望SpringSide的fans们少走弯路,天天开心。
我使用的SpringSide的版本是江南白衣最新发布的3.1.4翻墙版,在上一篇博文中,记录了我折腾的全过程,感兴趣的朋友可以看看:
http://www.blogjava.net/youxia/archive/2009/07/12/286454.html
下面进入正题:
结论:在基于SpringSide 3的项目中,如果要使用多个数据库,首先要配置多个数据源,然后配置多个SessionFactory,这本身没有问题,但是一涉及到事务,问题就来了,在多数据源的环境下,必须使用JTATransactionManager,而使用JTATransactionManager,就必须得有提供JTA功能的应用服务器或提供JTA功能的别的什么组件。
以上结论绝对正确,是属于SpringSide 3中关于使用多个数据库的最权威解答,下面来看具体过程:
方法一、使用GlassFish应用服务器
1、准备GlassFish服务器,下载地址为http://download.java.net/glassfish/v3/promoted/,我选择的是08-Jul-2009
17:20发布的大小为72M的latest-glassfish.zip,这里需要强调的一点是千万不要选择latest-glassfish-windows.exe这个版本,因为这个版本在Windows环境中只安装GlassFish而不提供合理的初始化配置,对于新手来说使用门槛太高,而ZIP版一解压缩就可以使用,其服务器是配置好了的;
2、在GlassFish中配置多个数据源,启动GlassFish后,访问4848端口就可以进入到GlassFish的管理界面,在其中配置两个数据源,其资源名称分别为jdbc/dataSourceContent和jdbc/dataSourceIndex,如下图:
3、在项目中配置多个DataSource和多个SessionFactory,并选择JTATransactionManager作为事务管理器,这里的DataSource是使用JNDI查找从应用服务器中获得的。下面是我项目中的applicationContext.xml文件:
<?xml version="1.0" encoding="UTF-8"?>
<beans xmlns="http://www.springframework.org/schema/beans" xmlns:xsi="http://www.w3.org/2001/XMLSchema-instance"
xmlns:jee="http://www.springframework.org/schema/jee" xmlns:tx="http://www.springframework.org/schema/tx"
xmlns:context="http://www.springframework.org/schema/context"
xsi:schemaLocation="http://www.springframework.org/schema/beans http://www.springframework.org/schema/beans/spring-beans-2.5.xsd http://www.springframework.org/schema/tx http://www.springframework.org/schema/tx/spring-tx-2.5.xsd http://www.springframework.org/schema/jee http://www.springframework.org/schema/jee/spring-jee-2.5.xsd http://www.springframework.org/schema/context http://www.springframework.org/schema/context/spring-context-2.5.xsd"
default-lazy-init="true">
<description>Spring公共配置文件 </description>
<!-- 定义受环境影响易变的变量 -->
<bean class="org.springframework.beans.factory.config.PropertyPlaceholderConfigurer">
<property name="systemPropertiesModeName" value="SYSTEM_PROPERTIES_MODE_OVERRIDE" />
<property name="ignoreResourceNotFound" value="true" />
<property name="locations">
<list>
<!-- 标准配置 -->
<value>classpath*:/application.properties</value>
</list>
</property>
</bean>
<!-- 使用annotation 自动注册bean,并保证@Required,@Autowired的属性被注入 -->
<context:component-scan base-package="cn.puretext" />
<!-- 数据源配置,使用应用服务器的数据库连接池 -->
<jee:jndi-lookup id="dataSourceContent" jndi-name="jdbc/dataSourceContent" />
<jee:jndi-lookup id="dataSourceIndex" jndi-name="jdbc/dataSourceIndex" />
<!-- Hibernate配置 -->
<bean id="sessionFactoryContent" class="org.springframework.orm.hibernate3.annotation.AnnotationSessionFactoryBean">
<property name="dataSource" ref="dataSourceContent" />
<property name="namingStrategy">
<bean class="org.hibernate.cfg.ImprovedNamingStrategy" />
</property>
<property name="hibernateProperties">
<props>
<prop key="hibernate.dialect">org.hibernate.dialect.MySQL5InnoDBDialect</prop>
<prop key="hibernate.show_sql">${hibernate.show_sql}</prop>
<prop key="hibernate.format_sql">${hibernate.format_sql}</prop>
<prop key="hibernate.cache.provider_class">org.hibernate.cache.EhCacheProvider
</prop>
<prop key="hibernate.cache.provider_configuration_file_resource_path">${hibernate.ehcache_config_file}</prop>
</props>
</property>
<property name="packagesToScan" value="cn.puretext.entity.*" />
</bean>
<bean id="sessionFactoryIndex" class="org.springframework.orm.hibernate3.annotation.AnnotationSessionFactoryBean">
<property name="dataSource" ref="dataSourceIndex" />
<property name="namingStrategy">
<bean class="org.hibernate.cfg.ImprovedNamingStrategy" />
</property>
<property name="hibernateProperties">
<props>
<prop key="hibernate.dialect">org.hibernate.dialect.MySQL5InnoDBDialect</prop>
<prop key="hibernate.show_sql">${hibernate.show_sql}</prop>
<prop key="hibernate.format_sql">${hibernate.format_sql}</prop>
<prop key="hibernate.cache.provider_class">org.hibernate.cache.EhCacheProvider
</prop>
<prop key="hibernate.cache.provider_configuration_file_resource_path">${hibernate.ehcache_config_file}</prop>
</props>
</property>
<property name="packagesToScan" value="cn.puretext.entity.*" />
</bean>
<!-- 事务管理器配置,多数据源JTA事务-->
<bean id="transactionManager" class="org.springframework.transaction.jta.JtaTransactionManager" />
<!-- 使用annotation定义事务 -->
<tx:annotation-driven transaction-manager="transactionManager" />
</beans>
4、由于配置了多个SessionFactory,所以需要在web.xml中配置两个OpenSessionInViewFilter,下面是我的web.xml文件:
<?xml version="1.0" encoding="UTF-8"?>
<web-app version="2.4" xmlns="http://java.sun.com/xml/ns/j2ee" xmlns:xsi="http://www.w3.org/2001/XMLSchema-instance"
xsi:schemaLocation="http://java.sun.com/xml/ns/j2ee http://java.sun.com/xml/ns/j2ee/web-app_2_4.xsd">
<display-name>PureText</display-name>
<!-- Spring ApplicationContext配置文件的路径,可使用通配符,多个路径用,号分隔
此参数用于后面的Spring Context Loader -->
<context-param>
<param-name>contextConfigLocation</param-name>
<param-value>classpath*:/applicationContext*.xml</param-value>
</context-param>
<!-- Character Encoding filter -->
<filter>
<filter-name>encodingFilter</filter-name>
<filter-class>org.springframework.web.filter.CharacterEncodingFilter</filter-class>
<init-param>
<param-name>encoding</param-name>
<param-value>UTF-8</param-value>
</init-param>
<init-param>
<param-name>forceEncoding</param-name>
<param-value>true</param-value>
</init-param>
</filter>
<filter>
<filter-name>hibernateOpenSessionInViewFilterContent</filter-name>
<filter-class>org.springside.modules.orm.hibernate.OpenSessionInViewFilter</filter-class>
<init-param>
<param-name>excludeSuffixs</param-name>
<param-value>js,css,jpg,gif</param-value>
</init-param>
<init-param>
<param-name>sessionFactoryBeanName</param-name>
<param-value>sessionFactoryContent</param-value>
</init-param>
</filter>
<filter>
<filter-name>hibernateOpenSessionInViewFilterIndex</filter-name>
<filter-class>org.springside.modules.orm.hibernate.OpenSessionInViewFilter</filter-class>
<init-param>
<param-name>excludeSuffixs</param-name>
<param-value>js,css,jpg,gif</param-value>
</init-param>
<init-param>
<param-name>sessionFactoryBeanName</param-name>
<param-value>sessionFactoryIndex</param-value>
</init-param>
</filter>
<!-- SpringSecurity filter-->
<filter>
<filter-name>springSecurityFilterChain</filter-name>
<filter-class>org.springframework.web.filter.DelegatingFilterProxy</filter-class>
</filter>
<!-- Struts2 filter -->
<filter>
<filter-name>struts2Filter</filter-name>
<filter-class>org.apache.struts2.dispatcher.ng.filter.StrutsPrepareAndExecuteFilter</filter-class>
</filter>
<filter-mapping>
<filter-name>encodingFilter</filter-name>
<url-pattern>/*</url-pattern>
</filter-mapping>
<filter-mapping>
<filter-name>springSecurityFilterChain</filter-name>
<url-pattern>/*</url-pattern>
</filter-mapping>
<filter-mapping>
<filter-name>hibernateOpenSessionInViewFilterContent</filter-name>
<url-pattern>/*</url-pattern>
</filter-mapping>
<filter-mapping>
<filter-name>hibernateOpenSessionInViewFilterIndex</filter-name>
<url-pattern>/*</url-pattern>
</filter-mapping>
<filter-mapping>
<filter-name>struts2Filter</filter-name>
<url-pattern>/*</url-pattern>
</filter-mapping>
<!--Spring的ApplicationContext 载入 -->
<listener>
<listener-class>org.springframework.web.context.ContextLoaderListener</listener-class>
</listener>
<!-- Spring 刷新Introspector防止内存泄露 -->
<listener>
<listener-class>org.springframework.web.util.IntrospectorCleanupListener</listener-class>
</listener>
<!-- session超时定义,单位为分钟 -->
<session-config>
<session-timeout>20</session-timeout>
</session-config>
<!-- 出错页面定义 -->
<error-page>
<exception-type>java.lang.Throwable</exception-type>
<location>/common/500.jsp</location>
</error-page>
<error-page>
<error-code>500</error-code>
<location>/common/500.jsp</location>
</error-page>
<error-page>
<error-code>404</error-code>
<location>/common/404.jsp</location>
</error-page>
<error-page>
<error-code>403</error-code>
<location>/common/403.jsp</location>
</error-page>
</web-app>
5、由于项目中有多个SessionFactory,所以编写Dao层的时候需要使用@Resource注解来明确指定使用哪一个SessionFactory,如下面代码所示,ArticleDao使用sessionFactoryContent,而ArticleIndexDao使用sessionFactoryIndex:
package cn.puretext.dao;
import javax.annotation.Resource;
import org.hibernate.SessionFactory;
import org.springframework.stereotype.Repository;
import org.springside.modules.orm.hibernate.HibernateDao;
import cn.puretext.entity.web.Article;
@Repository
public class ArticleDao extends HibernateDao<Article, Long> {
@Override
@Resource(name = "sessionFactoryContent")
public void setSessionFactory(SessionFactory sessionFactory) {
// TODO Auto-generated method stub
super.setSessionFactory(sessionFactory);
}
}
package cn.puretext.dao;
import javax.annotation.Resource;
import org.hibernate.SessionFactory;
import org.springframework.stereotype.Repository;
import org.springside.modules.orm.hibernate.HibernateDao;
import cn.puretext.entity.web.ArticleIndex;
@Repository
public class ArticleIndexDao extends HibernateDao<ArticleIndex, Long> {
@Override
@Resource(name = "sessionFactoryIndex")
public void setSessionFactory(SessionFactory sessionFactory) {
// TODO Auto-generated method stub
super.setSessionFactory(sessionFactory);
}
}
6、在GlassFish中部署项目,部署项目的时候依然使用前面提到的GlassFish的管理界面,这里不赘述。
经过以上六步,就可以成功的在基于SpringSide 3的项目中使用多个数据库。如果你确实很不相使用GlassFish,而对Tomcat情有独钟的话,就要使用我前面提到的“提供JTA功能的其它组件”了。在这里,我推荐使用Atomikos,这是一个很优秀的JTA实现,它的官方网站为www.atomikos.com,它提供开源版和商业版,下面是从其官方网站上截取的图片:
很烦人的是,该网站不直接提供下载地址,如果要下载,就必须先填写姓名邮箱和电话,如果大家不想填写这些信息,可以直接进入这个网址下载http://www.atomikos.com/Main/InstallingTransactionsEssentials,我选择的是3.5.5版。
方法二、使用Tomcat服务器和Atomikos
1、将Atomikos整合到Tomcat服务器中,其步骤可以参考Atomikos的文档,如下:
http://www.atomikos.com/Documentation/Tomcat6Integration33
2、在Tomcat中配置JNDI数据源,方法是修改Tomcat的content.xml文件,在文件中加入如下两个<Resource/>和一个<Transaction/>:
<Transaction factory="com.atomikos.icatch.jta.UserTransactionFactory" />
<Resource name="jdbc/dataSourceContent" auth="Container"
type="com.atomikos.jdbc.AtomikosDataSourceBean" factory="com.atomikos.tomcat.BeanFactory"
uniqueResourceName="jdbc/myDB" xaDataSourceClassName="com.mysql.jdbc.jdbc2.optional.MysqlXADataSource"
xaProperties.databaseName="puretext" xaProperties.serverName="localhost"
xaProperties.port="3306" xaProperties.user="USER"
xaProperties.password="PASSWORD" xaProperties.url="jdbc:mysql://localhost:3306/puretext" />
<Resource name="jdbc/dataSourceIndex" auth="Container"
type="com.atomikos.jdbc.AtomikosDataSourceBean" factory="com.atomikos.tomcat.BeanFactory"
uniqueResourceName="jdbc/myDB" xaDataSourceClassName="com.mysql.jdbc.jdbc2.optional.MysqlXADataSource"
xaProperties.databaseName="puretext_index" xaProperties.serverName="localhost"
xaProperties.port="3306" xaProperties.user="USER"
xaProperties.password="PASSWORD" xaProperties.url="jdbc:mysql://localhost:3306/puretext_index" />
剩下的四步就和使用GlassFish的第3、4、5、6步一模一样了,这里不赘述。
以上Atomikos和Tomcat的整合方案有时候或多或少出现一点问题,这些问题基本上都和JNDI有关,我想可能是Tomcat实现的JNDI配置有问题。如果出现这样的问题无法解决的话,还有第三种方案,那就是直接在Spring的配置文件中配置Atomikos的JTA相关组件。
方法三、直接在Spring的配置文件中配置Atomikos的JTA相关组件
1、将下载的Atomikos中的jta.properties拷贝到项目的classpath中,将Atomikos的相关jar文件拷贝到项目的classpath中。
2、在项目的applicationContext.xml文件中配置JTA的相关组件,配置文件如下:
<?xml version="1.0" encoding="UTF-8"?>
<beans xmlns="http://www.springframework.org/schema/beans" xmlns:xsi="http://www.w3.org/2001/XMLSchema-instance"
xmlns:jee="http://www.springframework.org/schema/jee" xmlns:tx="http://www.springframework.org/schema/tx"
xmlns:context="http://www.springframework.org/schema/context"
xsi:schemaLocation="http://www.springframework.org/schema/beans http://www.springframework.org/schema/beans/spring-beans-2.5.xsd http://www.springframework.org/schema/tx http://www.springframework.org/schema/tx/spring-tx-2.5.xsd http://www.springframework.org/schema/jee http://www.springframework.org/schema/jee/spring-jee-2.5.xsd http://www.springframework.org/schema/context http://www.springframework.org/schema/context/spring-context-2.5.xsd"
default-lazy-init="true">
<description>Spring公共配置文件 </description>
<!-- 定义受环境影响易变的变量 -->
<bean class="org.springframework.beans.factory.config.PropertyPlaceholderConfigurer">
<property name="systemPropertiesModeName" value="SYSTEM_PROPERTIES_MODE_OVERRIDE" />
<property name="ignoreResourceNotFound" value="true" />
<property name="locations">
<list>
<!-- 标准配置 -->
<value>classpath*:/application.properties</value>
</list>
</property>
</bean>
<!-- 使用annotation 自动注册bean,并保证@Required,@Autowired的属性被注入 -->
<context:component-scan base-package="cn.puretext" />
<bean id="dataSourceContent" class="com.atomikos.jdbc.AtomikosDataSourceBean" init-method="init" destroy-method="close">
<property name="uniqueResourceName">
<value>jdbc/dataSourceContent</value>
</property>
<property name="xaDataSourceClassName">
<value>com.mysql.jdbc.jdbc2.optional.MysqlXADataSource</value>
</property>
<property name="xaProperties">
<props>
<prop key="serverName">localhost</prop>
<prop key="portNumber">3306</prop>
<prop key="databaseName">puretext</prop>
<prop key="user">***</prop>
<prop key="password">***</prop>
</props>
</property>
<property name="poolSize">
<value>3</value>
</property>
</bean>
<bean id="dataSourceIndex" class="com.atomikos.jdbc.AtomikosDataSourceBean" init-method="init" destroy-method="close">
<property name="uniqueResourceName">
<value>jdbc/dataSourceIndex</value>
</property>
<property name="xaDataSourceClassName">
<value>com.mysql.jdbc.jdbc2.optional.MysqlXADataSource</value>
</property>
<property name="xaProperties">
<props>
<prop key="serverName">localhost</prop>
<prop key="portNumber">3306</prop>
<prop key="databaseName">puretext_index</prop>
<prop key="user">***</prop>
<prop key="password">***</prop>
</props>
</property>
<property name="poolSize">
<value>3</value>
</property>
</bean>
<!-- Hibernate配置 -->
<bean id="sessionFactoryContent" class="org.springframework.orm.hibernate3.annotation.AnnotationSessionFactoryBean">
<property name="dataSource" ref="dataSourceContent" />
<property name="namingStrategy">
<bean class="org.hibernate.cfg.ImprovedNamingStrategy" />
</property>
<property name="hibernateProperties">
<props>
<prop key="hibernate.dialect">org.hibernate.dialect.MySQL5InnoDBDialect</prop>
<prop key="hibernate.show_sql">${hibernate.show_sql}</prop>
<prop key="hibernate.format_sql">${hibernate.format_sql}</prop>
<prop key="hibernate.cache.provider_class">org.hibernate.cache.EhCacheProvider
</prop>
<prop key="hibernate.cache.provider_configuration_file_resource_path">${hibernate.ehcache_config_file}</prop>
</props>
</property>
<property name="packagesToScan" value="cn.puretext.entity.*" />
</bean>
<bean id="sessionFactoryIndex" class="org.springframework.orm.hibernate3.annotation.AnnotationSessionFactoryBean">
<property name="dataSource" ref="dataSourceIndex" />
<property name="namingStrategy">
<bean class="org.hibernate.cfg.ImprovedNamingStrategy" />
</property>
<property name="hibernateProperties">
<props>
<prop key="hibernate.dialect">org.hibernate.dialect.MySQL5InnoDBDialect</prop>
<prop key="hibernate.show_sql">${hibernate.show_sql}</prop>
<prop key="hibernate.format_sql">${hibernate.format_sql}</prop>
<prop key="hibernate.cache.provider_class">org.hibernate.cache.EhCacheProvider
</prop>
<prop key="hibernate.cache.provider_configuration_file_resource_path">${hibernate.ehcache_config_file}</prop>
</props>
</property>
<property name="packagesToScan" value="cn.puretext.entity.*" />
</bean>
<!-- 事务管理器配置,多数据源JTA事务-->
<bean id="atomikosTransactionManager" class="com.atomikos.icatch.jta.UserTransactionManager" init-method="init" destroy-method="close">
<property name="forceShutdown"><value>true</value></property>
</bean>
<bean id="atomikosUserTransaction" class="com.atomikos.icatch.jta.UserTransactionImp">
<property name="transactionTimeout" value="300"/>
</bean>
<bean id="transactionManager" class="org.springframework.transaction.jta.JtaTransactionManager">
<property name="transactionManager" ref="atomikosTransactionManager" />
<property name="userTransaction" ref="atomikosUserTransaction"/>
</bean>
<!-- 使用annotation定义事务 -->
<tx:annotation-driven transaction-manager="transactionManager" />
</beans>
3、在web.xml中配置多个OpenSessionInViewFilter,其配置方法同前。
4、在Dao类中使用@Resource指定使用哪一个sessionFactory。
5、运行项目,成功。
在以上的三个方法中,我强烈推荐第三种,因为该方法只需要将Atomikos的相关文件拷贝到项目的classpath中,并在applicationContext.xml文件中完成配置即可,不需要修改应用服务器的任何文件,是非侵入性的,是最轻量级的,同时,也是配置起来最容易成功的,在我的测试过程中基本上是一次成功,没有报错。
好了,就写到这里了,希望SpringSide的fans们少走弯路,天天开心。

相关文章推荐
- 在SpringSide 3 中使用多个数据库的方法
- 在SpringSide 3 中使用多个数据库的方法
- 在SpringSide 3 中使用多个数据库的方法
- C#中从数据库查询记录的方法分类( 一般使用两种方法):
- 使用SQL SERVER 数据库存取BMP等大数据的方法(转)
- Alembic对数据库版本管理的使用方法
- 因为数据库正在使用,所以无法获得对数据库的独占访问权---还原或删除数据库的解决方法
- sql server 还原数据库时提示数据库正在使用,无法进行操作的解决方法
- 使用sqlite3.exe建立数据库和表结构的方法
- Java使用JDBC连接数据库的实现方法
- 使用AJAX方法可以不刷新页面就从服务器上获得信息(文件信息,方法,数据库中的数据)
- 使用Navicat Premium 链接本地数据库的方法(二)
- 使用MySQL Workbench进行数据库设计——MySQL Workbench使用方法总结
- 使用PDO连接数据库 查询和插入乱码的解决方法
- 关于Jpa使用Update方法进行更新操作,却没有同步到数据库的原因
- VB使用ADODB操作数据库的常用方法
- 还原数据库时出错“无法处理数据库 ,因为它正由此会话使用”的解决方法
- 不使用Django ORM对数据库进行修改 保证一个方法实现原子性,一致性
- VC中使用ADO访问数据库技术程序实现方法
- "无法删除数据库,因为该数据库当前正在使用",删除数据库方法