IOS第二十六天——Picker
2013-05-25 18:18
225 查看
这篇相隔时间有些长了,好吧,跪求大家原谅我的懒惰,最近心情不是很美丽(次凹,真矫情了~),别人是蛋蛋的忧桑,在我来就是忧桑的二蛋了,反正咱也不是小资的人,干脆,好好学习,嗯哼,今天我们来学习下Picker,IOS中的Picker有些像老虎机(希望这个词儿不是敏感词),嗯,效果是很炫的,那么这种样式的控件有两种,一种是用来选择时间日期的date picker,另一种就是picker view,我们今天就主要来学习下这两个。
首先新建一个项目,Single View就可以了。
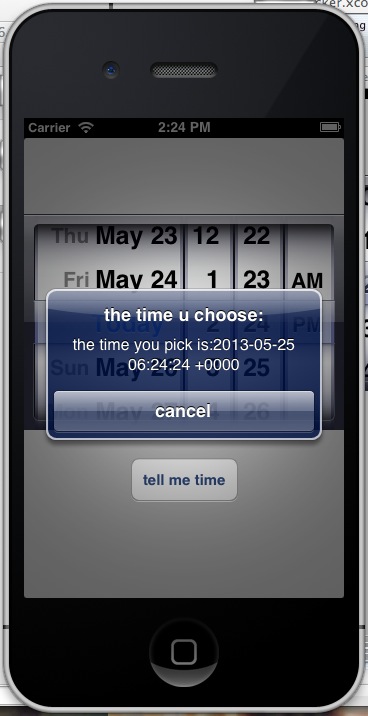
然后拖一个Date Picker过来,再拽一个Button,要实现的效果是这样儿的,选择日期,点击Button,弹出一个Alert,告知我选择的时间:
xib文件中布局如下:

我们来看下ViewController.h中的代码:
ViewController.m文件中,我们就要调用date picker的date方法获取用户选择的时间,代码如下:
OK,这样儿我们就写完了一个简单的Date Picker的demo,测试下效果:
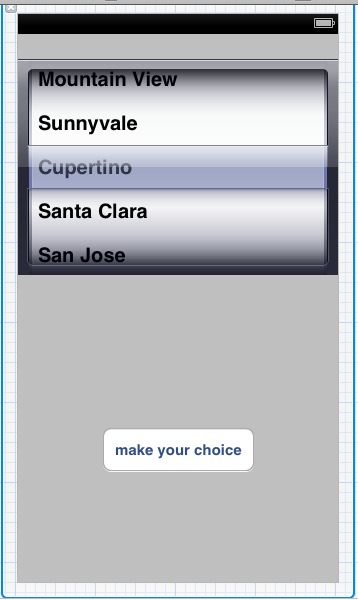
嗯,能够顺利的弹出我们需要的展示内容,那么接下来我们去掉Date Picker,换成Picker View,取名为actionPicker:
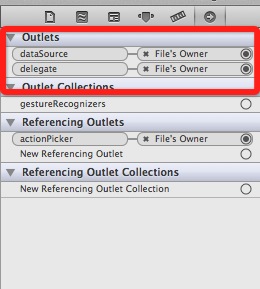
添加完控件之后我们还要选中File's Owner,control-drag到actionPicker上
然后选中actionPicker,打开connections inspector,将dataSource和delegate最后面的红圈儿拖拽到File's Owner上进行绑定,这样儿,我们的这个Picker View就会知道它的dataSource和delegate都是ETViewController类
这里我直接把原先的按钮也删掉了,重新加了一个按钮,我们需要为它添加Action,需要注意一下。
关于Picker View呢,样式和Date Picker是狠相似的,可以包含有多个组件-component,即竖着的分栏,每个component可以包含多个row,我们需要用实现以下三个方法来为Picker View赋值:
//picker view中组件的个数
-(NSInteger)numberOfComponentsInPickerView:(UIPickerView *)pickerView
{
//返回1即可,我们只添加一个Component
return 1;
}
//picker view组件中的row行数
-(NSInteger)pickerView:(UIPickerView *)pickerView numberOfRowsInComponent:(NSInteger)component
{
return [pickerDataSource count];
}
//循环数据源并绑定到picker view上进行展示
-(NSString *)pickerView:(UIPickerView *)pickerView titleForRow:(NSInteger)row forComponent:(NSInteger)component
{
return [pickerDataSource objectAtIndex:row];
}
然后我们就要在按钮的点击事件中添加如下代码:
//alert弹出用户选择的活动
- (IBAction)chooseActionBtn:(id)sender
{
NSInteger row=[actionPicker selectedRowInComponent:0];
NSString *selectedStr=[pickerDataSource objectAtIndex:row];
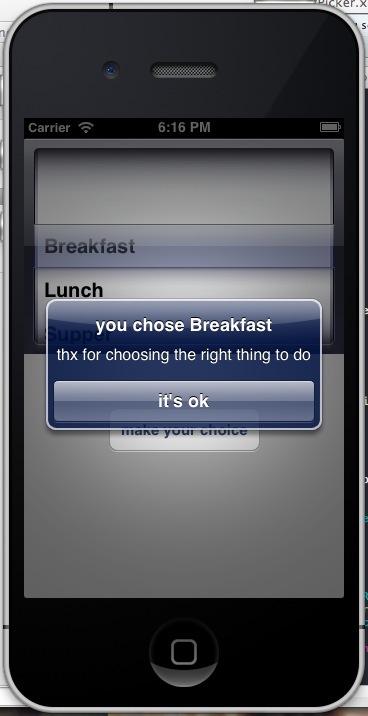
NSString *alertTitle=[[NSString alloc] initWithFormat:@"you chose %@",selectedStr];
UIAlertView *alertView=[[UIAlertView alloc] initWithTitle:alertTitle message:@"thx for choosing the right thing to do" delegate:nil cancelButtonTitle:@"it's ok" otherButtonTitles:nil, nil];
[alertView show];
}当然,不要忘了初始化我们的数组,因为数组是我们的picker view展示的数据来源
- (void)viewDidLoad
{
[super viewDidLoad];
// Do any additional setup after loading the view, typically from a nib.
NSArray *strArray=[[NSArray alloc] initWithObjects:@"Breakfast",@"Lunch",@"Supper",@"Game",@"Sport",@"Music", nil];
self.pickerDataSource=strArray;
}
那么代码部分我们也写完了,来运行下看效果:
OK,这个简单的功能也开发完成了,今天的课程就先学到这里,休息下,大家也好好享受周末!
2013年05月25日,Eric.Tang 记
首先新建一个项目,Single View就可以了。
然后拖一个Date Picker过来,再拽一个Button,要实现的效果是这样儿的,选择日期,点击Button,弹出一个Alert,告知我选择的时间:
xib文件中布局如下:
我们来看下ViewController.h中的代码:
#import <UIKit/UIKit.h>

@interface ETViewController : UIViewController
@property (weak, nonatomic) IBOutlet UIDatePicker *datePicker;
- (IBAction)getDate:(id)sender;

@end
ViewController.m文件中,我们就要调用date picker的date方法获取用户选择的时间,代码如下:
- (IBAction)getDate:(id)sender
{
NSString *dateStr=[[NSString alloc] initWithFormat:@"the time you pick is:%@",[datePicker date]];
UIAlertView *dateAlert=[[UIAlertView alloc] initWithTitle:@"the time u choose:" message:dateStr delegate:self cancelButtonTitle:@"cancel" otherButtonTitles:nil];
[dateAlert show];
}
OK,这样儿我们就写完了一个简单的Date Picker的demo,测试下效果:
嗯,能够顺利的弹出我们需要的展示内容,那么接下来我们去掉Date Picker,换成Picker View,取名为actionPicker:
添加完控件之后我们还要选中File's Owner,control-drag到actionPicker上
然后选中actionPicker,打开connections inspector,将dataSource和delegate最后面的红圈儿拖拽到File's Owner上进行绑定,这样儿,我们的这个Picker View就会知道它的dataSource和delegate都是ETViewController类
这里我直接把原先的按钮也删掉了,重新加了一个按钮,我们需要为它添加Action,需要注意一下。
关于Picker View呢,样式和Date Picker是狠相似的,可以包含有多个组件-component,即竖着的分栏,每个component可以包含多个row,我们需要用实现以下三个方法来为Picker View赋值:
//picker view中组件的个数
-(NSInteger)numberOfComponentsInPickerView:(UIPickerView *)pickerView
{
//返回1即可,我们只添加一个Component
return 1;
}
//picker view组件中的row行数
-(NSInteger)pickerView:(UIPickerView *)pickerView numberOfRowsInComponent:(NSInteger)component
{
return [pickerDataSource count];
}
//循环数据源并绑定到picker view上进行展示
-(NSString *)pickerView:(UIPickerView *)pickerView titleForRow:(NSInteger)row forComponent:(NSInteger)component
{
return [pickerDataSource objectAtIndex:row];
}
然后我们就要在按钮的点击事件中添加如下代码:
//alert弹出用户选择的活动
- (IBAction)chooseActionBtn:(id)sender
{
NSInteger row=[actionPicker selectedRowInComponent:0];
NSString *selectedStr=[pickerDataSource objectAtIndex:row];
NSString *alertTitle=[[NSString alloc] initWithFormat:@"you chose %@",selectedStr];
UIAlertView *alertView=[[UIAlertView alloc] initWithTitle:alertTitle message:@"thx for choosing the right thing to do" delegate:nil cancelButtonTitle:@"it's ok" otherButtonTitles:nil, nil];
[alertView show];
}当然,不要忘了初始化我们的数组,因为数组是我们的picker view展示的数据来源
- (void)viewDidLoad
{
[super viewDidLoad];
// Do any additional setup after loading the view, typically from a nib.
NSArray *strArray=[[NSArray alloc] initWithObjects:@"Breakfast",@"Lunch",@"Supper",@"Game",@"Sport",@"Music", nil];
self.pickerDataSource=strArray;
}
那么代码部分我们也写完了,来运行下看效果:
OK,这个简单的功能也开发完成了,今天的课程就先学到这里,休息下,大家也好好享受周末!
2013年05月25日,Eric.Tang 记

相关文章推荐
- iOS学习之UIPickerView控件的关联选择
- 仿ios中pickerview控件类似滚桶的UI
- iOS学习之UIPickerView控件的简单使用
- IOS开发之DatePicker控件详解
- iOS摄像头和相册-UIImagePickerController-浅析
- js picker webapp仿ios picker
- ios中修改自定义PickerView的字体颜色
- iOS - UIImagePickerController
- iOS开发UI篇—使用picker View控件完成一个简单的选餐应用 - 文顶顶
- iOS编程之UIPickerView
- [IOS]今天开始学UI---UIPickerView
- [ios开发技巧之]UIPickerView的数据循环显示
- cocos2d-x横版项目调用 ios UIImagePickerController
- iOS开发 点菜系统 使用UIPickerView
- iOS摄像头和相册-UIImagePickerController-浅析
- iOS使用UIImagePickerController
- ios快速界面跳转利器-传送门方案VCPicker
- iOS摄像头和相册-UIImagePickerController
- iOS 学习笔记-个人头像获取UIImagePickerController使用
- Xamarin.ios UIImagePickerController 仅启用拍照功能。 禁止视频。