开博来的第一篇文贴:zxing2.0二维码在xcode4.2中的使用
2013-05-16 11:55
281 查看
虽然网上有很多关于zxing的使用方法,不过查了很多中文和英文的贴子。发现说的不够详细,差一步就错了很多!
在这里写下刚做的心得(注:这里只针对iphone版本,xcode4.2。SDK是5.1,当然听说最新的zxing要4.0以上才可以)。不知写的好不好。如果有朋友出现按我的做法,没有成功的。欢迎指出!
以下的步骤,就不截图了
1.准备工作(以下的步骤将以zxing2.0为基础)
1.1下载zxing最新的库,地址:http://code.google.com/p/zxing/downloads/list (如有变动,此文博不给于更新)。找到
1.2 再次声明一下,不要用模拟器去做测试了。既然是二维码的使用,那就会用到摄像头,所以要用真机来测试
2.关于库里的一些文件
不是所有的文件我们都用的到,
下载zxing2.0后,解压得到zxing-2.0文件夹,里面只保留 cpp 和 iphone 两个文件夹就可以了。
3.zxing2.0导入到你的项目中
3.1 :拷贝zxing-2.0到你的项目根文件夹下面
3.2:打开你的项目,新建GROUP命名为"Dependencies"。
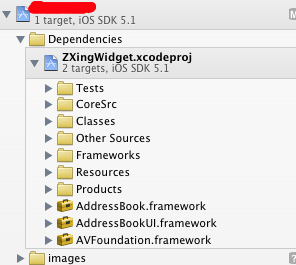
3.3:右击"Dependencies"选择“Add files to...”,在弹出的框中,找到:你的项目文件夹/zxing-2.0/iphone/ZXingWidget下面,选择"ZXingWidget.xcodeproj"(在添加前,请先运行该项目,进行编译,如果成功,再进行此步添加!)
,并确保"拷贝到项目文件夹中"不被选中。然后点添加。项目结构如下图:
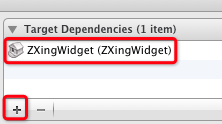
3.4:选择你的项目--TARGETS--Build Phases---Target Dependencies----然后点击"+"添加“ZXingWidget”。添加后如下图:
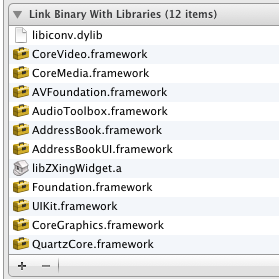
3.5:同样,添加frameWorks.方法:Build Phases---Target Dependencies----”Link
Binary With Libraries”---点击"+"。添加如下几项:
libZXingWidget.a
AddressBook
AddressBookUI
AudioToolbox
***Foundation
CoreMedia
CoreVideo
libiconv.dylib
完成后如下图:
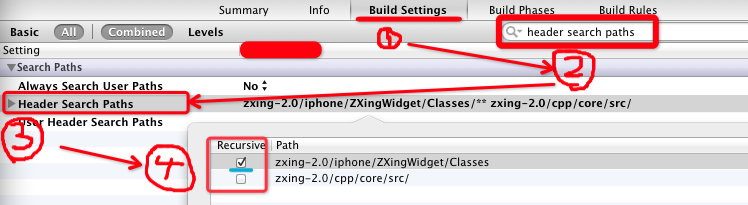
3.5:按下图做操作,这里很重要。
1. Build Settings --- 2. 搜索"header search paths" --- 3. 双击"Header Search Paths"
4. 添加 路径:如图,注意这里"Recursive"画蓝色线的地方请打勾,另一个不要打勾
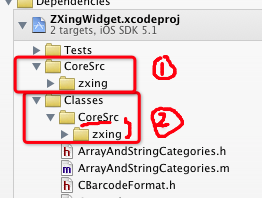
3.6:这步操作,最好做一下,因为不知道为产生什么问题
如下图中,"2" 标注处的CoreSrc这个组本来是没有的。所以大家在做的时候,最好手动建一下这个组,然后按"1"标注处那样。添加zxing。当然不需要拷贝了。因为在 "1" 处已经存在过了
4.在项目中引用
这一步会经常出现一些文件找不到等问题
首先请做如下操作:
1.请更改你的delegate文件的.m文件为.mm (请注意,如果你在项目中重命名,并不会使物理路径中的文件名被更改,所以请更改物理文件名)
MyZxingAppDelegate.m
>>>>
MyZxingAppDelegate.mm
2.请更改你要使用zxing的项目文件的.m文件为.mm
MyZxingViewController.m
>>>>
MyZxing
ViewController
.mm
需要注意的是,如果不做更改,可能会引发:XXX file not found的问题。最好是main.m也更改一下
5.
MyZxingViewController 文件夹中引用
.h
[cpp] view
plaincopyprint?
//
// Copyright 2011 __MyCompanyName__. All rights reserved.
//
#import <UIKit/UIKit.h>
#import "ZXingWidgetController.h"
//#import "QRCodeReader.h" //这个引用在.h文件中为出错:<span style="color: rgb(51, 51, 51); font-family: Arial; font-size: 14px; line-height: 26px; ">iostream file not found</span>
@interface Contact : UIViewController <ZXingDelegate>{
UITextView *resultsView;
NSString *resultsToDisplay;
}
@property (retain, nonatomic) IBOutlet UITextView *resultsView;
@property (nonatomic, copy) NSString *resultsToDisplay;
- (IBAction)scanPressed:(id)sender;
@end
.mm
[cpp] view
plaincopyprint?
//
// Created by yangke nicky on 11-12-30.
// Copyright 2011 __MyCompanyName__. All rights reserved.
//
//.mm中才可以引用
#import "QRCodeReader.h"
@implementation Contact
@synthesize resultsView;
@synthesize resultsToDisplay;
//正常扫描退出事件
- (void)zxingController:(ZXingWidgetController*)controller didScanResult:(NSString *)result {
self.resultsToDisplay = result;
if (self.isViewLoaded) {
[resultsView setText:resultsToDisplay];
[resultsView setNeedsDisplay];
}
[self dismissModalViewControllerAnimated:NO];
}
//扫描界面退出按钮事件
- (void)zxingControllerDidCancel:(ZXingWidgetController*)controller {
[self dismissModalViewControllerAnimated:YES];
}
- (void) viewDidLoad
{
[super viewDidLoad];
[resultsView setText:resultsToDisplay];
}
//扫描按钮事件
- (IBAction)scanPressed:(id)sender
{
ZXingWidgetController *widController = [[ZXingWidgetController alloc] initWithDelegate:self showCancel:YES OneDMode:NO];
QRCodeReader *qrcodeReader = [[QRCodeReader alloc] init];
NSSet *readers = [[NSSet alloc ] initWithObjects:qrcodeReader,nil];
[qrcodeReader release];
widController.readers = readers;
[readers release];
NSBundle *mainBundle = [NSBundle mainBundle];
//aiff
widController.soundToPlay =[NSURL fileURLWithPath:[mainBundle pathForResource:@"beep-beep" ofType:@"caf"] isDirectory:NO];
[self presentModalViewController:widController animated:YES];
[widController release];
}
- (void)viewDidUnload {
self.resultsView = nil;
}
- (void)dealloc {
[resultsView release];
[resultsToDisplay release];
[super dealloc];
}
- (void)didReceiveMemoryWarning {
// Releases the view if it doesn't have a superview.
[super didReceiveMemoryWarning];
// Release any cached data, images, etc that aren't in use.
}
@end
教程基本写完了,希望对大家有用处。接下来,我要写联系人二维码保存到联系人中。目前正在进行中,等写完了,再发表出来!
之前,推送问题,也搞定了。抽空发上来!
在这里写下刚做的心得(注:这里只针对iphone版本,xcode4.2。SDK是5.1,当然听说最新的zxing要4.0以上才可以)。不知写的好不好。如果有朋友出现按我的做法,没有成功的。欢迎指出!
以下的步骤,就不截图了
1.准备工作(以下的步骤将以zxing2.0为基础)
1.1下载zxing最新的库,地址:http://code.google.com/p/zxing/downloads/list (如有变动,此文博不给于更新)。找到
| ZXing-2.0.zip | ZXing 2.0 Release 这是我写博客时的版本,具体版本请参考网站 |
2.关于库里的一些文件
不是所有的文件我们都用的到,
下载zxing2.0后,解压得到zxing-2.0文件夹,里面只保留 cpp 和 iphone 两个文件夹就可以了。
3.zxing2.0导入到你的项目中
3.1 :拷贝zxing-2.0到你的项目根文件夹下面
3.2:打开你的项目,新建GROUP命名为"Dependencies"。
3.3:右击"Dependencies"选择“Add files to...”,在弹出的框中,找到:你的项目文件夹/zxing-2.0/iphone/ZXingWidget下面,选择"ZXingWidget.xcodeproj"(在添加前,请先运行该项目,进行编译,如果成功,再进行此步添加!)
,并确保"拷贝到项目文件夹中"不被选中。然后点添加。项目结构如下图:
3.4:选择你的项目--TARGETS--Build Phases---Target Dependencies----然后点击"+"添加“ZXingWidget”。添加后如下图:
3.5:同样,添加frameWorks.方法:Build Phases---Target Dependencies----”Link
Binary With Libraries”---点击"+"。添加如下几项:
libZXingWidget.a
AddressBook
AddressBookUI
AudioToolbox
***Foundation
CoreMedia
CoreVideo
libiconv.dylib
完成后如下图:
3.5:按下图做操作,这里很重要。
1. Build Settings --- 2. 搜索"header search paths" --- 3. 双击"Header Search Paths"
4. 添加 路径:如图,注意这里"Recursive"画蓝色线的地方请打勾,另一个不要打勾
3.6:这步操作,最好做一下,因为不知道为产生什么问题
如下图中,"2" 标注处的CoreSrc这个组本来是没有的。所以大家在做的时候,最好手动建一下这个组,然后按"1"标注处那样。添加zxing。当然不需要拷贝了。因为在 "1" 处已经存在过了
4.在项目中引用
这一步会经常出现一些文件找不到等问题
首先请做如下操作:
1.请更改你的delegate文件的.m文件为.mm (请注意,如果你在项目中重命名,并不会使物理路径中的文件名被更改,所以请更改物理文件名)
MyZxingAppDelegate.m
>>>>
MyZxingAppDelegate.mm
2.请更改你要使用zxing的项目文件的.m文件为.mm
MyZxingViewController.m
>>>>
MyZxing
ViewController
.mm
需要注意的是,如果不做更改,可能会引发:XXX file not found的问题。最好是main.m也更改一下
5.
MyZxingViewController 文件夹中引用
.h
[cpp] view
plaincopyprint?
//
// Copyright 2011 __MyCompanyName__. All rights reserved.
//
#import <UIKit/UIKit.h>
#import "ZXingWidgetController.h"
//#import "QRCodeReader.h" //这个引用在.h文件中为出错:<span style="color: rgb(51, 51, 51); font-family: Arial; font-size: 14px; line-height: 26px; ">iostream file not found</span>
@interface Contact : UIViewController <ZXingDelegate>{
UITextView *resultsView;
NSString *resultsToDisplay;
}
@property (retain, nonatomic) IBOutlet UITextView *resultsView;
@property (nonatomic, copy) NSString *resultsToDisplay;
- (IBAction)scanPressed:(id)sender;
@end
.mm
[cpp] view
plaincopyprint?
//
// Created by yangke nicky on 11-12-30.
// Copyright 2011 __MyCompanyName__. All rights reserved.
//
//.mm中才可以引用
#import "QRCodeReader.h"
@implementation Contact
@synthesize resultsView;
@synthesize resultsToDisplay;
//正常扫描退出事件
- (void)zxingController:(ZXingWidgetController*)controller didScanResult:(NSString *)result {
self.resultsToDisplay = result;
if (self.isViewLoaded) {
[resultsView setText:resultsToDisplay];
[resultsView setNeedsDisplay];
}
[self dismissModalViewControllerAnimated:NO];
}
//扫描界面退出按钮事件
- (void)zxingControllerDidCancel:(ZXingWidgetController*)controller {
[self dismissModalViewControllerAnimated:YES];
}
- (void) viewDidLoad
{
[super viewDidLoad];
[resultsView setText:resultsToDisplay];
}
//扫描按钮事件
- (IBAction)scanPressed:(id)sender
{
ZXingWidgetController *widController = [[ZXingWidgetController alloc] initWithDelegate:self showCancel:YES OneDMode:NO];
QRCodeReader *qrcodeReader = [[QRCodeReader alloc] init];
NSSet *readers = [[NSSet alloc ] initWithObjects:qrcodeReader,nil];
[qrcodeReader release];
widController.readers = readers;
[readers release];
NSBundle *mainBundle = [NSBundle mainBundle];
//aiff
widController.soundToPlay =[NSURL fileURLWithPath:[mainBundle pathForResource:@"beep-beep" ofType:@"caf"] isDirectory:NO];
[self presentModalViewController:widController animated:YES];
[widController release];
}
- (void)viewDidUnload {
self.resultsView = nil;
}
- (void)dealloc {
[resultsView release];
[resultsToDisplay release];
[super dealloc];
}
- (void)didReceiveMemoryWarning {
// Releases the view if it doesn't have a superview.
[super didReceiveMemoryWarning];
// Release any cached data, images, etc that aren't in use.
}
@end
教程基本写完了,希望对大家有用处。接下来,我要写联系人二维码保存到联系人中。目前正在进行中,等写完了,再发表出来!
之前,推送问题,也搞定了。抽空发上来!

相关文章推荐
- 开博来的第一篇文贴:zxing2.0二维码在xcode4.2中的使用
- [转载]开源ZXing在XCode上如何使用<二维码应用库配置步骤>
- C#使用Zxing2.0生成二维码 带简单中心LOGO
- 二维码(第一弹:使用ZXing方式实现二维码)
- Android使用zxing-android-embedded(由zxing开发)实现二维码生成和扫描
- 使用zxing生成二维码 - servlet形式
- 使用zxing生成二维码
- 使用zxing生成嵌图片的二维码,demo世海夺宝二维码,邀请码
- 使用谷歌zxing生成二维码
- 如何在 XCode 4.2 設定部分程式碼不使用 ARC 方式分享(转)
- C# 使用zxing生成包含中文的二维码
- 使用ZXing扫描和生成二维码
- java使用zxing生成和解析二维码
- xcode 4.2使用方法初探--第一个objective-c程序
- Android 二维码ZXing使用详解
- 使用zxing生成二维码
- 二维码开源库zbar、zxing使用心得
- Android zxing二维码使用及修改小结
- ZXing二维码编解码的使用
- 使用zxing生成和解析二维码