Storyboard Tutorial: Create Tab Bar Controller and Web View
2013-05-08 14:19
585 查看
This is the third article of the Storyboards series. Last time, we discussed how to pass data between
view controllers with segue. It should be easy, right? Now let’s continue to polish our Storyboard project and see how you can create to two other common UI elements in iPhone apps.
In this tutorial, you’ll learn:
How to Create a Tab Bar Controller
How to Create an About page using UIWebView
If you’re new to Storyboards, I suggest you to check out the first tutorial. All the materials discussed
in this material are based on the work we’ve done before.
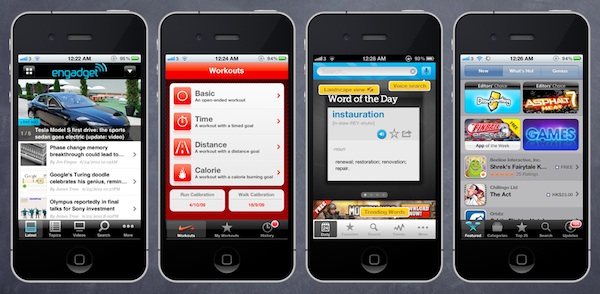
First, as usual, let’s have a brief introduction for Tab Bar Controller and UIWebView. You may not be familiar with the term “Tab Bar” but it’s commonly found in most of the iPhone apps. Just take a look at the below sample apps. All of them make use of the
Tab Bar controller to display distinct view in each tab. Normally the Tab Bar contains at least two tabs and you’re allowed to add up to five tabs depending on your needs.
Sample App with Tab Bar Interface
UIWebView, on the other hand, is a handy component to load web content. In some cases, you want to display a single web page locally in your app or let users access external web pages within your app. You can simply embed the UIWebView object in your app and
send it a request to load the web content.
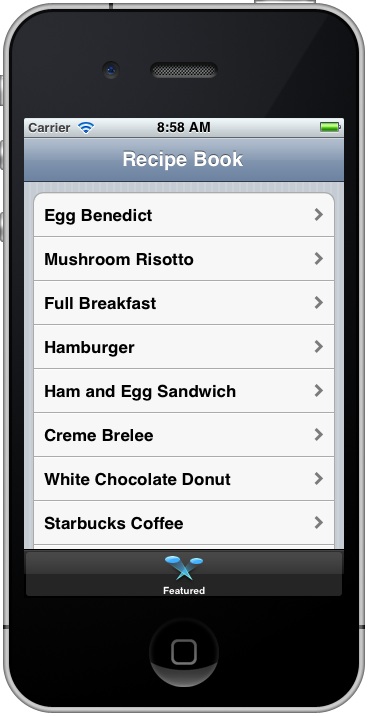
Now back to our Xcode project. Let me first recap what we’ve done. If you’ve followed the previous tutorial, you should build a simple recipe app with Navigation interface. It’s not completely implemented but just works.

Final Deliverable in Previous Tutorial
In this tutorial, we’re going to polish the app and create a tab bar interface. You may think it’ll be difficult and requires a lot of coding. The introduction of Storyboarding feature simplifies everything. It’s so easy to embed the navigation controller into
a tab bar controller with just point and click.
First, select the “Navigation Controller” in MainStoryboard.storyboard. Then select “Editor” in the menu and choose “Embed in”, followed by “Tab Bar Controller”.

Embed Navigation Controller in Tab Bar Controller
As you can see from below figure, Xcode automatically puts the navigation controller inside a tab bar controller. Super easy, right? You may think that’s trivial. Before Apple introduced the Storyboarding feature, you would need to write code and design a separate
NIB in order to embed a navigation controller.

Navigation Controller is embedded in Tab Bar Controller
By default, the tab bar item is not named and without an icon. Select the tab item in Navigation Controller. You’re free to change the name and specify an icon in the Attributes Inspector. The tab bar item is default to the “custom” identifier. When it’s set
to custom, that means you have to specify the title and image manually.

Customize Tab Bar Item
You can also use some built-in tab bar items (e.g. More, Favorites, Top Rated) that already include an icon. Let’s keep the tutorial simple and utilize the built-in item. Select “Featured” for the identifier and your screen should look like this:

Change Tab Bar Item to Featured
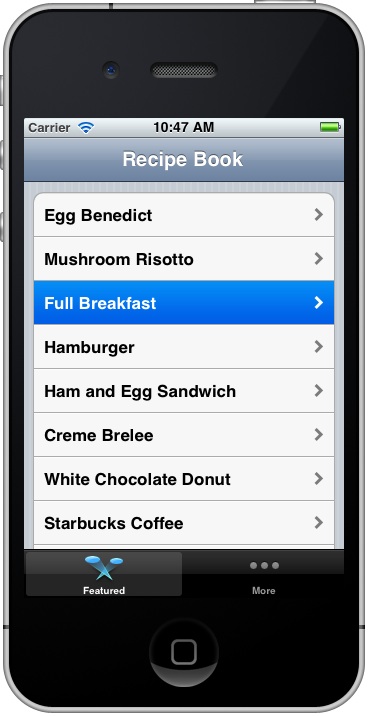
It’s now ready to test the app. Hit the Run button and see how it looks. The app should be very similar the one we built in the previous tutorial but with the tab bar.
You use tab bar interface to organize your app into distinct modes of operation. Each tab delivers specific functions. Obviously, there are at least two tabs in an app when tab bar controller is used. So we’re going to create a new tab for displaying the app’s
“About” page.
Drag a “Navigation Controller” object into the Storyboard. The default navigation controller is associated with a table view controller. Just leave it as is. We’ll change it later.

Add a New Navigation Controller
Next, we have to establish a relationship between the new navigation controller and the existing tab bar controller. Press and hold the “control” key, click the Tab Bar Controller and drag the pointer to the new Navigation Controller.

Link Up Tab Bar Controller and Navigation Controller
Release both buttons and a pop-up is displayed. Select the “Relationship – View Controllers” option. This tells Xcode that the new Navigation Controller is a part of Tab Bar Controller.

Establish Relationship with Navigation Controller
As soon as the relationship is established, the Tab Bar Controller automatically adds a new tab and associates it with the new Navigation Controller.

Tab Bar Controller with New Tab
Change the tab bar item of the new Navigation Controller to “More”. Save the Storyboard and run the app again. Don’t you see the new “More” tab?
The “More” tab is now empty. We’re going to turn it into a web view for displaying the “About” page of the app. First, delete the “Table View Controller” and replace it with a View Controller. Simply select the “Table View Controller” and click DELETE button
to remove it. Then drag the “View Controller” object from Object Library.

Replace Table View Controller with View Controller
As of now, the blank View Controller is not associated with the Navigation Controller. We have to link them up. Press and hold the command key, select the Navigation Controller and drag it towards the View Controller.

Link up View Controller and Navigation Controller
Like what we’ve done earlier, select the “Relationship – View Controllers” option to establish the relationship between both controllers.

Associated the Relationship Between View Controllers
The main purpose of this view controller is to render the “About” web page. iOS SDK has a built-in UIWebView object to display web content. You can simply embed the UIWebView object in any view controller. Later you send it a HTTP request and it automatically
loads the web content for you. Locate the “Web View” in Object Library and add it into the View Controller.

Add Web View into View Controller
As explained in previous tutorial, a blank view controller is assigned with the default UIViewController
class, that only provides the fundamental view management model. Apparently, it doesn’t come with a variable for controlling the UIWebView. Yet we have to create a new View Controller class that extends from the UIViewController.
In the Project Navigator, right-click the “RecipeBook” folder and select “New File…”.

Create New File in Xcode Project
Choose “Objective-C Class” under Cocoa Touch as the class template.

Select Objective C Class
Name the class as “AboutViewController” and it’s a subclass of “UIViewController”. Make sure you uncheck the option of “With XIB for user interface”. As we’re using Storyboards for designing the user interface, we do not need to create a separate interface
builder file. Click “Next” and save the file in your project folder.

Create a new class - AboutViewController
Next, assign the view controller with the “AboutViewController”. Go back to the Storyboards editor and select the view controller. In the identity inspector, change the class to “AboutViewController”.

Set the Custom Class to AboutViewController
To request UIWebView to load web content, we have to write a few lines of code. In brief, there are three things we need to implement:
Add the “about.html” and “about.jpg” to your Xcode project
Assign a variable for UIWebView and associate it with the Web View object in Storyboard
Use the loadRequest: method in UIWebView to load web content
The UIWebView class allows you to load web content both locally and remotely. You can send it a HTTP request (e.g. http://www.google.com) to load a remote website. Alternatively, you can tell UIWebView to load web pages embed in your app. For this tutorial,
we’ll put the “about.html” inside our app.
You can create your own about.html. For your convenience, however, download the about.zip, extract it and add all the files into the
Xcode project.
Select the “AboutViewController.h” and add a new property for UIWebView:
Go to the “AboutViewController.m” and add the synthesis for the variable. Make sure you place the code under “@implementation AboutViewController”:
If you’ve forgotten what the interface and implementation are, go back to this tutorial and revisit the concept.
As usual, it’s required to establish connection between the “webView” variable and the visual web view. In the Storyboards editor, press & hold the command key and then click the “View Controller” icon, drag it to the Web View object. Release both buttons and
a pop-up shows variables for your selection. Choose the “webView” variable.

Link Up UIWebView and webView Variable
Inside viewDidLoad method, add the following code to load the “about.html”:
The UIWebView class provides a convenient method named “loadRequest:” to load web content. What you need to do is to pass it a URL request. Line 5 of the above code returns the system path of the “about.html” in the form of NSURL object. Line 6 creates a NSURLRequest
using the URL. Obviously, line 7 sends the request to web view.
Hit the Run button and try out the app. If you got everything correctly, your final deliverable should look like below. When you select the “More” tab, it automatically loads the “about.html”.

Storyboarding has streamlined the user interface design of iOS app. As you can see from this tutorial, without a single line of code, you can create a tab bar controller and embed other controllers in the tab items. We’ve also showed you how to use UIWebView
to load web content. UIWebView offers basic function of a mobile browser. Whenever you need to display web page within your app, embed the web view and send it a request.
转载:http://www.appcoda.com/storyboard-tutorial-create-tab-bar-controller-and-web-view/
view controllers with segue. It should be easy, right? Now let’s continue to polish our Storyboard project and see how you can create to two other common UI elements in iPhone apps.
In this tutorial, you’ll learn:
How to Create a Tab Bar Controller
How to Create an About page using UIWebView
If you’re new to Storyboards, I suggest you to check out the first tutorial. All the materials discussed
in this material are based on the work we’ve done before.
Tab Bar Controller and UIWebView
First, as usual, let’s have a brief introduction for Tab Bar Controller and UIWebView. You may not be familiar with the term “Tab Bar” but it’s commonly found in most of the iPhone apps. Just take a look at the below sample apps. All of them make use of theTab Bar controller to display distinct view in each tab. Normally the Tab Bar contains at least two tabs and you’re allowed to add up to five tabs depending on your needs.
Sample App with Tab Bar Interface
UIWebView, on the other hand, is a handy component to load web content. In some cases, you want to display a single web page locally in your app or let users access external web pages within your app. You can simply embed the UIWebView object in your app and
send it a request to load the web content.
Creating a Tab Bar Controller
Now back to our Xcode project. Let me first recap what we’ve done. If you’ve followed the previous tutorial, you should build a simple recipe app with Navigation interface. It’s not completely implemented but just works.Final Deliverable in Previous Tutorial
In this tutorial, we’re going to polish the app and create a tab bar interface. You may think it’ll be difficult and requires a lot of coding. The introduction of Storyboarding feature simplifies everything. It’s so easy to embed the navigation controller into
a tab bar controller with just point and click.
First, select the “Navigation Controller” in MainStoryboard.storyboard. Then select “Editor” in the menu and choose “Embed in”, followed by “Tab Bar Controller”.
Embed Navigation Controller in Tab Bar Controller
As you can see from below figure, Xcode automatically puts the navigation controller inside a tab bar controller. Super easy, right? You may think that’s trivial. Before Apple introduced the Storyboarding feature, you would need to write code and design a separate
NIB in order to embed a navigation controller.
Navigation Controller is embedded in Tab Bar Controller
Changing Tab Bar Item Name
By default, the tab bar item is not named and without an icon. Select the tab item in Navigation Controller. You’re free to change the name and specify an icon in the Attributes Inspector. The tab bar item is default to the “custom” identifier. When it’s setto custom, that means you have to specify the title and image manually.
Customize Tab Bar Item
You can also use some built-in tab bar items (e.g. More, Favorites, Top Rated) that already include an icon. Let’s keep the tutorial simple and utilize the built-in item. Select “Featured” for the identifier and your screen should look like this:
Change Tab Bar Item to Featured
Run Your App
It’s now ready to test the app. Hit the Run button and see how it looks. The app should be very similar the one we built in the previous tutorial but with the tab bar.
Adding a New Tab
You use tab bar interface to organize your app into distinct modes of operation. Each tab delivers specific functions. Obviously, there are at least two tabs in an app when tab bar controller is used. So we’re going to create a new tab for displaying the app’s“About” page.
Drag a “Navigation Controller” object into the Storyboard. The default navigation controller is associated with a table view controller. Just leave it as is. We’ll change it later.
Add a New Navigation Controller
Next, we have to establish a relationship between the new navigation controller and the existing tab bar controller. Press and hold the “control” key, click the Tab Bar Controller and drag the pointer to the new Navigation Controller.
Link Up Tab Bar Controller and Navigation Controller
Release both buttons and a pop-up is displayed. Select the “Relationship – View Controllers” option. This tells Xcode that the new Navigation Controller is a part of Tab Bar Controller.
Establish Relationship with Navigation Controller
As soon as the relationship is established, the Tab Bar Controller automatically adds a new tab and associates it with the new Navigation Controller.
Tab Bar Controller with New Tab
Change the tab bar item of the new Navigation Controller to “More”. Save the Storyboard and run the app again. Don’t you see the new “More” tab?
Creating the ‘About’ Page with UIWebView
The “More” tab is now empty. We’re going to turn it into a web view for displaying the “About” page of the app. First, delete the “Table View Controller” and replace it with a View Controller. Simply select the “Table View Controller” and click DELETE buttonto remove it. Then drag the “View Controller” object from Object Library.
Replace Table View Controller with View Controller
As of now, the blank View Controller is not associated with the Navigation Controller. We have to link them up. Press and hold the command key, select the Navigation Controller and drag it towards the View Controller.
Link up View Controller and Navigation Controller
Like what we’ve done earlier, select the “Relationship – View Controllers” option to establish the relationship between both controllers.
Associated the Relationship Between View Controllers
The main purpose of this view controller is to render the “About” web page. iOS SDK has a built-in UIWebView object to display web content. You can simply embed the UIWebView object in any view controller. Later you send it a HTTP request and it automatically
loads the web content for you. Locate the “Web View” in Object Library and add it into the View Controller.
Add Web View into View Controller
Assigning a New View Controller Class
As explained in previous tutorial, a blank view controller is assigned with the default UIViewControllerclass, that only provides the fundamental view management model. Apparently, it doesn’t come with a variable for controlling the UIWebView. Yet we have to create a new View Controller class that extends from the UIViewController.
In the Project Navigator, right-click the “RecipeBook” folder and select “New File…”.
Create New File in Xcode Project
Choose “Objective-C Class” under Cocoa Touch as the class template.
Select Objective C Class
Name the class as “AboutViewController” and it’s a subclass of “UIViewController”. Make sure you uncheck the option of “With XIB for user interface”. As we’re using Storyboards for designing the user interface, we do not need to create a separate interface
builder file. Click “Next” and save the file in your project folder.
Create a new class - AboutViewController
Next, assign the view controller with the “AboutViewController”. Go back to the Storyboards editor and select the view controller. In the identity inspector, change the class to “AboutViewController”.
Set the Custom Class to AboutViewController
Use UIWebView to Load a Request
To request UIWebView to load web content, we have to write a few lines of code. In brief, there are three things we need to implement:Add the “about.html” and “about.jpg” to your Xcode project
Assign a variable for UIWebView and associate it with the Web View object in Storyboard
Use the loadRequest: method in UIWebView to load web content
Adding ‘About.html’
The UIWebView class allows you to load web content both locally and remotely. You can send it a HTTP request (e.g. http://www.google.com) to load a remote website. Alternatively, you can tell UIWebView to load web pages embed in your app. For this tutorial,we’ll put the “about.html” inside our app.
You can create your own about.html. For your convenience, however, download the about.zip, extract it and add all the files into the
Xcode project.
Assign a Variable for UIWebView
Select the “AboutViewController.h” and add a new property for UIWebView:| 1 2 3 4 5 | @interface AboutViewController : UIViewController @property (nonatomic, strong) IBOutlet UIWebView *webView; @end |
| 1 2 3 | @implementation AboutViewController @synthesize webView; |
As usual, it’s required to establish connection between the “webView” variable and the visual web view. In the Storyboards editor, press & hold the command key and then click the “View Controller” icon, drag it to the Web View object. Release both buttons and
a pop-up shows variables for your selection. Choose the “webView” variable.
Link Up UIWebView and webView Variable
Load Web Content
Inside viewDidLoad method, add the following code to load the “about.html”:| 1 2 3 4 5 6 7 8 | - (void)viewDidLoad { [super viewDidLoad]; // Add code to load web content in UIWebView NSURL *url = [NSURL fileURLWithPath:[[NSBundle mainBundle]pathForResource:@"about.html" ofType:nil]]; NSURLRequest *request = [NSURLRequest requestWithURL:url]; [webView loadRequest:request]; } |
using the URL. Obviously, line 7 sends the request to web view.
Final Deliverable
Hit the Run button and try out the app. If you got everything correctly, your final deliverable should look like below. When you select the “More” tab, it automatically loads the “about.html”.
Summary
Storyboarding has streamlined the user interface design of iOS app. As you can see from this tutorial, without a single line of code, you can create a tab bar controller and embed other controllers in the tab items. We’ve also showed you how to use UIWebViewto load web content. UIWebView offers basic function of a mobile browser. Whenever you need to display web page within your app, embed the web view and send it a request.
转载:http://www.appcoda.com/storyboard-tutorial-create-tab-bar-controller-and-web-view/

相关文章推荐
- [iPhone]如何在Tab Bar Controller里面使用ABPersonViewController?
- 在storyboard中的静态UITableView中拖入 UISearchBar and Search Display Controller出现的奇怪问题
- 在storyboard中的静态UITableView中拖入 UISearchBar and Search Display Controller出现的奇怪问题
- segue跳转到viewcontroller后tab bar item消失的问题
- AKTabBarController is an adaptive and customizable tab bar for iOS
- iOS: using xcode 4.3 to create nav controller + tab view + table view without storyboard
- ActionBar+TabPageIndicator+ViewPager+FragmentPagerAdapter的Tab主界面
- Android ViewFlipper within TabHost for Tabs with different Views ... and better memory footprint
- ActionBar Tab与ViewPager整合
- TabLayout +ViewPager+Fragment + RecycleView + webView加载本地html
- IOS -TOWebViewController使用简介
- Actionbar + tabs + viewpager使用
- UITabBarController:tab bar 的 image 太大、不清晰的解决方法
- NavigationViewController的backBarButtonItem的设置技巧
- android webview ZoomButtonsController 导致android.view.WindowLeaked 问题彻底解决
- android 使用Tabhost 发生could not create tab content because could not find view with id 错
- (三)UITabBar and UINavigationController基础教程之UITableView的插入删除移动
- 如何隐藏Tab Bar Controller的Tab Bar
- ios UISearchBar ,UISearchViewController,以及自定义的区别
- uicollectionviewcell automatically down -32 when self.navigationcontroller.navigationbar.translucent