Window下使用Gvim搭建简单IDE
2013-05-01 21:57
225 查看
本文源自:http://blog.csdn.net/wooin/archive/2007/10/31/1858917.aspx。
//这是我加上去的:
//第一步,先搭建一般IDE需要的功能,什么查找、编辑多个文件、高亮之类的功能
0.准备软件及插件。
(a)gvim72.exe 地址ftp://ftp.vim.org/pub/vim/pc/gvim72.exe。
(b)vimcdoc-1.7.0-setup.exe 地址http://prdownloads.sourceforge.net/vimcdoc/vimcdoc-1.7.0-setup.exe?download
(c)ec57w32.zip 地址http://prdownloads.sourceforge.net/ctags/ec57w32.zip
(d)taglist_45.zip 地址http://www.vim.org/scripts/download_script.php?src_id=7701
(e)winmanager.zip 地址http://www.vim.org/scripts/download_script.php?src_id=754
(f)minibufexpl.vim 地址http://www.vim.org/scripts/download_script.php?src_id=3640
(g)a.vim 地址http://www.vim.org/scripts/download_script.php?src_id=7218
(h)grep.vim 地址http://www.vim.org/scripts/download_script.php?src_id=7645
(i)visualmark.vim 地址http://www.vim.org/scripts/download_script.php?src_id=4700
1.安装gvim7.2。
运行gvim72.exe,选择完全安装(Full),我的安装目录是默认的C:\Program Files\Vim。
安装完成后,包括了文件夹vim72和文件夹vimfiles,以及脚本_vimrc。
2.安装中文帮助手册。
运行vimcdoc-1.7.0-setup.exe,它会自动找到gvim的安装位置。
安装完毕后重新打开gvim,:help 时帮助手册已经是中文的了。
进行到这一步时,我的gvim菜单处的中文出现了乱码。
在网上寻找解决方案,将C:\Program Files\Vim\vim72下名为 lang 的文件夹删去,使菜单语言变为英语。
3.语法高亮。首先,编辑_vimrc文件加入以下内容:
set nu!
colorscheme desert
syntax enable
syntax on
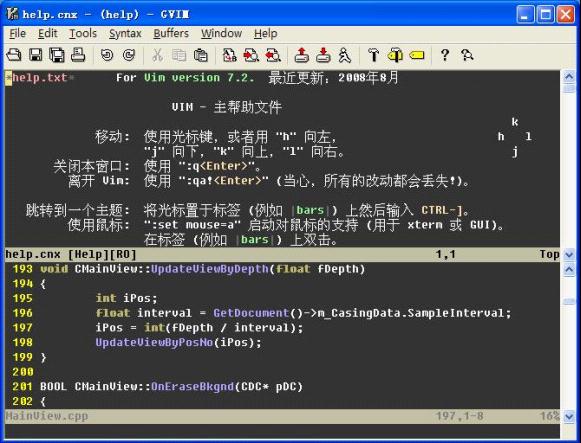
这些设置使得gvim可以显示行号,并使用了desert配色方案,而且打开了语法高亮功能(用不同颜色显示注释、关键字、字符串等)。
我们还可以让函数名也高亮起来,在C:\Program Files\Vim\vim72\syntax下找到 c.vim 和 cpp.vim,分别添加以下内容:
syn match cFunction "\<[a-zA-Z_][a-zA-Z_0-9]*\>[^()]*)("me=e-2
syn match cFunction "\<[a-zA-Z_][a-zA-Z_0-9]*\>\s*("me=e-1
hi cFunction gui=NONE guifg=#B5A1FF
重新打开gvim,效果如下:
4.程序中跳转。将ec57w32.zip解压,在解压后文件夹中找到ctags.exe,将其复制到C:\ProgramFiles\Vim\vim72下,并编辑_vimrc文件,添加以下内容:
set tags=tags;
set autochdir
打开cmd命令行,切换到你要查看的源代码的根目录处,运行
ctags -R
将会在此目录处生成一个tags文件。
用gvim打开一个代码文件,将光标放到某一函数名上,如下图的UpdateViewByPosNo(),按下"ctrl+]",光标会自动跳转到定义处。
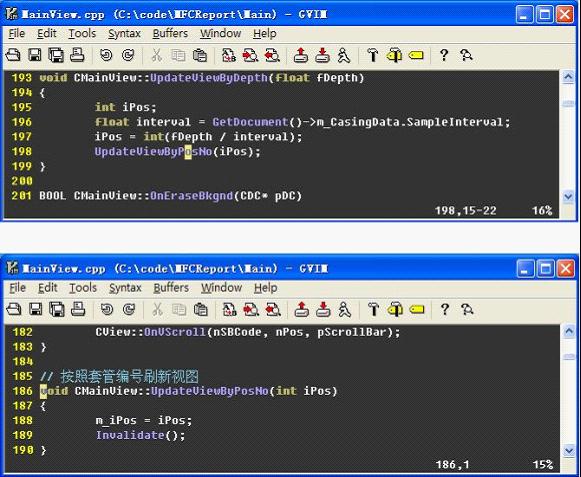
按下"ctrl+T"会跳回到原来的位置。
变量、结构体、宏等等,都可以这样做。
当你的源文件有更新时,只能重新运行ctags -R命令,来更新tags文件。
5.窗口管理。
将taglist_45.zip解压,解压后包含一个doc文件夹和一个plugin文件夹,将其中内容分别复制到C:\Program Files\Vim\vim72下的doc及plugin中。
在_vimrc文件中加入以下内容:
let Tlist_Show_One_File=1
let Tlist_Exit_OnlyWindow=1
用gvim打开代码文件(已生成过tags文件),:Tlist,TagList窗口即出现在左侧。
用相同的方法将winmanager.zip解压和拷贝,在_vimrc文件中加入以下内容:
let g:winManagerWindowLayout='FileExplorer|TagList'
nmap wm :WMToggle<cr>
用gvim打开代码文件,normal状态下输入命令"wm",窗口如下

其中左上是netrw窗口(浏览文件),左下是TagList窗口,再次输入"wm"时这两个窗口会关闭。
6.多文件编辑。
将minibufexpl.vim复制到C:\Program Files\Vim\vim72\plugin,在_vimrc中添加:
let g:miniBufExplMapCTabSwitchBufs=1
let g:miniBufExplMapWindowsNavVim=1
let g:miniBufExplMapWindowNavArrows=1
当用gvim打开两个或两个以上的文件时,会自动弹出MiniBufExplorer窗口,如下图

ctrl+Tab,切换到前一个buffer,并在当前窗口打开文件;
ctrl+shift+Tab,切换到后一个buffer,并在当前窗口打开文件;
ctrl+箭头键,可以切换到上下左右窗口中;
ctrl+h,j,k,l,切换到上下左右的窗口中。
7.快速切换头文件/源文件。
将a.vim复制到C:\Program Files\Vim\vim72\plugin,在_vimrc中添加:
nnoremap <silent> <F12> :A<CR>
用gvim打开源码文件后,按F12即可以在c/h文件中切换,也可以通过输入:A实现。
8.在工程中快速查找。
将grep.vim复制到C:\Program Files\Vim\vim72\plugin,在_vimrc中添加:
nnoremap <silent> <F3> :Grep<CR>
用gvim打开源码文件,并将光标定位到要查找的内容上,按下F3,确定要查找的内容和搜索范围,gvim会在弹出的QuickFix窗口中列出所有符合条件的搜索结果。如下图

确定查找内容时,支持正则表达式。
9.高亮的书签。
将visualmark.vim复制到C:\Program Files\Vim\vim72\plugin。
用gvim打开源码文件,将光标定位在需要添加书签的地方,按下ctrl+F2,即添加了书签。

使用F2在书签之间正向切换,shift+F2反向切换。
//第二步:在Windows下使用gcc编译器:
请参考博文:http://www.cnblogs.com/cryinstall/archive/2011/08/27/2280827.html
MinGW是指只用自由软件来生成纯粹的Win32可执行文件的编译环境,它是Minimalist GNU on Windows的略称。
实际上 MinGW 并不是一个 单纯的C/C++ 编译器,而是一套 GNU 工具集合。除开 GCC 以外,MinGW 还包含有一些其他的 GNU 程序开发工具 (比如 gawk bison 等等)。
开发 MinGW 是为了那些不喜欢工作在 Linux(FreeBSD) 操作系统而留在 Windows 的人提供一套符合 GNU 的 GNU 工作环境。
所以,使用 MinGW 我们就可以像在 Linux 下一样使用 GNU 程序开发工具。
GCC 就是 MinGW 的核心所在,GCC 是一套支持众多计算机程序语言的编译系统,而且在语言标准的实现上是最接近于标准的。并且 GCC 几乎可以移植到目前所有可用的计算机平台。(我的电脑上就还装有 DevKitPro,里面包含 GCC 的 ARM(for GBA/DS/GP32) 和 MIPS(for PSP) 版本。)
GCC 本身不像 VC 那样拥有IDE 界面(在 Windows 上也存在 Dev C++ 之类的支持 MinGW 编译器的 IDE)。源代码编辑你可以选用任何你喜欢的文本编辑器(据说微软的开发人员包括 VC 的开发都不用 VC 所带的 IDE 编辑器,而是选用 GNU 的 VIM 编辑器)。然后使用 make 等工具来进行软件项目的编译、链接、打包乃至发布。而像 cvs(svn) 源代码版本控制工具可以让世界上任何一个角落的人都可以参与到软件项目中来。
一种方法是到Sourceforge(http://sourceforge.net/project/showfiles.php?group_id=2435)下载一个MinGW-2.0.0-3.exe。
但是我配置的时候我电脑上安装了codeblocks,已经自带了MinGW。
在(系统属性-->高级-->环境变量-->系统变量 中)(以下目录都根据自己的电脑MinGW所在位置不同而改变)
a.在PATH的值中加入“C:\Program Files\MinGWStudio\MinGW\bin”。这是寻找gcc编译器的路径。如果PATH中还有其他内容,需要用英文状态下分号进行分割
b.新建LIBRARY_PATH变量,在其值中加入“C:\Program Files\MinGWStudio\MinGW\lib”。这是标准库存放的路径。
c.新建C_INCLUDE_PATH变量,在其值中加入“C:\Program Files\MinGWStudio\MinGW\include”。这是Include查找头文件的路径。
在cmd控制台窗口下面,输入gcc -v。若已经成功安装好,会显示gcc的版本信息。
//第三步:gVim/Vim 一键编译、连接、运行 C/C++ 单文件(Windows
与 Linux通用)
转载自:http://www.oschina.net/code/snippet_574132_13351
用于Gvim 或 Vim 配置文件的一键编译与运行函数(注:需要机器上安装了GCC才行)
本代码只加入了对C/C++的编译与运行,如果要加入其语言的可以参考此代码加入即可
同时,本代码加入了对Windows下用Gvim编译UTF-8编码格式的源文件时中文乱码的解
决方法(也就是在编译选项中加入了 “-fexec-charset=gbk”)。
将上面的代码加入到_vimrc文件里即可
----------------------------------------------------------
最后,配置所需要的资料,我自己已经先行找过了,都放在这里:http://iask.sina.com.cn/u/ish
//这是我加上去的:
//第一步,先搭建一般IDE需要的功能,什么查找、编辑多个文件、高亮之类的功能
0.准备软件及插件。
(a)gvim72.exe 地址ftp://ftp.vim.org/pub/vim/pc/gvim72.exe。
(b)vimcdoc-1.7.0-setup.exe 地址http://prdownloads.sourceforge.net/vimcdoc/vimcdoc-1.7.0-setup.exe?download
(c)ec57w32.zip 地址http://prdownloads.sourceforge.net/ctags/ec57w32.zip
(d)taglist_45.zip 地址http://www.vim.org/scripts/download_script.php?src_id=7701
(e)winmanager.zip 地址http://www.vim.org/scripts/download_script.php?src_id=754
(f)minibufexpl.vim 地址http://www.vim.org/scripts/download_script.php?src_id=3640
(g)a.vim 地址http://www.vim.org/scripts/download_script.php?src_id=7218
(h)grep.vim 地址http://www.vim.org/scripts/download_script.php?src_id=7645
(i)visualmark.vim 地址http://www.vim.org/scripts/download_script.php?src_id=4700
1.安装gvim7.2。
运行gvim72.exe,选择完全安装(Full),我的安装目录是默认的C:\Program Files\Vim。
安装完成后,包括了文件夹vim72和文件夹vimfiles,以及脚本_vimrc。
2.安装中文帮助手册。
运行vimcdoc-1.7.0-setup.exe,它会自动找到gvim的安装位置。
安装完毕后重新打开gvim,:help 时帮助手册已经是中文的了。
进行到这一步时,我的gvim菜单处的中文出现了乱码。
在网上寻找解决方案,将C:\Program Files\Vim\vim72下名为 lang 的文件夹删去,使菜单语言变为英语。
3.语法高亮。首先,编辑_vimrc文件加入以下内容:
set nu!
colorscheme desert
syntax enable
syntax on
这些设置使得gvim可以显示行号,并使用了desert配色方案,而且打开了语法高亮功能(用不同颜色显示注释、关键字、字符串等)。
我们还可以让函数名也高亮起来,在C:\Program Files\Vim\vim72\syntax下找到 c.vim 和 cpp.vim,分别添加以下内容:
syn match cFunction "\<[a-zA-Z_][a-zA-Z_0-9]*\>[^()]*)("me=e-2
syn match cFunction "\<[a-zA-Z_][a-zA-Z_0-9]*\>\s*("me=e-1
hi cFunction gui=NONE guifg=#B5A1FF
重新打开gvim,效果如下:
4.程序中跳转。将ec57w32.zip解压,在解压后文件夹中找到ctags.exe,将其复制到C:\ProgramFiles\Vim\vim72下,并编辑_vimrc文件,添加以下内容:
set tags=tags;
set autochdir
打开cmd命令行,切换到你要查看的源代码的根目录处,运行
ctags -R
将会在此目录处生成一个tags文件。
用gvim打开一个代码文件,将光标放到某一函数名上,如下图的UpdateViewByPosNo(),按下"ctrl+]",光标会自动跳转到定义处。
按下"ctrl+T"会跳回到原来的位置。
变量、结构体、宏等等,都可以这样做。
当你的源文件有更新时,只能重新运行ctags -R命令,来更新tags文件。
5.窗口管理。
将taglist_45.zip解压,解压后包含一个doc文件夹和一个plugin文件夹,将其中内容分别复制到C:\Program Files\Vim\vim72下的doc及plugin中。
在_vimrc文件中加入以下内容:
let Tlist_Show_One_File=1
let Tlist_Exit_OnlyWindow=1
用gvim打开代码文件(已生成过tags文件),:Tlist,TagList窗口即出现在左侧。
用相同的方法将winmanager.zip解压和拷贝,在_vimrc文件中加入以下内容:
let g:winManagerWindowLayout='FileExplorer|TagList'
nmap wm :WMToggle<cr>
用gvim打开代码文件,normal状态下输入命令"wm",窗口如下
其中左上是netrw窗口(浏览文件),左下是TagList窗口,再次输入"wm"时这两个窗口会关闭。
6.多文件编辑。
将minibufexpl.vim复制到C:\Program Files\Vim\vim72\plugin,在_vimrc中添加:
let g:miniBufExplMapCTabSwitchBufs=1
let g:miniBufExplMapWindowsNavVim=1
let g:miniBufExplMapWindowNavArrows=1
当用gvim打开两个或两个以上的文件时,会自动弹出MiniBufExplorer窗口,如下图
ctrl+Tab,切换到前一个buffer,并在当前窗口打开文件;
ctrl+shift+Tab,切换到后一个buffer,并在当前窗口打开文件;
ctrl+箭头键,可以切换到上下左右窗口中;
ctrl+h,j,k,l,切换到上下左右的窗口中。
7.快速切换头文件/源文件。
将a.vim复制到C:\Program Files\Vim\vim72\plugin,在_vimrc中添加:
nnoremap <silent> <F12> :A<CR>
用gvim打开源码文件后,按F12即可以在c/h文件中切换,也可以通过输入:A实现。
8.在工程中快速查找。
将grep.vim复制到C:\Program Files\Vim\vim72\plugin,在_vimrc中添加:
nnoremap <silent> <F3> :Grep<CR>
用gvim打开源码文件,并将光标定位到要查找的内容上,按下F3,确定要查找的内容和搜索范围,gvim会在弹出的QuickFix窗口中列出所有符合条件的搜索结果。如下图
确定查找内容时,支持正则表达式。
9.高亮的书签。
将visualmark.vim复制到C:\Program Files\Vim\vim72\plugin。
用gvim打开源码文件,将光标定位在需要添加书签的地方,按下ctrl+F2,即添加了书签。
使用F2在书签之间正向切换,shift+F2反向切换。
//第二步:在Windows下使用gcc编译器:
请参考博文:http://www.cnblogs.com/cryinstall/archive/2011/08/27/2280827.html
1.首先介绍下MinGW
MinGW是指只用自由软件来生成纯粹的Win32可执行文件的编译环境,它是Minimalist GNU on Windows的略称。实际上 MinGW 并不是一个 单纯的C/C++ 编译器,而是一套 GNU 工具集合。除开 GCC 以外,MinGW 还包含有一些其他的 GNU 程序开发工具 (比如 gawk bison 等等)。
开发 MinGW 是为了那些不喜欢工作在 Linux(FreeBSD) 操作系统而留在 Windows 的人提供一套符合 GNU 的 GNU 工作环境。
所以,使用 MinGW 我们就可以像在 Linux 下一样使用 GNU 程序开发工具。
GCC 就是 MinGW 的核心所在,GCC 是一套支持众多计算机程序语言的编译系统,而且在语言标准的实现上是最接近于标准的。并且 GCC 几乎可以移植到目前所有可用的计算机平台。(我的电脑上就还装有 DevKitPro,里面包含 GCC 的 ARM(for GBA/DS/GP32) 和 MIPS(for PSP) 版本。)
GCC 本身不像 VC 那样拥有IDE 界面(在 Windows 上也存在 Dev C++ 之类的支持 MinGW 编译器的 IDE)。源代码编辑你可以选用任何你喜欢的文本编辑器(据说微软的开发人员包括 VC 的开发都不用 VC 所带的 IDE 编辑器,而是选用 GNU 的 VIM 编辑器)。然后使用 make 等工具来进行软件项目的编译、链接、打包乃至发布。而像 cvs(svn) 源代码版本控制工具可以让世界上任何一个角落的人都可以参与到软件项目中来。
2.下载MinGW
一种方法是到Sourceforge(http://sourceforge.net/project/showfiles.php?group_id=2435)下载一个MinGW-2.0.0-3.exe。但是我配置的时候我电脑上安装了codeblocks,已经自带了MinGW。
3.环境变量的配置
在(系统属性-->高级-->环境变量-->系统变量 中)(以下目录都根据自己的电脑MinGW所在位置不同而改变)a.在PATH的值中加入“C:\Program Files\MinGWStudio\MinGW\bin”。这是寻找gcc编译器的路径。如果PATH中还有其他内容,需要用英文状态下分号进行分割
b.新建LIBRARY_PATH变量,在其值中加入“C:\Program Files\MinGWStudio\MinGW\lib”。这是标准库存放的路径。
c.新建C_INCLUDE_PATH变量,在其值中加入“C:\Program Files\MinGWStudio\MinGW\include”。这是Include查找头文件的路径。
4.验证gcc是否正常运行
在cmd控制台窗口下面,输入gcc -v。若已经成功安装好,会显示gcc的版本信息。//第三步:gVim/Vim 一键编译、连接、运行 C/C++ 单文件(Windows
与 Linux通用)
转载自:http://www.oschina.net/code/snippet_574132_13351
用于Gvim 或 Vim 配置文件的一键编译与运行函数(注:需要机器上安装了GCC才行)
本代码只加入了对C/C++的编译与运行,如果要加入其语言的可以参考此代码加入即可
同时,本代码加入了对Windows下用Gvim编译UTF-8编码格式的源文件时中文乱码的解
决方法(也就是在编译选项中加入了 “-fexec-charset=gbk”)。
将上面的代码加入到_vimrc文件里即可
gvim配置文件
"------------------------------------------------------------------------------
"  < 判断操作系统是否是 Windows 还是 Linux >
"------------------------------------------------------------------------------
if(has("win32") || has("win64") || has("win95") || has("win16"))
    let g:iswindows = 1
else
    let g:iswindows = 0
endif

"------------------------------------------------------------------------------
"  < 判断是终端还是 Gvim >
"------------------------------------------------------------------------------
if has("gui_running")
    let g:isGUI = 1
else
    let g:isGUI = 0
endif

"------------------------------------------------------------------------------
"  < 编译、连接、运行配置 >
"------------------------------------------------------------------------------
" F9 一键保存、编译、连接存并运行
map <F9> :call Run()<CR>
imap <F9> <ESC>:call Run()<CR>

" Ctrl + F9 一键保存并编译
map <c-F9> :call Compile()<CR>
imap <c-F9> <ESC>:call Compile()<CR>

" Ctrl + F10 一键保存并连接
map <c-F10> :call Link()<CR>
imap <c-F10> <ESC>:call Link()<CR>

let s:LastShellReturn_C = 0
let s:LastShellReturn_L = 0
let s:ShowWarning = 1
let s:Obj_Extension = '.o'
let s:Exe_Extension = '.exe'
let s:Sou_Error = 0

let s:windows_CFlags = 'gcc\ -fexec-charset=gbk\ -Wall\ -g\ -O0\ -c\ %\ -o\ %<.o'
let s:linux_CFlags = 'gcc\ -Wall\ -g\ -O0\ -c\ %\ -o\ %<.o'

let s:windows_CPPFlags = 'g++\ -fexec-charset=gbk\ -Wall\ -g\ -O0\ -c\ %\ -o\ %<.o'
let s:linux_CPPFlags = 'g++\ -Wall\ -g\ -O0\ -c\ %\ -o\ %<.o'

func! Compile()
    exe ":ccl"
    exe ":update"
    if expand("%:e") == "c" || expand("%:e") == "cpp" || expand("%:e") == "cxx"
        let s:Sou_Error = 0
        let s:LastShellReturn_C = 0
        let Sou = expand("%:p")
        let Obj = expand("%:p:r").s:Obj_Extension
        let Obj_Name = expand("%:p:t:r").s:Obj_Extension
        let v:statusmsg = ''
        if !filereadable(Obj) || (filereadable(Obj) && (getftime(Obj) < getftime(Sou)))
            redraw!
            if expand("%:e") == "c"
                if g:iswindows
                    exe ":setlocal makeprg=".s:windows_CFlags
                else
                    exe ":setlocal makeprg=".s:linux_CFlags
                endif
                echohl WarningMsg | echo " compiling..."
                silent make
            elseif expand("%:e") == "cpp" || expand("%:e") == "cxx"
                if g:iswindows
                    exe ":setlocal makeprg=".s:windows_CPPFlags
                else
                    exe ":setlocal makeprg=".s:linux_CPPFlags
                endif
                echohl WarningMsg | echo " compiling..."
                silent make
            endif
            redraw!
            if v:shell_error != 0
                let s:LastShellReturn_C = v:shell_error
            endif
            if g:iswindows
                if s:LastShellReturn_C != 0
                    exe ":bo cope"
                    echohl WarningMsg | echo " compilation failed"
                else
                    if s:ShowWarning
                        exe ":bo cw"
                    endif
                    echohl WarningMsg | echo " compilation successful"
                endif
            else
                if empty(v:statusmsg)
                    echohl WarningMsg | echo " compilation successful"
                else
                    exe ":bo cope"
                endif
            endif
        else
            echohl WarningMsg | echo ""Obj_Name"is up to date"
        endif
    else
        let s:Sou_Error = 1
        echohl WarningMsg | echo " please choose the correct source file"
    endif
    exe ":setlocal makeprg=make"
endfunc

func! Link()
    call Compile()
    if s:Sou_Error || s:LastShellReturn_C != 0
        return
    endif
    let s:LastShellReturn_L = 0
    let Sou = expand("%:p")
    let Obj = expand("%:p:r").s:Obj_Extension
    if g:iswindows
        let Exe = expand("%:p:r").s:Exe_Extension
        let Exe_Name = expand("%:p:t:r").s:Exe_Extension
    else
        let Exe = expand("%:p:r")
        let Exe_Name = expand("%:p:t:r")
    endif
    let v:statusmsg = ''
	if filereadable(Obj) && (getftime(Obj) >= getftime(Sou))
        redraw!
        if !executable(Exe) || (executable(Exe) && getftime(Exe) < getftime(Obj))
            if expand("%:e") == "c"
                setlocal makeprg=gcc\ -o\ %<\ %<.o
                echohl WarningMsg | echo " linking..."
                silent make
            elseif expand("%:e") == "cpp" || expand("%:e") == "cxx"
                setlocal makeprg=g++\ -o\ %<\ %<.o
                echohl WarningMsg | echo " linking..."
                silent make
            endif
            redraw!
            if v:shell_error != 0
                let s:LastShellReturn_L = v:shell_error
            endif
            if g:iswindows
                if s:LastShellReturn_L != 0
                    exe ":bo cope"
                    echohl WarningMsg | echo " linking failed"
                else
                    if s:ShowWarning
                        exe ":bo cw"
                    endif
                    echohl WarningMsg | echo " linking successful"
                endif
            else
                if empty(v:statusmsg)
                    echohl WarningMsg | echo " linking successful"
                else
                    exe ":bo cope"
                endif
            endif
        else
            echohl WarningMsg | echo ""Exe_Name"is up to date"
        endif
    endif
    setlocal makeprg=make
endfunc

func! Run()
    let s:ShowWarning = 0
    call Link()
    let s:ShowWarning = 1
    if s:Sou_Error || s:LastShellReturn_C != 0 || s:LastShellReturn_L != 0
        return
    endif
    let Sou = expand("%:p")
    let Obj = expand("%:p:r").s:Obj_Extension
    if g:iswindows
        let Exe = expand("%:p:r").s:Exe_Extension
    else
        let Exe = expand("%:p:r")
    endif
    if executable(Exe) && getftime(Exe) >= getftime(Obj) && getftime(Obj) >= getftime(Sou)
        redraw!
        echohl WarningMsg | echo " running..."
        if g:iswindows
            exe ":!%<.exe"
        else
            if g:isGUI
                exe ":!gnome-terminal -e ./%<"
            else
                exe ":!./%<"
            endif
        endif
        redraw!
        echohl WarningMsg | echo " running finish"
    endif
endfunc
----------------------------------------------------------
最后,配置所需要的资料,我自己已经先行找过了,都放在这里:http://iask.sina.com.cn/u/ish

相关文章推荐
- 转:windows下使用gvim搭建简单的IDE编译环境(支持C/C++/Python等)
- windows下使用gvim搭建简单的IDE编译环境(支持C/C++/Python等)
- 【转帖】windows下使用gvim搭建简单的IDE编译环境(支持C/C++/Python等)
- windows下使用gvim搭建简单的IDE编译环境(支持C/C++/Python等)
- 在window平台搭建Qt开发环境(使用VS2008 IDE)
- 在window平台搭建Qt开发环境(使用VS2008 IDE)
- 使用mingw在windows下搭建c/c++ IDE简单开发环境
- Window平台使用VS2010简单快速搭建QT开发环境
- Window平台使用VS2010简单快速搭建QT开发环境
- Window搭建Redis与简单的入门使用
- 2011年 使用最新版wampserver搭建 WAMP 平台超简单实用教程
- android 最新 NDK r8 在window下开发环境搭建 安装配置与使用 详细图文讲解,完整实际配置过程记录
- 如何在win7中使用IIS和花生壳搭建简单服务器
- 使用maven+eclipse搭建最简单的struts2的HelloWorld
- Jenkins简单搭建使用
- node使用express搭建简单web框架并实现文件上传
- 使用Python搭建简单Http服务器
- SVN服务端的搭建和简单使用
- Django使用-Django搭建简单博客
- Redis集群搭建与简单使用