Simple Plug-in Architecture in Plain C
2013-04-26 23:06
471 查看
Introduction
This article explains how to write an application using architecture that supports plug-ins. We would be doing this using plain C. The concepts that are explained can be used to implement in any language. The reader is expected to have a thorough understandingof function pointers and dynamic loading of dlls. Knowledge of the GTK toolkit would be a plus but not mandatory to understand the concepts. You can download the GTK development environment installer from http://downloads.sourceforge.net/gladewin32/gtk-dev-2.12.9-win32-2.exe
Background
A plug-in is a software component that can be loaded by a host application at run-time or during startup. The plug-in provides additional features to the application. However, a plug-in also needs to have some access to the host application in order to makethe application features customizable using plug-ins. We would be using the dynamic loading mechanism of DLLs in order to implement the plug-in architecture. The entire architecture, the application and the plug-ins will be implemented in plain C. The GUI
is implemented in GTK+ to make it cross-platform.
The Architecture
Any application that supports dynamic loading of software components is intended to be made so to enable customization and/or enhancement of the existing application without having to have it recompiled or, as that matter of fact, have access to its sourcecode. And to have an application support such a feature, it should be written to have at least the ability to:
1) Load the plug-in modules at run time. (Dynamic loading of DLLs)
2) Identify modules those are of its predetermined type.
3) Query for minimal functions and objects from the module.
4) Update its interface to enable the user to use it with the added functionality via menus or icons.
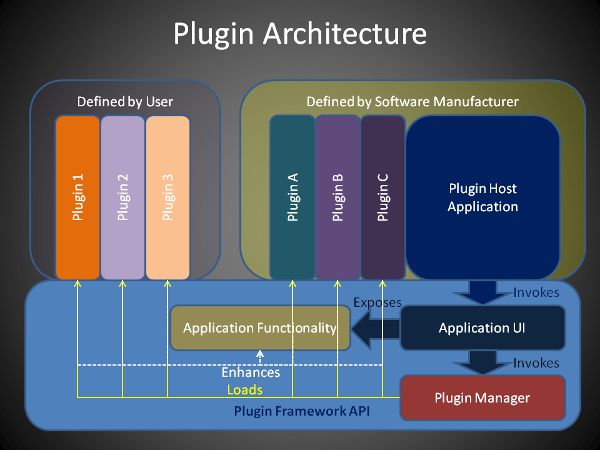
Shown below is typical plug-in based software architecture…
Loading the Plug-in
Typically, applications use a predetermined folder path and expect the plug-in developers to place the plug-ins in that path so that it can load them from there at runtime or during startup. Some applications may also provide interactive dialogs (plug-inmanagers) to add plug-in paths and save it to application configuration files. The application loads the DLL files using the standard OS API calls for dynamically loading libraries like
LoadLibraryon
Windows and
dlopenon
UNIX/Linux. The validity of the plug-in is verified by making calls to certain functions expected to be implemented by the plug-in developer.
Identifying plug-in types
The application may support plug-in modules for a variety of operations. These operations may be categorized into different types. The application will also query the module for its type. Based on this query, the application will decide to make it availablefor the user through the corresponding tool-box, tool-bar or menu category.
The API
For all this to work, the plug-in developer must be given some protocol to follow when the plug-in is written. This is enforced by having the developer implement certain functions and have them return certain predefined values. However, this is only halfpart of the game. By having the developer implement those functions only the application is gaining control over the plug-in module. The plug-in yet doesn’t have control over the application without which there is no point in having it to do something useful
to manipulate the application. Again this has to be provided by the application. But how does the plug-in developer link to the code in the application if it is built as a monolithic piece of code. For the developer to be able to call functions to control
the application, those functions must be written in a separate module that both the application and the plug-in can share. So, essentially most of the functionality that the application wishes to share with the plug-ins must be detached from the host application.
This set of application functionality and the plug-in protocols together put into a sharable module and interface makes the application’s Application Programming Interface (API) or Software Development Kit (SDK).
The Implementation
Let us now have a look at how to implement such and API, its hosting application and the plug-in modules. For convenience of implementation for this simple demonstration, most of the application’s functionality including the GUI is kept in the API with exportedfunctions to access and modify it. Shown below is a schematic representation of the implementation.

The application is a simple OpenGL application that draws a torus on the screen. The API exposes functions to modify the attributes of the OpenGL viewer and the torus displayed in it. The host application which is the main executable invokes the main GUI
from the API and keeps it up and running. The GUI is available via a static handle throughout the lifecycle of the application. This allows the GUI to be customizable via plug-ins. Editing the torus to change its attributes is done by a plug-in that gets added
to the menu if it is made available in the plugins
folder. A dialog box implemented in the plug-in provides control elements to set the attribute values which are applied to the torus by accessing the corresponding functions from the API. The OpenGL viewer is also exposed by the API via a static handle that
enables the plugin developer
to get hold of it to modify the viewer attributes like background color or the entities displayed in it.

We must remember that dynamically loading the plugin module
and making it available in the application via the menu is only half side of the story. For the other half, in which the code in the plugin module
will be able to control the objects in the application binary, the application itself must be implemented in the API so that the plugindeveloper
can link the modules in which the application components exist. The reason for making the core application objects available via static handles in the API is that the plugins
must be able to access the running instances of those objects and access the application functionality via them. This is possible because when the running application loads the plugin into
its own process space the static objects referred by the API, the plugin modules
and the host application would be the same.
To keep things as simple as possible and intuitive we would be using simple C structures and functions operating on those structures to represent the plugin interface,
the application functionality and the host application itself. Of course, using C++ and
an Object Oriented paradigm will make large scale application development more organized, modular and maintainable but to get through the raw concepts it would be easier to have it implemented in C.
Let us have a look at the plugin header
interface. Our plugin interface
is represented by the structure
_PluginStructwhich
holds nothing more than a few useful function pointers.

Collapse | Copy
Code
struct _PluginStruct
{
NAMEPROC nameProc;
PROVIDERPROC providerProc;
MENUPROC menuProc;
MENUCATPROC menuCatProc;
RUNPROC runProc;
DESTROYPROC destProc;
};
typedef struct _PluginStruct PluginStruct, *LPPLUGINSTRUCT;
The function pointers are to those functions expected to be implemented by the plugin developer.
Collapse | Copy
Code
typedef LPPLUGINSTRUCT (*CREATEPROC) (void);
typedef void (*DESTROYPROC) (LPPLUGINSTRUCT);
typedef const gchar* (*NAMEPROC) (void);
typedef const gchar* (*PROVIDERPROC)(void);
typedef const gchar* (*MENUPROC) (void);
typedef const gchar* (*MENUCATPROC) (void);
typedef void (*RUNPROC) (void);
The functions are for creating, destroying, getting plugin category
information, menu information and executing theplugin functionality.
Collapse | Copy
Code
PLUGINAPP_API LPPLUGINSTRUCT plugin_app_create_plugin(void);
PLUGINAPP_API void plugin_app_destroy_plugin(LPPLUGINSTRUCT);
PLUGINAPP_API const gchar* plugin_app_get_plugin_name(void);
PLUGINAPP_API const gchar* plugin_app_get_plugin_provider(void);
PLUGINAPP_API const gchar* plugin_app_get_menu_name(void);
PLUGINAPP_API const gchar* plugin_app_get_menu_category(void);
PLUGINAPP_API void plugin_app_run_proc(void);
Then we have static handles defined for the Application frame – the main window and for the OpenGL viewer…
Collapse | Copy
Code
static GtkWidget* _mainwindow = NULL;
static LPGLVIEW   _glview = NULL;
…and related query functions…
Collapse | Copy
Code
PLUGINAPP_API GtkWidget* plugin_app_get_mainwindow();
PLUGINAPP_API LPGLVIEW plugin_app_get_glview();
PLUGINAPP_API void plugin_app_get_torus_data(LPGLVIEW iView, double* majorRadius, double* minorRadius, int* r, int* g, int* b, BOOL* shaded);
PLUGINAPP_API void plugin_app_set_torus_data(LPGLVIEW iView, double majorRadius, double minorRadius, int r, int g, int b, BOOL shaded);
These funtions provide means to access the application objects like the main window, the viewer, the displayed 3D object etc. They also facilitate the manipulations of those objects.
That is the end of the simple plugin interface
header.
Now let us have a look at the implementation of the plugin loading
process in the core API. The header that provides the functions to load, unload and maintain the plugins
has the following functions…
Collapse | Copy
Code
PLUGINAPP_API void   plugin_helper_add_plugin_directory (const gchar *directory);
PLUGINAPP_API void   plugin_helper_find_plugins_in_directory();
PLUGINAPP_API GList* plugin_helper_get_plugin_list();
/* Use these functions to load/unload plugins. */
PLUGINAPP_API void*  plugin_helper_load_plugin (const gchar *filename);
PLUGINAPP_API void   plugin_helper_unload_plugin(void* handle);
Let us have a look into the function that loads the plugin…
Collapse | Copy
Code
void* plugin_helper_load_plugin(const gchar *filename)
{
gchar *pathname = NULL;
void *plugin = NULL;
if (!filename || !filename[0])
return NULL;
pathname = plugin_helper_find_plugin_file (filename);
if (!pathname)
{
g_warning (_("Couldn't find plugin file: %s"), filename);
return NULL;
}
plugin = (void*)LoadLibrary(pathname);
g_free (pathname);
return plugin;
}
The Windows API function LoadLibrary loads the plugin dll
into the memory and returns a handle to it from the function shown above.
When the main GUI of the application is shown, the Show event loads all the plugins
available in a predefined folder. Shown below is the code that loads and exposes the plugins…
Collapse | Copy
Code
void load_all_plugins(GtkWidget *widget, gpointer user_data)
{
LPPLUGINSTRUCT pls = NULL;
CREATEPROC create = NULL;
MENUPROC menuproc = NULL;
MENUCATPROC menucatproc = NULL;
RUNPROC runproc = NULL;
…
…
void* handle = NULL;
GtkWidget* mw = plugin_app_get_mainwindow();
editmenuitem = lookup_widget(mw, "editmenuitem");
insertmenuitem = lookup_widget(mw, "insertmenuitem");
elem = plugin_helper_get_plugin_list();
while (elem)
{
filename = (gchar*)elem->data;
handle = plugin_helper_load_plugin(filename);
if(handle)
{
create = (CREATEPROC) GetProcAddress(handle, "plugin_app_create_plugin");
if ((error = GetLastError()) != 0)
{
…
…
}
else
{
/* store the handle for later use */
plugin_handles = g_list_prepend(plugin_handles, handle);
/* Create an instance of the plugin struct */
pls = create();
if(pls && pls->menuProc && pls->runProc)
{
/* store the plugin struct for deletion at exit */
plugin_structs = g_list_prepend(plugin_structs, pls);
menuproc = (MENUPROC) pls->menuProc;
menuName = (gchar*)menuproc();
menucatproc = (MENUCATPROC) pls->menuCatProc;
menuCategory = (gchar*)menucatproc();
g_message (_("Creating menu item: %s"), menuName);
menu = gtk_image_menu_item_new_with_label (menuName);
gtk_widget_set_name (menu, menuName);
gtk_widget_show (menu);
g_object_set_data_full (G_OBJECT (mw), menuName,
gtk_widget_ref (menu), (GDestroyNotify) gtk_widget_unref);
if(g_strcmp0(menuCategory, "edit") == 0)
{
gtk_container_add (GTK_CONTAINER (editmenuitem), menu);
}
else
{
gtk_container_add (GTK_CONTAINER (insertmenuitem), menu);
}
runproc = (RUNPROC)pls->runProc;
g_signal_connect(G_OBJECT(menu), "activate", G_CALLBACK(runproc), NULL);
}
else
{
g_printerr("Invalid Plugin Structure!");
}
}
}
elem = elem->next;
}
gtk_widget_show_all(widget);
}
The function above loads all the valid plugins,
creates menus with appropriate names, attaches the plugin’s
execute function pointer to the menu handler and exposes it in the relevant category. This is where the function pointers in theplugin structure
comes handy. The function pointers in the plugin structure
are either used for querying or to attach as callbacks to the menus. They are also called directly for the plugin execution.
When the application quits the plugins
are gracefully unloaded and destroyed.
Remember, all what we discussed was the meat of the API. We haven’t yet seen the actual executable application that will instanciate the application main window and have it running. Let’s have a look at it…
Collapse | Copy
Code
int main (int argc, char *argv[])
{
GtkWidget *MainWindow;
char* exeName = getexepath();
gchar* exePath = g_path_get_dirname(exeName);
gchar* pluginPath = g_strdup_printf("%s%s", exePath, "/../plugins");
…
…
…
gtk_init (&argc, &argv);
add_pixmap_directory (PACKAGE_DATA_DIR "/" PACKAGE "/pixmaps");
plugin_helper_add_plugin_directory (pluginPath);
// Find plugins in the plugin directory
plugin_helper_find_plugins_in_directory();
// This is where the main window gets instanciated
// The function returns the static MainWindow object
// after creating it if necessary.
MainWindow = plugin_app_get_mainwindow ();
gtk_widget_show (MainWindow);
g_signal_connect(G_OBJECT(MainWindow), "destroy", _CALLBACK(on_quit1_activate), NULL);
gtk_main ();
return 0;
}
The executable simply sets the plugin folder
path and checks for available plugins
and maintains a list of the validplugin paths.
Then it instanciates the application main window and sets it up and running which in turn loads and exposes the plugins.
Now let us have a peek into a simple plugin that
controls the graphic attributes of the displayed torus…
Torusdlg/pluginimpl.c
Collapse | Copy
Code
#include <pluginappsdk.h>
#include "interface.h"
...
...
static GtkWidget* pDlg1 = NULL;
...
LPPLUGINSTRUCT plugin_app_create_plugin()
{
LPPLUGINSTRUCT PLS = (LPPLUGINSTRUCT)malloc(sizeof(PluginStruct));
g_debug("TorusDlg::plugin_app_create_plugin");
if(!PLS)
{
return NULL;
}
PLS->nameProc = plugin_app_get_plugin_name;
PLS->providerProc = plugin_app_get_plugin_provider;
PLS->menuProc = plugin_app_get_menu_name;
PLS->menuCatProc = plugin_app_get_menu_category;
PLS->runProc = plugin_app_run_proc;
PLS->destProc = plugin_app_destroy_plugin;
return PLS;
}
void plugin_app_run_proc()
{
pDlg1 = create_TorusDlg();
gtk_window_set_transient_for(GTK_WINDOW(pDlg1), GTK_WINDOW(plugin_app_get_mainwindow()));
gtk_widget_show(pDlg1);
}
We first implement the
plugin_app_create_plugin()function
in which we create a plugin structure
instance and assign the pointers to the other functions we implement to the function pointer members in the structure.
The
plugin_app_run_proc()function
only creates the torus edition dialog and displays it. The modification of the attributes of the torus is done on the Apply buttons click event.

Collapse | Copy
Code
void on_applybutton1_clicked(GtkButton *button, gpointer user_data)
{
GtkWidget* wid;
GdkColor color;
gdouble min, maj;
gboolean shaded;
...
LPGLVIEW view = plugin_app_get_glview();
...
wid = lookup_widget(GTK_WIDGET(button), "colorbutton1");
gtk_color_button_get_color(GTK_COLOR_BUTTON(wid), &color);
...
wid = lookup_widget(GTK_WIDGET(button), "spinbutton1");
maj = gtk_spin_button_get_value(GTK_SPIN_BUTTON(wid));
wid = lookup_widget(GTK_WIDGET(button), "spinbutton2");
min = gtk_spin_button_get_value(GTK_SPIN_BUTTON(wid));
wid = lookup_widget(GTK_WIDGET(button), "checkbutton1");
shaded = gtk_toggle_button_get_active(GTK_TOGGLE_BUTTON(wid));
...
if(view)
{
plugin_app_set_torus_data(view, maj, min, color.red/257,color.green/257,color.blue/257, shaded);
}
}
We get the OpenGL view static handle using the line...
LPGLVIEW view = plugin_app_get_glview();
...and use it to manipulate the torus attributes. The magic lies in the developer being able to compile this unit as a seperate module and link to the API and the module code being able to access the application objects once it is loaded into the application's
process space.
A couple of plugins
have been implemented to demonstrate the loading of multiple plugins
in different category. Explaining everything would make this article too long. I hope I have provided enough insight to the concepts. The accompanying source code will definitely provide more light to the matter. The reader is encouraged to debug through the
code and see the sequences of the function calls.
A plugin manager
dialog shows all the loaded plugins
and also allows the user to reload the plugins
thus enabling runtime plugging of software modules into the application.

The plugins
built in the solution automatically get copied to a folder named plugins.
If you only build and run thepluginapp
project for the first time you will not see any plugins
in the list box. Once you build all other projects in the solution the plugins
will be generated and copied to the plugins
folder. You need not close the application to have theplugins
loaded. Just click on the Reload button on the plugin manager
dialog and all the plugins
available in theplugins
folder will be loaded and the corresponding menus will be populated.
I hope this article has provided a good starting point for understanding plugin based
software archirecture.
Points of Interest
The basic mantra of writing plugin basedsoftware lies in providing the application the ability to dynamically load dlls/shared objects and having the application functionality built into the API instead of the executable. The executable is usually light weight and just calls the static application
object from the API (thereby instanciating it for the first time) and exposes it to the user.
Tip
To build the accompanying source code you need to install GTK from the link provided in the beginning of the article and also set the following include and library folder paths in Visual Studio:Include:
C:\GTK\include; C:\GTK\include\atk-1.0; C:\GTK\include\glib-2.0;
C:\GTK\include\gtk-2.0; C:\GTK\include\cairo; C:\GTK\include\pango-1.0;
C:\GTK\include\gtkglext-1.0; C:\GTK\lib\glib-2.0\include;
C:\GTK\lib\gtk-2.0\include; C:\GTK\lib\gtkglext-1.0\include;
Library:
C:\GTK\lib
History
First Version 22 May 2012Added GTK development environment installer link 23 May 2012
Added tip to set up GTK on Visual Studio. 24 May 2012
License
This article, along with any associated source code and files, is licensed under TheCode Project Open License (CPOL)

相关文章推荐
- A Simple Plug-In Library For .NET
- C# Plug-In Architecture Articles
- ActiveMQ(5.10.0) - Configuring the simple authentication plug-in
- The most simple and easy to use Qt GUI library plug-in FTStyle (2)The latest version - 2017.10
- The most simple and easy to use Qt GUI library plug-in FTStyle (3)How do Qt4 and Qt5 choose
- The most simple and easy to use Qt GUI library plug-in FTStyle (1)
- Task Plug-in: A Flexible .NET Plug-in Architecture
- My First Plug-in - Inventor API .NET 开发从0开始
- 通达OA 菜单突然消失报错:array_values experts parameter 1 to be array,string given in.index_simple.inc.php(图文)
- Choose a destination with a supported architecture in order to run on this device.
- Jenkins渠道打包插件Dynamic Parameter Plug-in
- 3-tier architecture in my way-1
- Eclipse Plug-in Project中使用jxl.jar
- Creating a Simple Sheet Designer in C#
- 为Eclipse plug-in(插件)创建语言包
- 在Ubuntu下firefox添加java-plug-in
- Eclipse启动失败 - 在安装BlackBerry Java Plug-in for Eclipse v1.3之后
- Ec 4000 lipse6.5+Flex Builder 3 Plug-in
- Handling HTML Element Events in MFC applications - A simple alternative approach
- Simple VBScript program to extract data from all worksheets in an Excel spreadsheet