xcode 4.5 new feature __ ios6 新特性
2013-03-16 11:55
495 查看
转:/article/9004846.html
上两周看了wwdc 2012 developer session 400 - 412的视频,下面总结一下xcode4.5的新特性。(部分参考onevcat的文章,在此感谢。)
@synthesize by default(属性自动绑定)在xcode4.4以前,当我们想为类添加一个新的属性,一般都要对应写实例变量和相应的synthesis,但是在Xcode
4.4之后,synthesis现在会对应property自动生成。默认行为下,对于属性foo,当开发者没有写相应的synthesis的时候,编译器会自动在实现文件中为开发者补全synthesis,就好像你写了@synthesis foo = _foo。
总结一下,新的属性绑定规则如下:
● 除非开发者在实现文件中提供getter或setter,否则将自动生成
● 除非开发者同时提供getter和setter,否则将自动生成实例变量
● 只要写了synthesis,无论有没有跟实例变量名,都将生成实例变量
●
如开发者写了@synthesize foo;那么实例变量名就是foo
● dynamic优先级高于synthesis
● 对于写了@dynamic的实现,所有的对应的synthesis都将不生效
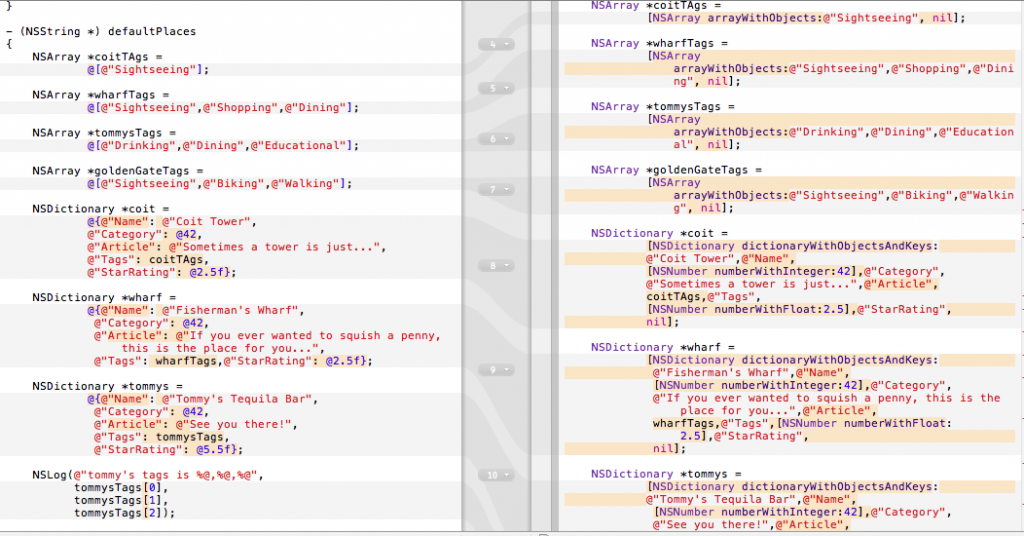
@literals(简写)
在xcode4.4以前
NSNumber
所有的[NSNumber numberWith…:]方法都可以简写了:
● [NSNumber numberWithChar:‘X’]简写为 @‘X’;
● [NSNumber numberWithInt:12345] 简写为 @12345
● [NSNumber numberWithUnsignedLong:12345ul] 简写为 @12345ul
● [NSNumber numberWithLongLong:12345ll] 简写为 @12345ll
● [NSNumber numberWithFloat:123.45f] 简写为 @123.45f
● [NSNumber numberWithDouble:123.45] 简写为 @123.45
● [NSNumber numberWithBool:YES] 简写为 @YES
NSDictionary
● [NSDictionary dictionary] 简写为 @{}
● [NSDictionary dictionaryWithObject:o1forKey:k1] 简写为 @{ k1 : o1 }
● [NSDictionarydictionaryWithObjectsAndKeys:o1, k1, o2, k2, o3, k3, nil] 简写为 @{ k1 : o1, k2 : o2,
k3 : o3 }
当写下@{ k1 : o1, k2 : o2, k3 : o3 }时,实际的代码会是
// compiler generates:
id objects[] = { o1, o2, o3 };
id keys[] = { k1, k2, k3 };
NSUInteger count = sizeof(objects) / sizeof(id);
dict = [NSDictionary dictionaryWithObjects:objects forKeys:keyscount:count];
NSArray
部分NSArray方法得到了简化:
● [NSArray array] 简写为 @[]
● [NSArray arrayWithObject:a] 简写为 @[ a ]
● [NSArray arrayWithObjects:a, b, c, nil] 简写为 @[ a, b, c ]
比如对于@[ a, b, c ],实际编译时的代码是
// compiler generates:
id objects[] = { a, b, c };
NSUInteger count = sizeof(objects)/ sizeof(id);
array = [NSArray arrayWithObjects:objectscount:count];
Mutable版本和静态版本
上面所生成的版本都是不可变的,想得到可变版本的话,可以对其发送-mutableCopy消息以生成一份可变的拷贝。比如
NSMutableArray *mutablePlanets = [@[
@"Mercury", @"Venus",
@"Earth", @"Mars",
@"Jupiter", @"Saturn",
@"Uranus", @"Neptune" ]
mutableCopy];
另外,对于标记为static的数组,不能使用简写为其赋值(其实原来的传统写法也不行)。
如果直接赋值就会提示出错
@implementation MyClass
static NSArray * thePlanets = @[
error:array literals not constant
@"Mercury", @"Venus", @"Earth",
@"Mars", @"Jupiter", @"Saturn",
@"Uranus", @"Neptune"
];
解决方法是在类方法+ (void)initialize中对static进行赋值。
@implementation MyClass
static NSArray *thePlanets;
+ (void)initialize{
if (self == [MyClass class]) {
thePlanets = @[ @"Mercury", @"Venus", @"Earth", @"Mars", @"Jupiter", @"Saturn", @"Uranus", @"Neptune" ];
}
}
下标
Array
Song *oldSong = [_songs objectAtIndex:idx];
[_songs replaceObjectAtIndex:idx withObject:newSong];
可以简写为
Song *oldSong = _songs[idx];
_songs[idx] = newSong;
Dictionary
id oldObject = [_storage objectForKey:key];
[_storage setObject:newobject forKey:key];
可以简写为
id oldObject = _storage[key];
_storage[key] = newObject;
而且你不仅仅能使用它所提供的下标访问。你也可以对自定义的类使用下标访问。
对于我们自定义的类,只需要实现一下的方法就能使用下标访问。
Array
- (elementType)objectAtIndexedSubscript:(indexType)idx;
- (void)setObject:(elementType)object atIndexedSubscript:(indexType)idx;
Dictionary
- (elementType)objectForKeyedSubscript:(keyType)key;
- (void)setObject:(elementType)object forKeyedSubscript:(keyType)key;
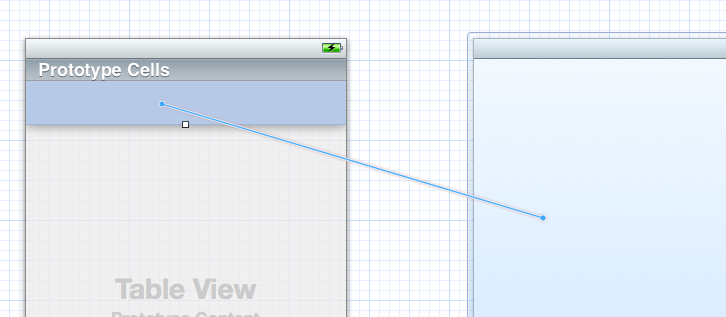
Segues
xcode 4.5的storyboard提供了更方便的segue方法。
当你要实现按cell中的箭头实现segue时。以往都要用代码来实现。xcode4.5中提供了直接在storyboard中链接的方法

Unwind Segues
有了Unwind segues,你可以很容易就实现segue到你制定的一个View上。


你要在制定目标的controller中实现以下两个方法。
-(BOOL)canPerformUnwindSegueAction:(SEL)action fromViewController:(UIViewController *)fromViewController
withSender:(id)sender
{
return YES;
}
(默认YES)
- (IBAction)done:(UIStoryboardSegue *)segue
{
// React to the impending segue
// Pull state back, etc.
}
CollectionView
下面这幅图就是用Collection Views实现的一个照片墙显示。

类似于瀑布流的展示方法。
为什么要使用Collection Views呢?
■
可以高度定制内容的展现
■
管理数据最佳的做法
■ 即使是处理大量数据,也非常的高效
对于CollectionView主要要实现的方法有三个
UICollectionViewDataSource
●section的数量
-numberOfSectionsInCollection:
●某个section里有多少个item
-collectionView:numberOfItemsInSection:
●对于某个位置应该显示什么样的cell
-collectionView:cellForItemAtIndexPath:
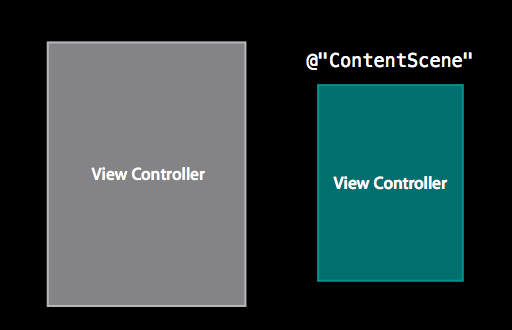
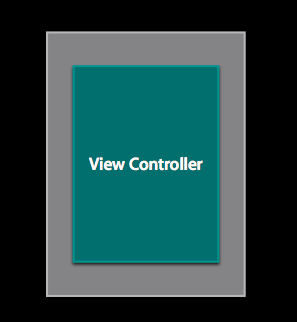
embed segue
在以往的xcode中,如果我们想要添加一个子视图,我们需要用代码实现。
UIViewController *child =
[[self storyboard] instantiateViewControllerWithIdentifier:@"ContentScene"];
[self addChildViewController:child];
[[self view] addSubview:[child view]];
[[child view] setFrame:frame];
现在在storyboard多了container view这个控件,可以让你不用代码实现添加一个子视图。


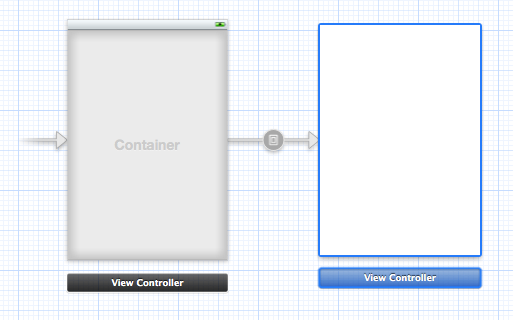
你可以在
- (void)prepareForSegue:(UIStoryboardSegue *)segue
sender:(id)sender
中实现参数的传递。
方法顺序
如果有以下代码:
@interface SongPlayer : NSObject
- (void)playSong:(Song *)song;
@end
@implementation SongPlayer
- (void)playSong:(Song *)song {
NSError *error;
[self startAudio:&error];
...
}
- (void)startAudio:(NSError **)error { ... }
@end
在早一些的编译环境中,上面的代码会在[self startAudio:&error]处出现一个实例方法未找到的警告。由于编译顺序,编译器无法得知在-playSong:方法之后还有一个-startAudio:,因此给出警告。
在新编译器里,如果在同一实现文件中,无论方法写在哪里,编译器都可以在对方法实现进行编译前知道所有方法的名称,从而避免了警告。
枚举改进
从Xcode4.4开始,有更好的枚举的写法了:
typedef enum NSNumberFormatterStyle : NSUInteger {
NSNumberFormatterNoStyle,
NSNumberFormatterDecimalStyle,
NSNumberFormatterCurrencyStyle,
NSNumberFormatterPercentStyle,
NSNumberFormatterScientificStyle,
NSNumberFormatterSpellOutStyle
} NSNumberFormatterStyle;
分享到:
上两周看了wwdc 2012 developer session 400 - 412的视频,下面总结一下xcode4.5的新特性。(部分参考onevcat的文章,在此感谢。)
@synthesize by default(属性自动绑定)在xcode4.4以前,当我们想为类添加一个新的属性,一般都要对应写实例变量和相应的synthesis,但是在Xcode
4.4之后,synthesis现在会对应property自动生成。默认行为下,对于属性foo,当开发者没有写相应的synthesis的时候,编译器会自动在实现文件中为开发者补全synthesis,就好像你写了@synthesis foo = _foo。
总结一下,新的属性绑定规则如下:
● 除非开发者在实现文件中提供getter或setter,否则将自动生成
● 除非开发者同时提供getter和setter,否则将自动生成实例变量
● 只要写了synthesis,无论有没有跟实例变量名,都将生成实例变量
●
如开发者写了@synthesize foo;那么实例变量名就是foo
● dynamic优先级高于synthesis
● 对于写了@dynamic的实现,所有的对应的synthesis都将不生效
@literals(简写)
在xcode4.4以前
NSNumber
所有的[NSNumber numberWith…:]方法都可以简写了:
● [NSNumber numberWithChar:‘X’]简写为 @‘X’;
● [NSNumber numberWithInt:12345] 简写为 @12345
● [NSNumber numberWithUnsignedLong:12345ul] 简写为 @12345ul
● [NSNumber numberWithLongLong:12345ll] 简写为 @12345ll
● [NSNumber numberWithFloat:123.45f] 简写为 @123.45f
● [NSNumber numberWithDouble:123.45] 简写为 @123.45
● [NSNumber numberWithBool:YES] 简写为 @YES
NSDictionary
● [NSDictionary dictionary] 简写为 @{}
● [NSDictionary dictionaryWithObject:o1forKey:k1] 简写为 @{ k1 : o1 }
● [NSDictionarydictionaryWithObjectsAndKeys:o1, k1, o2, k2, o3, k3, nil] 简写为 @{ k1 : o1, k2 : o2,
k3 : o3 }
当写下@{ k1 : o1, k2 : o2, k3 : o3 }时,实际的代码会是
// compiler generates:
id objects[] = { o1, o2, o3 };
id keys[] = { k1, k2, k3 };
NSUInteger count = sizeof(objects) / sizeof(id);
dict = [NSDictionary dictionaryWithObjects:objects forKeys:keyscount:count];
NSArray
部分NSArray方法得到了简化:
● [NSArray array] 简写为 @[]
● [NSArray arrayWithObject:a] 简写为 @[ a ]
● [NSArray arrayWithObjects:a, b, c, nil] 简写为 @[ a, b, c ]
比如对于@[ a, b, c ],实际编译时的代码是
// compiler generates:
id objects[] = { a, b, c };
NSUInteger count = sizeof(objects)/ sizeof(id);
array = [NSArray arrayWithObjects:objectscount:count];
Mutable版本和静态版本
上面所生成的版本都是不可变的,想得到可变版本的话,可以对其发送-mutableCopy消息以生成一份可变的拷贝。比如
NSMutableArray *mutablePlanets = [@[
@"Mercury", @"Venus",
@"Earth", @"Mars",
@"Jupiter", @"Saturn",
@"Uranus", @"Neptune" ]
mutableCopy];
另外,对于标记为static的数组,不能使用简写为其赋值(其实原来的传统写法也不行)。
如果直接赋值就会提示出错
@implementation MyClass
static NSArray * thePlanets = @[
error:array literals not constant
@"Mercury", @"Venus", @"Earth",
@"Mars", @"Jupiter", @"Saturn",
@"Uranus", @"Neptune"
];
解决方法是在类方法+ (void)initialize中对static进行赋值。
@implementation MyClass
static NSArray *thePlanets;
+ (void)initialize{
if (self == [MyClass class]) {
thePlanets = @[ @"Mercury", @"Venus", @"Earth", @"Mars", @"Jupiter", @"Saturn", @"Uranus", @"Neptune" ];
}
}
下标
Array
Song *oldSong = [_songs objectAtIndex:idx];
[_songs replaceObjectAtIndex:idx withObject:newSong];
可以简写为
Song *oldSong = _songs[idx];
_songs[idx] = newSong;
Dictionary
id oldObject = [_storage objectForKey:key];
[_storage setObject:newobject forKey:key];
可以简写为
id oldObject = _storage[key];
_storage[key] = newObject;
而且你不仅仅能使用它所提供的下标访问。你也可以对自定义的类使用下标访问。
对于我们自定义的类,只需要实现一下的方法就能使用下标访问。
Array
- (elementType)objectAtIndexedSubscript:(indexType)idx;
- (void)setObject:(elementType)object atIndexedSubscript:(indexType)idx;
Dictionary
- (elementType)objectForKeyedSubscript:(keyType)key;
- (void)setObject:(elementType)object forKeyedSubscript:(keyType)key;
Segues
xcode 4.5的storyboard提供了更方便的segue方法。
当你要实现按cell中的箭头实现segue时。以往都要用代码来实现。xcode4.5中提供了直接在storyboard中链接的方法
Unwind Segues
有了Unwind segues,你可以很容易就实现segue到你制定的一个View上。
你要在制定目标的controller中实现以下两个方法。
-(BOOL)canPerformUnwindSegueAction:(SEL)action fromViewController:(UIViewController *)fromViewController
withSender:(id)sender
{
return YES;
}
(默认YES)
- (IBAction)done:(UIStoryboardSegue *)segue
{
// React to the impending segue
// Pull state back, etc.
}
CollectionView
下面这幅图就是用Collection Views实现的一个照片墙显示。
类似于瀑布流的展示方法。
为什么要使用Collection Views呢?
■
可以高度定制内容的展现
■
管理数据最佳的做法
■ 即使是处理大量数据,也非常的高效
对于CollectionView主要要实现的方法有三个
UICollectionViewDataSource
●section的数量
-numberOfSectionsInCollection:
●某个section里有多少个item
-collectionView:numberOfItemsInSection:
●对于某个位置应该显示什么样的cell
-collectionView:cellForItemAtIndexPath:
embed segue
在以往的xcode中,如果我们想要添加一个子视图,我们需要用代码实现。
UIViewController *child =
[[self storyboard] instantiateViewControllerWithIdentifier:@"ContentScene"];
[self addChildViewController:child];
[[self view] addSubview:[child view]];
[[child view] setFrame:frame];
现在在storyboard多了container view这个控件,可以让你不用代码实现添加一个子视图。
你可以在
- (void)prepareForSegue:(UIStoryboardSegue *)segue
sender:(id)sender
中实现参数的传递。
方法顺序
如果有以下代码:
@interface SongPlayer : NSObject
- (void)playSong:(Song *)song;
@end
@implementation SongPlayer
- (void)playSong:(Song *)song {
NSError *error;
[self startAudio:&error];
...
}
- (void)startAudio:(NSError **)error { ... }
@end
在早一些的编译环境中,上面的代码会在[self startAudio:&error]处出现一个实例方法未找到的警告。由于编译顺序,编译器无法得知在-playSong:方法之后还有一个-startAudio:,因此给出警告。
在新编译器里,如果在同一实现文件中,无论方法写在哪里,编译器都可以在对方法实现进行编译前知道所有方法的名称,从而避免了警告。
枚举改进
从Xcode4.4开始,有更好的枚举的写法了:
typedef enum NSNumberFormatterStyle : NSUInteger {
NSNumberFormatterNoStyle,
NSNumberFormatterDecimalStyle,
NSNumberFormatterCurrencyStyle,
NSNumberFormatterPercentStyle,
NSNumberFormatterScientificStyle,
NSNumberFormatterSpellOutStyle
} NSNumberFormatterStyle;
分享到:

相关文章推荐
- xcode 4.5 new feature __ ios6 新特性
- xcode 4.5 new feature __ ios6 新特性
- xcode 4.5 new feature __ ios6 新特性
- xcode 4.5 new feature __ ios6 新特性
- xcode 4.5 new feature __ ios6 新特性
- xcode 4.5 new feature __ ios6 新特性
- xcode 4.5 new feature __ ios6 新特性
- Xcode 4.5_ IOS6 新特性
- Xcode 4.5_ IOS6 新特性
- Xcode 4.5_ IOS6 新特性
- xcode 4.5 ios6 新特性
- Xcode 4.5_ IOS6 新特性
- Xcode 4.4/4.5 的新特性 | LLVM 4.0 的新语法
- Xcode 4.5( iOS6 SDK)、旧版本号cocos2d,支持iPhone5解析度
- 旧工程适配iOS6和iPhone5续之第三方静态库(xcode 4.5 - symbols not found for architecture i386 (zbar))
- xcode7.0-iOS9新特性之三:watch
- Xcode 7新的特性Lightweight Generics 轻量级泛型与__kindof修饰符
- 【视频】ASP.NET4.5 新特性之数据绑定 推荐
- IOS7新特性之Xcode
- Xcode 4.5平台上设置应用本地化, Ios 本地化,多语言