redis 安装使用与配置
2013-03-14 11:32
591 查看
Redis是一个开源的使用ANSI C语言编写、支持网络、可基于内存亦可持久化的日志型、Key-Value数据库,并提供多种语言的API。从2010年3月15日起,Redis的开发工作由VMware主持。
如何[b]安装Redis?[/b]
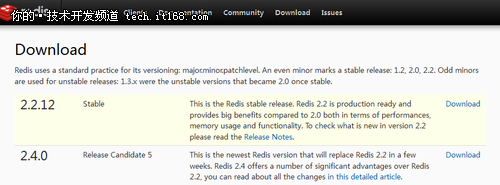
Redis的官方下载站是http://redis.io/download,可以去上面下载最新的安装程序下来,我写此文章时的的稳定版本是2.2.12。
怎么安装 Redis数据库呢?下面将介绍Linux版本的安装方法:
步骤一: 下载Redis
下载安装包:wget http://redis.googlecode.com/files/redis-2.2.12.tar.gz
[root@localhost 4setup]# wget http://redis.googlecode.com/files/redis-2.2.12.tar.gz --19:06:56-- http://redis.googlecode.com/files/redis-2.2.12.tar.gz 正在解析主机 redis.googlecode.com... 74.125.71.82
Connecting to redis.googlecode.com|74.125.71.82|:80... 已连接。
已发出 HTTP 请求,正在等待回应... 200 OK
长度:455240 (445K) [application/x-gzip]
Saving to: `redis-2.2.12.tar.gz' 100%[==========================================>] 455,24034.8K/s in 13s
19:07:16 (34.8 KB/s) - `redis-2.2.12.tar.gz' saved [455240/455240] [root@localhost 4setup]#
步骤二: 编译源程序
[root@localhost 4setup]# ll
总计 29168
-rw-r--r--1 root root 4552402011-07-22 redis-2.2.12.tar.gz
[root@localhost 4setup]# tar xzf redis-2.2.12.tar.gz
[root@localhost 4setup]# cd redis-2.2.12
[root@localhost redis-2.2.12]# make
cd src && make all
make[1]: Entering directory `/root/4setup/redis-2.2.12/src'
步骤三: 启动Redis服务
src/redis-server
[root@localhost redis-2.2.12]# src/redis-server
[6246] 05 Aug 19:17:22 # Warning: no config file specified, using the default config. In order to specify a config file use 'redis-server /path/to/redis.conf' [6246] 05 Aug 19:17:22* Server started, Redis version 2.2.12
[6246] 05 Aug 19:17:22 # WARNING overcommit_memory issetto0! Background save may fail under low memory condition. Tofix this issue add 'vm.overcommit_memory = 1' to /etc/sysctl.conf and then reboot or run the command 'sysctl vm.overcommit_memory=1' for this to take effect. [6246] 05 Aug 19:17:22* The server isnow ready to accept connections on port 6379
[6246] 05 Aug 19:17:22-0 clients connected (0 slaves), 539544 bytes in use
Redis 服务端的默认连接端口是 6379。
步骤四: 将Redis作为 Linux 服务随机启动
vi /etc/rc.local, 使用vi编辑器打开随机启动配置文件,并在其中加入下面一行代码。
/root/4setup/redis-2.2.12/src/redis-server
步骤五: 客户端连接验证
新打开一个Session输入:src/redis-cli,如果出现下面提示,那么您就可以开始Redis之旅了。
[root@localhost redis-2.2.12]# src/redis-cli
redis 127.0.0.1:6379>
步骤六: 查看Redis日志
查看服务器端session,即可对Redis的运行状况进行查看或分析了。
[6246] 05 Aug 19:24:33-0 clients connected (0 slaves), 539544 bytes in use
[6246] 05 Aug 19:24:37- Accepted 127.0.0.1:51381
[6246] 05 Aug 19:24:38-1 clients connected (0 slaves), 547372 bytes in use
以上的几个步骤就OK了!!这样一个简单的Redis数据库就可以畅通无阻地运行起来了。
步骤七: 停止Redis实例
最简单的方法是在启动实例的session中,直接使用Control-C来将实例停止。
我们还可以用客户端来停止服务,如可以用shutdown来停止Redis实例, 具体如下:
[root@localhost redis-2.2.12]# src/redis-cli shutdown
如何[b]安装Redis?[/b]
Redis的官方下载站是http://redis.io/download,可以去上面下载最新的安装程序下来,我写此文章时的的稳定版本是2.2.12。
怎么安装 Redis数据库呢?下面将介绍Linux版本的安装方法:
步骤一: 下载Redis
下载安装包:wget http://redis.googlecode.com/files/redis-2.2.12.tar.gz
[root@localhost 4setup]# wget http://redis.googlecode.com/files/redis-2.2.12.tar.gz --19:06:56-- http://redis.googlecode.com/files/redis-2.2.12.tar.gz 正在解析主机 redis.googlecode.com... 74.125.71.82
Connecting to redis.googlecode.com|74.125.71.82|:80... 已连接。
已发出 HTTP 请求,正在等待回应... 200 OK
长度:455240 (445K) [application/x-gzip]
Saving to: `redis-2.2.12.tar.gz' 100%[==========================================>] 455,24034.8K/s in 13s
19:07:16 (34.8 KB/s) - `redis-2.2.12.tar.gz' saved [455240/455240] [root@localhost 4setup]#
步骤二: 编译源程序
[root@localhost 4setup]# ll
总计 29168
-rw-r--r--1 root root 4552402011-07-22 redis-2.2.12.tar.gz
[root@localhost 4setup]# tar xzf redis-2.2.12.tar.gz
[root@localhost 4setup]# cd redis-2.2.12
[root@localhost redis-2.2.12]# make
cd src && make all
make[1]: Entering directory `/root/4setup/redis-2.2.12/src'
步骤三: 启动Redis服务
src/redis-server
[root@localhost redis-2.2.12]# src/redis-server
[6246] 05 Aug 19:17:22 # Warning: no config file specified, using the default config. In order to specify a config file use 'redis-server /path/to/redis.conf' [6246] 05 Aug 19:17:22* Server started, Redis version 2.2.12
[6246] 05 Aug 19:17:22 # WARNING overcommit_memory issetto0! Background save may fail under low memory condition. Tofix this issue add 'vm.overcommit_memory = 1' to /etc/sysctl.conf and then reboot or run the command 'sysctl vm.overcommit_memory=1' for this to take effect. [6246] 05 Aug 19:17:22* The server isnow ready to accept connections on port 6379
[6246] 05 Aug 19:17:22-0 clients connected (0 slaves), 539544 bytes in use
Redis 服务端的默认连接端口是 6379。
步骤四: 将Redis作为 Linux 服务随机启动
vi /etc/rc.local, 使用vi编辑器打开随机启动配置文件,并在其中加入下面一行代码。
/root/4setup/redis-2.2.12/src/redis-server
步骤五: 客户端连接验证
新打开一个Session输入:src/redis-cli,如果出现下面提示,那么您就可以开始Redis之旅了。
[root@localhost redis-2.2.12]# src/redis-cli
redis 127.0.0.1:6379>
步骤六: 查看Redis日志
查看服务器端session,即可对Redis的运行状况进行查看或分析了。
[6246] 05 Aug 19:24:33-0 clients connected (0 slaves), 539544 bytes in use
[6246] 05 Aug 19:24:37- Accepted 127.0.0.1:51381
[6246] 05 Aug 19:24:38-1 clients connected (0 slaves), 547372 bytes in use
以上的几个步骤就OK了!!这样一个简单的Redis数据库就可以畅通无阻地运行起来了。
步骤七: 停止Redis实例
最简单的方法是在启动实例的session中,直接使用Control-C来将实例停止。
我们还可以用客户端来停止服务,如可以用shutdown来停止Redis实例, 具体如下:
[root@localhost redis-2.2.12]# src/redis-cli shutdown

相关文章推荐
- Laravel 5.1中 Redis 的安装配置及基本使用教程
- 【Redis】redis的安装、配置执行及Jedisclient的开发使用
- windows下redis的安装配置和php扩展使用phpredis
- Redis的安装/配置/启动及RedisDesktopManager配置使用
- Redis安装、配置、操作、持久化、主从、phpredis扩展安装使用详解之安装配置
- Windows10下Redis安装配置使用
- redis服务安装、配置、使用
- redis安装配置和使用;tomcat安装和使用
- Laravel 5.1中 Redis 的安装配置及基本使用教程
- redis安装配置和使用;tomcat安装和使用
- redis 安装 多实例配置 基本命令使用
- redis-windows 安装配置以及使用手册
- Django中redis的使用方法(包括安装、配置、启动)
- redis-linux 安装配置以及使用手册
- Redis(Windows安装方法与Java调用实例 & 配置文件参数说明 & Java使用Redis所用Jar包 & Redis与Memcached区别 & redis-cli.exe命令及示例)
- Redis详解(原理,安装,配置,使用,命令)
- windows系统 windows7 windows10系统下安装和配置以及使用redis
- windows下redis的安装配置和php扩展使用phpredis
- python(十一)下:Redis安装配置及使用详解
- Redis安装配置及使用详解