Android-PopupWindow弹出对话框
2013-01-14 09:38
405 查看
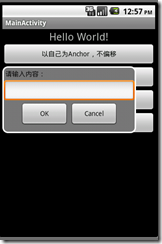
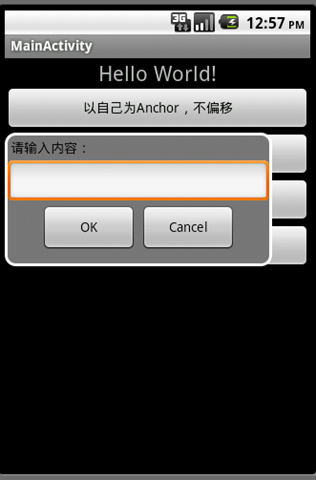
Android的对话框常用的有两种:PopupWindow和AlertDialog。PopupWindow顾名思义为弹出菜单,不同于AlertDialog对话框,PopupWindow弹出的位置可以很多变化,按照有无偏移分,可以分为无偏移和偏移两种;按照参照类型不同又可以分为两种:相对某个控件(Anchor锚)的位置和父容器内部的相对位置。具体如下:
下面是运行程序截图:
程序代码:
布局文件:main.xml
自定义对话框 popupwindow.xml
顺便将popupWindow的背景重新定义了一下:rounded_corners_view.xml
主程序代码:
package com.example.test;
import android.os.Bundle;
import android.app.Activity;
import android.view.Gravity;
import android.view.Menu;
import android.view.View;
import android.view.View.OnClickListener;
import android.widget.Button;
import android.widget.EditText;
import android.widget.PopupWindow;
import android.widget.TextView;
import android.widget.Toast;
public class MainActivity extends Activity {//PopupWindow属于阻塞的对话框,AlertDialog属于不阻塞的对话框
private Button button_test1 = null;
private Button button_test2 = null;
private Button button_test3 = null;
private Button button_test4 = null;
private TextView tv = null;
private Button button_ok = null;
private Button button_cancel = null;
private PopupWindow popupWindow = null;
private int screenWidth = 0;
private int screenHeight = 0;
private int popupWindowWidth = 0;
private int popupWindowHeight = 0;
@Override
public void onCreate(Bundle savedInstanceState) {
super.onCreate(savedInstanceState);
setContentView(R.layout.activity_main);
initView();
}
/**
* 初始化控件和设置响应事件
*/
private void initView(){
button_test1 = (Button) findViewById(R.id.button_test1);
button_test1.setOnClickListener(new ButtonClickListener());
button_test2 = (Button) findViewById(R.id.button_test2);
button_test2.setOnClickListener(new ButtonClickListener());
button_test3 = (Button) findViewById(R.id.button_test3);
button_test3.setOnClickListener(new ButtonClickListener());
button_test4 = (Button) findViewById(R.id.button_test4);
button_test4.setOnClickListener(new ButtonClickListener());
tv = (TextView) findViewById(R.id.text_view);
}
/**
* 按钮点击事件
*
*/
private class ButtonClickListener implements OnClickListener {
@Override
public void onClick(View v) {
switch (v.getId()) {
case R.id.button_test1://以自己为Anchor,不偏移
getPopupWindow();
popupWindow.showAsDropDown(v);
break;
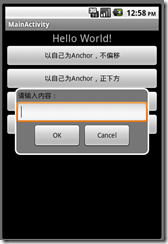
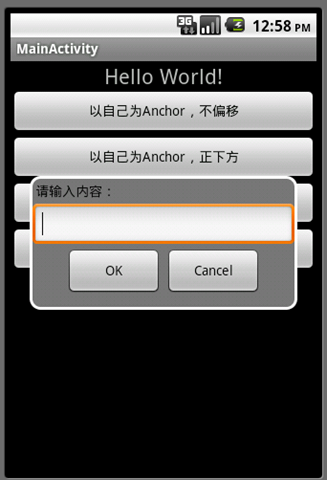
case R.id.button_test2://以自己为Anchor,偏移偏移(screenWidth-dialgoWidth)/2, 0)--按钮正下方
getPopupWindow();
popupWindow.showAsDropDown(v, (screenWidth-popupWindowWidth)/2, 0);
break;
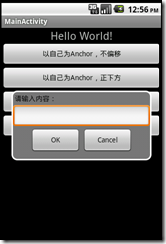
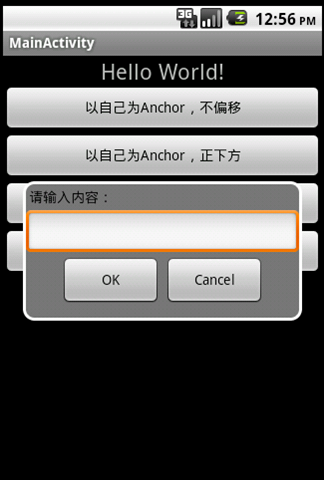
case R.id.button_test3://以屏幕中心为参照,不偏移
getPopupWindow();
popupWindow.showAtLocation(findViewById(R.id.layout), Gravity.CENTER, 0, 0);
break;
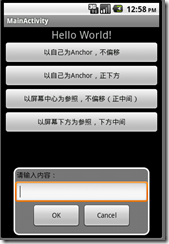
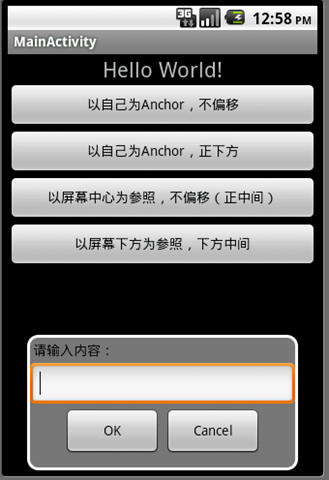
case R.id.button_test4: //以屏幕左下角为参照,偏移(screenWidth-dialgoWidth)/2, 0) --屏幕下方中央
getPopupWindow();
popupWindow.showAtLocation(findViewById(R.id.layout), Gravity.BOTTOM, 0, 0);
break;
default:
break;
}
}
}
/*
* 获取PopupWindow实例
*/
private void getPopupWindow(){
if(null != popupWindow){
popupWindow.dismiss();
return;
}else{
initPopupWindow();
}
}
/**
* 创建PopupWindow
*/
private void initPopupWindow(){
//得到屏幕的宽度和高度
screenWidth = this.getWindowManager().getDefaultDisplay().getWidth();
screenHeight = this.getWindowManager().getDefaultDisplay().getHeight();
//获取自定义布局文件popupwindow.xml
View popupWindow_view = getLayoutInflater()
.inflate(R.layout.pupupwindow, null, false);
//设置其背景
popupWindow_view.setBackgroundResource(R.drawable.rounded_corners_view);
//创建popupWindow实例
popupWindow = new PopupWindow(popupWindow_view, screenWidth-40, screenHeight/3-20, true);
// popupWindow.setBackgroundDrawable(getResources().getDrawable(R.drawable.rounded_corners_pop));
//获取视图中的按钮与编辑框
button_ok = (Button) popupWindow_view.findViewById(R.id.button_ok);
button_cancel = (Button) popupWindow_view.findViewById(R.id.button_cancel);
final EditText editText = (EditText) popupWindow_view.findViewById(R.id.edit_text);
button_ok.setOnClickListener(new OnClickListener() {
@Override
public void onClick(View v) {
//设置标签中的内容
tv.setText(editText.getText());
editText.setText("");
popupWindow.dismiss();
}
});
button_cancel.setOnClickListener(new OnClickListener() {
@Override
public void onClick(View v) {
editText.setText("");
popupWindow.dismiss();
}
});
popupWindowHeight = popupWindow.getHeight();
popupWindowWidth = popupWindow.getWidth();
}
}
| 函数 | 简介 |
| showAsDropDown(View anchor) | 相对某个控件的位置(正左下方),无偏移 |
| showAsDropDown(View anchor, int xoff, int yoff) | 相对某个控件的位置,有偏移 |
| showAtLocation(View parent, int gravity, int x, int y) | 父容器容器相对位置,例如正中央Gravity.CENTER,下方Gravity.BOTTOM等 |
程序代码:
布局文件:main.xml
<LinearLayout xmlns:android="http://schemas.android.com/apk/res/android"
xmlns:tools="http://schemas.android.com/tools"
android:layout_width="match_parent"
android:layout_height="match_parent"
android:orientation="vertical"
android:id="@+id/layout">

<TextView android:id="@+id/text_view"
android:layout_width="fill_parent"
android:layout_height="wrap_content"
android:gravity="center"
android:text="@string/hello"
android:textSize="22dp"/>

<Button android:id="@+id/button_test1"
android:layout_width="fill_parent"
android:layout_height="wrap_content"
android:text="以自己为Anchor,不偏移"/>

<Button android:id="@+id/button_test2"
android:layout_width="fill_parent"
android:layout_height="wrap_content"
android:text="以自己为Anchor,正下方"/>

<Button android:id="@+id/button_test3"
android:layout_width="fill_parent"
android:layout_height="wrap_content"
android:text="以屏幕中心为参照,不偏移(正中间)"/>

<Button android:id="@+id/button_test4"
android:layout_width<
ee9f
span style="line-height:1.5;color:rgb(0,0,255);">="fill_parent"
android:layout_height="wrap_content"
android:text="以屏幕下方为参照,下方中间"/>
</LinearLayout>
自定义对话框 popupwindow.xml
<?xml version="1.0" encoding="utf-8"?>
<LinearLayout xmlns:android="http://schemas.android.com/apk/res/android"
android:layout_width="match_parent"
android:layout_height="match_parent"
android:orientation="vertical" >

<TextView android:layout_width="fill_parent"
android:layout_height="wrap_content"
android:text="@string/textview"
android:textColor="#000000"
android:layout_margin="3dp"/>

<EditText  android:id="@+id/edit_text"
android:layout_width="fill_parent"
android:layout_height="wrap_content"/>

<LinearLayout android:gravity="center_horizontal"
android:layout_width="fill_parent"
android:layout_height="fill_parent">

<Button android:id="@+id/button_ok"
android:text="@string/button_ok"
android:layout_width="100dp"
android:layout_height="50dp"
android:layout_marginRight="2dp"/>
<Button android:id="@+id/button_cancel"
android:text="@string/button_no"
android:layout_width="100dp"
android:layout_height="50dp"
android:layout_marginLeft="2dp"/>

</LinearLayout>

</LinearLayout>
顺便将popupWindow的背景重新定义了一下:rounded_corners_view.xml
<?xml version="1.0" encoding="utf-8"?>
<shape xmlns:android="http://schemas.android.com/apk/res/android" >

<!-- solid 设置stroke设置的边框以内的颜色 -->
<solid android:color="#777777"/>
<!-- stroke主要设置组件的边框。width为边框宽度,color为边框颜色 -->
<stroke android:width="3dp" android:color="#ffffff" />
<!-- corners 设置边框四角弧度 -->
<corners android:radius="10dp"/>
<!-- padding主要设置组件里内容距离组件内边框的间距 -->
<padding android:left="3dp" android:top="3dp" android:right="3dp" android:bottom="3dp"/>

</shape>
主程序代码:
package com.example.test;
import android.os.Bundle;
import android.app.Activity;
import android.view.Gravity;
import android.view.Menu;
import android.view.View;
import android.view.View.OnClickListener;
import android.widget.Button;
import android.widget.EditText;
import android.widget.PopupWindow;
import android.widget.TextView;
import android.widget.Toast;
public class MainActivity extends Activity {//PopupWindow属于阻塞的对话框,AlertDialog属于不阻塞的对话框
private Button button_test1 = null;
private Button button_test2 = null;
private Button button_test3 = null;
private Button button_test4 = null;
private TextView tv = null;
private Button button_ok = null;
private Button button_cancel = null;
private PopupWindow popupWindow = null;
private int screenWidth = 0;
private int screenHeight = 0;
private int popupWindowWidth = 0;
private int popupWindowHeight = 0;
@Override
public void onCreate(Bundle savedInstanceState) {
super.onCreate(savedInstanceState);
setContentView(R.layout.activity_main);
initView();
}
/**
* 初始化控件和设置响应事件
*/
private void initView(){
button_test1 = (Button) findViewById(R.id.button_test1);
button_test1.setOnClickListener(new ButtonClickListener());
button_test2 = (Button) findViewById(R.id.button_test2);
button_test2.setOnClickListener(new ButtonClickListener());
button_test3 = (Button) findViewById(R.id.button_test3);
button_test3.setOnClickListener(new ButtonClickListener());
button_test4 = (Button) findViewById(R.id.button_test4);
button_test4.setOnClickListener(new ButtonClickListener());
tv = (TextView) findViewById(R.id.text_view);
}
/**
* 按钮点击事件
*
*/
private class ButtonClickListener implements OnClickListener {
@Override
public void onClick(View v) {
switch (v.getId()) {
case R.id.button_test1://以自己为Anchor,不偏移
getPopupWindow();
popupWindow.showAsDropDown(v);
break;
case R.id.button_test2://以自己为Anchor,偏移偏移(screenWidth-dialgoWidth)/2, 0)--按钮正下方
getPopupWindow();
popupWindow.showAsDropDown(v, (screenWidth-popupWindowWidth)/2, 0);
break;
case R.id.button_test3://以屏幕中心为参照,不偏移
getPopupWindow();
popupWindow.showAtLocation(findViewById(R.id.layout), Gravity.CENTER, 0, 0);
break;
case R.id.button_test4: //以屏幕左下角为参照,偏移(screenWidth-dialgoWidth)/2, 0) --屏幕下方中央
getPopupWindow();
popupWindow.showAtLocation(findViewById(R.id.layout), Gravity.BOTTOM, 0, 0);
break;
default:
break;
}
}
}
/*
* 获取PopupWindow实例
*/
private void getPopupWindow(){
if(null != popupWindow){
popupWindow.dismiss();
return;
}else{
initPopupWindow();
}
}
/**
* 创建PopupWindow
*/
private void initPopupWindow(){
//得到屏幕的宽度和高度
screenWidth = this.getWindowManager().getDefaultDisplay().getWidth();
screenHeight = this.getWindowManager().getDefaultDisplay().getHeight();
//获取自定义布局文件popupwindow.xml
View popupWindow_view = getLayoutInflater()
.inflate(R.layout.pupupwindow, null, false);
//设置其背景
popupWindow_view.setBackgroundResource(R.drawable.rounded_corners_view);
//创建popupWindow实例
popupWindow = new PopupWindow(popupWindow_view, screenWidth-40, screenHeight/3-20, true);
// popupWindow.setBackgroundDrawable(getResources().getDrawable(R.drawable.rounded_corners_pop));
//获取视图中的按钮与编辑框
button_ok = (Button) popupWindow_view.findViewById(R.id.button_ok);
button_cancel = (Button) popupWindow_view.findViewById(R.id.button_cancel);
final EditText editText = (EditText) popupWindow_view.findViewById(R.id.edit_text);
button_ok.setOnClickListener(new OnClickListener() {
@Override
public void onClick(View v) {
//设置标签中的内容
tv.setText(editText.getText());
editText.setText("");
popupWindow.dismiss();
}
});
button_cancel.setOnClickListener(new OnClickListener() {
@Override
public void onClick(View v) {
editText.setText("");
popupWindow.dismiss();
}
});
popupWindowHeight = popupWindow.getHeight();
popupWindowWidth = popupWindow.getWidth();
}
}

相关文章推荐
- Android安卓用Dialog对话框简单并且完美实现popupWindow底部弹出效果,有动画效果
- Android PopupWindow弹出对话框的实现
- 经常使用的android弹出对话框
- android 点击文本框弹出日期对话框
- Android界面上弹出一些对话框
- android弹出全局对话框
- android常用弹出对话框(AlertDialog)
- 常用的android弹出对话框
- 常用的android弹出对话框
- 【android开发】弹出对话框_2
- Android初学之安全卫士中号码归属地背景设置(弹出对话框)
- 常用的android弹出对话框
- Android弹出对话框
- Android 弹出对话框 且焦点在确认或者取消
- android普通弹出对话框
- Android常用的五种弹出对话框
- android弹出对话框中带有确定和取消对话框带事件的应用
- android webview js alert对话框 不能弹出 解决办法
- Android 如何监听返回键,弹出一个退出对话框
- 经常使用的android弹出对话框