自定义PreferenceActivity——修改Preference样式、加顶部布局
首先在res/xml文件夹下建立preferences.xml
01 | <? xml
version = "1.0"
encoding = "utf-8" ?> |
02 | < PreferenceScreen
xmlns:android = "http://schemas.android.com/apk/res/android"
> |
04 | < PreferenceCategory
android:title = "inline_preferences"
> |
07 | android:key = "checkbox_preference" |
08 | android:summary = "summary_toggle_preference" |
09 | android:title = "title_toggle_preference"
/> |
12 | < PreferenceCategory
android:title = "dialog_based_preferences"
> |
15 | android:dialogTitle = "dialog_title_edittext_preference" |
16 | android:key = "edittext_preference" |
17 | android:summary = "summary_edittext_preference" |
18 | android:title = "title_edittext_preference"
/> |
21 | android:dialogTitle = "dialog_title_list_preference" |
22 | android:entries = "@array/entries_list_preference" |
23 | android:entryValues = "@array/entryvalues_list_preference" |
24 | android:key = "list_preference" |
25 | android:summary = "summary_list_preference" |
26 | android:title = "title_list_preference"
/> |
29 | < PreferenceCategory
android:title = "launch_preferences"
> |
32 | android:key = "screen_preference" |
33 | android:summary = "summary_screen_preference" |
34 | android:title = "title_screen_preference"
> |
37 | android:key = "next_screen_checkbox_preference" |
38 | android:summary = "summary_next_screen_toggle_preference" |
39 | android:title = "title_next_screen_toggle_preference"
/> |
43 | android:summary = "summary_intent_preference" |
44 | android:title = "title_intent_preference"
> |
47 | android:action = "android.intent.action.VIEW" |
48 | android:data = "http://www.android.com"
/> |
52 | < PreferenceCategory
android:title = "preference_attributes"
> |
55 | android:key = "parent_checkbox_preference" |
56 | android:summary = "summary_parent_preference" |
57 | android:title = "title_parent_preference"
/> |
60 | android:dependency = "parent_checkbox_preference" |
61 | android:key = "child_checkbox_preference" |
62 | android:layout = "?android:attr/preferenceLayoutChild" |
63 | android:summary = "summary_child_preference" |
64 | android:title = "title_child_preference"
/> |
然后在代码中加载preferences.xml
1 | public class
MyPreferenceActivity extends
PreferenceActivity { |
2 | /** Called when the activity is first created. */ |
4 | public
void onCreate(Bundle savedInstanceState) { |
5 | super .onCreate(savedInstanceState); |
6 | addPreferencesFromResource(R.xml.preferences); |
这样就创建了从xml加载preferences的默认的PreferenceActivity。
在加载了preferences.xml的PreferenceActivity中, a top-level preference是一个PreferenceScreen,可用getPreferenceScreen()获取。PreferenceScreen和PreferenceCategory继承自PreferenceGroup,它们可以包含一个或多个PreferenceScreen,PreferenceCategory或者是具体的preference(如EditTextPreference、CheckBoxPreference)。由于PreferenceScreen,PreferenceCategory,EditTextPreference等都是继承自Preference,因此可以通过setLayoutResource()方法设置自己的布局样式。下面将遍历所有Preference,并设置自己的样式,代码如下:
01 | private void
setLayoutResource(Preference preference) { |
02 | if
(preference instanceof PreferenceScreen) { |
03 | PreferenceScreen ps = (PreferenceScreen) preference; |
04 | ps.setLayoutResource(R.layout.preference_screen); |
05 | int
cnt = ps.getPreferenceCount(); |
06 | for
( int i = 0 ; i < cnt; ++i) { |
07 | Preference p = ps.getPreference(i); |
10 | }
else if
(preference
instanceof PreferenceCategory) { |
11 | PreferenceCategory pc = (PreferenceCategory) preference; |
12 | pc.setLayoutResource(R.layout.preference_category); |
13 | int
cnt = pc.getPreferenceCount(); |
14 | for
( int i = 0 ; i < cnt; ++i) { |
15 | Preference p = pc.getPreference(i); |
19 | preference.setLayoutResource(R.layout.preference); |
1 | PreferenceScreen preferenceScreen = getPreferenceScreen(); |
2 | setLayoutResource(preferenceScreen); |
preference_screen.xml
01 | <? xml
version = "1.0"
encoding = "utf-8" ?> |
02 | < LinearLayout
xmlns:android = "http://schemas.android.com/apk/res/android" |
03 | android:layout_width = "match_parent" |
04 | android:layout_height = "wrap_content" |
05 | android:gravity = "center_vertical" |
06 | android:minHeight = "?android:attr/listPreferredItemHeight" |
07 | android:paddingRight = "?android:attr/scrollbarSize"
> |
10 | android:id = "@+android:id/icon" |
11 | android:layout_width = "wrap_content" |
12 | android:layout_height = "wrap_content" |
13 | android:layout_gravity = "center" |
14 | android:src = "@drawable/ic_launcher" /> |
17 | android:layout_width = "wrap_content" |
18 | android:layout_height = "wrap_content" |
19 | android:layout_marginBottom = "6dip" |
20 | android:layout_marginLeft = "15dip" |
21 | android:layout_marginRight = "6dip" |
22 | android:layout_marginTop = "6dip" |
23 | android:layout_weight = "1"
> |
26 | android:id = "@+android:id/title" |
27 | android:layout_width = "wrap_content" |
28 | android:layout_height = "wrap_content" |
29 | android:ellipsize = "marquee" |
30 | android:fadingEdge = "horizontal" |
31 | android:singleLine = "true" |
32 | android:textAppearance = "@android:style/TextAppearance.Large" |
33 | android:textColor = "#FFFF1234" |
37 | android:id = "@+android:id/summary" |
38 | android:layout_width = "wrap_content" |
39 | android:layout_height = "wrap_content" |
40 | android:layout_alignLeft = "@android:id/title" |
41 | android:layout_below = "@android:id/title" |
43 | android:textAppearance = "@android:style/TextAppearance.Small" |
44 | android:textColor = "#FF888888"
/> |
48 | android:id = "@+android:id/widget_frame" |
49 | android:layout_width = "wrap_content" |
50 | android:layout_height = "match_parent" |
51 | android:gravity = "center_vertical" |
52 | android:orientation = "vertical"
/> |
preference_category.xml
01 | <? xml
version = "1.0"
encoding = "utf-8" ?> |
02 | < LinearLayout
xmlns:android = "http://schemas.android.com/apk/res/android" |
03 | android:layout_width = "match_parent" |
04 | android:layout_height = "wrap_content" |
05 | android:background = "#FF123456" |
06 | android:gravity = "center_vertical" |
07 | android:minHeight = "?android:attr/listPreferredItemHeight" |
08 | android:paddingRight = "?android:attr/scrollbarSize"
> |
11 | android:id = "@+android:id/icon" |
12 | android:layout_width = "wrap_content" |
13 | android:layout_height = "wrap_content" |
14 | android:layout_gravity = "center" |
15 | android:src = "@drawable/ic_launcher"
/> |
18 | android:layout_width = "wrap_content" |
19 | android:layout_height = "wrap_content" |
20 | android:layout_marginBottom = "6dip" |
21 | android:layout_marginLeft = "15dip" |
22 | android:layout_marginRight = "6dip" |
23 | android:layout_marginTop = "6dip" |
24 | android:layout_weight = "1"
> |
27 | android:id = "@+android:id/title" |
28 | android:layout_width = "wrap_content" |
29 | android:layout_height = "wrap_content" |
30 | android:ellipsize = "marquee" |
31 | android:fadingEdge = "horizontal" |
32 | android:singleLine = "true" |
33 | android:textAppearance = "@android:style/TextAppearance.Large" |
34 | android:textColor = "#FFFF0000"
/> |
37 | android:id = "@+android:id/summary" |
38 | android:layout_width = "wrap_content" |
39 | android:layout_height = "wrap_content" |
40 | android:layout_alignLeft = "@android:id/title" |
41 | android:layout_below = "@android:id/title" |
43 | android:textAppearance = "@android:style/TextAppearance.Small" |
44 | android:textColor = "#FF00FF00"
/> |
48 | android:id = "@+android:id/widget_frame" |
49 | android:layout_width = "wrap_content" |
50 | android:layout_height = "match_parent" |
51 | android:gravity = "center_vertical" |
52 | android:orientation = "vertical"
/> |
preference.xml
01 | <? xml
version = "1.0"
encoding = "utf-8" ?> |
02 | < LinearLayout
xmlns:android = "http://schemas.android.com/apk/res/android" |
03 | android:layout_width = "match_parent" |
04 | android:layout_height = "wrap_content" |
05 | android:gravity = "center_vertical" |
06 | android:minHeight = "?android:attr/listPreferredItemHeight" |
07 | android:paddingRight = "?android:attr/scrollbarSize"
> |
10 | android:id = "@+android:id/icon" |
11 | android:layout_width = "wrap_content" |
12 | android:layout_height = "wrap_content" |
13 | android:layout_gravity = "center"
/> |
16 | android:layout_width = "wrap_content" |
17 | android:layout_height = "wrap_content" |
18 | android:layout_marginBottom = "6dip" |
19 | android:layout_marginLeft = "15dip" |
20 | android:layout_marginRight = "6dip" |
21 | android:layout_marginTop = "6dip" |
22 | android:layout_weight = "1"
> |
25 | android:id = "@+android:id/title" |
26 | android:layout_width = "wrap_content" |
27 | android:layout_height = "wrap_content" |
28 | android:ellipsize = "marquee" |
29 | android:fadingEdge = "horizontal" |
30 | android:singleLine = "true" |
31 | android:textAppearance = "@android:style/TextAppearance.Medium" |
32 | android:textColor = "#FF00FFFF"
/> |
35 | android:id = "@+android:id/summary" |
36 | android:layout_width = "wrap_content" |
37 | android:layout_height = "wrap_content" |
38 | android:layout_alignLeft = "@android:id/title" |
39 | android:layout_below = "@android:id/title" |
41 | android:textAppearance = "@android:style/TextAppearance.Small" |
42 | android:textColor = "#FFFFFF00"
/> |
46 | android:id = "@+android:id/widget_frame" |
47 | android:layout_width = "wrap_content" |
48 | android:layout_height = "match_parent" |
49 | android:gravity = "center_vertical" |
50 | android:orientation = "vertical"
/> |
下面介绍加顶部布局,其实也是添加加一个preference,通过preferenceScreen的addPreference添加。首先自定义一个PreferenceHead,布局中有一个返回按钮。
01 | package com.preference.main; |
03 | import android.content.Context; |
04 | import android.preference.Preference; |
05 | import android.view.View; |
06 | import android.view.View.OnClickListener; |
07 | import android.widget.Button; |
09 | public class
PreferenceHead extends Preference { |
11 | private
OnClickListener onBackButtonClickListener; |
13 | public
PreferenceHead(Context context) { |
15 | setLayoutResource(R.layout.preference_head); |
19 | protected
void onBindView(View view) { |
20 | super .onBindView(view); |
21 | Button btBack = (Button) view.findViewById(R.id.back); |
22 | btBack.setOnClickListener( new
OnClickListener() { |
25 | public
void onClick(View v) { |
26 | if
(onBackButtonClickListener != null ) { |
27 | onBackButtonClickListener.onClick(v); |
33 | public
void setOnBackButtonClickListener(OnClickListener onClickListener) { |
34 | this .onBackButtonClickListener = onClickListener; |
01 | <?xml version= "1.0"
encoding= "utf-8" ?> |
02 | <LinearLayout xmlns:android= "http://schemas.android.com/apk/res/android" |
03 | android:layout_width= "match_parent" |
04 | android:layout_height= "60.0dip" |
05 | android:background= "#8000FF00" |
06 | android:gravity= "center_vertical"
> |
09 | android:id= "@+id/back" |
10 | android:layout_width= "wrap_content" |
11 | android:layout_height= "wrap_content" |
12 | android:layout_margin= "10.0dip" |
然后在代码中实现
01 | PreferenceHeadph = new
PreferenceHead( this ); |
02 | ph.setOnBackButtonClickListener( new
OnClickListener() { |
05 | public
void onClick(View v) { |
10 | preferenceScreen.addPreference(ph); |
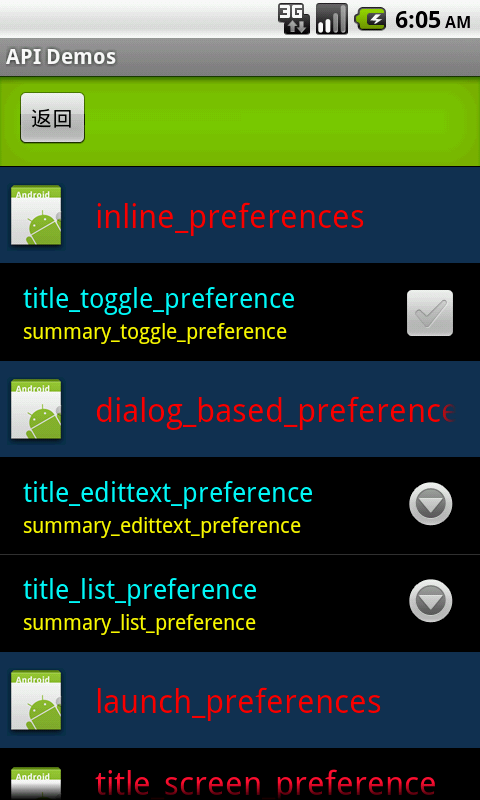
这样就完成了一个具有返回按钮的顶部布局的
PreferenceActivity,效果图如下

转:http://my.oschina.net/eclipse88/blog/52316
