cocos2d-x for android:CCSprite 精灵动画
2012-11-07 21:55
781 查看
记得以前学习XNA游戏开发的时候,操作精灵角色的攻击或者行走动作都是给出特定的几张序列图或者一张长序列图然后通过切割来作一帧一帧的切片动画播放。
说白一点,精灵就是将图形资源加载到内存中,并根据游戏需要将其显示到屏幕中的工具,游戏中大到背景、UI,小到NPC、道具,只要是用图片展示的,都是精灵或它的子类。从技术上讲,精灵是一个可以不断变化的图片,这些变化包括:位置移动、旋转、缩放、换帧(就是像动画片一样播放几张连续的图片,每帧换一张,形成一个动画效果)
在cocos2d-x 中精灵的关系如下图
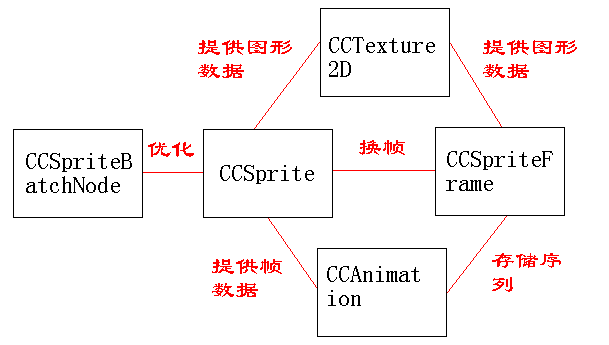
该图来源于:http://www.xuanyusong.com/archives/1370 更多的相关知识可以来这里参考。

图片命名也是根据nowpaper的示例命名,动画示例代码如下:
CCSize s = CCDirector::sharedDirector()->getWinSize(); //获取界面大小
CCArray *aniframe=CCArray::createWithCapacity(4); //创建长度为4的集合
CCSprite *sprite;//精灵
char str[20];
for(int i=0;i<4;i++){
sprintf(str,"attack/A1_%d.png",i); //通过下标动态创建精灵
CCSpriteFrame *frame =CCSpriteFrame::create(str,CCRectMake(0,0,64,64));
if(i==0){//默认添加第一帧图到界面上
sprite =CCSprite::createWithSpriteFrame(frame);
sprite->setPosition(ccp(sprite->getContentSize().width,s.height/2));
addChild(sprite);
}
aniframe->addObject(frame);//将每一帧精灵动画添加到集合里面
}
CCAnimation *animation=CCAnimation::createWithSpriteFrames(aniframe,0.2f);//通过集合创建动画
CCAnimate *animate=CCAnimate::create(animation);
CCActionInterval* seq=(CCActionInterval*)(CCSequence::create(animate,
CCFlipX::create(true),
animate->copy()->autorelease(),
CCFlipX::create(false),
NULL
));
sprite->runAction(CCRepeatForever::create(seq));//执行动画

上图序列图是一张序列图,可以看出分为横、竖各4个精灵动画帧,依次分割可以这么分
0-0,0-1,0-2,0-3
1-0,1-1,1-2,1-3
2-0,2-1,2-2,2-3
3-0,3-1,3-2,3-3
分割分部代码为
CCTexture2D *texture=CCTextureCache::sharedTextureCache()->addImage("split.png");
CCArray *splitAniframe=CCArray::createWithCapacity(16);
CCSprite *splitSprite ;
for(int i=0;i<4;i++){
for(int j=0;j<4;j++)
{
CCSpriteFrame *frame =CCSpriteFrame::createWithTexture(texture,CCRectMake(32*j,48*i,32,48));
if(i==0){
splitSprite= CCSprite::createWithSpriteFrame(frame);
splitSprite->setPosition(ccp(s.width/2,s.height/2));
addChild(splitSprite);
}
splitAniframe->addObject(frame);
}
}
CCAnimation *splitAnimation=CCAnimation::createWithSpriteFrames(splitAniframe,1.0f);
CCAnimate *splitAnimate=CCAnimate::create(splitAnimation);
splitSprite->runAction(CCRepeatForever::create(splitAnimate));
这个工具的使用,网上有很多教的,使用也方便多摸索下就可以了,使用该工具生成后的文件如下:
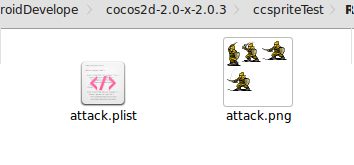
之后你就可以将它放入内存中操纵了,可能你会发现生成后的图片比之前的几张序列图要小好多,所以为了更快的游戏程序建议多使用该工具,动画代码如下:
CCSpriteFrameCache* cache =CCSpriteFrameCache::sharedSpriteFrameCache();
cache->addSpriteFramesWithFile("attack.plist");
CCSprite *plistSprite=CCSprite::createWithSpriteFrameName("A1_0.png");
plistSprite->setPosition(ccp(CCDirector::sharedDirector()->getWinSize().width-plistSprite->getContentSize().width,CCDirector::sharedDirector()->getWinSize().height/2));
CCSpriteBatchNode* spritebatch =CCSpriteBatchNode::create("attack.png");
spritebatch->addChild(plistSprite);
addChild(spritebatch);
CCArray* plistArray=CCArray::createWithCapacity(4);
char name[20];
for(int i=0;i<4;i++){
sprintf(name,"A1_%d.png",i);
CCSpriteFrame* frame =cache->spriteFrameByName(name);
plistArray->addObject(frame);
}
CCAnimation *plitAnimation=CCAnimation::createWithSpriteFrames(plistArray,0.2f);
CCAnimate *plitAnimate=CCAnimate::create(plitAnimation);
CCActionInterval* plitSeq=(CCActionInterval*)(CCSequence::create(plitAnimate,
CCFlipX::create(true),
plitAnimate->copy()->autorelease(),
CCFlipX::create(false),
NULL
));
plistSprite->runAction(CCRepeatForever::create(plitSeq));
好啦,来看看最后的效果图

源码下载:https://github.com/terryyhl/SpriteAnimation.git
好运。
开始
关于精灵sprite我从网上摘录了一段话如下说白一点,精灵就是将图形资源加载到内存中,并根据游戏需要将其显示到屏幕中的工具,游戏中大到背景、UI,小到NPC、道具,只要是用图片展示的,都是精灵或它的子类。从技术上讲,精灵是一个可以不断变化的图片,这些变化包括:位置移动、旋转、缩放、换帧(就是像动画片一样播放几张连续的图片,每帧换一张,形成一个动画效果)
在cocos2d-x 中精灵的关系如下图
该图来源于:http://www.xuanyusong.com/archives/1370 更多的相关知识可以来这里参考。
精灵多张序列图动画示例
精灵序列图来源自:/article/4834106.html ,使用他的三国兵种素材。用到的素材如下图片命名也是根据nowpaper的示例命名,动画示例代码如下:
CCSize s = CCDirector::sharedDirector()->getWinSize(); //获取界面大小
CCArray *aniframe=CCArray::createWithCapacity(4); //创建长度为4的集合
CCSprite *sprite;//精灵
char str[20];
for(int i=0;i<4;i++){
sprintf(str,"attack/A1_%d.png",i); //通过下标动态创建精灵
CCSpriteFrame *frame =CCSpriteFrame::create(str,CCRectMake(0,0,64,64));
if(i==0){//默认添加第一帧图到界面上
sprite =CCSprite::createWithSpriteFrame(frame);
sprite->setPosition(ccp(sprite->getContentSize().width,s.height/2));
addChild(sprite);
}
aniframe->addObject(frame);//将每一帧精灵动画添加到集合里面
}
CCAnimation *animation=CCAnimation::createWithSpriteFrames(aniframe,0.2f);//通过集合创建动画
CCAnimate *animate=CCAnimate::create(animation);
CCActionInterval* seq=(CCActionInterval*)(CCSequence::create(animate,
CCFlipX::create(true),
animate->copy()->autorelease(),
CCFlipX::create(false),
NULL
));
sprite->runAction(CCRepeatForever::create(seq));//执行动画
精灵单张序列图动画示例
图片如下上图序列图是一张序列图,可以看出分为横、竖各4个精灵动画帧,依次分割可以这么分
0-0,0-1,0-2,0-3
1-0,1-1,1-2,1-3
2-0,2-1,2-2,2-3
3-0,3-1,3-2,3-3
分割分部代码为
CCTexture2D *texture=CCTextureCache::sharedTextureCache()->addImage("split.png");
CCArray *splitAniframe=CCArray::createWithCapacity(16);
CCSprite *splitSprite ;
for(int i=0;i<4;i++){
for(int j=0;j<4;j++)
{
CCSpriteFrame *frame =CCSpriteFrame::createWithTexture(texture,CCRectMake(32*j,48*i,32,48));
if(i==0){
splitSprite= CCSprite::createWithSpriteFrame(frame);
splitSprite->setPosition(ccp(s.width/2,s.height/2));
addChild(splitSprite);
}
splitAniframe->addObject(frame);
}
}
CCAnimation *splitAnimation=CCAnimation::createWithSpriteFrames(splitAniframe,1.0f);
CCAnimate *splitAnimate=CCAnimate::create(splitAnimation);
splitSprite->runAction(CCRepeatForever::create(splitAnimate));
使用plist的单张序列图的动画
以上两种稍微复杂,cocos2d-x还可以使用一个叫TexturePackerGUI的工具,可以将多张序列图生成一个png的集合图和一个*.plist的文件,工具下载地址:TexturePackGUI这个工具的使用,网上有很多教的,使用也方便多摸索下就可以了,使用该工具生成后的文件如下:
之后你就可以将它放入内存中操纵了,可能你会发现生成后的图片比之前的几张序列图要小好多,所以为了更快的游戏程序建议多使用该工具,动画代码如下:
CCSpriteFrameCache* cache =CCSpriteFrameCache::sharedSpriteFrameCache();
cache->addSpriteFramesWithFile("attack.plist");
CCSprite *plistSprite=CCSprite::createWithSpriteFrameName("A1_0.png");
plistSprite->setPosition(ccp(CCDirector::sharedDirector()->getWinSize().width-plistSprite->getContentSize().width,CCDirector::sharedDirector()->getWinSize().height/2));
CCSpriteBatchNode* spritebatch =CCSpriteBatchNode::create("attack.png");
spritebatch->addChild(plistSprite);
addChild(spritebatch);
CCArray* plistArray=CCArray::createWithCapacity(4);
char name[20];
for(int i=0;i<4;i++){
sprintf(name,"A1_%d.png",i);
CCSpriteFrame* frame =cache->spriteFrameByName(name);
plistArray->addObject(frame);
}
CCAnimation *plitAnimation=CCAnimation::createWithSpriteFrames(plistArray,0.2f);
CCAnimate *plitAnimate=CCAnimate::create(plitAnimation);
CCActionInterval* plitSeq=(CCActionInterval*)(CCSequence::create(plitAnimate,
CCFlipX::create(true),
plitAnimate->copy()->autorelease(),
CCFlipX::create(false),
NULL
));
plistSprite->runAction(CCRepeatForever::create(plitSeq));
好啦,来看看最后的效果图
源码下载:https://github.com/terryyhl/SpriteAnimation.git
好运。

相关文章推荐
- cocos2d-x for android:CCSprite 精灵动画
- cocos2d-x for android:CCSprite 精灵动画
- cocos2d-x for android:CCSprite 精灵动画
- cocos2d-x for android:CCSprite 精灵动画(转)
- cocos2d-x for android:CCSprite 精灵动画
- cocos2d-x 中创建 CCSprite 精灵动画
- iphone游戏开发之cocos2d( 十一 )使用CCSpriteBatchNode和纹理图册,提高精灵动画效率;
- Cocos2d-x动画与精灵(新手)
- Cocos2d-x 之主要类介绍:精灵角色(CCSprite)
- Cocos2D研究院之精灵与动画(六)
- cocos2d-x 动画详解之三CCSpriteFrame
- Cocos-2d 关于多个CCSprite精灵播放同一个CCAction动画问题
- 【Cocos2d-X开发学习笔记】第06期:渲染框架之精灵类(CCSprite)的使用
- cocos2d-x for android:ubuntu 环境搭建
- cocos2d-x 详解之 CCSprite(精灵)- “CCSpriteBatchNode”和“CCSpriteFrameCache”
- cocos2d(CCSprite绑定不规则刚体与精灵一起移动)
- cocos2d开发学习五:精灵节点CCSpriteBatchNode的渲染和纹理集Texture Atlases内存优化
- Cocos2D研究院之精灵与动画
- iphone游戏开发之cocos2d ( 十 )使用纹理图册,更方便生成精灵动画
- Cocos2D研究院之精灵与动画(六)