Build a Desktop GIS Application Using MapWinGIS and C#
2012-10-27 09:46
344 查看
Introduction
A Geographic Information System is a type of application which has a set of facilities to capture, store, retrieve, maintain, and display geographic data and information. GIS applications are developed to meet many purposes, from simple purposes like GISdata exploration to sophisticated purposes like watershed mapping. Different commercial libraries are available for developers to use and implement in their applications, like ArcObject from ESIR and Map Suite from ThinkGeo. Unfortunately, the cost of license
for these libraries is usually high, which makes the GIS application development process not viable for free lance programmers and small firms. In this series of tutorials, I am going to describe in detail how to build a desktop GIS application using the Open
Source MapWinGIS library and C#. MapWinGIS is an ActiveX control for GIS development, with built-in support for many Raster and Vector formats.
MapWinGIS.ocx is the core of MapWindow GIS, the well known Open Source, multi-purpose, GIS desktop application. The first step in reading this tutorial is acquiring
MapWinGIS.ocx from the MapWindow GIS Open Source project website, then installing it to your computer using the installation procedures provided by the project site.
Create Your Map
Preparation
In this tutorial, I am using .NET Framework 3.5 and Microsoft Visual Studio 2008 Professional Edition. Actually, you can use Visual Studio Express Edition without any problem. I am also using a set of GIS data in ESRI shapefile format, which I have providedabove as a zipped file. I recommend you to download this data compressed file, decompress it, and place the file contents in an independent folder. Now, you are ready to go to the next step.
Create a Project and Add a Reference to MapWinGIS Components
Now, fire up your Visual Studio and create a new Windows Forms application. Point to the Project menu, then click Add Reference. In the Add Reference dialog box, point to COM tab, then select MapWinGIS Components from the Component Name list and click OK.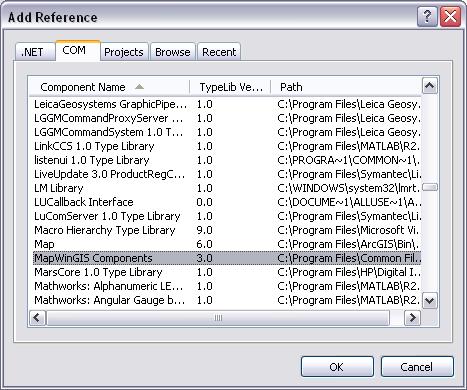
Now, you have a new reference in your project and you can show its name under References in the Solution Explorer.

Now, we are going to add the Map control to our toolbox. The Map control is a control used as a container and interactive display area for geographic data. To add this control to the toolbox, point to the General tab in the toolbox and right click. Select
Choose Item from the menu. The Choose Toolbox Item dialog box will appear. Select the COM Component tab and then select Map Control. To add it to the toolbox, click OK.

Now, you can see the Map Control icon in the toolbox contained by the General tab.

Time to Create Your GUI
Now, it's time to build your interface. Drag aToolStripcontrol from the Menu & Toolbars tab in the toolbox and drop it to the form. Add five buttons to the
ToolStrip, and name these buttons
toolCursor,
toolZoomExtent,
toolZoomIn,
toolZoomOut, and
toolPan. You can also assign meaningful labels and images to the buttons (you can use the images that I have in my project resources). Drag the
Mapcontrol from the toolbox and drop it to the form. In the Properties window, set the
Dockproperty of the
Mapcontrol to
Filland set the
CursorModeproperty to
cmNone.
Load your GIS data to the Application Pragmatically
Now, we will add two ESRI Shapefiles for our map. The ESRI Shapefile or simply a Shapefile is a popular geospatial vector data format for geographic information systems software. In theForm1_Loadevent, add the following code:

Collapse |
Copy Code
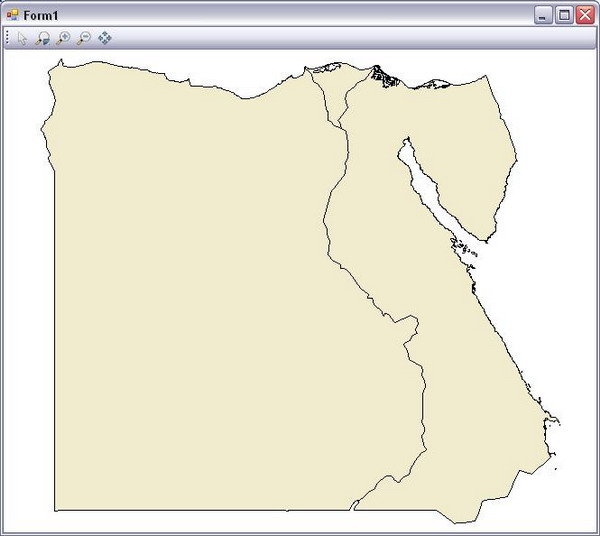
//Add first layer to your map
int intHandler1; //integer index to handle the layer
//create a new instance for MapWinGIS.Shapefile
//MapWinGIS.Shapefile  is a data provider for ESRI Shapefile
MapWinGIS.Shapefile shapefile1 = new MapWinGIS.Shapefile();
//Define the data source for MapWinGIS.Shapefile instance
shapefile1.Open(@"D:\GISSampleData\base.shp", null );
//display the layer on the map
intHandler1 = axMap1.AddLayer(shapefile1, true);

//Add second layer
int intHandler2;
MapWinGIS.Shapefile shapefile2 = new MapWinGIS.Shapefile();
shapefile2.Open(@"D:\GISSampleData\nile.shp", null);
intHandler2 = axMap1.AddLayer(shapefile2, true);
In the first line, we have created an integer variable (
intHandler1). In the second line, we have created an instance (
shapefile1) for the
MapWinGIS.Shapefileclass.
MapWinGIS.Shapefileis a container for geometric entities that represent real world geographic features. In the third line, the data source for the new object (
shapefile1) is defined. This data
source is an ESRI Shapefile. This data source shows Egypt as a polygon. In the fourth line, we have added this new object to our map control (
axMap1) and made it visible. The function
AddLayeris used to add a geographic layer to the map control and return an integer indicating the layer handler. Lines 4 to 8 add the second Shapefile to the Map control and make it visible. It is now time to run your first GIS application; strike
F5 in your key board to show Egypt's map in the map control.
Change Your Feature Symbol
Customizing different symbology for different geographic features included in the map is one of the most important tasks for a GIS developer. In this lesson, I am going to present the easiest way to customize features symbology. Actually, MapWinGIS providesmany advanced methods to symbolize GIS data, which I will discuss in an advanced lesson. Now, add the following code after the previous code in
Form1_Loadevent:
Collapse |
Copy Code
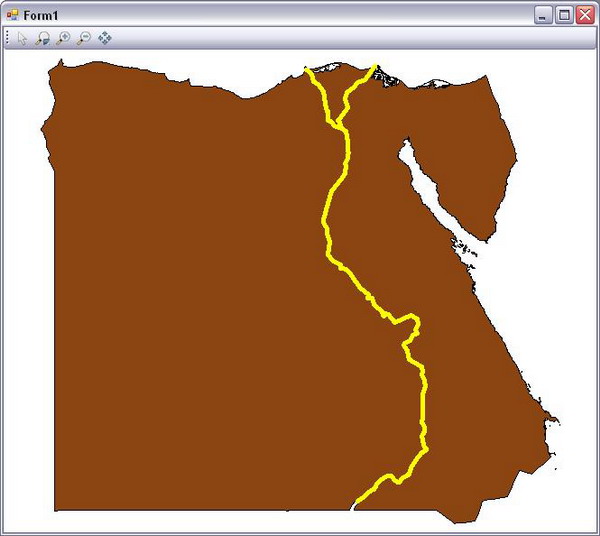
//Set Filling color of the ploygon shapefile
axMap1.set_ShapeLayerFillColor(intHandler1,
(UInt32)(System.Drawing.ColorTranslator.ToOle
(System.Drawing.Color.SaddleBrown)));
//Set the line color
axMap1 .set_ShapeLayerLineColor (intHandler2 ,
(UInt32)(System.Drawing.ColorTranslator.ToOle
(System.Drawing.Color.Yellow)));
//Set the line width
axMap1.set_ShapeLayerLineWidth(intHandler2,5);
In the first line, we use the
set_ShapeLayerFillColormethod of the
Mapcontrol (
axMap1). This method uses the layer handler (
intHandler1) and a color in
UInt32format to set the fill color for the defined layer. There are many other useful methods provided by the
Mapcontrol to customize the layer symbology, like
set_ShapeLayerFillStipplewhich defines the filling type of the layer, and
set_ShapeLayerFillTransparencywhich defines the transparency level of the layer. In the second line, another method is used. This method -
set_ShapeLayerLineColor- defines the color of line for line-geometry layers using the layer handler and the
UInt32format for color. In the third line, I have used the
set_ShapeLayerLineWidthmethod to define the width of the line-geometry layer using this layer handler, and a
floatnumber denotes the line width. Run your application to see how it displays your map now.
Add Some Actions to Your Map
Sure, you want to add some amazing actions like zoom in, zoom out, and pan for your map. Adding such actions is a very simple task with MapWinGIS. TheCursorModeproperty for the
Mapcontrol provides these tasks in an easy to use way; you have to assign the mode that you want to this property to use it directly in your map. In the following code, I am going to play with the
CursorModeproperty using the
Clickevent for each button in my toolbar.
Collapse |
Copy Code
private void toolCursor_Click(object sender, EventArgs e)
{
axMap1.CursorMode = MapWinGIS.tkCursorMode.cmNone;
}

private void toolZoomIn_Click(object sender, EventArgs e)
{
axMap1.CursorMode = MapWinGIS.tkCursorMode.cmZoomIn;
}

private void toolZoomOut_Click(object sender, EventArgs e)
{
axMap1.CursorMode = MapWinGIS.tkCursorMode.cmZoomOut;
}

private void toolPan_Click(object sender, EventArgs e)
{
axMap1.CursorMode = MapWinGIS.tkCursorMode.cmPan;
}
To set your map to the maximum map extent, you will use the
ZoomToMaxExtentsmethod of the
Mapcontrol. Just call this method using the
Clickevent as follows to display your map in the maximum extent:
Collapse |
Copy Code
private void toolZoomExtent_Click(object sender, EventArgs e)
{
axMap1.ZoomToMaxExtents();
}
Time to test these new features; run your application, and check every button.
原文地址:
http://www.codeproject.com/Articles/38045/Build-a-Desktop-GIS-Application-Using-MapWinGIS-an

相关文章推荐
- 使用MapWinGIS和C#建立GIS桌面程序-1
- Application Scheduler Service Using C#.Net And XML
- 项目经验:GIS<MapWinGIS>建模第七天
- 项目经验:GIS<MapWinGIS>建模第五天
- 项目经验:GIS<MapWinGIS>建模第四天
- 项目经验:GIS<MapWinGIS>建模第六天
- MapWinGIS+C#二次开发中加载图层无法显示/外部组建发生异常
- 项目经验:GIS<MapWinGIS>建模第二天
- 项目经验:GIS<MapWinGIS>建模第一天
- MVC architecture in ASP.Net using C# and Microsoft Data Access Application block
- Delphi下使用MapWinGIS控件打开GIS图层
- Using SiteMap and MasterPages to set META Tags in ASP.NET and C#
- 项目经验:GIS<MapWinGIS>建模第三天
- After Java and C# - what is next?
- Code Leader: Using People, Tools, and Processes to Build Successful So, Wrox
- This code compacts and repairs an MS Access database from a C# .NET application
- Display MS Excel Sheets and Charts in ASPX Pages using C#[favorite]
- (转)Creating a GTK notification area icon using Mono and C#
- Global Text Chat Room Application using C#.NET Remoting Technology(转载)
- 【转】Effective C# Item 15: Utilize using and try-finally