3D Cross-Platform 3rd Person Shooter - To Intel x86 Android
2012-09-12 15:01
459 查看
原文地址:http://www.codeproject.com/Articles/448748/3D-Cross-Platform-3rd-Person-Shooter-To-Intel-x86

2.0 license), and if you make something cool from it, please let me know, I'd love to see it. The end aim is to hopefully motivate potential game developers to reskin our code into their own game as well as motivate Android or iOS developers to go cross-platform,
by showing how easy it is to architect your code base to work for Android (including the Intel chipset) and on iOS.
to create concept art for the phones which we went on to call aBots and iBots, then create 3d models based on the concepts, of course attaching on big rocket launchers (It's the in thing to do when making a game). So, our players get the thrill of being able
to blow their rival platform players to bits, iOS players fight an aBot and Android players fight an iBot. Well, that's the premise.

Loads and renders 3d obj format models
Texture manager for dynamic texture streaming
Front facing sprites
Collision detection
Fires bullets from rockets
Health bars
AI that moves and shoots
Path finder (node generation and gating)
Pick Ups
UI screens
And a lot of other good stuff, but I must stress the most thrilling part I enjoy about this game (Warning: I'm a nerd), is that it works across multiple platforms. Across platforms is one of the big motivations for programming a C++
game, using NDK and JNI calls you can share the same code that you use for iOS. That's huge! You don't need to make a game for just one platform, you can target them all (muwhhahahahahha).
descoped from the demo code base as it's a more complicated set up (requires a server). But to motivate you beautiful people to read on, here's a video of the game running in the emulator.
http://www.youtube.com/watch?v=Tfv3jvjxfS4

Collapse | Copy
Code
Now we need to compile our C++ code and fix any compile errors. By using the usual ndk-build command.

No errors -- Winning!!!
(At this point I gave myself several hi5s and took a long well deserved break).
launch the SDK manager via Eclipse as sometimes on some platforms it has issues launching correctly due to incorrect Java bindings. So in Eclipse hit the Window tool bar > Android SDK Manager > Install Intel x86 Atom System Image.

Once it's downloaded, launch the AVD Manager and create an AVD with Intel Atom and GPU emulation.

Probably best to take another break now as usually things crash on first launch, so enjoy that feeling before you move
on to step 3.
(If this happens to you, just close the first emulator and things will proceed as usual).
CRASH #1: Google Services

The game crashed straight into the debugger complaining that the device didn't have the packagecom.google.android.gsf. This makes sense because our Emulator is running vanilla Android 4.0.3, which doesn't include any of Google's
services. What you have to do, is remove any Google specific services your game has.
Collapse | Copy
Code
This warning about HAX not working looked suspicious, so let's get that installed and see if that helps. You can grab HAX from the Android SDK folder or online here.
The installation process is pretty self-guiding, on the memory limit I went with the recommended setting.

Now re-run the emulator, and you should notice the message that HAX is working.

Lucky for us however, the game still crashes in the same spot.


or echo, then you're probably best trying to get your Eclipse environment set up with Sequoyah for NDK debugging. I produced a screen recording of myself setting
up Eclipse with NDK debugging on a Windows environment previously, might be worth checking out if you've never done this before. But, in general, NDK debugging is a stand out skill and worth leveling up on. I'm going to continue on as if you've set Eclipse
up with the Seqyouah magic in order to debug both C++ and Java code in Eclipse. The steps to debug your code go along this pattern. Compile it using the ndk-build NDK_DEBUG=1 flag. Launch your game in debug mode in Eclipse. Have it hit a breakpoint usually
after you've loaded your C++ library. Go back into the command line and type ndk-gdb.

Then launch the C++ debugger in Eclipse.
Result: It won't connect yet.
A ha! Of course we need to point the Eclipse C++ debugger to the x86 library folder and to use the x86 gdb debugger.

Notice the paths for the GDB debugger and GDB command file are pointing inside the x86 folders.
Result: Still doesn't work.

Well that didn't work, so I became a bit more aggressive with my attempts, I closed everything down, re-downloaded the NDK package (r8a), NDK-build clean, changed the emulator skin to WVGA800, and moved the break point from after the
to inside the GLView


(..What's a thead?)

If you managed to get this far, seriously STOP RIGHT NOW, hug yourself, have a shower, shave, look to the skies and appreciate
sunlight, as you probably haven't seen it for weeks.
Collapse | Copy
Code
Inspecting the logs, we can see that this is the case.
Collapse | Copy
Code
After some Googling it turned out to be that the root of the problem was that static calls can't call back into a non-static function. I was going in from Java into C++ with a static function and trying to come out of C++ back into
a non-static Java function.
To remedy this issue I went with switching the Java callbacks to be static.
Before:
Collapse | Copy
Code
After:
Collapse | Copy
Code
It runs!!! Well it gets to the first menu.


All that was required in this case, was to include a null check around reading variables passed in via a Java array.
Collapse | Copy
Code
Interesting how this issue never showed up on the ARM port, but it's good that it did, as I feel that this process has made my code more secure.
It runs!!!

Well OK, one last thing to fix, my
was good in the world.
game folder, it'll include all the folders of the game (Engine/External libs/App/Android).
Here I'll list out some of the best parts of the codebase that might be easiest to jump in and start customizing.
Collapse | Copy
Code
The
is the place to start modifying.
Collapse | Copy
Code
player 2 is added as a friend. You can add more friends here (well they're baddies really). Notice that if the player character is an iBot, an aBot is spawned and vice versa.
This part sets the level size to be 500 and sets the level texture to be "level_background.png".
Collapse | Copy
Code
This part creates a list of sandbag locations then spawns the sandbags around the level.
Collapse | Copy
Code
is set by projecting the 2D touch position from screen space into world space.
Collapse | Copy
Code
Inside the
(this allows us to both process different commands for single and double touches).
Collapse | Copy
Code
Here we check the health of the player, update the in-game healthbar, and if the life is less than 0, we tell our play manager that our game has ended. If you're looking to add in an explosion or some cool death animatics, this is the place to do it.
Collapse | Copy
Code
some good pointers on the easiest places to make changes to extend the gameplay. There's a heck of a lot more I'd like to add to this article, however it's best to leave it here to not scare off potential awesome gaming heroes with something too long. There
has been some potentially scary topics discussed here (NDK debugging), if you have any issues or questions, just leave a comment, and I'll try to improve this article over time. If you'd like other systems of the game explaining (AI, Path Finding, Model Loading,
Controls, Architecture), leave a comment and I'll work on another article focusing on that topic.
This article, along with any associated source code and files, is licensed under The Apache License, Version 2.0
Introduction
This article will cover the process of porting our cross-platform 3D third person shooter game to support the Intel x86 Android environment. The source code provided is free to use (Apache2.0 license), and if you make something cool from it, please let me know, I'd love to see it. The end aim is to hopefully motivate potential game developers to reskin our code into their own game as well as motivate Android or iOS developers to go cross-platform,
by showing how easy it is to architect your code base to work for Android (including the Intel chipset) and on iOS.
Description
Our game Phone Wars is based on the concept of getting an Android phone to fight an iPhone and vice versa. To get this done, we neededto create concept art for the phones which we went on to call aBots and iBots, then create 3d models based on the concepts, of course attaching on big rocket launchers (It's the in thing to do when making a game). So, our players get the thrill of being able
to blow their rival platform players to bits, iOS players fight an aBot and Android players fight an iBot. Well, that's the premise.
Features
The game works on multiple platforms (iOS, Android)Loads and renders 3d obj format models
Texture manager for dynamic texture streaming
Front facing sprites
Collision detection
Fires bullets from rockets
Health bars
AI that moves and shoots
Path finder (node generation and gating)
Pick Ups
UI screens
And a lot of other good stuff, but I must stress the most thrilling part I enjoy about this game (Warning: I'm a nerd), is that it works across multiple platforms. Across platforms is one of the big motivations for programming a C++
game, using NDK and JNI calls you can share the same code that you use for iOS. That's huge! You don't need to make a game for just one platform, you can target them all (muwhhahahahahha).
Technical Information
In this section here, I'm going to go through the exact process of porting the code base of the full version of the game to run on the Intel x86 Emulator. The full version also includes online multiplayer player vs player which I'vedescoped from the demo code base as it's a more complicated set up (requires a server). But to motivate you beautiful people to read on, here's a video of the game running in the emulator.
http://www.youtube.com/watch?v=Tfv3jvjxfS4
Step 1 - Compile for x86
We need to compile our C++ code for the x86 chipset. To do this, go into the Application.mk file located in the jnifolder and add x86 to the APP_ABI.Collapse | Copy
Code
APP_ABI += x86
Now we need to compile our C++ code and fix any compile errors. By using the usual ndk-build command.
No errors -- Winning!!!
(At this point I gave myself several hi5s and took a long well deserved break).
Step 2 - Download the x86 Emulator
Now we have the code compiled, we need to get it running on the x86 emulator. If you go to the link at the top of this article, the page states that the recommended method of installation is through the Android SDK Manager. I usuallylaunch the SDK manager via Eclipse as sometimes on some platforms it has issues launching correctly due to incorrect Java bindings. So in Eclipse hit the Window tool bar > Android SDK Manager > Install Intel x86 Atom System Image.
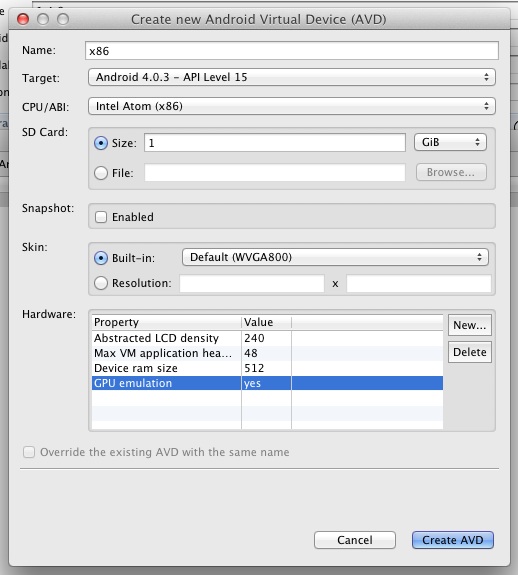
Once it's downloaded, launch the AVD Manager and create an AVD with Intel Atom and GPU emulation.
Probably best to take another break now as usually things crash on first launch, so enjoy that feeling before you move
on to step 3.
Step 3 - Running the App for the first time
First time I launched the game via Eclipse, it launched the Emulator but not the game. I hit the debug button again, and it launched a second emulator and went into the game. Probably a bug somewhere in the Eclipse Android dev environment(If this happens to you, just close the first emulator and things will proceed as usual).
CRASH #1: Google Services
The game crashed straight into the debugger complaining that the device didn't have the packagecom.google.android.gsf. This makes sense because our Emulator is running vanilla Android 4.0.3, which doesn't include any of Google's
services. What you have to do, is remove any Google specific services your game has.
Step 4 - Install HAX
After we removed all references to Google Services from the code base, the game was still crashing but now in GLSurfaceView. After inspecting the logs.Collapse | Copy
Code
HAX is not working and emulator runs in emulation mode
This warning about HAX not working looked suspicious, so let's get that installed and see if that helps. You can grab HAX from the Android SDK folder or online here.
The installation process is pretty self-guiding, on the memory limit I went with the recommended setting.
Now re-run the emulator, and you should notice the message that HAX is working.
Lucky for us however, the game still crashes in the same spot.

Step 5 - NDK Debugging
It's time to man up and ndk-gdb your problems away. If you've never debugged NDK code before, it's a bit daunting. If you're happy using gdb over the command line, good for you. If you're scared of anything that sounds like vi or cator echo, then you're probably best trying to get your Eclipse environment set up with Sequoyah for NDK debugging. I produced a screen recording of myself setting
up Eclipse with NDK debugging on a Windows environment previously, might be worth checking out if you've never done this before. But, in general, NDK debugging is a stand out skill and worth leveling up on. I'm going to continue on as if you've set Eclipse
up with the Seqyouah magic in order to debug both C++ and Java code in Eclipse. The steps to debug your code go along this pattern. Compile it using the ndk-build NDK_DEBUG=1 flag. Launch your game in debug mode in Eclipse. Have it hit a breakpoint usually
after you've loaded your C++ library. Go back into the command line and type ndk-gdb.

Then launch the C++ debugger in Eclipse.
Result: It won't connect yet.
A ha! Of course we need to point the Eclipse C++ debugger to the x86 library folder and to use the x86 gdb debugger.

Notice the paths for the GDB debugger and GDB command file are pointing inside the x86 folders.
Result: Still doesn't work.
Well that didn't work, so I became a bit more aggressive with my attempts, I closed everything down, re-downloaded the NDK package (r8a), NDK-build clean, changed the emulator skin to WVGA800, and moved the break point from after the
loadLibrarycall
to inside the GLView
onSurfaceChangedfunction and victory!!!
(..What's a thead?)
If you managed to get this far, seriously STOP RIGHT NOW, hug yourself, have a shower, shave, look to the skies and appreciate
sunlight, as you probably haven't seen it for weeks.
Step 6 - Fixing a JNI crash
Having tooled ourselves up with NDK debugging we can step through the code base to find out where the crash occurs. For this game, it was crashing in calls from the C++ code back into Java.Collapse | Copy
Code
const int result = jEnv->CallIntMethod( jObj, mid, jFilename, jPackaged, jGenerateMipMap );
Inspecting the logs, we can see that this is the case.
Collapse | Copy
Code
08-14 10:43:17.515: W/dalvikvm(2825): JNI WARNING:
can't call Lcom/android2c/CCJNI;.textureLoad on instance of Ljava/lang/Class;
After some Googling it turned out to be that the root of the problem was that static calls can't call back into a non-static function. I was going in from Java into C++ with a static function and trying to come out of C++ back into
a non-static Java function.
To remedy this issue I went with switching the Java callbacks to be static.
Before:
Collapse | Copy
Code
static int jniLoad(const char *name, const bool packaged, const bool generateMipMap)
{
// JNI Java call
JNIEnv *jEnv = gView->jniEnv;
jobject jObj = gView->jniObj;

jclass jniClass = jEnv->FindClass( "com/android2c/CCJNI" );
ASSERT_MESSAGE( jniClass != 0, "Could not find Java class." );

static jmethodID mid = jEnv->GetMethodID( jniClass, "textureLoad", "(Ljava/lang/String;ZZ)I" );
ASSERT( mid != 0 );

// Call the function
jstring jFilename = jEnv->NewStringUTF( name );
const int result = jEnv->CallIntMethod( jObj, mid, jFilename, packaged, generateMipMap );
jEnv->DeleteLocalRef( jFilename );
return result;
}

private int textureLoad(final String filename, final boolean packaged, final boolean mipmap)
{
return CCGLTexture.load( filename, packaged, mipmap );
}After:
Collapse | Copy
Code
static int jniLoad(const char *name, const bool packaged, const bool generateMipMap)
{
// JNI Java call
JNIEnv *jEnv = gView->jniEnv;

jclass jniClass = jEnv->FindClass( "com/android2c/CCJNI" );
ASSERT_MESSAGE( jniClass != 0, "Could not find Java class." );

static jmethodID mid = jEnv->GetStaticMethodID( jniClass, "TextureLoad", "(Ljava/lang/String;ZZ)I" );
ASSERT( mid != 0 );

// Call the function
jstring jFilename = jEnv->NewStringUTF( name );
const int result = jEnv->CallStaticIntMethod( jniClass, mid, jFilename, packaged, generateMipMap );
jEnv->DeleteLocalRef( jFilename );
return result;
}

private static int TextureLoad(final String filename, final boolean packaged, final boolean mipmap)
{
return CCGLTexture.Load( filename, packaged, mipmap );
}
It runs!!! Well it gets to the first menu.
Step 7 - Fixing the final crash
The next crash I was experiencing was to do with a null pointer coming in from our URL Manager class.
All that was required in this case, was to include a null check around reading variables passed in via a Java array.
Collapse | Copy
Code
jstring jHeaderName = (jstring)jEnv->GetObjectArrayElement( jHeaderNames, i );
if( jHeaderName != NULL )
{
const char *cHeaderName = jEnv->GetStringUTFChars( jHeaderName, &isCopy );
Interesting how this issue never showed up on the ARM port, but it's good that it did, as I feel that this process has made my code more secure.
It runs!!!
Well OK, one last thing to fix, my
glClearColourwas set to not clear out the alpha channel, once I set the alpha to 1, everything
was good in the world.
Using the code
You can find the iOS project inside the iOS folder (2c.xcproj). You can find the Android project inside theAndroid/Source folder. Inside Eclipse if you select import projects into your workspace and target the rootgame folder, it'll include all the folders of the game (Engine/External libs/App/Android).
Here I'll list out some of the best parts of the codebase that might be easiest to jump in and start customizing.
Starting the game
In ScenePlayManager.cpp:Collapse | Copy
Code
void ScenePlayManager::start()
{
if( gameState == GameState_SplashScreen )
{
updaters.deleteObjects();

startOfflineGame();
}
}
The
startfunction gets called when the background image is pressed. If you want to not start the game and do something else instead, this
is the place to start modifying.
More opponents?
In SceneAndroidsManager.cpp:Collapse | Copy
Code
void SceneAndroidsManager::startGame()
{
CharacterPlayer *player1, *player2;
player1 = game->spawnCharacter( "player1", playerType.buffer );
game->assignPlayerCharacter( player1 );

if( CCText::Contains( playerType.buffer, "aBot" ) )
{
player2 = game->spawnCharacter( "player2", "iBot" );
game->addFriend( player2 );
}
else
{
player2 = game->spawnCharacter( "player2", "aBot" );
game->addFriend( player2 );
}

super::startGame();
}startGamegets called after the level is loaded, here we spawn two characters. Player1 is assigned to be a
PlayerCharacterand
player 2 is added as a friend. You can add more friends here (well they're baddies really). Notice that if the player character is an iBot, an aBot is spawned and vice versa.
Customizing the level?
In thecreateEnvironment functionof SceneGameSyndicate.cpp:
This part sets the level size to be 500 and sets the level texture to be "level_background.png".
Collapse | Copy
Code
void SceneGameSyndicate::createEnvironment()
{
{
CCText levelsPath = "Resources/common/levels/level_";

// Ground
{
const float size = 500.0f;
mapBounds.width = size * 0.5f * 0.8f;
mapBounds.height = size * 0.5f * 0.8f;

ground = new CollideableFloor();
ground->setup( size, size );
ground->setScene( this );
ground->readDepth = false;

CCText texPath = "Resources/";
texPath += CLIENT_NAME;
texPath += "/levels/level_background.png";
ground->primitive->setTexture( texPath.buffer, Resource_Packaged );
}
This part creates a list of sandbag locations then spawns the sandbags around the level.
Collapse | Copy
Code
// Create sandbags around the level
{
CCList<CCPoint> sandbagLocations;
sandbagLocations.add( new CCPoint( 0.0f, 0.0f ) );
sandbagLocations.add( new CCPoint( -50.0f, -100.0f ) );
sandbagLocations.add( new CCPoint( 50.0f, -100.0f ) );
sandbagLocations.add( new CCPoint( -50.0f, 100.0f ) );
sandbagLocations.add( new CCPoint( 50.0f, 100.0f ) );

const float sandbagWidth = 30.0f;
for( int i=0; i<sandbagLocations.length; ++i )
{
CCText fxPath = "Resources/common/levels/";
CCText objFile = fxPath;
objFile += "sandbags.obj";

CCText texFile = fxPath;
texFile += "sandbags_diffuse.png";

CCObjectCollideable *object = new CCObjectCollideable();
object->setScene( this );
CCAddFlag( object->collideableType, collision_static );

CCModelBase *model = new CCModelBase();
CCModelObj *model3d = CCModelObj::CacheModel( objFile.buffer, texFile.buffer );
model3d->setColour( CCColour( 1.0f ) );
model->addModel( model3d );
object->model = model;

float modelWidth = model3d->getWidth();
float modelHeight = model3d->getHeight();
float modelDepth = model3d->getDepth();

// Adjust model height
const float scaleFactor = sandbagWidth / modelWidth;
CCVector3FillPtr( &model->scale, scaleFactor, scaleFactor, scaleFactor );
model->rotateY( 90.0f );

modelWidth *= scaleFactor;
modelDepth *= scaleFactor;
modelHeight *= scaleFactor;

object->setCollisionBounds( modelDepth, modelHeight, modelWidth );
object->translate( 0.0f, object->collisionBounds.y, 0.0f );
object->setPositionXZ( sandbagLocations.list[i]->x, sandbagLocations.list[i]->y );

pathFinderNetwork.addCollideable( object, ground->collisionBounds );

object->setTransparent();
object->disableCulling = true;
object->readDepth = true;
object->drawOrder = 99;
}

sandbagLocations.deleteObjects();
}
How do you move?
TheplayerDestinationPendingvariable of SceneGameSyndicate.cpp handles moving the player, when a touch is released the variable
is set by projecting the 2D touch position from screen space into world space.
Collapse | Copy
Code
// Callback for when a touch is released
bool SceneGameSyndicate::touchReleased(const CCScreenTouches &touch, const CCTouchAction touchAction)
{
...
if( hitObject == NULL )
{
playerDestinationPending = new CCVector3();
camera->project3DY( playerDestinationPending, touch.position.x, touch.position.y );
CCClampFloat( playerDestinationPending->x, -mapBounds.width, mapBounds.width );
CCClampFloat( playerDestinationPending->z, -mapBounds.height, mapBounds.height );

if( playerDestinationIndicator != NULL )
{
playerDestinationIndicator->setPositionXZ( playerDestinationPending->x, playerDestinationPending->z );
playerDestinationIndicator->model->setColourAlpha( 1.0f );
}
}
}
}
...
}
Inside the
updateScenefunction, as soon as we've released our touch for longer than our threshold, we tell our character to move there
(this allows us to both process different commands for single and double touches).
Collapse | Copy
Code
bool SceneGameSyndicate::updateScene(const CCTime &time)
{
...
// Move the player
if( playerDestinationPending != NULL )
{
const CCScreenTouches *touches = gEngine->controls->getScreenTouches();
if( touches[0].lastTimeReleased > CC_DOUBLE_TAP_THRESHOLD )
{
if( controlsMoving == false )
{
playerCharacter->controller->goToScan( *playerDestinationPending );
DELETE_POINTER( playerDestinationPending );
}
}
}
...
}
How to die?
TheregisterAttackfunction in SceneGameSyndicate.cpp gets called whenever a collision is made between a bullet and a player.
Here we check the health of the player, update the in-game healthbar, and if the life is less than 0, we tell our play manager that our game has ended. If you're looking to add in an explosion or some cool death animatics, this is the place to do it.
Collapse | Copy
Code
void SceneGameSyndicate::registerAttack(CCObject *from, CCObject *to, const float force)
{
CharacterPlayer *friendCharacter = getFriend( to );
if( friendCharacter != NULL )
{
const float healthRatio = friendCharacter->controller->getHealthRatio();
sceneGameUI->setHealthAlpha( 1, healthRatio );
if( healthRatio <= 0.0f )
{
if( ScenePlayManager::scene != NULL )
{
ScenePlayManager::scene->matchEnd();
}
}
}
}
Wrapping up
Hopefully, from this guide, you should now be able or be motivated to port your games over to support the Intel chipset for Android. The source code is available, so feel free to experiment with it, the section above should give yousome good pointers on the easiest places to make changes to extend the gameplay. There's a heck of a lot more I'd like to add to this article, however it's best to leave it here to not scare off potential awesome gaming heroes with something too long. There
has been some potentially scary topics discussed here (NDK debugging), if you have any issues or questions, just leave a comment, and I'll try to improve this article over time. If you'd like other systems of the game explaining (AI, Path Finding, Model Loading,
Controls, Architecture), leave a comment and I'll work on another article focusing on that topic.
License
This article, along with any associated source code and files, is licensed under The Apache License, Version 2.0

相关文章推荐
- 【转】How to Start Intel Hardware-assisted Virtualization (hypervisor) on Linux to Speed-up Intel Android x86 Emulator
- Easy to use cross-platform 3D engines
- Android Studio之让人懵逼的错误:Failed to load native library 'native-platform.dll' for Windows 10 x86.
- how to cross compile valgrind on android platform
- how to create colored 3D Objects using the OpenGL® ES cross-platform API.
- Build Android-x86 ICS 4 Virtualbox from Google Virtualbox Target and Intel Kernel 编译体验
- 如何在Netbeans下配置Android开发环境 -- a platform target has to be selected
- MonoGame Cross Platform Implementation of XNA for iOS, Android, Mac , Linux, Windows, Windows8, OUYA
- (OK) how to customize the kernel for your hardware for Android-x86
- android在创建程序出现的类似:Failed to load C:\Program Files (x86)\Android\android-sdk\build-tools\26.0.0-previ
- (OK) MPTCP - 100% OK - Android-x86-6.0-rc1 - (porting MPTCP to Android-x86) 成功 - Success
- 如何在Netbeans下配置Android开发环境 -- a platform target has to be selected
- 运行Android SDK Manager无法下载ARM EABI v7a System Image 、Intel x86 Atom System Image 和MIPS System Image
- (OK) porting MPTCP to android-x86-6.0-rc1 - altered files - modified files
- Cross Platform IDE for Android Native Development
- 关于android sdk manager在下载包时提示android intel x86 atom system image...的解决方法
- do you know any crossplatform sound effects library (iOS and Android)?
- zcelib - One cplusplus C++ crossplatform library use for develop server,similar to ACE.
- 当Android遇上x86:Intel San Diego智能手机全面解析
- Parallel Vasp successfully compiled (Intel x86_64, 16 core, OpenMPI, GotoBLAS, Intel-Fortran-Comp.)