IOS之导航控制器与表视图
2012-09-12 07:23
666 查看
7.1 导航控制器
7.2 创建第一级控制器
7.3 第一个二级控制器
7.4 第一个三级控制器
7.5 第二个二级表控制器
7.6 第三个二级表控制器
7.7 第四个二级表控制器
7.8 第五个二级表视图控制器
7.8 第六个二级表视图控制器
7.1 导航控制器
关于导航控制器和表视图导航控制器和表视图密不可分。严格的说,要完成导航控制器的功能并不需要表视图。然而,在实际的应用程序中使用导航控制器时,几乎总是要实现至少一个表,并且通常多个表,因为导航控制器的强大之处在于它能够处理复杂的分层数据,在iPhone的小屏幕上,连续的使用表示分层数据最理想的方式。

7.2 创建第一级控制器
一级控制器RootViewController还是一个UITableViewController,它并不是我们说的导航控制器,我们在委托Delegate中定义了导航控制器UINavigationController,事实上UINavigationController才真正意义的根控制器。RootViewController.h
#import <UIKit/UIKit.h>

@interface RootViewController : UITableViewController {
NSArray *controllers;
}

@property (nonatomic, retain) NSArray *controllers;

@end
RootViewController.m
@implementation RootViewController

@synthesize controllers;

- (void)viewDidLoad {
self.title = @"First Level";
NSMutableArray *array = [[NSMutableArray alloc] init];
//增加控制器
//
self.controllers = array;
[array release];
[super viewDidLoad];
}

- (void)didReceiveMemoryWarning {
[super didReceiveMemoryWarning];
}

- (void)viewDidUnload {
}

- (void)dealloc {
[super dealloc];
}
实现TableView数据源方法
#pragma mark Table view data source

// Customize the number of sections in the table view.
- (NSInteger)numberOfSectionsInTableView:(UITableView *)tableView {
return 1;
}

// Customize the number of rows in the table view.
- (NSInteger)tableView:(UITableView *)tableView numberOfRowsInSection:(NSInteger)section {
return [controllers count];
}

// Customize the appearance of table view cells.
- (UITableViewCell *)tableView:(UITableView *)tableView
cellForRowAtIndexPath:(NSIndexPath *)indexPath {

static NSString *CellIdentifier = @"Cell";

UITableViewCell *cell = [tableView dequeueReusableCellWithIdentifier:CellIdentifier];
if (cell == nil) {
cell = [[[UITableViewCell alloc] initWithStyle:UITableViewCellStyleDefault
reuseIdentifier:CellIdentifier] autorelease];
}

NSInteger row = [indexPath row];
SecondLevelViewController *controller = [controllers objectAtIndex:row];
cell.textLabel.text =  controller.title;
cell.imageView.image = controller.rowImage;
cell.accessoryType = UITableViewCellAccessoryDisclosureIndicator;

return cell;
}
cell.accessoryType属性设定表视图单元格扩展图标类型。单元格扩展图标类型:
UITableViewCellAccessoryNone,没有扩展图标;
UITableViewCellAccessoryDisclosureIndicator,扩展指示器,触摸该图标将切换到下一级表视图,图标为

UITableViewCellAccessoryDetailDisclosureButton,细节展示按钮,触摸该行将显示当前行的更多详细信息视图,图标为

UITableViewCellAccessoryCheckmark,选中标志,当选中某一行时候标志该行,图标为

实现TableView委托方法
#pragma mark -
#pragma mark Table view delegate

- (void)tableView:(UITableView *)tableView didSelectRowAtIndexPath:(NSIndexPath *)indexPath {

NSInteger row = [indexPath row];
SecondLevelViewController *nextController = [self.controllers objectAtIndex:row];
[self.navigationController pushViewController:nextController animated:YES];
}
二级表视图控制器
由于二级控制器也是表视图控制器,而且我们需要在为每个页面指定一个图片,所以我们定义了一个父类SecondLevelViewController
SecondLevelViewController
@interface SecondLevelViewController : UITableViewController {
UIImage *rowImage;
}
@property (nonatomic, retain) UIImage *rowImage;

@end
#import "SecondLevelViewController.h" @implementation SecondLevelViewController @synthesize rowImage; @end
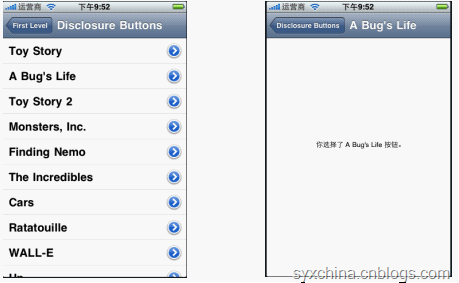
7.3 第一个二级控制器
DisclosureButtonController.h
#import <Foundation/Foundation.h>
#import "SecondLevelViewController.h"
#import "DisclosureDetailController.h"

@interface DisclosureButtonController : SecondLevelViewController {
NSArray *listData;
DisclosureDetailController *childController;
}
@property (nonatomic,retain) NSArray *listData;
@property (nonatomic, retain) DisclosureDetailController *childController;

@end
DisclosureButtonController.m
#import "DisclosureButtonController.h"
#import "SecondLevelViewController.h"

@implementation DisclosureButtonController

@synthesize listData;
@synthesize childController;

- (void)viewDidLoad {
NSArray *array = [[NSArray alloc] initWithObjects:@"Toy Story",
@"A Bug's Life", @"Toy Story 2", @"Monsters, Inc.",
@"Finding Nemo", @"The Incredibles", @"Cars",
@"Ratatouille", @"WALL-E", @"Up", @"Toy Story 3",
@"Cars 2", @"The Bear and the Bow", @"Newt", nil];
self.listData = array;
[array release];

[super viewDidLoad];
}

- (void)viewDidUnload {
self.listData = nil;
self.rowImage = nil;
}

- (void)dealloc {
[listData release];
[rowImage release];
[super dealloc];
}
实现TableView数据源方法
#pragma mark -
#pragma mark Table view data source

// Customize the number of sections in the table view.
- (NSInteger)numberOfSectionsInTableView:(UITableView *)tableView {
return 1;
}

// Customize the number of rows in the table view.
- (NSInteger)tableView:(UITableView *)tableView numberOfRowsInSection:(NSInteger)section {
return [listData count];
}
// Customize the appearance of table view cells.
- (UITableViewCell *)tableView:(UITableView *)tableView
cellForRowAtIndexPath:(NSIndexPath *)indexPath {
static NSString *CellIdentifier = @"Cell";
UITableViewCell *cell = [tableView dequeueReusableCellWithIdentifier:CellIdentifier];
if (cell == nil) {
cell = [[[UITableViewCell alloc] initWithStyle:UITableViewCellStyleDefault
reuseIdentifier:CellIdentifier] autorelease];
}
NSInteger row = [indexPath row];
NSString *title = [listData objectAtIndex:row];
cell.textLabel.text = title;
//cell.imageView.image = controller.rowImage;
cell.accessoryType = UITableViewCellAccessoryDetailDisclosureButton;
return cell;
}实现TableView委托方法
#pragma mark -
#pragma mark Table view delegate
- (void)tableView:(UITableView *)tableView didSelectRowAtIndexPath:(NSIndexPath *)indexPath {
if (childController == nil) {
childController = [[DisclosureDetailController alloc]
initWithNibName:@"DisclosureDetailController"
bundle:nil];
}
//childController.title = @"DisclosureDetail Button Pressed";
NSInteger row = [indexPath row];
NSString *selectedMessage = [listData objectAtIndex:row];
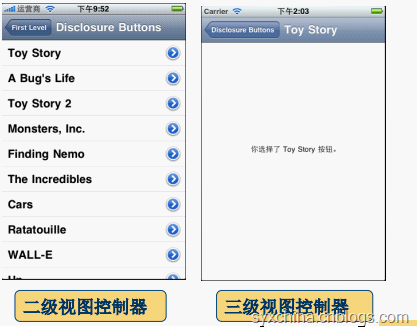
NSString *message = [[NSString alloc] initWithFormat:@"你选择了 %@ 按钮。", selectedMessage];
childController.message = message;
childController.title = selectedMessage;
[message release];
[self.navigationController pushViewController:childController animated:YES];
}上面的委托方法,是用户选中单元格后触发的方法。
[self.navigationController pushViewController:childController animated:YES];
是将详细视图控制器放置到导航控制器栈中,并以动画效果显示详细视图。
RootViewController中 viewDidLoad方法
//增加细节扩展按钮控制器
DisclosureButtonController *disclosureButtonController = [[DisclosureButtonController alloc]
initWithStyle:UITableViewStylePlain];

disclosureButtonController.title = @"Disclosure Buttons";
disclosureButtonController.rowImage = [UIImage imageNamed:@"disclosureButtonControllerIcon.png"];
[array addObject:disclosureButtonController];
[disclosureButtonController release];
7.4 第一个三级控制器
DisclosureDetailController.h
@interface DisclosureDetailController : UIViewController {
UILabel *label;
NSString *message;
}
@property (nonatomic, retain) IBOutlet UILabel *label;
@property (nonatomic, retain) NSString *message;

@end
message从上一个屏幕传递过来的消息 label显示消息的控件。
m文件中的初始化方法
@implementation DisclosureDetailController

@synthesize message;
@synthesize label;

// Implement viewDidLoad to do additional setup after loading the view, typically from a nib.
- (void)viewWillAppear:(BOOL)animated {
label.text = message;
[super viewWillAppear:animated];
}
不要使用viewDidLoad 方法,而是使用viewWillAppear:animated:方法,该方法是在屏幕出现时候调用。
m文件中释放方法
- (void)viewDidUnload {
[super viewDidUnload];
self.message = nil;
self.label = nil;
}
- (void)dealloc {
[message release];
[label release];
[super dealloc];
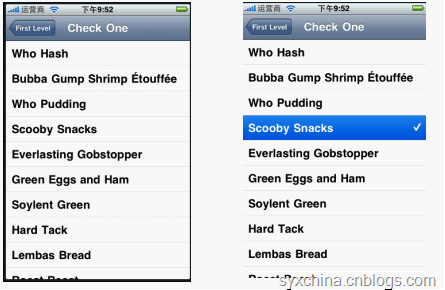
}7.5 第二个二级表控制器
CheckListController.h
#import <UIKit/UIKit.h>
#import "SecondLevelViewController.h"

@interface CheckListController : SecondLevelViewController {
NSArray *listData;
NSIndexPath *lastIndexPath;
}

@property (nonatomic, retain) NSArray *listData;
@property (nonatomic, retain) NSIndexPath *lastIndexPath;

@end
CheckListController.m
- (void)viewDidLoad {
NSArray *array = [[NSArray alloc] initWithObjects:@"Who Hash",
@"Bubba Gump Shrimp Étouffée", @"Who Pudding", @"Scooby Snacks",
@"Everlasting Gobstopper", @"Green Eggs and Ham", @"Soylent Green",
@"Hard Tack", @"Lembas Bread",  @"Roast Beast", @"Blancmange", nil];
self.listData = array;
[array release];
}

- (void)didReceiveMemoryWarning {
[super didReceiveMemoryWarning];
}

- (void)viewDidUnload {
self.listData = nil;
self.lastIndexPath = nil;
}

- (void)dealloc {
[listData release];
[lastIndexPath release];
[super dealloc];
}
实现TableView数据源方法
#pragma mark Table view methods

- (NSInteger)numberOfSectionsInTableView:(UITableView *)tableView {
return 1;
}

// Customize the number of rows in the table view.
- (NSInteger)tableView:(UITableView *)tableView numberOfRowsInSection:(NSInteger)section {
return [listData count];
}
// Customize the appearance of table view cells.
- (UITableViewCell *)tableView:(UITableView *)tableView cellForRowAtIndexPath:(NSIndexPath *)indexPath {
static NSString *CellIdentifier = @"Cell";
UITableViewCell *cell = [tableView dequeueReusableCellWithIdentifier:CellIdentifier];
if (cell == nil) {
cell = [[[UITableViewCell alloc] initWithStyle:UITableViewCellStyleDefault
reuseIdentifier:CellIdentifier] autorelease];
}
NSInteger row = [indexPath row];
// NSInteger oldRow = [lastIndexPath row];
cell.textLabel.text = [listData objectAtIndex:row];
// cell.accessoryType = (row == oldRow && lastIndexPath != nil) ?
// UITableViewCellAccessoryCheckmark : UITableViewCellAccessoryNone;
return cell;
}实现TableView委托方法
- (void)tableView:(UITableView *)tableView didSelectRowAtIndexPath:(NSIndexPath *)indexPath {

int newRow = [indexPath row];
int oldRow = (lastIndexPath != nil) ? [lastIndexPath row] : -1;

if (newRow != oldRow) {
UITableViewCell *newCell = [tableView cellForRowAtIndexPath:indexPath];
newCell.accessoryType = UITableViewCellAccessoryCheckmark;

UITableViewCell *oldCell = [tableView cellForRowAtIndexPath:lastIndexPath];
oldCell.accessoryType = UITableViewCellAccessoryNone;

lastIndexPath = indexPath;
}

}
int oldRow = (lastIndexPath != nil) ? [lastIndexPath row] : -1;
获得上次选择的单元格行,如果lastIndexPath为nil这设置为-1
newCell.accessoryType = UITableViewCellAccessoryCheckmark;
设置新单元格为UITableViewCellAccessoryCheckmark oldCell.accessoryType = UITableViewCellAccessoryNone;
设置旧单元格为UITableViewCellAccessoryNone
RootViewController中 viewDidLoad方法
//增加check控制器
CheckListController *checkListController = [[CheckListController alloc]
initWithStyle:UITableViewStylePlain];

checkListController.title = @"Check One";
checkListController.rowImage = [UIImage imageNamed:@"checkmarkControllerIcon.png"];
[array addObject:checkListController];
[checkListController release];
7.6 第三个二级表控制器

RowControlsController.h
#import <UIKit/UIKit.h>
#import "SecondLevelViewController.h"

@interface RowControlsController : SecondLevelViewController {
NSArray *listData;
}

@property (nonatomic, retain) NSArray *listData;
-(IBAction)buttonTapped:(id)sender;

@end
RowControlsController.m
@implementation RowControlsController

@synthesize listData;

-(IBAction)buttonTapped:(id)sender {
UIButton *senderButton = (UIButton *)sender;
UITableViewCell *buttonCell = (UITableViewCell *)[senderButton superview];

NSInteger buttonRow = [[self.tableView indexPathForCell:buttonCell] row];
NSString *rowTitle = [listData objectAtIndex:buttonRow];

UIAlertView *alert = [[UIAlertView alloc] initWithTitle:@"点击Button"
message:[NSString stringWithFormat:@"你点击的Button是 %@",rowTitle]
delegate:self
cancelButtonTitle:@"Ok"
otherButtonTitles:nil];
[alert show];
[alert release];
}

- (void)viewDidLoad {
NSArray *array = [[NSArray alloc] initWithObjects:@"R2-D2",
@"C3PO", @"Tik-Tok", @"Robby", @"Rosie", @"Uniblab",
@"Bender", @"Marvin", @"Lt. Commander Data",
@"Evil Brother Lore", @"Optimus Prime", @"Tobor", @"HAL",
@"Orgasmatron", nil];
self.listData = array;
[array release];
}

- (void)viewDidUnload {
self.listData = nil;
}

- (void)dealloc {
[listData release];
[super dealloc];
}
实现TableView数据源方法
#pragma mark Table view methods

- (NSInteger)numberOfSectionsInTableView:(UITableView *)tableView {
return 1;
}

// Customize the number of rows in the table view.
- (NSInteger)tableView:(UITableView *)tableView numberOfRowsInSection:(NSInteger)section {
return [listData count];
}
// Customize the appearance of table view cells.
- (UITableViewCell *)tableView:(UITableView *)tableView cellForRowAtIndexPath:(NSIndexPath *)indexPath {
static NSString *CellIdentifier = @"Cell";
UITableViewCell *cell = [tableView dequeueReusableCellWithIdentifier:CellIdentifier];
if (cell == nil) {
cell = [[[UITableViewCell alloc] initWithStyle:UITableViewCellStyleDefault
reuseIdentifier:CellIdentifier] autorelease];
UIImage *buttonUpImage = [UIImage imageNamed:@"button_up.png"];
UIImage *buttonDownImage = [UIImage imageNamed:@"button_down.png"];
UIButton *button = [UIButton buttonWithType:UIButtonTypeCustom];
button.frame = CGRectMake(0.0f, 0.0f, buttonUpImage.size.width, buttonUpImage.size.height);
[button setBackgroundImage:buttonUpImage forState:UIControlStateNormal];
[button setBackgroundImage:buttonDownImage forState:UIControlStateHighlighted];
[button setTitle:@"Tap" forState:UIControlStateNormal];
[button addTarget:self action:@selector(buttonTapped:) forControlEvents:UIControlEventTouchUpInside];
cell.accessoryView = button;
}
NSInteger row = [indexPath row];
NSString *rowTitle = [listData objectAtIndex:row];
cell.textLabel.text = rowTitle;
return cell;
}由于我们没有nib文件,所以按钮要通过代码自己写按钮, 如下:
UIButton *button = [UIButton buttonWithType:UIButtonTypeCustom];
指定按钮的边框大小:
button.frame = CGRectMake(0.0f, 0.0f, buttonUpImage.size.width, buttonUpImage.size.height);
设定按钮正常状态时候背景图片
[button setBackgroundImage:buttonUpImage forState:UIControlStateNormal];
设定按钮高亮状态时候背景图片
[button setBackgroundImage:buttonDownImage forState:UIControlStateHighlighted];
button setTitle:@"Tap" forState:UIControlStateNormal 设置按钮正常状态时候的title内容。
[button addTarget:self action:@selector(buttonTapped:) forControlEvents:UIControlEventTouchUpInside];
由于没有nib文件按钮事件不能通过IB设计工具添加,要通过代码实现与按钮事件的处理。
cell.accessoryView = button;
把按钮对象赋给单元格的accessoryView(扩展视图)。

实现TableView委托方法
- (void)tableView:(UITableView *)tableView didSelectRowAtIndexPath:(NSIndexPath *)indexPath {

NSInteger buttonRow = [indexPath row];
NSString *rowTitle = [listData objectAtIndex:buttonRow];

UIAlertView *alert = [[UIAlertView alloc] initWithTitle:@"点击Row"
message:[NSString stringWithFormat:@"你点击的Row是 %@",rowTitle]
delegate:self
cancelButtonTitle:@"Ok"
otherButtonTitles:nil];
[alert show];
[alert release];

}
RowControlsController.m
-(IBAction)buttonTapped:(id)sender {
UIButton *senderButton = (UIButton *)sender;
UITableViewCell *buttonCell = (UITableViewCell *)[senderButton superview];

NSInteger buttonRow = [[self.tableView indexPathForCell:buttonCell] row];
NSString *rowTitle = [listData objectAtIndex:buttonRow];

UIAlertView *alert = [[UIAlertView alloc] initWithTitle:@"点击Button"
message:[NSString stringWithFormat:@"你点击的Button是 %@",rowTitle]
delegate:self
cancelButtonTitle:@"Ok"
otherButtonTitles:nil];
[alert show];
[alert release];
}

- (void)viewDidLoad {
NSArray *array = [[NSArray alloc] initWithObjects:@"R2-D2",
@"C3PO", @"Tik-Tok", @"Robby", @"Rosie", @"Uniblab",
@"Bender", @"Marvin", @"Lt. Commander Data",
@"Evil Brother Lore", @"Optimus Prime", @"Tobor", @"HAL",
@"Orgasmatron", nil];
self.listData = array;
[array release];
}
buttonTapped:方法,是点击单元格中的按钮触发事件。
UITableViewCell *buttonCell = (UITableViewCell *)[senderButton superview];
其中superview获得父控件,即表视图单元格。
NSInteger buttonRow = [[self.tableView indexPathForCell:buttonCell] row];
其中获得选择的单元格中的按钮所在的单元格行数。
RootViewController中 viewDidLoad方法
//增加Row控制器
RowControlsController *rowControlsController = [[RowControlsController alloc]
initWithStyle:UITableViewStylePlain];

rowControlsController.title = @"Row Controls";
rowControlsController.rowImage = [UIImage imageNamed:@"rowControlsIcon.png"];
[array addObject:rowControlsController];
[rowControlsController release];
7.7 第四个二级表控制器

MoveMeController.h
#import <UIKit/UIKit.h>
#import "SecondLevelViewController.h"

@interface MoveMeController : SecondLevelViewController {
NSMutableArray *listData;
}
@property (nonatomic, retain) NSMutableArray *listData;
-(IBAction)toggleMove;

@end
MoveMeController.m
@implementation MoveMeController

@synthesize listData;

-(IBAction)toggleMove {

[self.tableView setEditing:!self.tableView.editing animated:YES];

if (self.tableView.editing) {
[self.navigationItem.rightBarButtonItem setTitle:@"Done"];
} else {
[self.navigationItem.rightBarButtonItem setTitle:@"Move"];
}

}
#pragma mark -
#pragma mark Memory management

- (void)didReceiveMemoryWarning {
[super didReceiveMemoryWarning];
}

- (void)viewDidUnload {
self.listData = nil;
}

- (void)dealloc {
[listData release];
[super dealloc];
}
toggleMove方法,是点击导航控制器右边按钮时候触发事件,如果表单元格处于编辑状态时候,设为不可编辑,反之可以编辑单元格。
MoveMeController.m
#pragma mark -
#pragma mark View lifecycle

- (void)viewDidLoad {
if (listData == nil) {
NSMutableArray *array = [[NSMutableArray alloc] initWithObjects:
@"Eeny", @"Meeny", @"Miney", @"Moe", @"Catch", @"A",
@"Tiger", @"By", @"The", @"Toe", nil];
self.listData = array;
[array release];
}

UIBarButtonItem *moveButton = [[UIBarButtonItem alloc]
initWithTitle:@"Move"
style:UIBarButtonItemStyleBordered
target:self
action:@selector(toggleMove)];
self.navigationItem.rightBarButtonItem = moveButton;
[moveButton release];
[super viewDidLoad];
}
实现TableView数据源方法
#pragma mark -
#pragma mark Table view data source

- (NSInteger)numberOfSectionsInTableView:(UITableView *)tableView {
// Return the number of sections.
return 1;
}

- (NSInteger)tableView:(UITableView *)tableView numberOfRowsInSection:(NSInteger)section {
// Return the number of rows in the section.
return [listData count];
}
// Customize the appearance of table view cells.
- (UITableViewCell *)tableView:(UITableView *)tableView
cellForRowAtIndexPath:(NSIndexPath *)indexPath {
static NSString *CellIdentifier = @"Cell";
UITableViewCell *cell = [tableView dequeueReusableCellWithIdentifier:CellIdentifier];
if (cell == nil) {
cell = [[[UITableViewCell alloc] initWithStyle:UITableViewCellStyleDefault
reuseIdentifier:CellIdentifier] autorelease];
//cell.showsReorderControl = YES;
}
NSInteger row = [indexPath row];
cell.textLabel.text = [listData objectAtIndex:row];
return cell;
}// Override to support rearranging the table view.
- (void)tableView:(UITableView *)tableView
moveRowAtIndexPath:(NSIndexPath *)fromIndexPath
toIndexPath:(NSIndexPath *)toIndexPath {
NSInteger fromRow = [fromIndexPath row];
NSInteger toRow = [toIndexPath row];
id object = [listData objectAtIndex:fromRow];//[[listData objectAtIndex:fromRow] retain];
[listData removeObjectAtIndex:fromRow];
[listData insertObject:object atIndex:toRow];
//[object release];
}// Override to support conditional rearranging of the table view.
- (BOOL)tableView:(UITableView *)tableView canMoveRowAtIndexPath:(NSIndexPath *)indexPath {
// Return NO if you do not want the item to be re-orderable.
return YES;
}控制单元格行是否可以移动,本例中我们是可以移动所有行。
实现TableView委托方法
#pragma mark -
#pragma mark Table view delegate

- (UITableViewCellEditingStyle)tableView:(UITableView *)tableView
editingStyleForRowAtIndexPath:(NSIndexPath *)indexPath {
return UITableViewCellEditingStyleNone;
}
我们希望能够对行重新排序,不过不希望用户能够删除或插入行,因此,我们实现了上面的委托方法,通过这个方法,表视图可以询问指定的行是否可以被删除,或是否可以将新行插入到指定的位置。通过为每一行返回
UITableViewCellEditingStyleNone,表示我们不支持插入或删除任何行。
RootViewController中 viewDidLoad方法
//增加Move控制器
MoveMeController *moveMeController = [[MoveMeController alloc]
initWithStyle:UITableViewStylePlain];

moveMeController.title = @"Move Me";
moveMeController.rowImage = [UIImage imageNamed:@"moveMeIcon.png"];
[array addObject:moveMeController];
[moveMeController release];
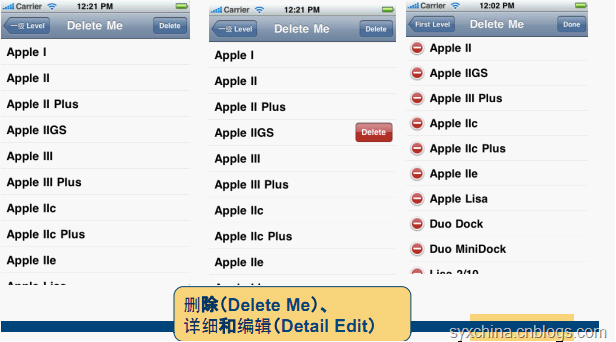
7.8 第五个二级表视图控制器
DeleteMeController.h
#import <UIKit/UIKit.h>
#import "SecondLevelViewController.h"

@interface DeleteMeController : SecondLevelViewController {
NSMutableArray *listData;
}

@property (nonatomic, retain) NSMutableArray *listData;
-(IBAction)toggleMove;

@end
DeleteMeController.m
@implementation DeleteMeController

@synthesize listData;

-(IBAction)toggleMove {

[self.tableView setEditing:!self.tableView.editing animated:YES];

if (self.tableView.editing) {
[self.navigationItem.rightBarButtonItem setTitle:@"Done"];
} else {
[self.navigationItem.rightBarButtonItem setTitle:@"Move"];
}

}

- (void)dealloc {
[listData release];
[super dealloc];
}
toggleMove方法,是点击导航控制器右边按钮时候触发事件,如果表单元格处于编辑状态时候,设为不可编辑,反之可以编辑单元格。
DeleteMeController.m
- (void)viewDidLoad {

if (listData == nil) {
NSString *path = [[NSBundle mainBundle] pathForResource:@"computers" ofType:@"plist"];
NSMutableArray *array = [[NSMutableArray alloc] initWithContentsOfFile:path];

self.listData = array;
[array release];
}

UIBarButtonItem *editButton = [[UIBarButtonItem alloc] initWithTitle:@"Delete"
style:UIBarButtonItemStyleBordered
target:self
action:@selector(toggleMove)];
self.navigationItem.rightBarButtonItem = editButton;
[editButton release];
}
实现TableView数据源方法
#pragma mark -
#pragma mark Table view data source

- (NSInteger)numberOfSectionsInTableView:(UITableView *)tableView {
// Return the number of sections.
return 1;
}

- (NSInteger)tableView:(UITableView *)tableView numberOfRowsInSection:(NSInteger)section {
// Return the number of rows in the section.
return [listData count];
}
// Customize the appearance of table view cells.
- (UITableViewCell *)tableView:(UITableView *)tableView cellForRowAtIndexPath:(NSIndexPath *)indexPath {
static NSString *CellIdentifier = @"Cell";
UITableViewCell *cell = [tableView dequeueReusableCellWithIdentifier:CellIdentifier];
if (cell == nil) {
cell = [[[UITableViewCell alloc] initWithStyle:UITableViewCellStyleDefault
reuseIdentifier:CellIdentifier] autorelease];
}
NSInteger row = [indexPath row];
cell.textLabel.text = [listData objectAtIndex:row];
return cell;
}// Override to support editing the table view.
- (void)tableView:(UITableView *)tableView commitEditingStyle:(UITableViewCellEditingStyle)editingStyle forRowAtIndexPath:(NSIndexPath *)indexPath {
if (editingStyle == UITableViewCellEditingStyleDelete) {
NSInteger row = [indexPath row];
[self.listData removeObjectAtIndex:row];
// Delete the row from the data source
[tableView deleteRowsAtIndexPaths:[NSArray arrayWithObject:indexPath] withRowAnimation:YES];
}
}-(void)tableView:(UITableView *)tableView commitEditingStyle:
(UITableViewCellEditingStyle)editingStyle forRowAtIndexPath:(NSIndexPath *)indexPath
该委托方法是实现删除和插入功能。
RootViewController中 viewDidLoad方法
//增加Delete控制器
DeleteMeController *deleteMeController = [[DeleteMeController alloc]
initWithStyle:UITableViewStylePlain];

deleteMeController.title = @"Delete Me";
deleteMeController.rowImage = [UIImage imageNamed:@"deleteMeIcon.png"];
[array addObject:deleteMeController];
[deleteMeController release];
7.9 第六个二级表视图控制器

TeamsViewController.h
#import <UIKit/UIKit.h>
#import "SecondLevelViewController.h"

@interface TeamsViewController : SecondLevelViewController {
NSArray *listData;
}

@property (nonatomic, retain) NSArray *listData;

@end
TeamsViewController.m
#import "TeamsViewController.h"
#import "TeamsViewController.h"
#import "TeamsDetailController.h"

@implementation TeamsViewController
@synthesize listData;
- (void)viewDidLoad {
NSString *path = [[NSBundle mainBundle] pathForResource:@"teamdictionary" ofType:@"plist"];
NSDictionary *dict = [[NSDictionary alloc] initWithContentsOfFile:path];
self.listData =  [dict allKeys];
[dict release];
}
- (void)didReceiveMemoryWarning {
[super didReceiveMemoryWarning];
}
- (void)viewDidUnload {
self.listData = nil;
}
- (void)dealloc {
[listData release];
[super dealloc];
}
实现TableView数据源方法
#pragma mark Table view methods

- (NSInteger)numberOfSectionsInTableView:(UITableView *)tableView {
return 1;
}

// Customize the number of rows in the table view.
- (NSInteger)tableView:(UITableView *)tableView numberOfRowsInSection:(NSInteger)section {
return [listData count];
}
实现TableView数据源方法
// Customize the appearance of table view cells.
- (UITableViewCell *)tableView:(UITableView *)tableView cellForRowAtIndexPath:(NSIndexPath *)indexPath {

static NSString *CellIdentifier = @"Cell";
UITableViewCell *cell = [tableView dequeueReusableCellWithIdentifier:CellIdentifier];
if (cell == nil) {
cell = [[[UITableViewCell alloc] initWithStyle:UITableViewCellStyleDefault reuseIdentifier:CellIdentifier] autorelease];
}
NSInteger row = [indexPath row];
NSString *title = [listData objectAtIndex:row];
cell.textLabel.text = title;
return cell;
}
- (void)tableView:(UITableView *)tableView didSelectRowAtIndexPath:(NSIndexPath *)indexPath {

NSInteger row = [indexPath row];
NSString *groupName = [listData objectAtIndex:row];

NSString *path = [[NSBundle mainBundle] pathForResource:@"teamdictionary" ofType:@"plist"];
NSDictionary *dict = [[NSDictionary alloc] initWithContentsOfFile:path];

TeamsDetailController *detailController = [[TeamsDetailController alloc]
initWithStyle:UITableViewStyleGrouped];

detailController.listData = [dict objectForKey:groupName];
[dict release];

//[array release];
// Navigation logic may go here. Create and push another view controller.
[self.navigationController pushViewController:detailController animated:YES];
[detailController release];
}
可编辑表视图控制器

TeamsDetailController.h
#import <UIKit/UIKit.h>
#define TEAM1  1
#define TEAM2  2
#define TEAM3  3
#define TEAM4  4
#define LABLE_TAG 45678

@interface TeamsDetailController : UITableViewController <UITextFieldDelegate> {
NSArray *listData;
NSMutableArray *teamsData;
NSArray *fieldLables;
}

@property (nonatomic, retain) NSArray *listData;
@property (nonatomic, retain) NSArray *fieldLables;
@property (nonatomic, retain) NSMutableArray *teamsData;

-(IBAction)cancel:(id)sender;
-(IBAction)save:(id)sender;
-(IBAction)textFieldDone:(id)sender;

@end
TeamsDetailController.m
#import "TeamsDetailController.h"

@implementation TeamsDetailController

@synthesize listData;
@synthesize fieldLables;
@synthesize teamsData;

-(IBAction)cancel:(id)sender {
[self.navigationController popViewControllerAnimated:YES];
}

-(IBAction)save:(id)sender {

for (UIView *oneView in self.tableView.subviews) {
if ([oneView isMemberOfClass:[UITableViewCell class]]) {
UITableViewCell *cell = (UITableViewCell *)oneView;
for (UIView *twoView in cell.contentView.subviews) {
if ([twoView isMemberOfClass:[UITextField class]]) {
UITextField *textField = (UITextField *)twoView;
NSLog(@"行 %i -- value %@", textField.tag ,textField.text);
}
}
}
}

[self.navigationController popViewControllerAnimated:YES];

}
-(IBAction)textFieldDone:(id)sender {
[sender resignFirstResponder];
}
- (void)viewDidUnload {
self.listData = nil;
self.teamsData = nil;
self.fieldLables = nil;
self.listData = nil;
}
- (void)dealloc {
[listData release];
[teamsData release];
[fieldLables release];
[super dealloc];
}- (void)viewDidLoad {
teamsData = [[NSMutableArray alloc] init];
for (id name in listData) {
[teamsData addObject:name];
}
NSArray *array = [[NSArray alloc] initWithObjects:@"第一队:",@"第二队:",@"第三队:",@"第四队:", nil];
self.fieldLables = array;
[array release];
UIBarButtonItem *cancelButton = [[UIBarButtonItem alloc]
initWithTitle:@"Cancel"
style:UIBarButtonItemStyleBordered
target:self
action:@selector(cancel:)];
self.navigationItem.leftBarButtonItem = cancelButton;
[cancelButton release];
UIBarButtonItem *saveButton = [[UIBarButtonItem alloc]
initWithTitle:@"Save"
style:UIBarButtonItemStyleBordered
target:self
action:@selector(save:)];
self.navigationItem.rightBarButtonItem = saveButton;
[saveButton release];
}
- (void)didReceiveMemoryWarning {
// Releases the view if it doesn't have a superview.
[super didReceiveMemoryWarning];
// Release any cached data, images, etc that aren't in use.
}实现TableView数据源方法
#pragma mark Table view methods

- (NSInteger)numberOfSectionsInTableView:(UITableView *)tableView {
return 1;
}

// Customize the number of rows in the table view.
- (NSInteger)tableView:(UITableView *)tableView numberOfRowsInSection:(NSInteger)section {
return [teamsData count];
}
// Customize the appearance of table view cells.
- (UITableViewCell *)tableView:(UITableView *)tableView cellForRowAtIndexPath:(NSIndexPath *)indexPath {
static NSString *CellIdentifier = @"Cell";
UITableViewCell *cell = [tableView dequeueReusableCellWithIdentifier:CellIdentifier];
if (cell == nil) {
cell = [[[UITableViewCell alloc] initWithStyle:UITableViewCellStyleDefault reuseIdentifier:CellIdentifier] autorelease];
UILabel *label = [[UILabel alloc] initWithFrame:CGRectMake(10, 10, 75, 25)];
label.textAlignment = UITextAlignmentRight;
label.tag = LABLE_TAG;
label.font = [UIFont boldSystemFontOfSize:14];
[cell.contentView addSubview:label];
[label release];
UITextField *textField = [[UITextField alloc] initWithFrame:CGRectMake(90, 12, 200, 25)];
textField.clearsOnBeginEditing = NO;
[textField setDelegate:self];
textField.returnKeyType = UIReturnKeyDone;
[textField addTarget:self action:@selector(textFieldDone:) forControlEvents:UIControlEventEditingDidEndOnExit];
[cell.contentView addSubview:textField];
[textField release];
}
NSInteger row = [indexPath row];
UILabel *label = (UILabel *)[cell viewWithTag:LABLE_TAG];
UITextField *textField = nil;
for (UIView *oneView in cell.contentView.subviews) {
if ([oneView isMemberOfClass:[UITextField class]]) {
textField = (UITextField *)oneView;
}
}
label.text = [fieldLables objectAtIndex:row];
textField.text = [listData objectAtIndex:row];
textField.tag = row;
return cell;
}实现TableView委托方法
#pragma mark 文本字段控件的委托方法
- (void)textFieldDidEndEditing:(UITextField *)textField {
NSLog(@"修改 行 %i -- value %@", textField.tag ,textField.text);
}
RootViewController中 viewDidLoad方法
//增加可编辑详细窗格控制器
TeamsViewController *teamsViewController = [[TeamsViewController alloc]
initWithStyle:UITableViewStylePlain];

teamsViewController.title = @"Detail Edit";
teamsViewController.rowImage = [UIImage imageNamed:@"detailEditIcon.png"];
[array addObject:teamsViewController];
[teamsViewController release];
注:
1 本教程是基于关东升老师的教程
2 基于黑苹果10.6.8和xcode4.2
3 本人初学,有什么不对的望指教
4 教程会随着本人学习,持续更新
5 教程是本人从word笔记中拷贝出来了,所以格式请见谅

相关文章推荐
- iOS在自定义视图(常用于自定义cell)中获取导航控制器上面的当前的控制器对象
- IOS之导航控制器与表视图
- iOS基础控件-UITabBarController - 2 之UITabBarItem 详解,结合视图控制器和导航控制器的用法
- IOS开发-表视图LV3导航控制器
- iOS 导航控制器、标签、表视图的创建方法
- IOS-导航视图控制器的使用
- iOS开发系列课程(05) --- 导航视图控制器
- IOS编程教程:使用StoryBoard来建立导航控制器和表视图
- iOS Dev 深入浅出 导航控制器(二)with表视图相关操作
- iOS 7 使用导航控制器后有关根视图高度及位置的那些事
- [IOS]添加NavigationItem到导航视图控制器
- IOS开发基础05(导航视图控制器,跳转视图控制器,模态)
- ios学习记录 day31 UI 9 多视图切换 导航控制器
- 【iOS开发-26】利用协议代理实现导航控制器UINavigationController视图之间的正向传值和反向传值
- iOS开发导航控制器下不同视图控制器之间切换:利用CATrasition和view的layer层来实现自定义的动画效果
- IOS视图控制器导航及生命周期研究Demo
- 【iOS开发-24】导航控制器下不同视图控制器之间切换:利用CATrasition和view的layer层来实现自定义的动画效果
- iOS培训章节——UI多视图之导航控制器的用法
- iOS 导航控制器上添加\删除子视图
- IOS开发学习笔记(导航控制器,视图控制器,模态)