Android 基站定位源代码
2012-09-09 11:39
323 查看
经过几天的调研以及测试,终于解决了联通2G、移动2G、电信3G的基站定位代码。团队里面只有这些机器的制式了。下面就由我来做一个详细的讲解吧。
1 相关技术内容
Google Android Api里面的TelephonyManager的管理。
联通、移动、电信不同制式在获取基站位置的代码区别。
通过基站的基本信息,通过Google Gears获取对应的GPS经纬度。
通过Google Map API根据GPS经纬度获取当前位置。
2 目前存在的几个问题
由于得到的GPS经纬度在Google Map上面显示需要偏移,这块暂时没有进行处理。
没有使用PhoneStateListener来对状态实时进行更新。
没有使用线程异步获取数据
没有使用服务的方式来实时获取数据
所以如果是商业使用的话,还需进一步修改。
3 当然本部分代码已经移植到我们的家庭卫士的项目中了,2提到的问题全部解决了。
下面我针对第一部分的四大内容进行代码注解。
1 Google Android Api里面的TelephonyManager的管理。
通过这个方式就可以得到TelephonyManager接口。
这个接口的源代码可以通过设置在项目里面查看,这里不具体附上了。
得到TelephonyManager后,由于针对不同的运营商,代码有所不同,所以需要判断getNetworkType()
在源代码里面有如下的类型定义
查看源码
打印?
2 联通、移动、电信不同制式在获取基站位置的代码区别。
这部分是我实际测试出来的,经过无数次的拆机,放卡,才实现了不同制式的完美实现。
代码如下:
查看源码
打印?
3 通过基站的基本信息,通过Google Gears获取对应的GPS经纬度。
这部分前面的两篇文章都有提到,代码参考了网友们的代码,感谢感谢。
查看源码
打印?
4 通过Google Map API根据GPS经纬度获取当前位置。
本部分代码参考了 简单基站定位程序 ,感谢雷一兄这么好的文章。同时雷一兄的排版真的非常好看,清晰明了。
查看源码
打印?
5 最关键的出来了,附上代码吧。
下载地址:http://download.csdn.net/detail/t80t90s/4558226
补充一下:
在AndroidMenifest.xml里面需要加上
android.permission.INTERNET、android.permission.ACCESS_COARSE_LOCATION、android.permission.READ_PHONE_STATE权限,否则会出错。
放在Application包前面。
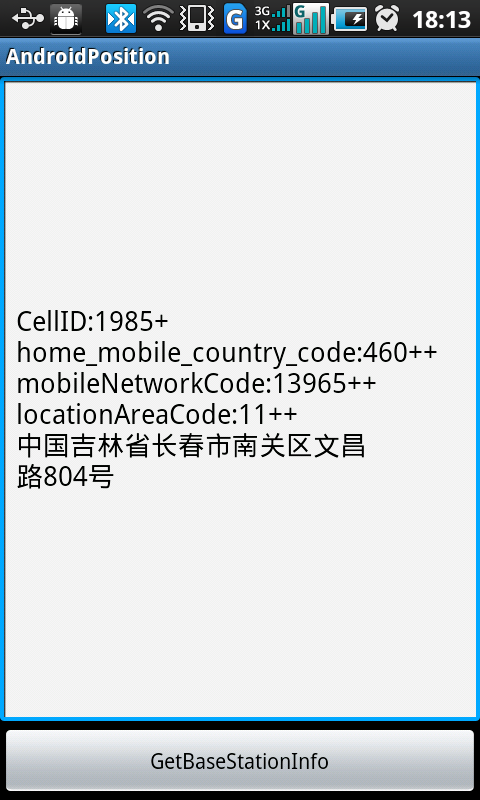
6 图片看一下效果吧。
7 另外在提交数据到Google Gears的时候,格式如下
发送到Google的数据格式:
02-24 18:08:20.550: E/Location send(12892): {“address_language”:”zh_CN”,”host”:”maps.google.com”,”radio_type”:”cdma”,”home_mobile_country_code”:”460″,”home_mobile_network_code”:”13965″,”cell_towers”:[{"mobile_network_code":"13965","location_area_code":11,"cell_id":1985,"age":0,"mobile_country_code":"460"}],”request_address”:true,”version”:”1.1.0″}
接收到Google的数据格式:
02-24 18:08:22.975: E/Locaiton receive(12892): {“location”:{“latitude”:43.8595097,”longitude”:125.3355736,”address”: {“country”:”中国”,”country_code”:”CN”,”region”:”吉林省”,”city”:”长春市”,”street”:”文昌路”,”street_number”:”"},”accuracy”:1815.0},”access_token”:”2:_Kpk9mOFMgyWgLai:8iWlDpBYZsp4_VxO”}
-End-
1 相关技术内容
Google Android Api里面的TelephonyManager的管理。
联通、移动、电信不同制式在获取基站位置的代码区别。
通过基站的基本信息,通过Google Gears获取对应的GPS经纬度。
通过Google Map API根据GPS经纬度获取当前位置。
2 目前存在的几个问题
由于得到的GPS经纬度在Google Map上面显示需要偏移,这块暂时没有进行处理。
没有使用PhoneStateListener来对状态实时进行更新。
没有使用线程异步获取数据
没有使用服务的方式来实时获取数据
所以如果是商业使用的话,还需进一步修改。
3 当然本部分代码已经移植到我们的家庭卫士的项目中了,2提到的问题全部解决了。
下面我针对第一部分的四大内容进行代码注解。
1 Google Android Api里面的TelephonyManager的管理。
TelephonyManager tm = (TelephonyManager) getSystemService(Context.TELEPHONY_SERVICE);
通过这个方式就可以得到TelephonyManager接口。
这个接口的源代码可以通过设置在项目里面查看,这里不具体附上了。
得到TelephonyManager后,由于针对不同的运营商,代码有所不同,所以需要判断getNetworkType()
在源代码里面有如下的类型定义
查看源码
打印?
01 | /** Network type is unknown */ |
02 | public static final int NETWORK_TYPE_UNKNOWN = 0 ; |
03 | /** Current network is GPRS */ |
04 | public static final int NETWORK_TYPE_GPRS = 1 ; |
05 | /** Current network is EDGE */ |
06 | public static final int NETWORK_TYPE_EDGE = 2 ; |
07 | /** Current network is UMTS */ |
08 | public static final int NETWORK_TYPE_UMTS = 3 ; |
09 | /** Current network is CDMA: Either IS95A or IS95B*/ |
10 | public static final int NETWORK_TYPE_CDMA = 4 ; |
11 | /** Current network is EVDO revision 0*/ |
12 | public static final int NETWORK_TYPE_EVDO_0 = 5 ; |
13 | /** Current network is EVDO revision A*/ |
14 | public static final int NETWORK_TYPE_EVDO_A = 6 ; |
15 | /** Current network is 1xRTT*/ |
16 | public static final int NETWORK_TYPE_1xRTT = 7 ; |
17 | /** Current network is HSDPA */ |
18 | public static final int NETWORK_TYPE_HSDPA = 8 ; |
19 | /** Current network is HSUPA */ |
20 | public static final int NETWORK_TYPE_HSUPA = 9 ; |
21 | /** Current network is HSPA */ |
22 | public static final int NETWORK_TYPE_HSPA = 10 ; |
这部分是我实际测试出来的,经过无数次的拆机,放卡,才实现了不同制式的完美实现。
代码如下:
查看源码
打印?
01 | TelephonyManager tm = (TelephonyManager) getSystemService(Context.TELEPHONY_SERVICE); |
02 | int type = tm.getNetworkType(); |
03 | //中国电信为CTC |
04 | //NETWORK_TYPE_EVDO_A是中国电信3G的getNetworkType |
05 | //NETWORK_TYPE_CDMA电信2G是CDMA |
06 | if (type == TelephonyManager.NETWORK_TYPE_EVDO_A || type == TelephonyManager.NETWORK_TYPE_CDMA || type ==TelephonyManager.NETWORK_TYPE_1xRTT) |
07 | { |
08 | } |
09 | //移动2G卡 + CMCC + 2 |
10 | //type = NETWORK_TYPE_EDGE |
11 | else if (type == TelephonyManager.NETWORK_TYPE_EDGE) |
12 | { |
13 | } |
14 | //联通的2G经过测试 China Unicom 1 NETWORK_TYPE_GPRS |
15 | else if (type == TelephonyManager.NETWORK_TYPE_GPRS) |
16 | { |
17 |
18 | } |
19 | else |
20 | { |
21 | tv.setText( "Current Not Support This Type." ); |
22 | } |
这部分前面的两篇文章都有提到,代码参考了网友们的代码,感谢感谢。
查看源码
打印?
01 | private Location callGear(ArrayList cellID) { |
02 | if (cellID == null ) return null ; |
03 | DefaultHttpClient client = new DefaultHttpClient(); |
04 | HttpPost post = new HttpPost( |
05 | "http://www.google.com/loc/json" ); |
06 | JSONObject holder = new JSONObject(); |
07 | try { |
08 | holder.put( "version" , "1.1.0" ); |
09 | holder.put( "host" , "maps.google.com" ); |
10 | holder.put( "home_mobile_country_code" , cellID.get( 0 ).mobileCountryCode); |
11 | holder.put( "home_mobile_network_code" , cellID.get( 0 ).mobileNetworkCode); |
12 | holder.put( "radio_type" , cellID.get( 0 ).radioType); |
13 | holder.put( "request_address" , true ); |
14 | if ( "460" .equals(cellID.get( 0 ).mobileCountryCode)) |
15 | holder.put( "address_language" , "zh_CN" ); |
16 | else |
17 | holder.put( "address_language" , "en_US" ); |
18 | JSONObject data,current_data; |
19 | JSONArray array = new JSONArray(); |
20 | current_data = new JSONObject(); |
21 | current_data.put( "cell_id" , cellID.get( 0 ).cellId); |
22 | current_data.put( "location_area_code" , cellID.get( 0 ).locationAreaCode); |
23 | current_data.put( "mobile_country_code" , cellID.get( 0 ).mobileCountryCode); |
24 | current_data.put( "mobile_network_code" , cellID.get( 0 ).mobileNetworkCode); |
25 | current_data.put( "age" , 0 ); |
26 | array.put(current_data); |
27 | if (cellID.size() > 2 ) { |
28 | for ( int i = 1 ;
i < cellID.size(); i++) { |
29 | data = new JSONObject(); |
30 | data.put( "cell_id" , cellID.get(i).cellId); |
31 | data.put( "location_area_code" , cellID.get(i).locationAreaCode); |
32 | data.put( "mobile_country_code" , cellID.get(i).mobileCountryCode); |
33 | data.put( "mobile_network_code" , cellID.get(i).mobileNetworkCode); |
34 | data.put( "age" , 0 ); |
35 | array.put(data); |
36 | } |
37 | } |
38 | holder.put( "cell_towers" , array); |
39 | StringEntity se = new StringEntity(holder.toString()); |
40 | Log.e( "Location send" , holder.toString()); |
41 | post.setEntity(se); |
42 | HttpResponse resp = client.execute(post); |
43 | HttpEntity entity = resp.getEntity(); |
44 |
45 | BufferedReader br = new BufferedReader( |
46 | new InputStreamReader(entity.getContent())); |
47 | StringBuffer sb = new StringBuffer(); |
48 | String result = br.readLine(); |
49 | while (result != null ) { |
50 | Log.e( "Locaiton receive" , result); |
51 | sb.append(result); |
52 | result = br.readLine(); |
53 | } |
54 | if (sb.length() return null ; |
55 | data = new JSONObject(sb.toString()); |
56 | data = (JSONObject) data.get( "location" ); |
57 |
58 | Location loc = new Location(LocationManager.NETWORK_PROVIDER); |
59 | loc.setLatitude((Double) data.get( "latitude" )); |
60 | loc.setLongitude((Double) data.get( "longitude" )); |
61 | loc.setAccuracy(Float.parseFloat(data.get( "accuracy" ).toString())); |
62 | loc.setTime(GetUTCTime()); |
63 | return loc; |
64 | } catch (JSONException e) { |
65 | return null ; |
66 | } catch (UnsupportedEncodingException e) { |
67 | e.printStackTrace(); |
68 | } catch (ClientProtocolException e) { |
69 | e.printStackTrace(); |
70 | } catch (IOException e) { |
71 | e.printStackTrace(); |
72 | } |
73 | return null ; |
74 | } |
本部分代码参考了 简单基站定位程序 ,感谢雷一兄这么好的文章。同时雷一兄的排版真的非常好看,清晰明了。
查看源码
打印?
01 | private String getLocation(Location itude) throws Exception { |
02 | String resultString = "" ; |
03 |
04 | /** 这里采用get方法,直接将参数加到URL上 */ |
05 | String urlString = String.format( "http://maps.google.cn/maps/geo?key=abcdefg&q=%s,%s" , itude.getLatitude(), itude.getLongitude()); |
06 | Log.i( "URL" , urlString); |
07 |
08 | /** 新建HttpClient */ |
09 | HttpClient client = new DefaultHttpClient(); |
10 | /** 采用GET方法 */ |
11 | HttpGet get = new HttpGet(urlString); |
12 | try { |
13 | /** 发起GET请求并获得返回数据 */ |
14 | HttpResponse response = client.execute(get); |
15 | HttpEntity entity = response.getEntity(); |
16 | BufferedReader buffReader = new BufferedReader( new InputStreamReader(entity.getContent())); |
17 | StringBuffer strBuff = new StringBuffer(); |
18 | String result = null ; |
19 | while ((result = buffReader.readLine()) != null ) { |
20 | strBuff.append(result); |
21 | } |
22 | resultString = strBuff.toString(); |
23 |
24 | /** 解析JSON数据,获得物理地址 */ |
25 | if (resultString != null && resultString.length() > 0 )
{ |
26 | JSONObject jsonobject = new JSONObject(resultString); |
27 | JSONArray jsonArray = new JSONArray(jsonobject.get( "Placemark" ).toString()); |
28 | resultString = "" ; |
29 | for ( int i = 0 ;
i < jsonArray.length(); i++) { |
30 | resultString = jsonArray.getJSONObject(i).getString( "address" ); |
31 | } |
32 | } |
33 | } catch (Exception e) { |
34 | throw new Exception( "获取物理位置出现错误:" + e.getMessage()); |
35 | } finally { |
36 | get.abort(); |
37 | client = null ; |
38 | } |
39 |
40 | return resultString; |
41 | } |
下载地址:http://download.csdn.net/detail/t80t90s/4558226
补充一下:
在AndroidMenifest.xml里面需要加上
android.permission.INTERNET、android.permission.ACCESS_COARSE_LOCATION、android.permission.READ_PHONE_STATE权限,否则会出错。
放在Application包前面。
6 图片看一下效果吧。
7 另外在提交数据到Google Gears的时候,格式如下
发送到Google的数据格式:
02-24 18:08:20.550: E/Location send(12892): {“address_language”:”zh_CN”,”host”:”maps.google.com”,”radio_type”:”cdma”,”home_mobile_country_code”:”460″,”home_mobile_network_code”:”13965″,”cell_towers”:[{"mobile_network_code":"13965","location_area_code":11,"cell_id":1985,"age":0,"mobile_country_code":"460"}],”request_address”:true,”version”:”1.1.0″}
接收到Google的数据格式:
02-24 18:08:22.975: E/Locaiton receive(12892): {“location”:{“latitude”:43.8595097,”longitude”:125.3355736,”address”: {“country”:”中国”,”country_code”:”CN”,”region”:”吉林省”,”city”:”长春市”,”street”:”文昌路”,”street_number”:”"},”accuracy”:1815.0},”access_token”:”2:_Kpk9mOFMgyWgLai:8iWlDpBYZsp4_VxO”}
-End-

相关文章推荐
- Android基站定位源代码
- Android 基站定位源代码
- Android 基站定位源代码
- Android基站定位源代码
- Android 基站定位源代码(有问题)
- Gears Android WIFI/基站定位源代码分析
- Android基站定位源代码
- Android基站定位源代码
- Android基站定位源代码
- Gears Android WIFI/基站定位源代码分析
- 【Android开发笔记】4.简单基站定位程序
- android 定位 WIFI定位其实和基站定位
- android GSM+CDMA基站定位
- android基站定位程序获取地理位置
- android基站定位
- android GSM+CDMA基站定位 获取详细位置信息
- android GSM+CDMA基站定位--获取移动网络相关信息
- Android-基站定位
- Android打印日志,实现快速定位源代码
- Android基站定位