Android高手进阶教程(二)之----Android Launcher抽屉类SlidingDrawer的使用!
2012-09-08 12:06
549 查看
最近在研究Lanucher ,看了源码,发现了SlidingDrawer 这个类,也就是所谓的"抽屉"类。它的用法很简单,要包括handle ,和content .
handle 就是当你点击它的时候,content 要么抽抽屉要么关抽屉。别的不多说了,具体步骤如下.
1.新建Android 工程,命名为SlidingDrawer .
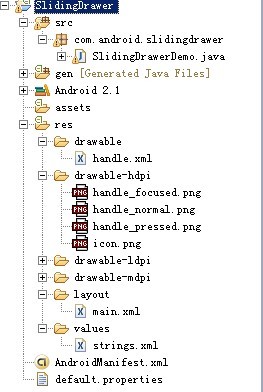
2.准备素材,在这里我的图标是用Launcher2 里面的图标,放在drawable-hdpi 文件夹目录结构如下:
3.设置main.xml 布局:代码如下:
[c-sharp]
view plaincopyprint?
<?xml version="1.0" encoding="utf-8"?> <LinearLayout xmlns:android="http://schemas.android.com/apk/res/android" android:orientation="vertical" android:layout_width="fill_parent" android:layout_height="fill_parent" android:background="#808080" > <SlidingDrawer android:id="@+id/slidingdrawer" android:layout_width="fill_parent" android:layout_height="fill_parent" android:orientation="vertical" android:handle="@+id/handle" android:content="@+id/content"> <Button android:id="@+id/handle" android:layout_width="88dip" android:layout_height="44dip" android:background="@drawable/handle" /> <LinearLayout android:id="@+id/content" android:layout_width="fill_parent" android:layout_height="fill_parent" android:background="#00ff00"> <Button android:id="@+id/button" android:layout_width="wrap_content" android:layout_height="wrap_content" android:text="Button" /> <EditText android:id="@+id/editText" android:layout_width="fill_parent" android:layout_height="wrap_content" /> </LinearLayout> </SlidingDrawer> </LinearLayout>
<?xml version="1.0" encoding="utf-8"?> <selector xmlns:android="http://schemas.android.com/apk/res/android"> <item android:state_window_focused="false" android:state_enabled="true" android:drawable="@drawable/handle_normal" /> <item android:state_pressed="true"
android:drawable="@drawable/handle_pressed" /> <item android:state_focused="true" android:state_enabled="true" android:drawable="@drawable/handle_focused" /> <item android:state_enabled="true" android:drawable="@drawable/handle_normal" /> <item android:state_focused="true"
android:drawable="@drawable/handle_focused" /> </selector>
5.运行之。将会得到如下效果:
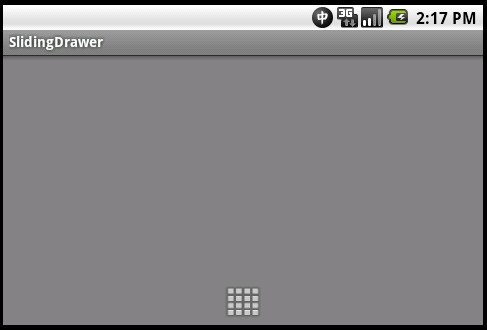
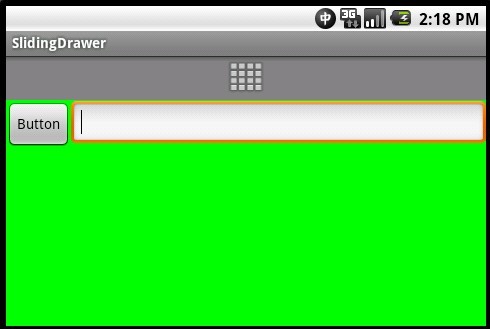
的比较简单呵呵,如果想深入了解,大家看Launcher 源码吧!
handle 就是当你点击它的时候,content 要么抽抽屉要么关抽屉。别的不多说了,具体步骤如下.
1.新建Android 工程,命名为SlidingDrawer .
2.准备素材,在这里我的图标是用Launcher2 里面的图标,放在drawable-hdpi 文件夹目录结构如下:
3.设置main.xml 布局:代码如下:
[c-sharp]
view plaincopyprint?
<?xml version="1.0" encoding="utf-8"?> <LinearLayout xmlns:android="http://schemas.android.com/apk/res/android" android:orientation="vertical" android:layout_width="fill_parent" android:layout_height="fill_parent" android:background="#808080" > <SlidingDrawer android:id="@+id/slidingdrawer" android:layout_width="fill_parent" android:layout_height="fill_parent" android:orientation="vertical" android:handle="@+id/handle" android:content="@+id/content"> <Button android:id="@+id/handle" android:layout_width="88dip" android:layout_height="44dip" android:background="@drawable/handle" /> <LinearLayout android:id="@+id/content" android:layout_width="fill_parent" android:layout_height="fill_parent" android:background="#00ff00"> <Button android:id="@+id/button" android:layout_width="wrap_content" android:layout_height="wrap_content" android:text="Button" /> <EditText android:id="@+id/editText" android:layout_width="fill_parent" android:layout_height="wrap_content" /> </LinearLayout> </SlidingDrawer> </LinearLayout>
[c-sharp] view plaincopyprint?<?xml version="1.0" encoding="utf-8"?> <selector xmlns:android="http://schemas.android.com/apk/res/android"> <item android:state_window_focused="false" android:state_enabled="true" android:drawable="@drawable/handle_normal" /> <item android:state_pressed="true" android:drawable="@drawable/handle_pressed" /> <item android:state_focused="true" android:state_enabled="true" android:drawable="@drawable/handle_focused" /> <item android:state_enabled="true" android:drawable="@drawable/handle_normal" /> <item android:state_focused="true" android:drawable="@drawable/handle_focused" /> </selector>
<?xml version="1.0" encoding="utf-8"?> <selector xmlns:android="http://schemas.android.com/apk/res/android"> <item android:state_window_focused="false" android:state_enabled="true" android:drawable="@drawable/handle_normal" /> <item android:state_pressed="true"
android:drawable="@drawable/handle_pressed" /> <item android:state_focused="true" android:state_enabled="true" android:drawable="@drawable/handle_focused" /> <item android:state_enabled="true" android:drawable="@drawable/handle_normal" /> <item android:state_focused="true"
android:drawable="@drawable/handle_focused" /> </selector>
5.运行之。将会得到如下效果:
的比较简单呵呵,如果想深入了解,大家看Launcher 源码吧!

相关文章推荐
- Android高手进阶教程(十六)之---Android中万能的BaseAdapter(Spinner,ListView,GridView)的使用!
- Android高手进阶教程(二)之----Android Launcher抽屉类SlidingDrawer的使用!
- Android高手进阶教程(五)之----Android 中LayoutInflater的使用!
- Android高手进阶教程(十六)之---Android中万能的BaseAdapter(Spinner,ListView,GridView)的使用!
- [转]Android高手进阶教程(五)之----Android 中LayoutInflater的使用!
- Android高手进阶教程(四)之----Android 中自定义属性(attr.xml,TypedArray)的使用!
- Android 高手进阶教程(十三)----Android Location的使用!!
- Android高手进阶教程(四)之----Android 中自定义属性(attr.xml,TypedArray)的使用!
- Android高手进阶教程(五)之----Android 中LayoutInflater的使用
- Android高手进阶教程(六)之----Android 中MenuInflater的使用(布局定义菜单)!
- Android 高手进阶教程(十四)之----Android Location的使用!!
- Android高手进阶教程(五)之----Android 中LayoutInflater的使用!
- Android高手进阶教程(七)之----Android 中Preferences的使用!
- Android高手进阶教程(十)之----Android PopupWindow的使用!!!
- Android高手进阶教程(六)之 ----Android 中MenuInflater的使用(布局定义菜单)
- Android高手进阶教程(十)之----Android PopupWindow的使用!
- Android高手进阶教程(七)之----Android 中Preferences的使用!
- Android高手进阶教程(五)之----Android 中LayoutInflater的使用!
- Android高手进阶教程(四)之----Android 中自定义属性(attr.xml,TypedArray)的使用!
- Android高手进阶教程(十五)之---通过Location获取Address的使用!