7 Steps to Setup A Record Level Audit in PeopleSoft
2012-08-02 14:46
369 查看
As PeopleSoft maintains critical enterprise data, having an audit trail on critical data is of paramount importance. This post will help you setup Record Level Auditing in 7 simple steps.
1. Choose the Record
Not all records in PeopleSoft need auditing. When there is such a business requirement, choose the record(s) that needs to be audited.
2. Create the Audit Record
The Audit record is essentially a copy of the record being audited. The easiest way to create a copy of your record is to do a Save As. Name the new record under standard record naming convention prefixed with AUDIT_
3. Remove the unwanted
An Audit record doesn’t need keys, so remove them. The same rule goes with Related Language Records, Query security records and PeopleCode. Also, remove all other fields that you are not interested in. Just remove them all.
4. Add Audit Fields
Insert the below fields (also known as audit fields) at the top of the new record in the below order
AUDIT_OPRID (Captures the User who performed an action)
AUDIT_STAMP (Captures the date and time when the action was performed)
AUDIT_ACTN (Captures the type of action performed)
AUDIT_RECNAME (Captures the name of the audited record definition. This field is used only when the same audit record is used for auditing multiple records)
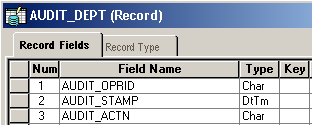
Audit Fields
On the Record Field Properties for AUDIT_STAMP, we need to check the Auto-Update checkbox. This is essential to correctly populate the date-time stamp.
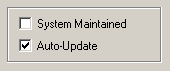
Auto Update property
AUDIT_ACTN can take up any of the below values based on the type of the action performed.
A – Row inserted
D – Row deleted.
C – Row changed (updated), but no key fields changed.
K – Row changed (updated), and at least one key field changed.
N – Row changed (updated), and at least one key field changed.
In case of C and K the system writes old values to the audit table. While for N, the new values are written into the audit table.
5. Build the audit record
Your Audit record must be a Database record and you should be able to access it using Query.
6. Link them up
Open the Base Record that is to be audited. Open its properties. On the Use tab, under the Record Audit, specify the name of the audit record that we just created as the Record Name. Choose Audit Options based on your requirement.
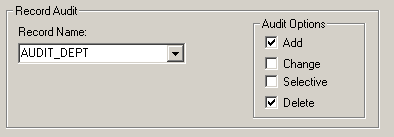
Audit Record Mapping
Add – An Audit table row is inserted when a row is inserted in the base record
Delete – An Audit table row is inserted when a row is deleted from the base record
Change – Audit table row(s) is inserted when a row changes in the base record
Selective – Audit table row(s) is inserted when common field (present in both base record and audit record) changes
7. Test the Auditing
Based on the Audit option that you have chosen, perform some transaction that can trigger the audit. Now query the audit record and check for new rows. Try to infer the meaning of each row that got added.
A delivered page to test this is the Department page. Navigate to Set Up Financials/Supply Chain > Common Definitions > Design ChartFields > Department. Add a new value.
Examine the audit rows.
Record level Auditing
As the name suggests, record level auditing is the auditing mechanism enforced on a Record. To set up record level auditing, follow the steps below.1. Choose the Record
Not all records in PeopleSoft need auditing. When there is such a business requirement, choose the record(s) that needs to be audited.
2. Create the Audit Record
The Audit record is essentially a copy of the record being audited. The easiest way to create a copy of your record is to do a Save As. Name the new record under standard record naming convention prefixed with AUDIT_
3. Remove the unwanted
An Audit record doesn’t need keys, so remove them. The same rule goes with Related Language Records, Query security records and PeopleCode. Also, remove all other fields that you are not interested in. Just remove them all.
4. Add Audit Fields
Insert the below fields (also known as audit fields) at the top of the new record in the below order
AUDIT_OPRID (Captures the User who performed an action)
AUDIT_STAMP (Captures the date and time when the action was performed)
AUDIT_ACTN (Captures the type of action performed)
AUDIT_RECNAME (Captures the name of the audited record definition. This field is used only when the same audit record is used for auditing multiple records)
Audit Fields
On the Record Field Properties for AUDIT_STAMP, we need to check the Auto-Update checkbox. This is essential to correctly populate the date-time stamp.
Auto Update property
AUDIT_ACTN can take up any of the below values based on the type of the action performed.
A – Row inserted
D – Row deleted.
C – Row changed (updated), but no key fields changed.
K – Row changed (updated), and at least one key field changed.
N – Row changed (updated), and at least one key field changed.
In case of C and K the system writes old values to the audit table. While for N, the new values are written into the audit table.
5. Build the audit record
Your Audit record must be a Database record and you should be able to access it using Query.
6. Link them up
Open the Base Record that is to be audited. Open its properties. On the Use tab, under the Record Audit, specify the name of the audit record that we just created as the Record Name. Choose Audit Options based on your requirement.
Audit Record Mapping
Add – An Audit table row is inserted when a row is inserted in the base record
Delete – An Audit table row is inserted when a row is deleted from the base record
Change – Audit table row(s) is inserted when a row changes in the base record
Selective – Audit table row(s) is inserted when common field (present in both base record and audit record) changes
7. Test the Auditing
Based on the Audit option that you have chosen, perform some transaction that can trigger the audit. Now query the audit record and check for new rows. Try to infer the meaning of each row that got added.
A delivered page to test this is the Department page. Navigate to Set Up Financials/Supply Chain > Common Definitions > Design ChartFields > Department. Add a new value.
SELECT * FROM PS_AUDIT_DEPT;
Examine the audit rows.

相关文章推荐
- 7 Steps to Setup A Record Level Audit in PeopleSoft
- How to read a SQL Trace in PeopleSoft
- PeopleSoft Alter Audit -- 检查Table 与 Record的差异性
- Steps to Create Setup and Deployment Project in Dot Net VS 2008
- HOWTO Setup Dual Authentication in CAS - SSL Client Auth and LDAP
- Siebel HOW TO: How to change log level in command-line
- How to setup VVR in VCS , including the FireDrill.
- How to reduce CPU soft lock up in KVM guest
- How to Setup Chroot SFTP in Linux (Allow Only SFTP, not SSH)
- 5 Steps to Advanced Format readiness in your deployment process
- X++ CODE TO GENERATE ALERT FOR RECORD IN DAX 2011
- 6 Easy Steps to Learn Naive Bayes Algorithm (with code in Python)
- End-to-end people detection in crowded scenes
- Mining Machinery Steps to New Level through Railway
- How To Setup And Check MO / MOAC Setups In a R12 APPS Instance - Precedence of MO / MOAC Profile Options [ID 745420.1]
- 为什么实际内存使用量已经超过了memory.soft_limit_in_bytes,但是并没有立即触发try_to_free_pages in try_charge
- FaceBook 论文:DeepFace: Closing the Gap to Human-Level Performance in Face Verification 笔记
- Siebel HOW TO: How to change log level in command-line
- [转]Writing Custom Entries to the Audit Log in Windows SharePoint Services 3.0(如何记录自定义审核日志)
- How to Setup a Private Proxy Server on EC2 in Under 10 Minutes