UITABBARCONTROLLER WITH UINAVIGATIONCONTROLLER USING INTERFACE BUILDER
2012-08-02 09:31
489 查看
转自: http://www.cimgf.com/2009/06/25/uitabbarcontroller-with-uinavigationcontroller-using-interface-builder/
I’ve seen a good bit of sample code that shows how to implement using a UINavigationController in a view controller that is managed by a UITabBarController, but I haven’t seen much on how to do it with Interface Builder. Turns out that it’s pretty simple and
I’m going to show you how.
TabBarNavigator Demo Project
To get started, create a new project in Xcode. Select the Tab Bar Application template and click Choose….

Name the project, TabBarNavigator and click Save

TabBarNavigator Project
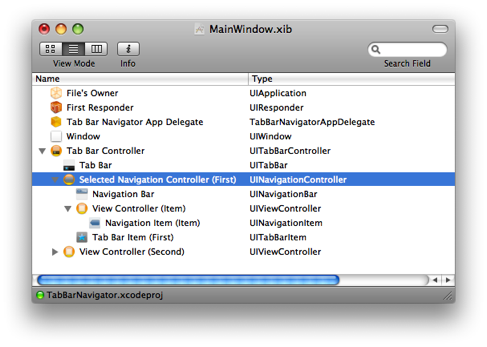
In Xcode, expand the Resources group in the Groups and Files view and double-click MainWindow.xib to open the xib in Interface Builder
When Interface builder opens, change the xib View Mode to the tree view mode and expand your Tab Bar Controller item.

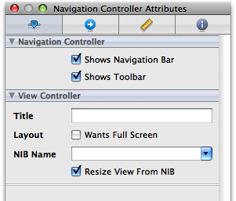
Make sure that the Tab View Controller object is selected. In the object inspector switch to the Attributes tab and change the Class for the First controller from View Controller to Navigation Controller.

You will notice back in the MainWindow.xib window that the view controller for First View is now aUINavigationController. Expand the UINavigationController item now.

Now select the View Controller that is a child of our new UINavigationController. Click on the Identity tab of the object inspector and change the Class to FirstViewController.

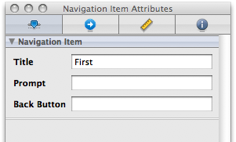
Click on the Navigation Item that is a child of the First View Controller and change the Title in the Attributes tab of the object inspector to “First”.
Save your changes in Interface Builder, switch back to Xcode and Build & Go. You should see something like the following in your First view tab.

Notice that there is a Toolbar visible at the bottom of the first view. If you would like to hide this, go back into Interface Builder and select the Navigation Controller In the object inspector, uncheck the Shows Toolbarcheckbox.
Before we create a new view controller, let’s set up our FirstViewController to create an event that will trigger pushing the new controller. Since our FirstView was not created with a xib, let’s create one and then add actions and outlets to it.
In Xcode, right-click or ctrl-click the Resources group and select Add | New File…. In the ensuing dialog, selectView XIB in the User Interface section of iPhone OS templates and click Next. Name the XIB FirstView and
clickFinish.
Double-click the new XIB to open it in Interface Builder and select the Identity tab after you have made sure thatFile’s Owner is selected. Change the Class field to FirstViewController.
Ctrl-click and drag a connection from the File’s Owner object to the View object in the main window for our XIB and select view in the ensuing pop up menu.
From the Object Library drag and drop a button onto the view. Double-click the button and give it the title “Push”. Save your changes in Interface Builder and switch back to Xcode.

Open the file FirstViewController.h and add an action so that the header looks like this:
Open the file FirstViewController.m and implement the action so that the code looks like this:
Note: You can safely delete all of the view controller template code which I have done in this example. Don’t worry. You won’t hurt anything.
We will come back to the push implementation after we have created our new view controller that we are going to push.
We are now going to create the new view controller that will be displayed when we tap our “Push” button in theFirstViewController.
In Xcode, right-click or ctrl-click the Classes group and select Add | New File…. In the ensuing dialog, selectUIViewController subclass in the Cocoa Touch Class category of the iPhone OS templates. Make sure With
XIB for user interface is checked and click Next. Name the file NewViewController.m and click Finish.
For organization purposes, move the newly created NewViewController.xib file into the Resources group. Then double-click it to open it in Interface Builder.
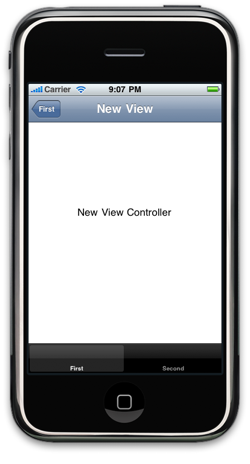
In Interface Builder, drag a UILabel onto the view and give it the title “New View Controller”. Save the file and switch back to Xcode.
Open the file FirstViewController.m again and implement controller push code so that it looks like this:
Don’t forget to #import “NewViewController.h”
To connect our button to the push action, double-click the FirstView.xib file in the Resources group to open it in Interface Builder.
Ctrl-click and drag a connection from the “Push” button in our view to the File’s Owner object and select push: in the ensuing pop up menu. Save your changes in Interface Builder. Switch back to Xcode and Build & Go.
Additionally, you can give your New View Controller a title by implementing -viewDidLoad. Just open yourNewViewController.m file and uncomment the -viewDidLoad code making it look like the following:

And that’s pretty much all there is to it. There are a lot of steps here, but I think you’ll see that setting up your application to implement both a UITabBarController and a UINavigationController is pretty straight forward.
How best to organize your views in an iPhone application is a design process. Often applications will have a lot of data for your users to access and it will be up to you to find the best way to organize it. Being able to utilize both a tab bar and a navigation
controller can really help in this process. Until next time.
TabBarNavigator Demo Project
I’ve seen a good bit of sample code that shows how to implement using a UINavigationController in a view controller that is managed by a UITabBarController, but I haven’t seen much on how to do it with Interface Builder. Turns out that it’s pretty simple and
I’m going to show you how.
TabBarNavigator Demo Project
To get started, create a new project in Xcode. Select the Tab Bar Application template and click Choose….

Name the project, TabBarNavigator and click Save

TabBarNavigator Project
Change The Controller Type
In Xcode, expand the Resources group in the Groups and Files view and double-click MainWindow.xib to open the xib in Interface BuilderWhen Interface builder opens, change the xib View Mode to the tree view mode and expand your Tab Bar Controller item.

Make sure that the Tab View Controller object is selected. In the object inspector switch to the Attributes tab and change the Class for the First controller from View Controller to Navigation Controller.

You will notice back in the MainWindow.xib window that the view controller for First View is now aUINavigationController. Expand the UINavigationController item now.
Now select the View Controller that is a child of our new UINavigationController. Click on the Identity tab of the object inspector and change the Class to FirstViewController.
Click on the Navigation Item that is a child of the First View Controller and change the Title in the Attributes tab of the object inspector to “First”.
Save your changes in Interface Builder, switch back to Xcode and Build & Go. You should see something like the following in your First view tab.
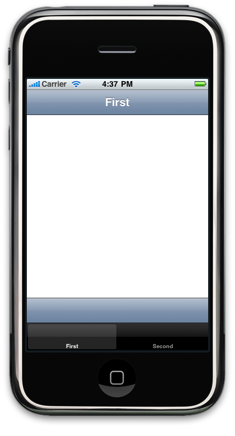
Notice that there is a Toolbar visible at the bottom of the first view. If you would like to hide this, go back into Interface Builder and select the Navigation Controller In the object inspector, uncheck the Shows Toolbarcheckbox.
Pushing a New Controller
Before we create a new view controller, let’s set up our FirstViewController to create an event that will trigger pushing the new controller. Since our FirstView was not created with a xib, let’s create one and then add actions and outlets to it.In Xcode, right-click or ctrl-click the Resources group and select Add | New File…. In the ensuing dialog, selectView XIB in the User Interface section of iPhone OS templates and click Next. Name the XIB FirstView and
clickFinish.
Double-click the new XIB to open it in Interface Builder and select the Identity tab after you have made sure thatFile’s Owner is selected. Change the Class field to FirstViewController.
Ctrl-click and drag a connection from the File’s Owner object to the View object in the main window for our XIB and select view in the ensuing pop up menu.
From the Object Library drag and drop a button onto the view. Double-click the button and give it the title “Push”. Save your changes in Interface Builder and switch back to Xcode.

Open the file FirstViewController.h and add an action so that the header looks like this:
1 2 3 4 5 6 7 8 9 | #import <UIKit/UIKit.h>
@interface FirstViewController : UIViewController {
}
- (IBAction)push:(id)sender;
@end |
1 2 3 4 5 6 7 8 910 | #import "FirstViewController.h"
@implementation FirstViewController
- (IBAction)push:(id)sender
{
}
- (void)dealloc {
[super dealloc];
}
@end |
We will come back to the push implementation after we have created our new view controller that we are going to push.
Create the New View Controller
We are now going to create the new view controller that will be displayed when we tap our “Push” button in theFirstViewController.In Xcode, right-click or ctrl-click the Classes group and select Add | New File…. In the ensuing dialog, selectUIViewController subclass in the Cocoa Touch Class category of the iPhone OS templates. Make sure With
XIB for user interface is checked and click Next. Name the file NewViewController.m and click Finish.
For organization purposes, move the newly created NewViewController.xib file into the Resources group. Then double-click it to open it in Interface Builder.
In Interface Builder, drag a UILabel onto the view and give it the title “New View Controller”. Save the file and switch back to Xcode.
Open the file FirstViewController.m again and implement controller push code so that it looks like this:
1 2 3 4 5 6 7 8 910 | #import "FirstViewController.h"
#import "NewViewController.h"
@implementation FirstViewController
- (IBAction)push:(id)sender
{
NewViewController *controller = [[NewViewController alloc] initWithNibName:@"NewViewController" bundle:nil];
[[self navigationController] pushViewController:controller animated:YES];
[controller release], controller = nil;
}
- (void)dealloc {
[super dealloc];
}
@end |
To connect our button to the push action, double-click the FirstView.xib file in the Resources group to open it in Interface Builder.
Ctrl-click and drag a connection from the “Push” button in our view to the File’s Owner object and select push: in the ensuing pop up menu. Save your changes in Interface Builder. Switch back to Xcode and Build & Go.
Additionally, you can give your New View Controller a title by implementing -viewDidLoad. Just open yourNewViewController.m file and uncomment the -viewDidLoad code making it look like the following:
1 2 3 4 5 6 7 8 910 | #import "NewViewController.h"
@implementation NewViewController
- (void)viewDidLoad {
[self setTitle:@"New View"];
[super viewDidLoad];
}
- (void)dealloc {
[super dealloc];
}
@end |
And that’s pretty much all there is to it. There are a lot of steps here, but I think you’ll see that setting up your application to implement both a UITabBarController and a UINavigationController is pretty straight forward.
Conclusion
How best to organize your views in an iPhone application is a design process. Often applications will have a lot of data for your users to access and it will be up to you to find the best way to organize it. Being able to utilize both a tab bar and a navigationcontroller can really help in this process. Until next time.
TabBarNavigator Demo Project

相关文章推荐
- XCode4: UITabBarController with UINavigationController using Interface Builder
- Business Intelligence: Using SQL 2008 Reporting Services and SQL Report Builder 2.0 with Log Parser
- xcode 总是输出 Unknown class ViewController in Interface Builder file
- iOS 视图切换(UITabBarController,UINavigation,Controller模态窗口)
- 在 UITabBarController 和 UINavigationController tableView被navigati
- 【iOS开发-78】用代码实现UITabBarController+UINavigationController
- UI- UINavigationController UITabBarController 使用总结
- Application Launch Fails with Web Interface using Internet Explorer 9
- IOS学习笔记(5)UINavigationController UITabBarController
- xcode提示Unknown class ViewController in Interface Builder file
- Unknown class ViewController in Interface Builder file
- [iOS 导航与TabBar混合] UINavigationCon+UITabBarViewController 混合使用
- App主流框架UINavigationController && UITabBarController的简单使用
- 在自定义指令中使用NgModelController(Using NgModelController with Custom Directives)
- 应用一个类轻松实现UITabBar and UINavigationController的界面跳转
- UINavigationController within a UITabBarController, setting the navig
- iOS UINavigationController + UITabBarController
- Using Scene Builder with NetBeans IDE
- UINavigationController UITabbarController 一起使用实例一
- 解决UINavigationController+UITabbar跳转页面隐藏tabbar的一种方法